Table of Contents
Advertisement
Quick Links
Download this manual
See also:
User Manual
Advertisement
Table of Contents

Related Manuals for HP CW450t


Summary of Contents for HP CW450t
- Page 1 CW450t Digital Camera Quick Start Guide...
- Page 2 For more details about the camera operation and troubleshooting, please read the User Manual located on the CDROM disc included with your camera or visit http://www.hp.com/support and download it for the camera support page.
-
Page 3: Getting Started
Getting Started Attach the Camera Strap To reduce the risk of dropping the camera, it is strongly recommended to attach and use the provided camera strap Inserting the Batteries Follow these instructions to insert the rechargeable battery into the battery/memory card compartment. -
Page 4: Inserting An Sd/Sdhc Memory Card
Insert the batteries into the compartment with correct orientation as illustrated. Close and lock the battery/memory card compartment Inserting an SD/SDHC Memory Card It is highly recommended that the camera storage is expanded by inserting a SD or SDHC memory card. These memory cards are available at most consumer store and online locations. - Page 5 Push the SD/SDHC card into the memory slot until it clicks into place. If the card does not click into place, repeat the previous step to ensure proper orientation. Close the Battery/memory card compartment. - To remove the SD/SDHC card Make sure to power off the camera before proceeding.
-
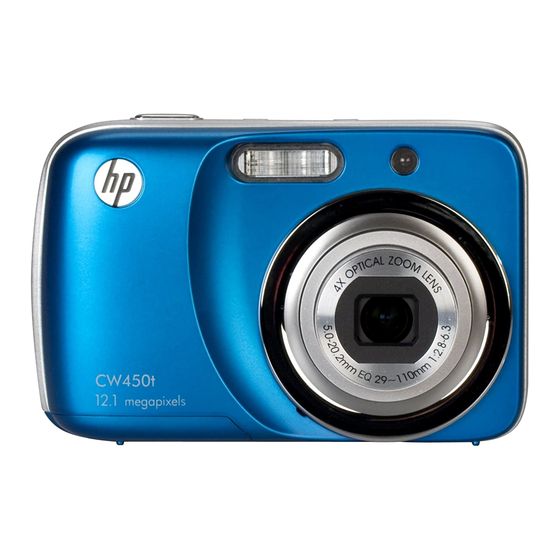
Page 6: Camera Views
Camera Views Front View Back View Flash Microphone Self-timer LED / Assist Lamp Lens LCD monitor Zoom Button LED indicator Playback Button... -
Page 7: Top View
Top View Bottom View Left/Right View Speaker Stabilizer button Shutter button Power button Tripod screw hole Battery/Memory compartment door USB/TV Out Strap ring... -
Page 8: Initial Settings
Initial Settings When you turn on your camera for the first time, you will be asked to do the initial settings of your camera. First is the setup of language menu. Specify in which language menus and messages are to be displayed on the LCD monitor. Setting the Language Specify in which language menus and messages are to be displayed on the LCD monitor to turn pages. -
Page 9: Record Mode
Modes Your camera has two modes: Record Mode • This is the default mode while you turn on the camera every time. You are able to take photos and record videos/audio clips in this mode. Playback Mode Playback button • Press the captured images or playback videos and audio clips. -
Page 10: Using The Touch Screen
Using the Touch Screen The touch screen shows all important information regarding camera settings as well as the visual image of your image or video. It also provides all kinds of touch buttons to control the settings for the camera. The display on the touch screen is called the On Screen Display or OSD. - Page 11 Shake warning Touch button – AF area/Face tracking Touch button - Display Image Stabilizer Resolution Quality Sharpness Metering White balance Contrast Saturation Exposure Shutter speed Aperture value Touch button - Menu Touch button - Macro Touch button - Self-timer/Burst Touch button - Flash Touch button - Record mode Indicates that the camera is moving too much that may result in image blur.
-
Page 12: Playback Mode Screen Layout
Playback Mode Screen Layout The Playback mode display varies depending on the type of image being viewed. - Playback mode display of still images: Item File no./Total no. Battery Storage media Touch button - Next file Touch button - Display Aperture value Shutter speed Flash... -
Page 13: Setting Battery Type
Exposure Folder/Filename Date & Time DPOF Resolution Touch button - Menu Voice memo Touch button - Previous file Protect Playback mode Setting Battery Type Select the type of the battery to ensure the camera shows the correct battery level on screen. -
Page 14: Taking Photos
Taking Photos This camera is designed to make the experience of taking photos simple and quick. It’s Auto mode feature will optimise the internal settings so that in most situations, it can take photos with ease. This camera also has additional modes and features that extend the capabilities for the more experienced user. -
Page 15: Setting The Scene Mode
Setting the Scene Mode By simply selecting one of the following 30 modes, you can capture the image with the most appropriate settings. MENU button From the Record Record mode button Use the to move through the selections. The highlighted scene mode will either have text that describes the benefits of the mode or have a sidebysidephoto comparison that illustrates the benefits. -
Page 16: File Navigation
Playback You can playback the still images, videos and audio clips on the LCD monitor. File Navigation There are 4 playback modes for file navigation in this camera: • Single navigation • Photo Steam • Thumbnail • Calendar Viewing in Single Navigation Mode The single navigation mode displays the image one by one on the LCD monitor. -
Page 17: Play Button
Tap the onscreen buttons to view next/previous image/video/audio. To play a movie or audio clip, tap the onscreen Delete The Delete function allows to remove unwanted files in the internal memory or on the memory card. Protected files cannot be erased, to delete, unprotect the file first. - To delete a photo/video/audio clip: Set the camera to Playback mode and locate the desired image by single navigation or photo stream mode. -
Page 18: Using The Setup Menu
Using the Setup Menu You can access the Setup menu whether you are in Record or Playback mode. The Setup menu allows you to configure general camera settings. - To go to Setup Menu: Menu button Tap the onscreen Tap the tab button to launch Setup menu. to turn pages. -
Page 19: Getting Help
Should you have a technical support question or your HP Digital Camera require service within the warranty period, please contact the original point of purchase or an authorized HP reseller in your country. If service is not available at those locations, please contact an HP Branded Product warranty agent from the support contact list provided below. - Page 20 Contact/phone Support: Country Europe Region (EMEA) België Deutschland España France Ireland Italia Nederland Schweiz North America United States Canada Country Language México Español Venezuela Español Colombia Español Perú Español Chile Español Brasil Argentina Argentina Español Language Nederlandsk/ Deutsch Deutsch Español Français English Italiano...
- Page 22 P/N: 7525C00174A...