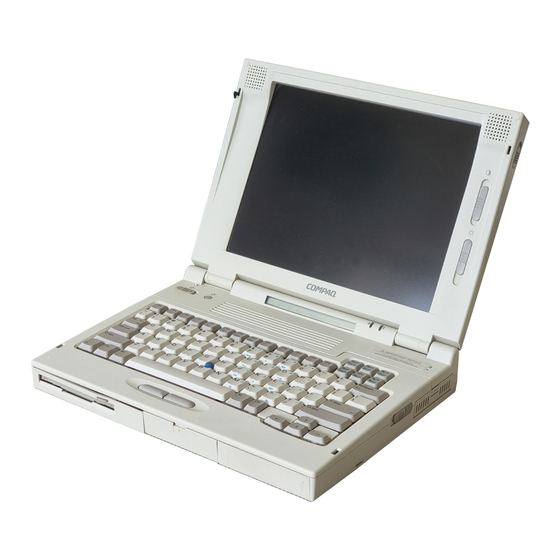
Compaq LTE 5000 Setup Manual
Hp lte 5000: supplementary guide
Hide thumbs
Also See for LTE 5000:
- Release notes (10 pages) ,
- Maintenance and service manual (314 pages) ,
- Frequently asked questions manual (26 pages)
Table of Contents
Advertisement
Quick Links
. . . . . . . . . . . . . . . . . . . . . . . . .
Notice
The information in this guide is subject to change without notice.
COMPAQ COMPUTER CORPORATION SHALL NOT BE LIABLE
FOR TECHNICAL OR EDITORIAL ERRORS OR OMISSIONS
CONTAINED HEREIN; NOR FOR INCIDENTAL OR
CONSEQUENTIAL DAMAGES RESULTING FROM THE
FURNISHING, PERFORMANCE, OR USE OF THIS MATERIAL.
This guide contains information protected by copyright. No part of this
guide may be photocopied or reproduced in any form without prior written
consent from Compaq Computer Corporation.
1995 Compaq Computer Corporation.
All rights reserved. Printed in Singapore.
Compaq, Deskpro, LTE, Contura, Presario, ProLinea
Registered U. S. Patent and Trademark Office.
LTE 5000 is a trademark of Compaq Computer Corporation.
Contura Registered in the Philippines Patent Office.
Microsoft, MS-DOS, and Windows are registered trademarks of
Microsoft Corporation.
Windows 95 is a trademark of Microsoft Corporation.
The software described in this guide is furnished under a license agreement or
nondisclosure agreement. The software may be used or copied only in
accordance with the terms of the agreement.
Product names mentioned herein may be trademarks and/or registered
trademarks of their respective companies.
Beyond Setup
Compaq LTE 5000 Family of Personal Computers
Second Edition (September 1996)
First Edition (September 1995)
Part Number 213660-002
Compaq Computer Corporation
Advertisement
Table of Contents

Related Manuals for Compaq LTE 5000


Summary of Contents for Compaq LTE 5000
- Page 1 All rights reserved. Printed in Singapore. Compaq, Deskpro, LTE, Contura, Presario, ProLinea Registered U. S. Patent and Trademark Office. LTE 5000 is a trademark of Compaq Computer Corporation. Contura Registered in the Philippines Patent Office. Microsoft, MS-DOS, and Windows are registered trademarks of Microsoft Corporation.
-
Page 2: Regulatory Notices
......Regulatory Notices Federal Communications Commission Notice This equipment has been tested and found to comply with the limits for a Class B digital device, pursuant to Part 15 of the FCC Rules. -
Page 3: European Notice
......European Notice Products with the CE Marking comply with both the EMC Directive (89/336/EEC) and the Low Voltage Directive (73/23/EEC) issued by the Commission of the European Community. -
Page 4: Japanese Notice
......Japanese Notice Airline Travel Notice Use of electronic equipment aboard commercial aircraft is at the discretion of the airline. -
Page 5: Laser Information
......The removable CD-ROM drive is classified as a CLASS 1 LASER PRODUCT. These labels are located on the outside of the CD-ROM drive: Laser Information Laser Type:... -
Page 6: Table Of Contents
......Contents Preface Where to Find Information Symbols and Conventions Used in This Guide Compaq Support Preparing for a Technical Support Call Ordering Backup Diskettes Worldwide Telephone Numbers... - Page 7 ......Chapter 3 Basic Operating, Maintenance, and Travel Guidelines Power Sources Connecting to an External Power Source Disconnecting from an External Power Source Power Controls Turning On the Computer...
- Page 8 ......Chapter 5 Connecting External Desktop Equipment Serial Devices Parallel Devices External Monitor External Keyboard, Numeric Keypad, or PS/2 Mouse MultiBay-ISA Expansion Base Docking the Computer in the Expansion Bases Undocking the Computer from the Expansion Bases...
- Page 9 ......Using Additional Hard Drives Using LTE 5000 Hard Drives Using LTE Elite Hard Drives Changing the Boot Drive...
- Page 10 ......Security Menu Setup Password Power-On Password QuickLock/QuickBlank Device Disabling Exit Menu Customizing Computer Settings Power Management Computer Setup Power Management Windows 95 Power Properties Suspend...
- Page 11 ......Solving PC Card Problems Solving Pointing Device Problems Solving Power Problems Solving Printer Problems Solving Screen Problems Appendix A Appendix B Appendix C...
-
Page 12: Preface
......Preface Before You Begin Where to Find Information This Beyond Setup guide and the online User’s Guide should answer most questions that you may have about your new Compaq personal computer and the preinstalled Windows 95 operating system. -
Page 13: Compaq Support
......File names that are not in command lines are presented in uppercase italic type as shown here: FILENAME. Commands are presented in lowercase, bold type as shown here: install or a:\install. -
Page 14: Preparing For A Technical Support Call
......Preparing for a Technical Support Call If you cannot solve a problem using the troubleshooting tips in Chapter 13 and the online Troubleshooting help, you may need to call technical support. -
Page 15: Worldwide Telephone Numbers
......Worldwide Telephone Numbers Locate your geographical area from the following table and use one of the telephone numbers for Compaq assistance. General Information Numbers:—Product information, technical assistance, and the location of your nearest Compaq authorized dealer, reseller, or service provider. - Page 16 ......Worldwide Telephone Numbers Location Belgium General Information Compaq Care Center Compaq Care Center Fax General Fax FaxPaq QuickLine Ordering Backup Software...
- Page 17 ......Worldwide Telephone Numbers Location Czech Republic General Information Technical Support Denmark General Information Technical Support Finland General Information Technical Support...
- Page 18 ......Worldwide Telephone Numbers Location Italy General Information Technical Support Customer Support Japan General Information Technical Support Windows 95 Support Ordering Backup Software FaxStation...
- Page 19 ......Worldwide Telephone Numbers Location Poland General Information Technical Support Portugal General Information Technical Support Singapore General Information Customer Support Center PaqFax...
- Page 20 ......Worldwide Telephone Numbers Location Taiwan General Information Technical Support Thailand General Information United Arab Emirates (Dubai) General Information United Kingdom General Information...
-
Page 21: Features
......Chapter 1 Taking a Look at the Computer This chapter provides an overview of the computer features and components. -
Page 22: Preinstalled Software
Call one of the worldwide telephone numbers listed in the Preface of this guide for information about ordering the drivers kit. When ordering, ask for the Compaq LTE 5000 Drivers Kit for Windows 95. Taking a Look at the Computer... -
Page 23: Interior Components
......Interior Components Interior components vary by model, and some components are upgradable. To view information about your system components, double-click the System icon in Control Panel or run the View System Information (INSPECT) utility from the Compaq Diagnostics diskette. -
Page 24: Exterior Components
......Exterior Components The green power/suspend light are visible whether the computer is opened or closed. Power/Suspend Light and Battery Light on the Computer Slide the release latches forward all the components on the front of the computer. -
Page 25: Components On The Front And Right Side
......Components on the Front and Right Side Front and Right Side View Components on the Front and Right Side Component Power switch Display switch... - Page 26 ......Components on the Front and Right Side Component Status panel icons Taking a Look at the Computer Continued Function The computer is connected to an external...
- Page 27 ......Components on the Front and Right Side Component Ventilation intake Stereo speakers Brightness control Contrast control (not shown) Power/suspend light Battery light...
-
Page 28: Components On The Rear And Left Side
......Components on the Rear and Left Side Pull open the connector door on the rear panel to see all the external connectors on the rear of the computer. - Page 29 ......Component Serial number Serial connector Parallel connector External options connector External monitor connector Power connector Stereo speaker/ headphone jack Stereo line-in jack...
-
Page 30: Keyboard And Easypoint Ii Pointing Device
......Chapter 2 Keyboard and EasyPoint II Pointing Device The computer keyboard has separate pointer and screen-control keys, an embedded numeric keypad, special hotkeys for quick access to certain functions, a palm rest, and an integrated pointing device and mouse buttons. -
Page 31: Customizing The Pointing Device
......The left and right mouse buttons are easily pressed with your left or right thumb. EasyPoint II Pointing Device and Mouse Buttons NOTE: If an external pointing device is connected, the integrated pointing device is automatically disabled and the external pointing... -
Page 32: Identifying Keyboard Features
......Identifying Keyboard Features The illustration and table below identify the keyboard features, including the embedded numeric keypad and the special hotkeys. Identifying Keyboard Features Esc key Hotkeys... -
Page 33: Using The Embedded Numeric Keypad
......Using the Embedded Numeric Keypad The embedded numeric keypad is a section of the main keyboard that converts to a numeric keypad when the NumLk function is enabled. - Page 34 ......The following hotkeys are available: Function Fn+F4 Switches between external, internal, and simultaneous display. (Model 810 CSTN 800 × 600 does not support simultaneous display.) Fn+F5 Toggles speakers/headphones off and on.
- Page 35 ......Fn+F6 The QuickLock/QuickBlank hotkey disables the keyboard and pointing device and blanks the screen. You must enter your power-on password to reenable the keyboard and pointing device and to return information to the screen.
-
Page 36: Basic Operating, Maintenance, And Travel Guidelines
......Chapter 3 Basic Operating, Maintenance, and Travel Guidelines This chapter contains basic guidelines for operating and caring for the computer and for traveling with or shipping the computer. - Page 37 ......Connecting the AC Adapter Follow these steps to connect the computer to an external power source using the AC Adapter: CAUTION: Be sure that the electrical outlet into which you plug the AC Adapter is easily accessible at all times.
-
Page 38: Disconnecting From An External Power Source
......Connecting the Automobile Adapter Follow these steps to connect the computer to an external power source using the optional Automobile Adapter: 1. -
Page 39: Power Controls
......Power Controls The power switch and other power controls initiate various actions depending on the power state of the computer, as described in the following table. -
Page 40: Turning Off The Computer
......NOTE: It is normal for the fan to cycle on and off when the computer reaches certain temperatures, and for the computer to feel warm to hot when it is being used. -
Page 41: Traveling And Shipping Guidelines
......Clean the lens of the CD-ROM drive occasionally with a commercially available dry-type cleaning kit (not a wet-type kit). -
Page 42: International Travel
......IMPORTANT: There are three types of airport security devices: X-ray machines (the conveyor belt device you set your bags on), magnetic detectors (the device you walk through), and security magnetic wands (the hand-held device used by security personnel). -
Page 43: Using Battery Packs
......Chapter 4 Using Battery Packs This chapter contains guidelines for using, storing, and recycling battery packs. A nickel metal hydride battery pack is supplied with the computer. -
Page 44: Battery Gauge Icons And Battery Light
......Removing PC Cards or turning the power off to PC Card slots (through Computer Setup) when they are not being used. PC Cards may drain the battery more quickly than expected, even when the computer is in Suspend. -
Page 45: Enhancing Battery Gauge Accuracy
......Battery Gauge Icons and Battery Light The above illustration shows two fully charged battery packs in the computer. -
Page 46: Identifying And Resolving A Low-Battery Condition
......Identifying and Resolving a Low-Battery Condition When battery pack(s) are near the end of their charge, the computer beeps once every 15 seconds and the battery light blinks to indicate a low-battery condition. -
Page 47: Replacing Battery Pack(S)
......Replacing Battery Pack(s) If you are operating the computer with only one battery pack or if the computer indicates a low-battery condition, initiate Suspend before replacing the battery pack(s). - Page 48 ......Removing a Battery Pack from the Computer 4. If you removed the battery pack from the MultiBay, slide the battery panel to the left until it is flush with the side of the battery pack for more convenient storage.
-
Page 49: Inserting A Battery Pack Into The Computer
......Inserting a Battery Pack into the Computer The front of the battery pack has a sliding panel that covers the larger opening of the MultiBay when the battery pack is inserted into the MultiBay. -
Page 50: Charging Battery Packs
......Charging Battery Packs You can charge one or two battery packs in the computer, in the expansion bases, or in the optional external Battery Fastcharger. -
Page 51: Charging Battery Packs Outside Normal Operating Conditions
......Refer to Chapter 5, "Connecting External Desktop Equipment," for information about docking the computer. Four yellow battery lights on the right front of the expansion base indicate when battery packs are charging. -
Page 52: Storing Battery Packs
......When you connect the computer to an external power source, the battery light on the computer turns on. However, charging may not occur until the battery pack reaches normal operating conditions, which may take several minutes to an hour. -
Page 53: Connecting External Desktop Equipment
......Chapter 5 Connecting External Desktop Equipment The computer automatically detects most new equipment and installs any needed device drivers. If you connect new equipment that does not work as expected, double-click the Add New Hardware icon in Control Panel for help installing the equipment. -
Page 54: Serial Devices
......Serial Devices The following illustration and procedures describe connecting a serial device to the serial port. 1. -
Page 55: Parallel Devices
......Parallel Devices NOTE: The parallel port is compliant with industry standards for a bidirectional parallel peripheral interface. It supports the faster bidirectional communications of the Extended Capabilities Port (ECP) mode and the Enhanced Parallel Port (EPP) mode for compliant parallel devices. -
Page 56: External Monitor
......External Monitor The computer can support an external monitor with a resolution up to 1024 × 768 in 256 colors. Follow these steps to connect an external monitor: 1. - Page 57 ......NOTE: If the monitor is an energy saving monitor, you can either enable the Energy Star compliant options in Windows Display Properties or run Computer Setup and enable the Energy Saving Monitor option on the Power menu.
-
Page 58: External Keyboard, Numeric Keypad, Or Ps/2 Mouse
......External Keyboard, Numeric Keypad, or PS/2 Mouse Follow these steps to connect an external keyboard, numeric keypad, or PS/2 mouse to the keyboard/ mouse connector on the rear panel of the computer. -
Page 59: Multibay-Isa Expansion Base
......MultiBay-ISA Expansion Base The MultiBay-ISA Expansion Base extends the functionality of the original MultiBay Expansion Base by providing a full-length ISA slot and Premier Sound audio sysstem. - Page 60 ......4. Slide open the external options connector cover in the connector door of the computer to expose the external options connector. NOTE: If a cable or PC Card extends beyond the PC Card slot when connecting the computer to the expansion base, the PC Card connector may be damaged.
- Page 61 ......6. Use both hands to slide the computer into the expansion base until you feel a slight resistance. CAUTION: To prevent damage to the connectors on the computer and expansion base, use both hands to slide the computer straight back into the expansion base.
- Page 62 ......7. Push the docking level back to complete the docking procedure. 8. Push the docking lever away from you to pull the computer into the expansion base and to seat the external options connector.
-
Page 63: Undocking The Computer From The Expansion Bases
......Undocking the Computer from the Expansion Bases Follow these steps to undock the computer from the expansion bases: 1. -
Page 64: Using The Ethernet Connectors On The Expansion Base
......Using the Ethernet Connectors on the Expansion Base The expansion bases have an Ethernet controller that is NE-2000 compatible and two Ethernet connectors: RJ-45 (10BASE-T) and BNC (10BASE2). - Page 65 ......4. Insert the key into the lock, turn it to the locked position, and remove the key. Securing the Computer with an Optional Cable Lock Securing the Expansion Base and Docked Computer with an Optional Cable Lock...
- Page 66 ......The computer has an infrared port that allows cable-free IrDA communication between the computer and another infrared- equipped computer or printer.
-
Page 67: Preparing For An Infrared Connection
......Preparing for an Infrared Connection The infrared port uses an invisible beam of infrared light to communicate with another infrared-equipped computer, printer, or other device. -
Page 68: Working With Removable Drives
......Chapter 6 Working with Removable Drives The computer has one MultiBay , and one dedicated battery compartment base has two MultiBays When the computer is undocked, drive activity is indicated by the following icons on the status panel:... -
Page 69: Number And Supported Locations For Drives And Battery Packs6-2
......Number and Supported Locations for Drives and Battery Packs The following table lists the removable drives and battery packs that can be used in the computer and expansion bases, along with the maximum number and supported locations. -
Page 70: Caring For Removable Drives
......Caring for Removable Drives Removable drives are fragile components that must be handled with care. A hard drive carrying case and a MultiBay device carrying case are supplied with the computer to protect a drive whenever it is out of the drive bay. -
Page 71: Placing A Hard Drive Into The Hard Drive Carrying Case
......Placing a Hard Drive into the Hard Drive Carrying Case A hard drive carrying case is supplied with the computer to protect a hard drive when it is out of the drive bay. -
Page 72: Placing A Cd-Rom Drive Or Diskette Drive Into The Multibay Device Carrying Case
......Placing a CD-ROM Drive or Diskette Drive into the MultiBay Device Carrying Case A MultiBay device carrying case is supplied with the computer to protect a CD-ROM drive or a diskette drive when it is out of the MultiBay. -
Page 73: Dedicated Hard Drive Bay
The computer hard drive bay is a dedicated bay; it supports only a hard drive. The LTE 5000 hard drive that is preinstalled in the dedicated hard drive bay contains the software necessary to access many resources that will not be available if you start the computer from a drive other than the preinstalled (or specially prepared) hard drive. -
Page 74: Removing A Hard Drive From The Dedicated Hard Drive Bay6-7
......Removing a Hard Drive from the Dedicated Hard Drive Bay To remove the hard drive from the hard drive bay, follow these steps: IMPORTANT: Before inserting or removing a drive, be sure you have read the cautions under "Caring for Removable Drives"... - Page 75 ......4. Release the hard drive by sliding and holding the hard drive release on the bottom of the computer as you pull gently on the hard drive tab CAUTION: To prevent damage to the hard drive, do not use excessive force when removing it.
-
Page 76: Inserting A Hard Drive Into The Dedicated Hard Drive Bay6-9
......Inserting a Hard Drive into the Dedicated Hard Drive Bay To insert a hard drive into the dedicated hard drive bay, follow these steps: IMPORTANT: Before inserting or removing a drive, be sure you have read the cautions under "Caring for Removable Drives"... - Page 77 ......3. With the hard drive tab facing out and the labels on the drive facing up, insert the drive into the hard drive bay until it clicks into place.
-
Page 78: Computer Multibay
......Computer MultiBay The following procedures describe inserting and removing drives from the computer MultiBay. The procedures are similar to insert drives into and remove drives from the expansion base MultiBays. -
Page 79: Inserting The Multibay Weight Saver Into The Computer Multibay
......Inserting the MultiBay Weight Saver into the Computer MultiBay When you do not need a device in the computer MultiBay, you can insert the supplied MultiBay Weight Saver. - Page 80 ......Follow these steps to place the hard drive into the MultiBay Hard Drive Carrier and to insert the carrier into the computer MultiBay: 1.
- Page 81 ......7. Position the carrier against the left side of the MultiBay and insert it into the MultiBay until it clicks into place. The system can recognize the hard drive only if the carrier is properly seated.
-
Page 82: Removing A Hard Drive From The Computer Multibay
......Removing a Hard Drive from the Computer MultiBay To remove a hard drive from the computer MultiBay and from the MultiBay Hard Drive Carrier, follow these steps: IMPORTANT: Before inserting or removing a drive, be sure you have read the cautions under "Caring for Removable Drives"... -
Page 83: Inserting A Cd-Rom Drive Into The Computer Multibay6-16
......Inserting a CD-ROM Drive into the Computer MultiBay The system supports up to three CD-ROM drives—one in the computer MultiBay and two in the expansion base MultiBays. -
Page 84: Removing A Cd-Rom Drive From The Computer Multibay6-17
......Inserting the CD-ROM Drive into the Computer MultiBay 4. If you want to secure the CD-ROM drive in the MultiBay, insert the security screw as described in this chapter under "Securing a Drive in the Computer MultiBay."... -
Page 85: Operating A Cd-Rom Drive
......5. Pull forward on the MultiBay device release of the computer to release the drive. NOTE: If the drive does not easily eject from the bay, verify that the security screw has not been inserted into the bottom of the computer to secure the drive in the bay. - Page 86 ......Special features of the drive include: Optional 6x-speed transfer rate (900 Kbytes per second) 190 millisecond average access time MPC 2 (Multimedia Personal Computers (MPC-2)) Refer to Chapter 8, "Using Audio Equipment,"...
- Page 87 ......5. Close the loading tray by pushing on the front panel of the tray. The drive performs a diagnostic check and automatically begins reading the Table of Contents (TOC).
- Page 88 ......Opening the CD Loading Tray Manually If you are unable to open the tray with the release button after you have exited a CD application, you can open the tray manually.
-
Page 89: Accessing A Diskette Drive In The Expansion Base
......Accessing a Diskette Drive in the Expansion Base The system supports two diskette drives—one in the computer MultiBay and one in either of the expansion base MultiBays. - Page 90 ......3. Position the diskette drive against the left side of the MultiBay and insert the drive into the MultiBay until it clicks into place. The system can recognize the diskette drive only if it is properly seated.
-
Page 91: Removing A Diskette Drive From The Computer Multibay6-24
......Removing a Diskette Drive from the Computer MultiBay Follow these steps to remove a diskette drive from the computer MultiBay: IMPORTANT: Before inserting or removing a drive, be sure you have read the cautions under "Caring for Removable Drives"... -
Page 92: Using A Diskette Drive
......Using a Diskette Drive The diskette drive automatically reads and writes to the following formatted 3.5-inch diskettes: 1.44 MB high-density (HD) 720 Kbyte double-density (DD) 1.2 MB (Japanese format) -
Page 93: Using Additional Hard Drives
NOTE: If you want to start the computer from the optional hard drive, you must partition and format it as a bootable drive. You must also copy to it the LTE 5000 software that is necessary to operate the computer and access computer features. - Page 94 If you have LTE Elite hard drives that do not have secondary-drive capability, you can use them in the LTE 5000 computer with the limitations described later in this section.
- Page 95 1. Save your work and shut down the computer. 2. Remove the LTE 5000 hard drive from the dedicated hard drive bay. 3. Place the LTE 5000 hard drive into the MultiBay Hard Drive Carrier (sold separately) and insert the carrier into the computer MultiBay.
-
Page 96: Changing The Boot Drive
CONFIG.SYS). 6. Transfer files between drives. NOTE: Some computer resources will not be available until you reinsert the LTE 5000 hard drive into the dedicated hard drive bay and restart the computer. Changing the Boot Drive The computer must start (boot) from a drive that has the operating system files on it. - Page 97 ......The factory default hard drive boot sequence is: 1. Hard drive in the computer 2. Hard drive in the computer MultiBay 3.
-
Page 98: Using Pc Cards
......Chapter 7 Using PC Cards The PC Card (PCMCIA) slots allow you to add and remove options easily when you need to perform various tasks. -
Page 99: Installing Card-Specific Device Drivers
......Installing Card-Specific Device Drivers Some PC Cards that may require additional card-specific device drivers to function properly are listed below: Network cards Combination cards (such as SCSI/sound cards and modem/network cards... -
Page 100: Using Pc Cards In Ms-Dos Mode
......If you have an ATA hard drive card that is not already partitioned and formatted or if you want to change the partition, follow these steps: 1. -
Page 101: Inserting A Pc Card
......Inserting a PC Card You do not have to turn off the computer or initiate Suspend before inserting a PC Card. - Page 102 ......2. Align the PC Card with the guide rails and gently insert the card (connectors facing in, label facing up) into the slot until it is seated.
-
Page 103: Removing A Pc Card
......Removing a PC Card You do not have to turn off the computer or initiate Suspend before removing a PC Card. -
Page 104: Using Audio Equipment
......Chapter 8 Using Audio Equipment The computer has an industry standard-compatible Sound Blaster Pro stereo sound system and both internal and external audio capabilities. -
Page 105: Using The Built-In Audio Equipment
......Using the Built-In Audio Equipment The computer has the following built-in audio equipment: Two stereo speakers Volume control Microphone Built-in Audio Equipment... -
Page 106: Internal Stereo Speakers
......Internal Stereo Speakers The internal stereo speakers support playback of recorded sounds, audio for games and business programs, and line-out devices such as a CD player, tape deck, or stereo tuner. -
Page 107: Internal Microphone
......Internal Microphone The internal microphone on the front of the computer supports audio input for spoken comments. The internal microphone is disabled if an external microphone is connected. -
Page 108: Stereo Line-In Jack
......WARNING: To reduce the risk of personal injury, adjust the volume control before putting on headphones. CAUTION: Use only a 3.5 mm stereo plug in the stereo headphone jack. -
Page 109: Installing An Optional Memory Expansion Board
......Chapter 9 Installing an Optional Memory Expansion Board You can increase the original 8 or 16 megabytes of random access memory (RAM) up to 72 or 80 megabytes, respectively, by installing an optional memory expansion board. - Page 110 ......4. Open the connector door on the rear panel of the computer. Opening the Connector Door 5.
- Page 111 ......Holding the memory expansion board by the edges, insert the board into the memory slot. Tighten the two screws on the back of the memory expansion board.
-
Page 112: Running Computer Setup
......Chapter 10 Running Computer Setup Computer Setup automatically recognizes and configures the system for new Compaq devices. It does this without prompting you for information about the devices. -
Page 113: Initialization Menu
......Initialization Menu Use the Initialization menu to set the date and time, to change the language for Computer Setup, and to change the factory-default settings for the following options: Option... -
Page 114: Ports Menu
......Ports Menu Use the Ports menu to change the factory-default input/output (I/O) addresses and interrupt requests (IRQs) for the following ports: Option Serial/Infrared Parallel... - Page 115 ......The High conservation level provides the maximum amount of power conservation and the maximum battery operating time from a single charge.
-
Page 116: Security Menu
......Security Menu Use the Security menu to enable or disable the following security options: Option Setup Password Power-On Password Power-On Password to Resume... -
Page 117: Power-On Password
......If you forget your setup password, you cannot change the system configuration until the computer memory is cleared of the password. -
Page 118: Quicklock/Quickblank
......QuickLock/QuickBlank Enabling QuickLock/QuickBlank allows you to temporarily disable the keyboard and blank the screen until the power-on password is entered. -
Page 119: Customizing Computer Settings
......Customizing Computer Settings Computer Setup has four menus to set preferences. Initialization menu: boot (startup) preferences Ports menu: input/output (I/O) addresses and interrupt requests (IRQ) Power menu: power management settings and low-battery... -
Page 120: Windows 95 Power Properties
......Windows 95 Power Properties To open the Windows 95 Power Properties dialog box, double-click the Power icon in Control Panel. Windows 95 provides the following options: Advanced (default)—Activates power management settings in Computer Setup and provides some additional power-saving... -
Page 121: Hibernation
......Hibernation Hibernation automatically saves all information in memory to a Hibernation file on the hard drive and turns off the computer. Because the computer is off, there is no limit to the amount of time it can remain in Hibernation. -
Page 122: Running Compaq Diagnostics
......Chapter 11 Running Compaq Diagnostics Compaq Diagnostics utilities are supplied on diskette with the computer. Run the Diagnostics utilities when you want to view or test system information and equipment that is installed or connected. - Page 123 ......5. Press Enter to continue. The Diagnostics menu appears. 6. Select Computer Checkup from the Diagnostics menu. A Test Option menu appears.
-
Page 124: View System Information (Inspect)
......View System Information (INSPECT) The View System Information (INSPECT) utility provides information about the computer and installed or connected devices. You can display, print, or save the information. -
Page 125: Intelligent Manageability
......Chapter 12 Intelligent Manageability Intelligent Manageability combines innovative hardware technology with Enterprise Management and PC LAN management solutions from Compaq and other leading vendors to make Compaq portable computers easier to inventory, troubleshoot, and protect. -
Page 126: Security Management
......Compaq Insight Personal Edition displays a pop-up message to notify you when a hard drive or system temperature fault is detected. If the computer is connected to a network managed by Compaq Insight Manager, fault notices are also sent to the network management application. -
Page 127: Troubleshooting
......Chapter 13 Troubleshooting If you have a problem with your computer, you may be able to solve it easily with the aid of this chapter and the online Troubleshooting help. -
Page 128: Checklist For Minor Problems
Printers icon in Control Panel for help installing new equipment that is not Plug and Play? Did the computer boot from a hard drive that has the LTE 5000 software necessary to access all the computer resources? If the problem appears related to software, have you read the... -
Page 129: Solving Audio Problems
......Solving Audio Problems Problem Computer beeps once after you turn it Computer does not beep after the Power-On Self-Test (POST). -
Page 130: Solving Battery And Battery Gauge Problems
......Solving Battery and Battery Gauge Problems "Solving Power Problems" in this chapter may also be helpful. Problem Computer won’t turn on when battery... - Page 131 ......Solving Battery and Battery Gauge Problems Problem Battery light does not turn on and battery pack does not charge.
- Page 132 ......Solving Battery and Battery Gauge Problems Problem Battery pack operating time is far less than the documented average operating time.
-
Page 133: Solving Cd-Rom Drive Problems
......Solving CD-ROM Drive Problems Problem CD-ROM drive cannot read a compact disc. CD-ROM drive does not work. -
Page 134: Solving Diskette And Diskette Drive Problems
......Solving Diskette and Diskette Drive Problems Problem Cannot access diskette drive. Cannot access diskette drive in expansion base Diskette drive icon stays on. - Page 135 ......Solving Diskette and Diskette Drive Problems Problem Diskette drive cannot read a diskette. Cannot boot from diskette.
-
Page 136: Solving Hard Drive Problems
......Solving Hard Drive Problems CAUTION: To prevent loss of information in case of errors or failures, maintain an up-to-date backup of your hard drive at all times. -
Page 137: Solving Hardware Problems
Removable drive is not seated properly. Device is not Plug and Play. Solutions(s) Boot from the original LTE 5000 hard drive or a hard drive that has been prepared with the LTE 5000 software. Verify that the additional drive... -
Page 138: Solving Infrared Problems
......Solving Infrared Problems Problem Cannot link with another computer. Cannot transmit data. 13-12 Troubleshooting Cause Microsoft Direct Cable Connection is not running on both computers. -
Page 139: Solving Keyboard Problems
......Solving Keyboard Problems Problem Keyboard is locked. You initiated QuickLock. Embedded numeric keypad on computer keyboard is disabled. -
Page 140: Solving Pc Card Problems
......Solving PC Card Problems Problem When the computer is on, it does not beep when a PC Card is inserted. -
Page 141: Solving Pointing Device Problems
......Solving PC Card Problems Problem Computer beeps twice but PC Card modem, fax, or network card does not work. -
Page 142: Solving Power Problems
......Solving Power Problems Also see "Solving Battery and Battery Gauge Problems" in this chapter. Problem Computer will not turn on. -
Page 143: Solving Printer Problems
......Solving Printer Problems If you experience problems printing, run a printer self-test. Refer to the documentation provided with your printer for instructions. If the self-test fails, it is a printer-specific problem. -
Page 144: Solving Screen Problems
......Solving Screen Problems This section lists some common causes and solutions for computer display and external monitor problems You can perform a monitor self-test on an external color or monochrome monitor by disconnecting the monitor from the computer. - Page 145 ......Solving Screen Problems Problem Screen is blank (continued). Computer screen is blank and the screen on an external monitor displays information.
-
Page 146: Error Messages
......Appendix A Power-On Self-Test Error Messages This chapter contains typical error messages that you may encounter during the Power-On Self-Test (POST). -
Page 147: Warning Messages
......Message: CLOCK NOT TICKING CORRECTLY Description: The real time-clock is not ticking. Message: CMOS CHECKSUM INVALID - RUN SCU Description: CMOS RAM Information has been corrupted and needs to be reinitialized by running Computer Setup. - Page 148 ......Warning Messages Message: KEYBOARD FAILURE Description: The keyboard failed to respond to the RESET ID Command. Message: NO INTERRUPTS FROM TIMER 0 Description:...
-
Page 149: Fatal Error Messages
......Message: CMOS RAM TEST FAILED Description: A walking bit test of CMOS RAM locations 0E (Hex) - 3F (Hex) failed. Beep Code: Message: DMA CONTROLLER FAULTY... - Page 150 ......Error Beep Codes The following table lists some of the Fatal Error beep codes, along with the beep sequence (short, long, pause), and the meaning of the beeps.
-
Page 151: Specifications
......Appendix B Specifications This appendix provides physical and performance specifications for the computer, display, removable drives, and battery packs. Dimensions Height Width... - Page 152 ......Computer Specifications Temperature Operating Nonoperating Relative Humidity (noncondensing) Operating Nonoperating (t w = 38.7º C max) Maximum Altitude (unpressurized) Operating Nonoperating...
- Page 153 ......Dimensions Height Width Number of Colors Contrast Ratio Brightness Pixel Resolution Pitch Format Configuration Backlight Character Display Total Power Consumption Dimensions...
- Page 154 ......Dimensions Height Width Number of Colors Contrast Ratio Brightness Pixel Resolution Pitch Format Configuration Backlight Character Display Total Power Consumption Dimensions...
- Page 155 ......12.1-Inch Color TFT 1024x768 Display Dimensions Height Width Number of Colors Contrast Ratio Brightness Pixel Resolution Pitch Format Configuration...
-
Page 156: Hard Drive
......Capacity per Drive Drive Type Drive Height Transfer Rate Host/Interface (MBytes/sec) 8.33 Media (Mbits/sec) Sector Interleave Seek Times (Typical, Including settling) Track-to-track Average... -
Page 157: Diskette Drive
......Diskette size High density Low density Light Height Bytes per sector Sectors per track High density Low density Tracks per side High density... - Page 158 ......Weight Applicable Disc Center hole diameter Disc diameter Rotational speed Disc thickness Track pitch Laser Beam divergence Output power Type...
-
Page 159: Nickel Metal Hydride Battery Pack
......Nickel Metal Hydride Battery Pack Dimensions Height Width Depth Weight Energy Voltage Capacity Temperature Operating Storage No time limit No longer than 3 months... -
Page 160: Appendix C
......Appendix C Connector Pin Assignments Connector Connector Serial Connector Signal Carrier Detect Receive Data Transmit Data Data Terminal Ready Ground Data Set Ready... - Page 161 ......* = Active low Connector Pin Assignments Parallel Connector Signal Strobe* Data Bit 0 Data Bit 1 Data Bit 2 Data Bit 3 Data Bit 4...
- Page 162 ......Connector External Monitor Connector Signal Red Video Output Green Video Output Blue Video Output Monitor ID Bit 2 Ground Ground Ground...
- Page 163 ......Pin Signal Ground Data bit 3 Data bit 4 Data bit 5 Data bit 6 Data bit 7 Card enable 1 Address bit 10...
- Page 164 ......PC Card (PCMCIA) Connector Pin Signal Address bit 24 Address bit 25 5 V Detect Card reset Extend bus cycle Input port acknowledge...
- Page 165 ......Pin Signal Expansion - SMI (Reserved) CRT- Red Video Battery 2 Voltage CRT- Blue Video CRT- Green Video CRT- Vertical Sync CRT- Horizontal Sync...
- Page 166 ......External Options Connector Pin Signal Reserved Mouse Data DMA Acknowledge 1 DMA Request 5 DMA Request 0 Interrupt Request 11 Interrupt Request 6 Interrupt Request 3...
- Page 167 ......External Options Connector Signal Line Out - Right Channel Ground VAFC - Video Clock VAFC - Pixel Data 0 Ground VAFC - Pixel Data 4 VAFC - Pixel Data 8...
- Page 168 ......External Options Connector Signal Memory Write Control Ground System Address Bit 23 System Address Bit 19 System Address Bit 15 System Address Bit 13 Ground...
-
Page 169: Appendix D
......Appendix D Two-Prong, Double-Insulated Power Cord Set Requirements Determine whether your AC power cord has a two-prong or three- prong plug. -
Page 170: Power Cord Set Requirements
......Country-Specific Requirements Power Cord Set Requirements Country Australia Austria Belgium Canada Denmark Finland France Germany Italy Japan The Netherlands... - Page 171 ......Notes: 1. Flexible cord must be <HAR> Type HO3VV-F, 2-conductor, 0.75 mm conductor size. Power cord set fittings (appliance coupler and wall plug) must bear the certification mark of the agency responsible for evaluation in the country where it will be used.
-
Page 172: General Requirements
......Appendix E Three-Prong Grounded Power Cord Set Requirements Determine whether your AC power cord has a two-prong or three- prong plug. - Page 173 ......Country-Specific Requirements Power Cord Set Requirements Country Australia Austria Belgium Canada Denmark Finland France Germany Italy Japan The Netherlands...
- Page 174 ......Notes: 1. Flexible cord must be <HAR> Type HO5VV-F, 3-conductor, 1.0 conductor size. Power cord set fittings (appliance coupler and wall plug) must bear the certification mark of the agency responsible for evaluation in the country where it will be used.
-
Page 175: Electrostatic Discharge
......Appendix F Electrostatic Discharge A discharge of static electricity from a finger or other conductor may damage system boards or other static-sensitive devices. -
Page 176: Grounding Methods
......Grounding Methods There are several methods for grounding. Use one or more of the following methods when handling or installing electrostatic- sensitive parts: Use a wrist strap connected by a ground cord to a grounded workstation or computer chassis. - Page 177 ......Index AC Adapter, 1-10, 3-1, 3-2, 3-3, 3-6 AC power icon on status panel, 1-7, Add New Hardware icon, Control Panel, 5-1, 13-2 air travel with computer, 3-6...
- Page 178 ......booting computer, 6-6, 6-26, 6-29 brightness control, 1-8 buttons, See also switches CD loading tray release, 6-19, 6-20 diskette drive, 6-25 expansion base power, 5-10...
- Page 179 ......connecting audio equipment, 8-4 external desktop equipment, 5-1 connector door, 1-9, 9-2 connectors audio, 1-10, 8-4 Ethernet on expansion base, 1-1, 5-7, 10-3 external monitor, 1-10, 5-4...
- Page 180 ......diskettes formatting, 4-2, 6-25 inserting into diskette drive, 6-25 ordering backup, xvii, 1-2 removing from diskette drive, 6-25 troubleshooting, 13-8 display...
- Page 181 6-1 icon on status panel, 1-7, 6-1 inserting into dedicated bay, 6-9 MultiBay, 6-12 MultiBay Hard Drive Carrier, 6-13 LTE 5000, additional, 6-26 LTE Elite compatibility, 6-27, 6-28 number and locations supported, preinstalled software, 1-2, 6-26, 6-29 release, 6-8...
- Page 182 ......I/O address, See input/output address icons secondary-drive capability, 6-27 status panel, 1-7 AC power, 1-7, 3-4 battery gauges, 1-7, 3-4, 4-2 caps lock, 1-7 diskette drive, 1-7, 6-1...
- Page 183 ......lights battery, 1-4, 1-8, 4-2, 4-8 CD-ROM drive, 6-1 on expansion base, 4-9, 5-10, power/suspend, 1-4, 1-8, 3-4 line-in jack, 1-10, 8-4, 8-5 liquids, avoiding, 6-3 logical drive designations, 6-30...
- Page 184 ......MultiBay, computer, 1-8, 6-1, 6-11 device release, 1-10, 4-5, 6-15, 6-18 inserting battery pack, 4-7 CD-ROM drive, 6-16 diskette drive, 6-22 hard drive, 6-12...
- Page 185 ......PCI bus, 1-2 PCMCIA, See PC Cards Pentium processor, 1-1 phone numbers, worldwide, xviii Photo CD, 6-18 PIN number, See product identification number pointing device, 1-8, 2-1...
- Page 186 ......releases battery, 1-8, 4-5 hard drive, 6-8 MultiBay device, 4-5, 6-15, 6-18 MultiBay Hard Drive Carrier, 6-13 removable drives caring for, 6-3...
- Page 187 ......speakers built-in stereo, 1-8, 8-2 disabling, 8-2 expansion base, 8-2 specifications battery pack lithium ion, B-9 nickel metal hydride, B-9 CD-ROM drive, B-8 computer, B-1...
- Page 188 ......undocking computer from MultiBay Expansion Base, 5-10 User’s Guide, online, xv utilities Computer Checkup (TEST), 12-1 View System Information (INSPECT), 12-3...