
Related Manuals for LG LP1411SHR


Summary of Contents for LG LP1411SHR
-
Page 1: Air Conditioner
OWNER’S MANUAL AIR CONDITIONER Please read this manual carefully before operating your set and retain it for future reference. TYPE:PORTABLE AIR CONDITIONER MODEL:LP1411SHR www.lg.com... -
Page 2: Table Of Contents
Product Registration Information ... . . 24 THANK YOU! Congratulations on your purchase and welcome to the LG family. Your new LG Air Conditioner combines high-efficiency operation with portable convenience. - Page 3 I M P O RTA N T S A F E T Y I N S T RU C T I O N S READ ALL INSTRUCTIONS BEFORE USE We have provided many important safety messages in this manual and on your appliance. Always read and obey all safety messages.
- Page 4 I M P O RTA N T S A F E T Y I N S T RU C T I O N S READ ALL INSTRUCTIONS BEFORE USE CAUTION using this appliance, follow basic precautions, including the following: • To avoid possible cuts, avoid contacting the metal parts of the air conditioner when removing or reinstalling the filter.
-
Page 5: Electrical Safety
RESET button will not stay engaged, unplug the air conditioner immediately and contact your LG service technician. Due to potential safety hazards, the use of an adapter plug is strongly discouraged. -
Page 6: Parts And Features
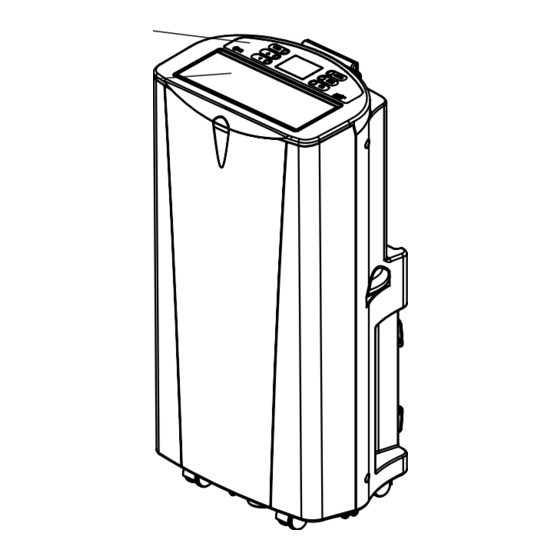
PA RT S A N D F E AT U R E S KEY PARTS AND COMPONENTS CONTROL PANEL AND DISPLAY Easy-to-read white LCD display shows the operation state. Digital touch buttons make changing settings quick and easy. MOTORIZED AIR DISCHARGE The adjustable louvered air discharge opens automatically when the air conditioner is turned on, and closes when it is turned off. - Page 7 Operation of functions is the same when using the remote or the control panel, unless otherwise stated. For detailed instructions on each function, see the follow ing pages POWER ON/OFF Turns the air conditioner on and off. When turning on, a rising tone will sound to confirm.
-
Page 8: How To Use
H O W TO U S E BEFORE USING YOUR AIR CONDITIONER PREPARING FOR OPERATION Refer to the Installation Instructions included in this manual before using the air conditioner. Once the air conditioner has been properly assembled and installed: Plug the power cord into its own dedicated properly grounded outlet. - Page 9 BEFORE USING YOUR AIR CONDITIONER INSERTING BATTERIES IN THE REMOTE Before using your remote, install the provided AAA batteries: Press and glide the battery cover on the back of the remote,then you can remove the cover. Insert two new alkaline AAA batteries into the battery compartment, being sure to note the proper polarity.
-
Page 10: Using The Controls
H O W TO U S E USING THE CONTROLS Control panel buttons shown. Operation using the remote control is the same, unless specifically noted.NOTE:The remote sensor is located under the air discharge and on the top of the front panel. POWER Press the POWER button to turn the air conditioner ON or OFF. - Page 11 USING THE CONTROLS Pressing the FAN button cycles the circulation fan speed from low (F1) to medium (F2) to high (F3).The selected fan speed will be shown in the LCD display. The function can be used in either COOL,FAN or HEAT modes. When changing fan speeds, there is a brief delay before the fan motor changes speed.
-
Page 12: Auto Clean
HOW TO U SE USING THE CONTROLS AUTO CLEAN To turn the AUTO CLEAN function on, press the AUTO CLEAN button while the air conditioner is running in COOL,DRY or ENERGY SAVER mode. This function can only be selected from the remote;it is not available from the control panel.It must be set each time you wish to run the AUTO CLEAN... -
Page 13: Installation Instructions
PREPARING FOR INSTALLATION WARNING The air conditioner is heavy! Use two or more people to lift and install the unit! Failure to do so could result in back injury or other injuries. EXHAUST COMPONENTS The following c omponents are used for window venting. Not all compon ents are used for every installation. - Page 14 " Vent Panel 18" Large extension panel Vent Panel 24" − 29" For window openings from 24" to 29", use the window vent panel and the large extension panel. Extension vent panel Extension vent panel Large extension panel Vent Panel 36"...
-
Page 15: Installation In Vertical Sliding Windows
I N S TA L L AT I O N I N S T RU C T I O N S INSTALLATION IN VERTICAL SLIDING WINDOWS NOTE: The window installation kit can be used with vertical sliding windows between 18" and 48"... - Page 16 I N S TA L L AT I O N I N S T RU C T I O N S Security Bracket Type B screw Install the security bracket with a type B screw, as shown. Insert the oval end of the diffuser into the window installation kit until the locking tabs engage.
-
Page 17: Installation In Casement Style Windows
I N S TA L L AT I O N I N S T RU C T I O N S INSTALLATION IN CASEMENT STYLE WINDOWS NOTE: The window installation kit can be used with casement windows between 18 ″ and 48 ″ tall. Foam seal A (Adhesive type) Cut the foam seal A(adhesive type) &... - Page 18 I N S TA L L AT I O N I N S T RU C T I O N S Security bracket Type B screw Install the window security bracket with a type B screw, as shown. Insert the oval end of the diffuser into the window installation kit until the locking tabs engage.
-
Page 19: Care And Cleaning
For maximum efficiency, it is recommended that you have the cooling coils inspected and cleaned annually. Your local LG Authorized Service Center can provide this inspection and cleaning service for a nominal fee. • To prevent damage to the finish, do not use gasoline, benzene, thinner, etc., or any... -
Page 20: Emptying The Water Collection Tank
EMPTYING THE WATER COLLECTION TANK Using the bottom drain port When the internal water collection tank is full, FL will appear in the display and the air conditioner will turn off until the tank is emptied. Unplug the air conditioner, disconnect the exhaust hose from the back, and move the air conditioner to a suitable drain location or outdoors. -
Page 21: Storing The Air Conditioner
C A R E A N D C L E A R I N G STORING THE AIR CONDITIONER If the air conditioner will not be used for an extended period of time: Drain the water collection tank completely and leave the bottom drain cap and rubber plug long enough to allow any residual water to drain out. -
Page 22: Troubleshooting
BEFORE CALLING FOR SERVICE Before you call for service, review this list. It may save you time and expense. This list includes common occurrences that are not the result of a defect in workmanship or materials. Problem Possible Causes Air conditioner will •... - Page 23 . k n Care and Cleaning section. • u l p c r i i t i d c a t e c i . r e • Unplug the air conditioner and contact your authorized LG service center. z i r...
-
Page 24: Product Registration Information
WARRANTY PERIOD: Labor: 1 Year from the Date of Purchase. Parts: 1 Year from the Date of Purchase. Compressor: 5 Years from the Date of Purchase. HOW SERVICE IS HANDLED: Call 1-800-243-0000 and choose the appropriate prompt. Please (Portable Air Conditioner), have product type number, and ZIP code ready. - Page 25 I N T RO D U C C I Ó N INSTRUCCIONES DE SEGURIDAD IMPORTANTES Precauciones básicas de seguridad N ..26, 27 Seguridad eléctrica ..... 27, 28 PIEZAS Y CARACTERÍSTICAS Piezas y componentes clave .
-
Page 26: Instrucciones De Seguridad Importantes
I N S T RU C C I O N E S D E S E G U R I DA D I M P O RTA N T E S LEA TODAS LAS INSTRUCCIONES ANTES DE USAR ADVERTENCIA PRECAUCIÓN ADVERTENCIA lesiones personales al usar este artefacto, siga las precauciones básicas, incluyendo las siguientes:... -
Page 27: Precauciones Básicas De Seguridad N
I N S T RU C C I O N E S D E S E G U R I DA D I M P O RTA N T E S LEA TODAS LAS INSTRUCCIONES ANTES DE USAR PRECAUCIONES BÁSICAS DE SEGURIDAD PRECAUCIÓN lesiones a personas cuando utilice este artefacto, deben seguirse precauciones básicas de seguridad, incluyendo las siguientes:... -
Page 28: Seguridad Eléctrica
TEST (prueba) no hacen saltar el disyuntor, o si el botón RESET (reconfiguración) no queda trabado,desenchufe el acondicionador de aire de inmediato y comuníquese con un técnico de LG. Debido a peligros de seguridad potenciales, recomendamos enfáticamente no utilizar un enchufe adaptador. -
Page 29: Piezas Y Características
P I E Z A S Y C A R AC T E R Í S T I C A S PANEL DE CONTROL Y PANTALLA La pantalla digital de fácil lectura muestra la temperatura configurada y las luces indicadoras indican el modo de funcionamiento. -
Page 30: Panel De Control Y Control Remoto
PANEL DE CONTROL Y CONTROL REMOTO El uso de funciones es el mismo cuando utilice el control remoto o el panel de control, a menos que se indique lo contrario. Para instrucciones detalladas de cada función, lea las páginas siguientes. POWER ON/ OFF(encendido/apagado) Enciende y apaga el acondicionador de aire. -
Page 31: Cómo Utilizar El Artefacto
C Ó M O U T I L I Z A R E L A RT E FAC TO C Ó M O U T I L I Z A R E L A RT E FAC TO... - Page 32 C Ó M O U T I L I Z A R E L A RT E FAC TO NOTAS: ALMACENAMIENTO del REMOTO Su aire acondicionado tiene un lugar especial para un almacenamiento cómodo del control Véase la ilustración derecha. NOTA: Con el fin de evitar la pérdida del control remoto, por favor, pongalo dentro de la cajita de...
- Page 33 C Ó M O U T I L I Z A R E L A RT E FAC TO C Ó M O U T I L I Z A R E L A RT E FAC TO A continuació pueden verse los botones del panel de control.
- Page 34 C Ó M O U T I L I Z A R E L A RT E FAC TO FAN SPEED TEMP/TIMER L TEMP/TIMER L TEMP/TIMER NOTA: TIMER TEMP/TIMER L M Para establecer un modo del apagado de retraso, apriete el botón TEMPORIZADOR cuando el aire acondicionado está...
- Page 35 C Ó M O U T I L I Z A R E L A RT E FAC TO AUTO CLEAN(autolimpieza) • Para encender la función de AUTO CLEAN, apriete el botón AUTO CLEAN, cuando el aire acondicionado está trabajando en modos de como FRESCO, SECO o AHORRO de ENERGÍA.
-
Page 36: Instrucciones De Instalación
I N S T RU C C I O N E S D E I N S TA L AC I Ó N ADVERTENCIA dos o más personas para levantar e instalar la unidad! No hacerlo puede provocar lesiones en la espalda u otras lesiones. Los siguientes componentes se usan para la ventilación de la ventana. - Page 37 I N S T RU C C I O N E S D E I N S TA L AC I Ó N El equipo de instalación le permite instalar el acondicionador de aire en la mayoría de las ventanas de deslizamiento vertical de 18 ʺ...
- Page 38 I N S T RU C C I O N E S D E I N S TA L AC I Ó N NOTA: El equipo de instalación en ventanas puede utilizarse con ventanas de deslizamiento vertical de un ancho de entre 18ʺ y 48ʺ. Tipo C de sellado con espuma (tipo adhesivo-más corto).
- Page 39 I N S T RU C C I O N E S D E I N S TA L AC I Ó N Tornillos tipo A...
- Page 40 I N S T RU C C I O N E S D E I N S TA L AC I Ó N NOTA: El equipo de instalación de ventanas puede usarse con ventanas con bisagras con una altura de 18ʺ a 48ʺ. Sellado con espuma A (tipo adhesivo)
- Page 41 I N S T RU C C I O N E S D E I N S TA L AC I Ó N Tornillos tipo A...
-
Page 42: Cuidado Y Limpieza
Para una eficiencia máxima, se recomienda que haga inspeccionar y limpiar las serpentinas de enfriamiento una vez por año. Su Centro de Servicio Autorizado LG local puede prestar este servicio de inspección y limpieza por una módica suma. Para evitar daños al acabado, no utilice gasolina, benceno, solvente, etc., o... -
Page 43: De Agua
Cuando el tanque interno de recolección de agua está lleno, aparecerá FL en la pantalla y el acondicionador de aire se apagará hasta que se vacíe el tanque. Desenchufe el acondicionador de aire, desconecte la manguera de salida de la parte trasera, y traslade el acondicionador de aire a un lugar de drenaje adecuado o al exterior. - Page 44 C U I DA D O Y L I M P I E Z A Si no va a usar el acondicionador de aire durante Antes de volver a usar el acondicionador de aire: un período prolongado:...
-
Page 45: Detección De Problemas
D E T E C C I Ó N D E P RO B L E M A S Problema Causas posibles Soluciones Cuidado y limpieza. Cuidado y limpieza. - Page 46 CIRCUITO CORTO O ABIERTO en el termostato de tubo interior. Soluciones Cuidado y limpieza. • Desenchufe el acondicionador de aire y comuníque con su centro autorizado de LG. • Desenchufe el aire acondicionado y contacte con el centro autorizado de servicio de LG.
-
Page 47: Información Sobre Registro De Producto
PERÍODO DE GARANTÍA: Mano de obra: 1 años desde la fecha de compra. Piezas: 1 años desde la fecha de compra. Compresor: 5 años desde la fecha de compra. PARA CONTACTAR LG ELECTRONICS POR CORREO: LG ELECTRONICS, INC. PROCESO DE SERVICIO: Llamenos a 1-800-243-0000 y seleccione el mensaje adecuado. - Page 48 LG Customer Information Center 1-800-243-0000 Register your product Online! LG ELECTRONICS,INC. www.lgappliances.com 1000 Sylvan Ave.,Englewood Cliffs,NJ 07632...