
Related Manuals for Philips CD2752S/90


Summary of Contents for Philips CD2752S/90
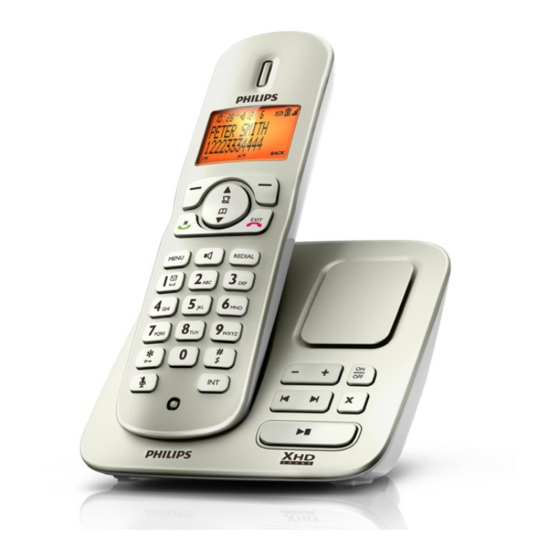
- Page 1 Register your product and get support at www.philips.com/welcome EN User manual CD270 CD275...
-
Page 2: Table Of Contents
Contents 1 Important safety instructions Declaration of conformity Use GAP standard compliance Compliance with EMF Disposal of your old product and batteries 6 2 Your CD270/CD275 What is in the box Overview of the phone Overview of the base station Display icons 3 Get started Connect the base station and charger... - Page 3 10 Self-defined settings Personalize the phone display Name the handset Set the display language Personalize the sounds Set the handset’s ringtone Set the handset’s ringtone volume Set the key tone Enhance the audio quality 11 Call features Auto hang up Activate/Deactivate auto hang up Auto conference Activate/Deactivate auto conference...
-
Page 4: Important Safety Instructions
• Battery life may be shortened in low temperature conditions. Declaration of conformity Hereby Philips Consumer Lifestyle, P&A, declares that the CD270/CD275 is in compliance with the essential requirements and other relevant provisions of Directive 1999/5/ EC. You can find the Declaration of Conformity on www.p4c.philips.com. -
Page 5: Use Gap Standard Compliance
One of Philips’ leading Business Principles is to take all necessary health and safety measures for our products, to comply with all applicable legal requirements and to stay well within the EMF standards applicable at the time of producing the products. - Page 6 separate into three materials: cardboard (box), polystyrene foam (buffer) and polyethylene (bags, protective foam sheet.) Your system consists of materials which can be recycled and reused if disassembled by a specialized company. Please observe the local regulations regarding the disposal of packaging materials, exhausted batteries and old equipment.
-
Page 7: Your Cd270/Cd275
2 Your CD270/ CD275 Congratulations on your purchase and welcome to Philips! To fully benefit from the support that Philips offers, register your product at www.philips. com/welcome. What is in the box Base station with bracket (CD270) Base station with bracket (CD275) -
Page 8: Overview Of The Phone
Guarantee User manual Quick start guide Note • * In some countries, you have to connect the line adapter to the line cord, then plug the line cord to the telephone socket. Note • ** In multi-handset packs, there are additional handsets and chargers and power adapters. -
Page 9: Overview Of The Base Station
Earpiece • Select the function displayed on the handset screen directly above the key. • Scroll up on the menu. • Increase the earpiece/ speaker volume. • Enter the call log. • Scroll down on the menu. • Decrease the earpiece/ speaker volume. -
Page 10: Display Icons
Slow flashing at 1 second interval: indicator • Unread messages. Fast flashing at 0.5 second interval: • The answering machine memory is full. Steady on: • The answering machine is on. • Ongoing answering machine operation. • Ongoing remote operation via the handset. • Find handsets • Enter registration mode Display icons In standby mode, the icons shown on the main screen tell you what features are available on... -
Page 11: Get Started
3 Get started Caution • Ensure you have read the safety instructions in the “Important” section before you connect and install your handset. Connect the base station and charger Warning • Risk of product damage! Ensure that the power supply voltage corresponds to the voltage printed on the back or the underside of the phone. -
Page 12: Check The Battery Level
a The batteries are pre-installed in the handset. Pull the battery tape off from the battery door before charging. b Place the handset on the base station to charge the handset. When the handset is placed correctly on the base station, your hear a docking sound. -
Page 13: Set The Date And Time
Set the date and time Press MENU. Select [CLOCK & ALARM] > [SET DATE/TIME], then press [OK] to confirm. Press the numeric buttons to enter the date, then press [OK] to confirm. On the handset, the time set menu is »... -
Page 14: Calls
4 Calls Note • When the power fails, the phone cannot access emergency services. • Check the signal strength before you make a call or when you are in a call. For more information, see “Check the signal strength” in the Get started section. -
Page 15: End A Call
End a call You can end a call in these ways: • Press ; or • Place the handset to the base station or charging cradle if the auto hang up is activated. Answer a call When the phone rings, press answer the call. -
Page 16: Answer A Second Call
Answer a second call Note • This service is network dependent. When there is a periodical beep to notify you of an incoming call, you can answer the call in these ways: Press to answer the call. » The first call is put on hold, and you are now connected to the second call. -
Page 17: Intercom And Conference Calls
5 Intercom and conference calls An intercom call is a call to another handset that shares the same base station. A conference call involves a conversation among you, another handset user and the outside callers. Make a call to another handset Note •... -
Page 18: During An External Call
During an external call Press INT to initiate an internal call. » The handsets available for intercom are displayed. » The external caller is put on hold. Select or enter a handset number, then press [OK] to confirm. The selected handset rings. »... -
Page 19: Text And Numbers
6 Text and numbers You can enter text and numbers for handset name, phonebook records, and other menu items. Enter text and number Press once or several times on the alphanumeric key to enter the selected character. Press [BACK] to delete the character. Press to move the cursor left and right. -
Page 20: Phonebook
7 Phonebook This phone has a phonebook that stores up to 100 records. You can access the phonebook from the handset. Each record can have a name up to 14 characters long and a number up to 24 digits long. View the phonebook Note •... -
Page 21: Add A Record
Add a record Note • If your phonebook memory is full, the handset displays a notification message. Delete some records to add new ones. Press MENU. Select [PHONEBOOK] > [NEW ENTRY], then press [OK] to confirm. Enter the name then press [OK] to confirm. -
Page 22: Direct Access Memory
Direct access memory You have 2 direct access memories (Keys 1 and 2). To dial the saved phone number automatically, press and hold on the keys in standby mode. Depending on your country, Keys 1 and 2 are preset to [1_VOICEMAIL] (voice mail number) and [2_INFO SVC] (information service number) of your network operator respectively. -
Page 23: Call Log
8 Call log The call log stores the call history of all missed or received calls. The incoming call history includes the name and number of the caller, call time and date. This feature is available if you have registered to the caller ID service with your service provider. -
Page 24: Redial List
9 Redial list The redial list stores the call history of dialed calls. It includes the names and/or numbers you have called. This phone can store up to 5 redial records. View the redial records Press REDIAL to enter the list of dialed calls. -
Page 25: Self-Defined Settings
10 Self-defined settings Customize the settings to make it your own phone. Personalize the phone display Name the handset The name of the handset can be up to 12 characters. It is displayed on the handset screen in standby mode. Press MENU. -
Page 26: Enhance The Audio Quality
Enhance the audio quality XHD (Extreme High Definition) sound mode is an exclusive feature which transmits high fidelity signals to the handset. It makes the phone conversations sound like real-life conversations. When you are in standby mode, Press MENU. Select [ADVANCED SET] > [XHD SOUND], then press [OK] to confirm. -
Page 27: 11 Call Features
11 Call features The phone supports a number of call-related features that help you handle and manage the calls. Auto hang up To end a call, simply place the handset on the base station or charge cradle. Activate/Deactivate auto hang up Press MENU. -
Page 28: Set The Recall Duration
Set the recall duration Press MENU. Select [ADVANCED SET] > [RECALL TIME], then press [OK] to confirm. Select an option, then press [OK] to confirm. The setting is saved. » First ring If you have subscribed to the caller ID service with your service provider, your phone can suppress the first ring before the caller ID displays on the screen. -
Page 29: 12 Extra Features
12 Extra features Your phone offers you extra features which keep you organized and informed while on the move. Alarm clock Your phone has a built-in alarm clock. Check the information below to set your alarm clock. Set the alarm Press MENU. -
Page 30: 13 Advanced Settings
13 Advanced settings Register the handsets You can register additional handsets to the base station. The base station can register up to 5 handsets. Auto registration Place the handset on the base station. The handset detects the base station » and start to register automatically. -
Page 31: Network Type
Network type Note • This feature only applies to models with network type support. Press MENU. Select [ADVANCED SET] > [NETWORK TYPE], then press [OK]. Select a network type, then press [OK]. The setting is saved. »... -
Page 32: Telephone Answering Machine
14 Telephone answering machine Note • Available only for CD275. Your phone includes a telephone answering machine that records unanswered calls when it is on. By default, the answering machine is set to the [ANSWER & REC.] mode. You can also access the answering machine remotely and change the settings through the answering machine menu on the handset. -
Page 33: Set The Answer Mode
Set the answer mode You can set the answering machine and select if the callers can leave messages. Select [ANSWER & REC.] if you allow the callers to leave messages. Select [ANSWER ONLY] if you forbid the callers to leave messages. Press MENU. -
Page 34: Listen To The Announcement
Listen to the announcement Press MENU. Select [ANSWER MACHINE] > [ANNOUNCEMENT], then press [OK] to confirm. Select [ANSWER & REC.] or [ANSWER ONLY], then press [OK] to confirm. Select [PLAY], then press [OK] to confirm. » You can listen to the current announcement. -
Page 35: From The Handset
From the handset Press MENU. Select [ANSWER MACHINE] > [PLAY], then press [OK] to confirm. New messages start playing. Old » messages start playing if there is no new message. [BACK] to stop listening. • Press • Press [OK] to enter the options menu. •... -
Page 36: Set The Ring Delay
Set the ring delay You can set the number of times the phone rings before the answering machine picks up the call. Press MENU. Select [ANSWER MACHINE] > [SETTINGS] > [RING DELAY], then press [OK] to confirm. Select a new setting, then press [OK] to confirm. -
Page 37: Access The Answering Machine Remotely
Access the answering machine remotely Make a call to your home number with a touch tone phone. Enter # when you hear the announcement. Enter your PIN code. You now have access to your » answering machine, and you can now listen to the new messages. -
Page 38: 15 Default Settings
15 Default settings Language* Country dependent Handset name PHILIPS Date 01/01/10 Date format* Country dependent Time* Country dependent Time format* Country dependent Alarm Phonebook list Unchanged Auto hang up Recall time* Country dependent First ring* Country dependent Conference Dial mode*... -
Page 39: 16 Technical Data
16 Technical data Display • Amber LCD backlight General telephone features • Dual mode caller name & number identification • Conference call and voicemails • Intercom • Maximum talk time: 12 hours Phonebook list, Redial list and Call log • Phonebook list with 100 entries •... -
Page 40: Frequently Asked Questions
17 Frequently asked questions No signal bar displays on the screen. • The handset is out of range. Move it closer to the base station. • If the handset displays [UNREGISTERED], register the handset. • For more information, see “Register the handsets”... - Page 41 0168 © 2010 Koninklijke Philips Electronics N.V. All rights reserved. Printed in China IFU_CD270-275_90_EN_V1.0 WK10235...