Sundance Spas CAMDEN 780 Owner's Manual
780 series
Hide thumbs
Also See for CAMDEN 780:
- Owner's manual (44 pages) ,
- Manual (32 pages) ,
- Owner's manual (66 pages)

Related Manuals for Sundance Spas CAMDEN 780


Summary of Contents for Sundance Spas CAMDEN 780
- Page 1 S E R I E S 7 8 0 Camden ™ | Certa ™ | Chelsee ™ | Dover ™ | Hamilton ™ o w n e r ’ s m a n u a l 6530-436W Rev. C...
- Page 2 Congratulations on the purchase of your new Sundance following is a list of automated functions and maintenance recommendations for your new spa. Automated functions have been listed below in an attempt to suppress any operational concerns you may have during startup and the first 24-hours of ownership! Maintenance recommendations are listed in an attempt to stress their importance in protecting your new spa.
-
Page 3: Table Of Contents
Lock Modes (L1-L2) ... 29 10.4 Selecting The Filtration/Heating Mode ... 30 11.0 Spa Maintenance... 31 11.1 Cleaning The Filter ... 31 11.2 Draining And Refilling... 33 11.3 Pillow Care ... 34 780 SERIES © Sundance Spas, Inc. All Rights Reserved... - Page 4 780 SERIES 11.4 Cleaning The Spa Interior ... 35 11.5 Vinyl Cover Care And Maintenance ... 35 11.6 Maintaining The Synthetic Cabinet ... 36 11.7 Winterizing ... 36 11.8 Restarting Your Spa in Cold Weather ... 37 12.0 Water Quality Maintenance ... 37 12.1 pH Control ...
-
Page 5: Important Spa Owner Information
Important Spa Owner Information ® Your new Sundance standards and is capable of providing many years of trouble-free use. However, because heat retentive materials are utilized to insulate the spa for efficient operation, an uncovered acrylic spa surface and wall fittings directly exposed to sunlight and high temperatures for an extended period are subject to permanent damage or discoloration. -
Page 6: Important Safety Instructions For All Spa Owners
780 SERIES Important Safety Instructions for all Spa Owners REAd ANd FOLLOW ALL INSTRUCTIONS CAREFULLY! This spa was manufactured to meet the standards and specifications outlined in the “Virginia Graeme Baker Pool and Spa Safety Act” (VGB Safety Act). When installing and using this spa, basic safety precautions should always be followed, including: dANGER: •... - Page 7 • A grounding wire connector is provided on this unit to connect a minimum No. 8 AWG (8.4 mm²) solid copper conductor between this unit and any metal equipment, metal enclosures of electrical equipment, metal water pipe, or conduit within 5 feet (1.5m) of the unit. •...
- Page 8 780 SERIES WARNING: • Since excessive water temperatures have a high potential for causing fetal damage during the early months of pregnancy, if pregnant or possibly pregnant, consult your physician before using a spa. • Pregnant or possibly pregnant women should limit spa water temperatures to 100°F (38°C).
- Page 9 WARNING: chemistry, proper ventilation is recommended to reduce the risk of contracting a waterborne illness (e.g. an infection, bacteria or virus) and/or respiratory ailments that could be present in the air or water. Consult a licensed architect or building contractor to determine your specific needs if installing your hot tub indoors.
-
Page 10: Entrapment Risk
780 SERIES Entrapment Risk The Consumer Products Safety Commission/USA has reported that users of pools and spas have become entrapped (stuck) to drain and/or suction fittings causing death, drowning, or serious injury (see diagram below). This spa was manufactured to meet the standards and specifica- tions outlined in the “Virginia Graeme Baker Pool and Spa Safety Act”... -
Page 11: Hyperthermia
dANGER: body entrapment: May occur when part of the torso becomes entrapped, inserted or sucked into a suction or outlet opening. • Never allow children to play or get near the suction fittings, suction covers, filter, filter lid or skimmer assembly. dANGER: Evisceration (disembowelment) entrapment: May occur when the buttocks becomes entrapped, inserted or sucked into a suction or... -
Page 12: Important Additional Csa Safety Instructions (Canada Only)
Sundance dealer or local building department should you have any questions regarding your installation. Proper grounding is extremely important. Sundance spas are equipped with a current collector system. A pressure wire connector is provided on the surface of the control box, located outside the equipment door... -
Page 13: Choosing A Location
Before installing your spa, check with your local building department to ensure installation conforms to local building codes. 120/240 volt dover Convertible Model A spa connected to a 120 VAC electrical service must be located close enough to a grounded, grounding-type electrical outlet so that the included 10 feet (3m) power cord can be plugged directly into it. -
Page 14: Outdoor Location
780 SERIES CAUTION: If the spa is indoors or located in an enclosed area, proper ventilation should be discussed with an Engineer or authority competent enough to understand the necessary provisions needed to vent moist or heated air and air associated with chemical odors outdoors. -
Page 15: Power Requirements
• PROPER dRAINAGE: measures to sufficiently handle excessive water spillage. Be sure the flooring in which the spa rests on has adequate drainage and can handle draining of the entire contents of the spa. Be sure to make provisions for ceilings or any other structures that may be below the spas installation. -
Page 16: North American 60 Hz Power Options
780 SERIES North American 60 Hz Power Options North American dover Convertible Models (60 Hz) Voltage: # of Wires: Frequency: Current Draw: Circuit Breaker: CAUTION (For 4-wire, 240 vAC Heater Operation): Move the red wire on the main terminal strip (TB1) from position #1 to position #3. Make certain wires are connected exactly as shown in Figure D (page 17) before applying power. -
Page 17: Export 50 Hz Power Options
North American Certa/Chelsee/Hamilton 2-Pump Models (60 Hz) Voltage: # of Wires: Frequency: Current Draw: Circuit Breaker: In 40A configuration, the heater will not operate while either jets pump is running in high speed. Note: pump 2 runs only in high speed. In 50A configuration, the heater will not operate while both jets pumps are running in high speed. -
Page 18: Electrical Wiring Instructions
780 SERIES Export 2-Pump Certa/Chelsee/Hamilton Models (50 Hz) Voltage: # of Wires: Frequency: Current Draw: Circuit Breaker: In 20A configuration, the heater will not operate while either jets pump is running in high speed. This is the factory setting. Note: pump 2 runs only in high speed. - Page 19 2. dedicated 240v Power Camden/Certa/Chelsee/Hamilton Models: These spas must be permanently connected (hard-wired) to the power supply. No plug-in connections or extension cords are to be used in conjunction with the operation of these spas. Supplying power to these spas which is not in accordance with these instructions will void both the independent testing agency listing and the manufacturer’s warranty.
- Page 20 780 SERIES Control Box Power Supply Entrace(s) 2-Speed Pump #1 Heater Spa Drain Valve Pump Drain Plugs 1-Speed Pump #2 Terminal Block Bonding Lug Grounding Terminal Page 16 Figure A Equipment Area Circulation pump behind load box Pump, ozone and drain locations may vary by model Ozone injector Control Panel...
- Page 21 Figure-C North American Dover Convertible Models: 120 VAC, 3-Wire Connection (60 Hz) CAUTION: (For 4-wire, 240 VAC Heater Operation): Move the red wire on the main terminal strip (TB1) from position #1 to position #3. Make certain wires are connected exactly as shown in Figure D before applying power.
-
Page 22: Spa Fill Up Procedure
780 SERIES Spa Fill Up Procedure For best results, read each step in its entirety before proceeding with that step. 1. Prepare The Spa For Filling • Clear all debris from the spa. (Although the spa shell has been polished at the factory, you may want to treat it with a specially formulated spa cleaner.) Consult your dealer for additional information prior to filling spa. - Page 23 4. Activate jets Pumps Turn on all jet(s) pumps to ensure proper mixing when adding start-up chemical in step 5. 5. Add Start-Up Chemicals Add the spa water chemicals as recommended by your Sundance dealer. See Section titled “Water Quality Maintenance” (page 37) for general guidance.
- Page 24 780 SERIES Important Heater details: • The maximum temperature for which the spa can be set is 104°F (40°C) and the minimum is 65°F (18°C). • For North American 2-pump spas powered by a 40 amp service, jets pump #1 must be set to low speed and jets pump #2 must be turned off to operate the heater.
- Page 25 CAUTION: RISK OF PERSONAL INjURY OR SPA dAMAGE! Never add chlorine tablets (trichlor) or acid to your hot tub for any reason! These chemical may damage components within your hot tub, burn or irritate your skin, create a rash, and void the manufacturer warranty for your spa.
- Page 26 780 SERIES CAUTION: TO dECREASE bUILd UP ON COMPONENTS ANd MINIMIZE ACRYLIC dAMAGE. Never fill with water from a water softener. If your water is extremely “hard”, it is preferable to fill half-way with hard water and the rest of the way with softened water.
-
Page 27: Control Functions
Control Functions Control Panel A. LEd display: Can display current water temperature (default display), water temperature set point, selected filtration/heating mode, and error messages. B. Heat Indicator: Lit when heater is on. C. Warmer ( ) button: Increases water temperature set point. D. -
Page 28: General Spa Features And Controls
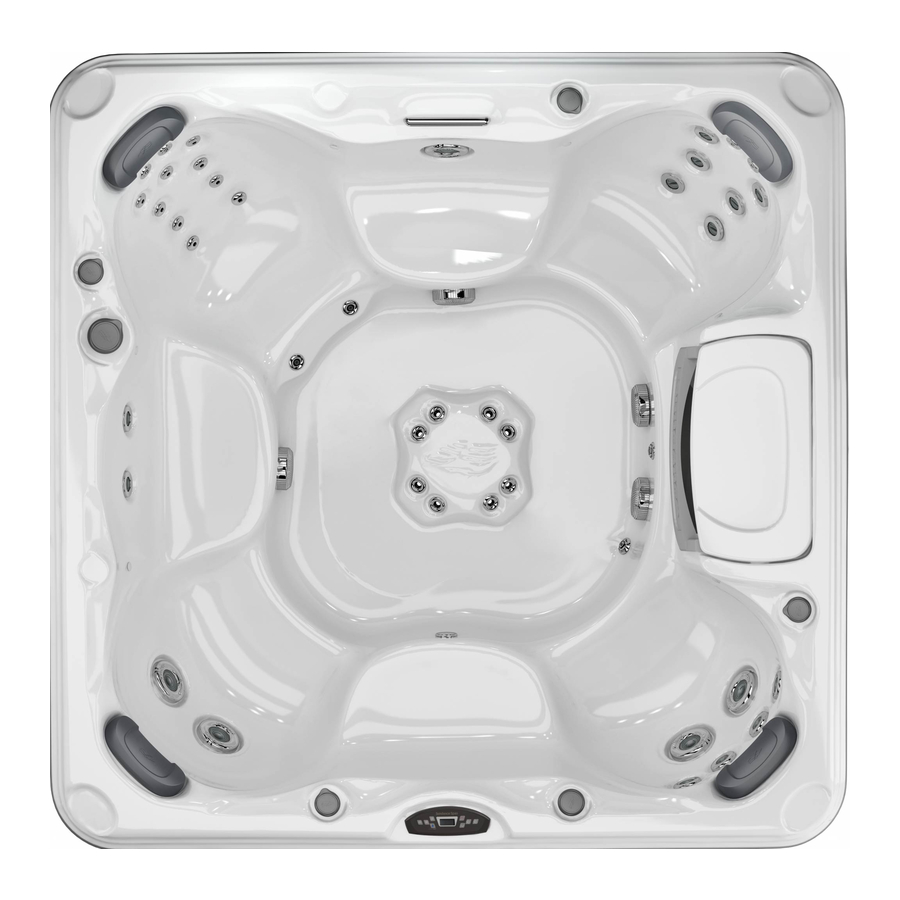
780 SERIES General Spa Features And Controls Control Panel Filter Lid and Filter Cartridge Air Controls w/LED Light (3) Pillows (4) Massage Selector Gravity Drain/Ozone Return/ Heater Return Fitting Spa Light Suction Fittings (3) Integrated Cupholder 10. Waterfall w/LED Light Page 24 Hamilton model illustrated - Jet locations and features will vary by model. -
Page 29: Operating Instructions
Operating Instructions The spa control system has automatic functions that operate upon startup and normal operation to protect the system. Upon power up, the readout displays the following information: 1. Control panel displays current software release (e.g. 3.57). 2. Control panel displays “888” and all indicator LEDs are lit, permitting visual inspection of all display segments and indi- cator lights for proper operation. -
Page 30: Activate Jets Pumps
780 SERIES Activate jets Pumps The jETS 1 button activates the functions of the main 2-speed jets pump. The first press activates pump 1 in low speed, the second press activates high speed, and the third press shuts the pump off. For 2-pump models, the jETS 2 button controls jets pump 2 which only operates in high speed. -
Page 31: Jets
Press Once Press Again Press Selects or “freezes” your low speed blending color of choice. Again BLUE (X4)VIOLET (X5)RED (X6) AMBER (X7)GREEN (X8) AQUA (X9) Press Again Selects one of 7 solid (high-intensity) colors of choice. jets All SMT Turbo jets (A) offers an adjustable flow stream angle. -
Page 32: Optional Audio System (Certa/Chelsee/Hamilton Only)
780 SERIES Optional Audio System (Certa/Chelsee/Hamilton Only) Spas equipped with the optional audio system offer enhanced spa enjoyment. These models include a high-quality AM/FM/CD stereo receiver with four high-quality marine speakers for unsurpassed sound quality and long-life, wireless remote control and an MP3 adapter cable. -
Page 33: Automatic Filtration Cycles
10.0 Automatic Filtration Cycles Your new spa includes a 24-hour circulation pump which filters the water continuously while using less energy than a common 100 watt light bulb! The circulation pump draws water through the short side of the double- ended filter cartridge and effectively removes small debris in your spa. -
Page 34: Selecting The Filtration/Heating Mode
780 SERIES 10.4 Selecting The Filtration/Heating Mode Press and hold both control panel WARMER ( ) buttons at the same time, then release. Then press either WARMER ( ) or COOLER ( mode F0-F6 or lock modes L1-L2 outlined below. Standard Filtration/Heating Modes F0 5 minutes of filtration per day (one 5 minute “blow-out”... -
Page 35: Spa Maintenance
11.0 Spa Maintenance Proper and regular maintenance of your spa will help it retain its beauty and performance. Your authorized Sundance dealer can supply you with all the information, supplies and accessory products you will need to accomplish this. dANGER: bY ENTRAPMENT! •... - Page 36 780 SERIES dANGER: TURN POWER TO SPA OFF! TO dECREASE RISK OF dEATH, dROWNING, OR ENTRAPMENT, NEvER OPERATE SPA WHEN FILTER IS NOT PROPERLY INSTALLEd OR IF SKIMMER ASSEMbLY IS dAMAGEd OR ALTEREd! Refer to the filter cleaning/replacement procedure: Loosen filter nut to provide clearance, then remove filter assembly.
-
Page 37: Draining And Refilling
Periodically, the polyester mesh (pleated) filter will need a more thorough cleaning to remove imbedded oils and minerals. For this, we suggest cleaning as illustrated above (step D), followed by soaking the filter overnight in a plastic container filled with a solution of water and a specially formulated filter cleanser available from your Sundance dealer. -
Page 38: Pillow Care
780 SERIES draining Procedures: 1. Turn off power to spa at breaker. 2. Locate the 3" gray drain valve cap on side of the spa cabinet. Unscrew drain valve cap to expose the underlying male garden hose fitting (Fig. G-I). 3. -
Page 39: Cleaning The Spa Interior
5. Do not drag or use the flaps/skirt or the cover lock straps to remove the cover. 6. Use only recommended cover lift systems. 7. Use only chemicals and cleaners recommended by Sundance Spas. 8. Remember to keep spa covered when not in use. Maintaining proper water levels assures efficient operation and efficient electrical usage. -
Page 40: Maintaining The Synthetic Cabinet
780 SERIES 11.6 Maintaining The Synthetic Cabinet Your new spa’s synthetic cabinet requires little or no maintenance of any kind. To clean, simply wipe cabinet with a clean towel and mild soap solution. CAUTION: Never spray cabinet with a garden hose for any reason since this action may induce an electrical short in the spa’s electrical equipment. -
Page 41: Restarting Your Spa In Cold Weather
For specific guidance on maintaining water quality, consult your Authorized Sundance Spas dealer who can recommend appropriate chemical products for sanitizing and maintaining your hot tub. -
Page 42: Ph Control
780 SERIES WARNING: WILL: • Increase risk of contracting a waterborne illness (e.g. an infection bacteria or virus) and/or respiratory ailments. • Damage the equipment, components and spa shell, which are not covered under the hot tub’s warranty. CAUTION: Never store hot tub chemicals inside the hot tub’s equip- ment bay. -
Page 43: Cd Ozone Water Maintenance System
WARNING: OR ENTRAPMENT! Never leave your hot tub unattended for any reason while the cover is open and accessible, especially to small children and animals! CAUTION: RISK OF PERSONAL INjURY OR SPA dAMAGE! Never add chlorine tablets (trichlor) or acid to your hot tub for any reason! These chemical may damage components within your hot tub, burn or irritate your skin, create a rash, and void the manufacturer warranty for your spa. -
Page 44: Error Conditions/Error Messages
780 SERIES 13.0 Error Conditions/Error Messages There are a number of unique functions designed into your spa to protect it from damage and/or aid in troubleshooting. Refer to Sections 13.1-13.8 below for a listing of all possible error messages and their meanings. -
Page 45: Panel Displays Sn2
13.4 Panel displays SN2 Open or shorted sensor (heater disabled). The temperature sensor is not functioning. Your authorized dealer must repair this. 13.5 Panel displays FL1 or FL2 A flashing “FL1” display means the flow switch is malfunctioning open, the circulation pump’s filter cartridge is excessively dirty, or an “air lock”... -
Page 46: Panel Displays
780 SERIES 13.8 Panel displays - - - WARNING: RISK OF HYPERTHERMIA (OvER-HEATING) CAUSING SEvERE INjURY, bURNS, OR WELTS. dO NOT ENTER SPA WATER! The safety “Watchdog” software has been triggered and the spa is deactivated. A problem has been detected which could cause damage to the spa or its components. -
Page 47: Poor Jet Action
14.3 Poor jet Action 1. Press the JETS 1 button to make certain the pump #1 is on. 2. Rotate the air control clockwise to the “on” position. 3. Check for dirty filter. Clean, if necessary. 4. Make sure jets are all the way open. 14.4 Water is Too Hot Reduce thermostat setting so the heater turns off. -
Page 48: North American Dover Convertible Circuit Diagram
780 SERIES 15.0 North American dover Convertible Circuit diagram This wiring diagram is used for all North American Dover 120/240 VAC (60 Hz) convertible power models. Page 44... -
Page 49: North American Camden Circuit Diagram
780 SERIES 16.0 North American Camden Circuit diagram This wiring diagram is used for all North American Camden 240 VAC (60 Hz) dedicated power models Page 45... -
Page 50: North American Certa/Chelsee/Hamilton Circuit Diagram
780 SERIES 17.0 North American Certa/Chelsee/Hamilton Circuit diagram This wiring diagram is used for all North American Certa/Chelsee/ Hamilton 240 VAC (60 Hz) dedicated power models. Page 46... -
Page 51: Export Dover Circuit Diagram
780 SERIES 18.0 Export dover Circuit diagram This wiring diagram is used for Export Dover 230 VAC (50 Hz) dedicated power models. Page 47... -
Page 52: Export Camden Circuit Diagram
780 SERIES 19.0 Export Camden Circuit diagram This wiring diagram is used for Export Camden 230 VAC (50 Hz) dedicated power models. Page 48... -
Page 53: Export Certa/Chelsee/Hamilton Circuit Diagram
780 SERIES 20.0 Export Certa/Chelsee/Hamilton Circuit diagram This wiring diagram is used for Export Certa/Chelsee/Hamilton 230 VAC (50 Hz) dedicated power models. Page 49... -
Page 54: Optional Sunsurround™ Stereo Receiver Functions
780 SERIES 21.0 Optional SunSurround™ Stereo Receiver Functions BAND SUBW ZONE AQ-CD-3 21.1 Stereo Receiver Control Functions Models equipped with the stereo option only: To start enjoying your new Stereo Receiver, please read the following operation instructions in their entirety. 1. - Page 55 5. Menu Function List button: Press Menu to navigate through the list of stereo performance functions. Steps to access menu items: A. To access the MENU press the Menu button < 3 seconds. B. “MENU” will be displayed for 2 seconds, and then “CONTRAST” will appear on the display.
- Page 56 780 SERIES BAND SUBW ZONE AQ-CD-3 6. Audio/Enter button: Press Audio/Enter to navigate through the stereo sound functions. Short press “AUDIO” button to access the audio menu. User can navigate thru the audio menu items by pressing the “AUDIO” button repeatedly, or by pressing the Tuning Up (21) or Tuning Down Button (22).
- Page 57 • iX-bASS (iX-bass Level) Down button to select the 3 different Bass Boost level: Low, Mid, or High. • bASS (bass Level) Down button to adjust the desired Bass level range from -6 to +6. • bASS -CFQ (bass Cente the Volume Up or Down button to adjust the desired Bass Center Frequency to 60 Hz, 80 Hz, 100 Hz, or 200 Hz.
- Page 58 780 SERIES BAND SUBW ZONE AQ-CD-3 • TREbLE (Treble Level) or Down button to adjust the desired Treble level range from -6 to +6. • TRE-CFQ (Treble Center Frequency) the Volume Up or Down button to adjust the desired Treble center frequency to 10 KHz, 12.5 KHz, 15 KHz, or 17.5 KHz.
- Page 59 11. Sub-Woofer (SUbW) button: Press the SUB-W button to activate the Sub-woofer function On, and “Sub-woofer” will appear on the LCD display for 3 seconds. Press the SUB-W button again to turn off the Sub-woofer function. 12. 2 Zone button: The feature is not used. 13.
- Page 60 780 SERIES BAND SUBW ZONE AQ-CD-3 18. Preset 4/RdM button: In Tuner mode, any station can be stored as preset 4 by simply pressing and holding this button for 2 seconds, after the desired station is selected. To recall the station preset, simply press and release this button.
- Page 61 as a strong station is found. In CD mode, pressing this button will advance the CD down to the previous track, the track number is shown on the display panel. Simply press and hold the button to rewind through a track. CD play starts when the button is released. 23.
-
Page 62: Stereo Audio Receiver Specifications
780 SERIES folders are accessed in order in which they were written by the CD writer. Therefore, the playing order may not be the same as the order in which they are expected. For example, a disc with the following folder/file hierarchy is subject to folder select, file select and play back order as illustrated on page 59. -
Page 63: Cd/Mp3/Wma Folder/File Hierarchy
21.3 Cd/MP3/WMA folder/file hierarchy When selected for play, folder search, file search or folder select, files and folders are accessed in the order in which they were written. Because of this, the order in which they are expected to be played may not match the order in which they are actually played. - Page 64 780 SERIES A. Cd/MP3/WMA File/folder play 1. There are three different play methods as following: • Press the M2 button more than 3 seconds during playing an MP3/ WMA disc for “intro play” to all files of the current folder. “Intro play” should restart from the first song of the current folder, after all files in the current files have been intro-played.
-
Page 65: Stereo Audio Receiver Troubleshooting
C. Id3 information display • For any MP3/WMA file recording with ID3 Tag information. The ID3 information such like Album title, Track title, Artist title will be displayed and automatic scrolling through the LCD while the file is playing. User also allows pressing the AS/PS button repeatedly to view the ID3 tag information manually. -
Page 66: Standard Wireless Remote Control Functions
780 SERIES The installation angle is more than 30 degrees Sound skips. The disc is extremely dirt or defective disc The radio does The antenna cable is not work. The not connected radio station automatic The signals are too selection does weak not work. - Page 67 Volume Button: Used to decrease volume level between 46 to 0. Seek/Track Down Button: • In CD mode: Press to rewind tracks or press and hold to do a fast rewind. • In Radio mode: Seeks down for stations. Seek/Track Up Button: •...
-
Page 68: Ipod®/Mp3 Player Connection
780 SERIES 21.6 iPod®/MP3 Player Connection A. Connecting Your iPod/MP3 Player 1. Plug in the iPod/MP3 Player (purchased separately) with supplied mini RCA cable into the auxiliary port (Figure A). 2. Plug the other end of the supplied cable into the phone jack connection on the iPod/MP3 Player (Figure B). -
Page 69: Wireless Remote Battery Replacement Procedure
21.7 Wireless Remote battery Replacement Procedure 1. Turn the remote unit over and locate the battery door (Figure A). 2. Rotate the battery door, with a coin, counterclockwise until the dot aligns with the Open arrow (Figure B). 3. Remove battery door using coin to pry the door upward (Figure C). - Page 70 780 SERIES Page 66...
- Page 71 780 SERIES Page 67...
- Page 72 780 SERIES Page 68...