Table of Contents
Advertisement
Available languages
Available languages
OWNER'S MANUAL
Model SC-10030A
For 6 and 12-Volt Batteries
Fully Automatic
Microprocessor Controlled
Battery Charger with
Engine Starter plus
Battery Tester and
Alternator Tester
ELECTRONIC
BATTERY CHARGER
2
a m p
S L O W
C H A R G E
100
a m p
E N G I N E
S T A R T
12
30
00-99-000828/0408
®
TM
a m p
F A S T
C H A R G E
Advertisement
Table of Contents

Related Manuals for Schumacher SpeedCharge SC-10030A


Summary of Contents for Schumacher SpeedCharge SC-10030A
-
Page 1: Battery Charger
OWNER’S MANUAL Model SC-10030A For 6 and 12-Volt Batteries Fully Automatic Microprocessor Controlled Battery Charger with Engine Starter plus Battery Tester and Alternator Tester ELECTRONIC BATTERY CHARGER a m p S L O W C H A R G E... - Page 3 Model SC-10030A. Do not expose charger to rain or snow. Use of an attachment not recommended or sold by the battery charger manufacturer may result in a risk of fire, electric shock, or injury to per- sons.
- Page 4 Use charger for charging a LEAD-ACID battery only. It is not intended to supply power to a low voltage electrical system other than in a starter-mo- tor application. Do not use battery charger for charging dry-cell batteries that are commonly used with home appliances. These batteries may burst and cause injury to persons and damage to property.
- Page 5 CHARGER LOCATION Locate charger as far away from battery as DC cables permit. Never place charger directly above battery being charged; gases from bat- tery will corrode and damage charger. Never allow battery acid to drip on charger when reading electrolyte spe- cific gravity or filling battery.
- Page 6 AC CONNECTIONS This battery charger is for use on a nominal 120-volt circuit. DANGER – Never alter AC cord or plug provided – if it will not fit outlet, have proper outlet installed by a qualified electrician. Improper connec- tion can result in a risk of an electric shock.
- Page 7 RECOMMENDED MINIMUM AWG SIzE FOR EXTENSION CORDS FOR BATTERY CHARGERS AC input rating, amperes But less At least If the input rating of a charger is given in watts rather than in amperes, the corresponding ampere rating is to be determined by dividing the wattage rating by the voltage rating example: Length of cord, feet (m)
- Page 8 Wrap clamp cables after unplugging the power cord from the AC wall outlet and store your charger in a dry location. USING ENGINE START Your battery charger can be used to jump start your vehicle if the battery is low. Follow these instructions on how to use the ENGINE START feature.
- Page 9 If the battery is disconnected during the cool down period, the charger will reset. OPERATING INSTRUCTIONS OVERVIEW: Using this battery charger is very simple. First, connect the battery and AC power. Then select the appropriate BATTERY TYPE and BATTERY SIZE for your battery. The charger will then do everything automatically.
- Page 10 could take up to 10 hours. If desulfation fails, charging will be aborted and the digital display will blink. 12.5 COMPLETION OF CHARGING: • 12V or 6V Standard Battery: CHARGED (green) LED; when lit, the charger has stopped charging and switched to the Maintain Mode of operation.
- Page 11 13.1 DIGITAL DISPLAY BUTTON Use this button to set the function of the digital display to one of the follow- ing: • BATTERY %: The digital display shows an estimate of the percent of charge of the battery connected to the charger battery clamps. •...
-
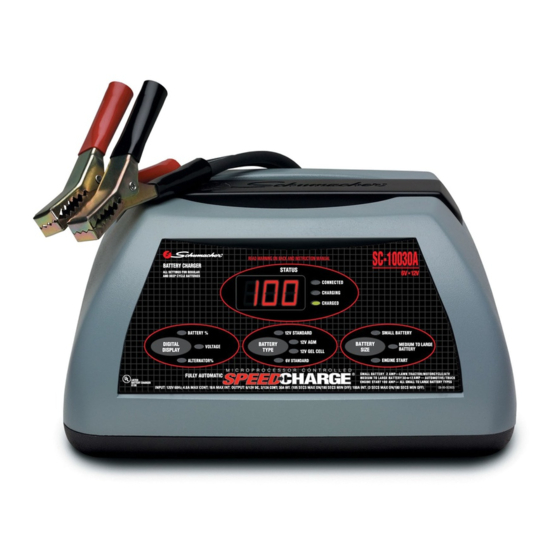
Page 12: Control Panel Guide
CONTROL PANEL GUIDE • •... - Page 13 When first turned on, the SC-10030A operates only as a tester, not as a charger. To continue to use it as only a tester, avoid pressing the BATTERY SIZE button. Selecting a charge rate activates the battery charger and de- activates the tester. Pressing the BATTERY SIZE button when the ENGINE START LED is lit (except during the 180 second cool down) will shut off the charger and activate the tester.
- Page 14 USING THE BUILT-IN ALTERNATOR TESTER This battery charger has a built-in alternator tester that displays either an accurate alternator voltage or an estimate of the alternator’s relative output compared to normal alternators. The Alternator % values displayed should be taken as general reference, not precise diagnosis.
- Page 15 • CHARGED (green) LED will light if the output of the charging system is at the normally desired level. • The CHARGING LED does not light in the alternator test mode. • CONNECTED LED lights if the tester detects a connection. •...
- Page 16 There are some important facts to keep in mind when charging a battery. • When the display indicates 77% charged, the battery has been charged enough to start most vehicles and has already been charged as much as by many other battery chargers. •...
- Page 17 18.3 Completing an interrupted charge interrupted and restarted after the charger displays a battery % of 85 or more, the charger could go straight to Maintain Mode. However, if the original charge was started using the MEDIUM TO LARGE BATTERY rate, the charge can often be completed using the SMALL BATTERY setting.
- Page 18 TROUBLESHOOTING PROBLEM The battery is connected and the charger is on, but isn’t charging. Indicator lights are lit in an erratic manner not explained in this manual. The DIGITAL DISPLAY always flashes before the battery is completely charged. The green CHARGED LED lights a few minutes after connecting to the battery.
- Page 19 AT RETAIL OF THIS PRODUCT. THIS LIMITED WARRANTY IS NOT TRANSFERABLE. Schumacher Electric Corporation warrants this battery charger for five years from date of purchase at retail against defective material or work- manship. If such should occur, the unit will be repaired or replaced at the option of the manufacturer.
- Page 20 • •...
- Page 21 MANUAL DEL DUEÑO Modelo SC-10030A Para Baterías de 6 y 12 voltios Cargador de Baterías Totalmente Automático Controlado por Microprocesador con Arranque de Motor más Probador de Baterías y Probador de Alternadores CARGADOR DE BATERIAS E L E C T R Ó N I C O C A R G A L E N TA a a m p e r i o s...
- Page 22 • •...
- Page 23 IMPORTANTE: LEA Y CONSERVE ESTE MANUAL DE INSTRUCCIONES Y SEGURIDAD. INSTRUCCIONES DE SEGURIDAD IMPORTANTES CONSERVE ESTAS INSTRUCCIONES – Este manual contiene instruc- ciones operativas y de seguridad importantes para el cargador de baterías Modelo SC-10030A. No exponga el cargador a lluvia ni a nieve. El uso de un accesorio no recomendado o vendido por el fabricante del cargador de baterías podría ocasionar riesgo de incendio, descarga eléc- trica o lesión a las personas.
- Page 24 PARA REDUCIR EL RIESGO DE EXPLOSIÓN DE LA BATERÍA, SIGA ESTAS INSTRUCCIONES ADEMÁS DE LAS PUBLICADAS POR EL FABRICANTE DE CUALqUIER EqUIPO qUE qUIERA USAR CERCA DE LA BATERÍA. REVISE LAS MARCAS DE PRECAUCIÓN DE ESTOS PRODUCTOS Y DEL MOTOR. PRECAUCIONES PERSONALES Considere tener a alguien que lo acompañe para asistirlo cuando trabaje cerca de una batería de plomo y ácido.
- Page 25 Agregue agua destilada en cada celda hasta que el ácido de la batería alcance el nivel especificado por el fabricante. Evite que se rebase. En el caso de una batería sin capas de celda desmontables, como las baterías de plomo y ácido reguladas por una válvula, siga atentamente las instruc- ciones de recarga del fabricante.
- Page 26 Determine qué terminal tiene conexión a tierra (conectado) con el chasis. Si el terminal negativo está conectado al chasis (como en la mayoría de los vehículos), véase (6.5). Si el terminal positivo es el que está conecta- do al chasis, véase (6.6). Para un vehículo de conexión a tierra negativa, conecte el sujetador POSITIVO (ROJO) desde el cargador de la batería hacia el terminal sin conexión a tierra POSITIVO (POS, P, +).
- Page 27 carga a bordo requiere un equipo especialmente diseñado para el uso marítimo. CONEXIONES AC Este cargador de batería es para usar en un circuito nominal de 120 voltios. PELIGRO – Nunca cambie un cable CA o enchufe suministrados – si no entra en el tomacorriente, solicite la instalación adecuada de un elec- tricista calificado.
- Page 28 INSTRUCCIONES DE ENSAMBLADO 10.1 Junto con el cargador de batería, encontrará dos abrazaderas cubiertas para almacenar los prensacables. 10.2 Para la instalación, alinee las dos presillas para que coincidan con los dos receptáculos, y empuje hasta que escuche un ruido seco. 10.3 Cubra los prensacables luego de desenchufar el cable de la energía del tomacorriente CA de la pared y deposite el cargador en un lugar seco.
- Page 29 11.7 Enfriamiento – Luego del arranque, el cargador entra en un estado obligatorio de 3 minutos de enfriamiento (180 segundos). Durante este período, no se pueden modificar las configuraciones. Los botones se ignoran. El visor digital indica el tiempo restante de enfriamiento en se- gundos.
- Page 30 finalización de la carga; cuando está iluminado, el cargador ha detenido la carga y pasado al Modo de Mantenimiento de operación. • BATERÍA AGM 12V O DE CéLULA DE GEL: aparece cuando la batería se cargó lo suficiente para su uso normal. Finalizada la carga, el LED DE CARGADO estará...
- Page 31 • BATTERY % (% de BATERÍA): porcentaje de carga de la batería conectada a las abrazaderas de la batería del cargador. • VOLTAGE (VOLTAJE): eras de la batería del cargador en voltios de corriente continua. • ALTERNATOR % (ALTERNADOR %): centaje estimado de salida del sistema de carga del vehículo conectado a las abrazaderas de la batería, según lo comparado con un sistema de funcionamiento adecuado.
- Page 32 13.3 BATTERY SIzE BUTTON (BOTÓN DE TAMAÑO DE LA BATERÍA) Utilice este botón para establecer el índice máximo de carga en uno de los siguientes: • SMALL BATTERY (BATERÍA PEqUEÑA): carga de hasta 2A. Destinado para cargar baterías pequeñas, como por ejemplo, aquellas que se utilizan en los tractores de jardín, motos de nieve y motocicletas.
- Page 33 GUIA DE CONTROL DEL TABLERO DE MANDOS • •...
- Page 34 UTILIzACIÓN DEL PROBADOR DE BATERÍAS INCORPORADO VISIÓN GENERAL: Este cargador de batería posee un probador de batería incorporado que muestra el voltaje preciso de la batería o un valor estimado de la carga relativa de la batería basándose en el voltaje de la batería y la escala del Consejo Internacional de Baterías.
- Page 35 15.6 LOS LED DE ESTADO DEL PROBADOR Cuando SC-10030A opera como probador de batería, los LED de estado se iluminan bajo las siguientes condiciones: • El LED correspondiente a CARGADA (verde) se encenderá si se está probando la batería cargada. •...
- Page 36 Conecte el cable de alimentación del cargador a una salida en la pared de 120V CA. Ponga en marcha el vehículo y encienda las luces delanteras. Lea el voltaje en la pantalla digital o presione el botón PANTALLA DIGITAL para configurar el probador en % DEL ALTERNADOR y lea el porcentaje del alternador.
- Page 37 las mismas condiciones. Las baterías se clasifican en amperios-horas (AH), capacidad de reserva (RC, por sus siglas en inglés) y amperios de arranque en frío (CCA, por sus siglas en inglés). Cuanto menor sea la clasificación, la batería se cargará más rápido. 17.3 Índice de carga: proporciona índices de carga de 2A, 12A y 30A.
- Page 38 DATOS ÚTILES SOBRE LA CARGA Lea todo el manual antes de utilizar el cargador. Los datos útiles que aparecen a continuación le sirven como guía para situaciones específicas. 18.1 Si el vehículo no arranca para encender el vehículo. Si el cargador no enciende el vehículo utili- zando el índice de ENCENDIDO DEL MOTOR, intente cargar la batería con la configuración BATERÍAS MEDIANAS A GRANDES durante 10 o 15 minutos.
- Page 39 LOCALIzACIÓN Y RESOLUCIÓN DE PROBLEMAS PROBLEMA La batería está conectada y el cargador encendido, pero no recibe carga Las luces indicadoras están prendidas en una forma errática no expli- cado en este manual El TABLERO DIGITAL siempre centellea antes de que la batería esté completamente cargada.
- Page 40 MOMENTO DE LA VENTA DE ESTE PRODUCTO. ESTA GARANTÍA LIMITADA NO ES TRANSFERIBLE. Schumacher Electric Corporation garantiza este cargador de baterías durante cinco años desde la fecha de su venta minorista en cuanto a materiales y mano de obra defectuosos. Si esto ocurriera, se reparará o reemplazará...