Table of Contents
Advertisement
Advertisement
Table of Contents

Related Manuals for Casio LK-55


Summary of Contents for Casio LK-55
- Page 1 USER’S GUIDE GUÍA DEL USUARIO LK55/56-ES-1 LK55_es_Cover.p65 03.2.17, 15:31...
- Page 2 • Do not short-circuit the battery terminals. • The product is not intended for children under 3 years. • Use only CASIO AD-5 adaptor. • The AC adaptor is not a toy. • Be sure to disconnect the AC adaptor before cleaning the product.
-
Page 3: Safety Precautions
Safety Precautions Congratulations on your selection of the CASIO electronic musical instrument. • Before using the instrument, be sure to carefully read through the instructions contained in this manual. • Please keep all information for future reference. Symbols Various symbols are used in this user’s guide and on... - Page 4 • Never twist or stretch the cord. • Should the electric cord or plug become damaged, contact your original retailer or authorized CASIO Service Provider. LK55_e_01-07.p65 AC Adaptor Never touch the AC adaptor while your hands are wet.
- Page 5 Plastic Bags Never place the plastic bag the product comes in over your head or in your mouth. Doing so creates the risk of suffocation. Particular care concerning this precaution is required where small children are present. Keep off of the product and stand.* Climbing onto the product or stand can cause it to tip over or become damaged.
- Page 6 Safety Precautions Location Avoid the following locations for this product. Such locations create the risk of fire and electric shock. • Areas subject to high humidity or large amounts of dust. • In food preparation areas or other areas subject to oil smoke. •...
-
Page 7: Main Features
Main Features ❐ 255 tones A wide selection of tones includes stereo piano and synthesized sounds, drum sets, and much more. ❐ PIANO BANK button The touch of a button takes you directly to piano tones and piano lessons. ❐ Advanced 3-Step Lesson System The 3-Step Lesson System lets you practice at your own pace. -
Page 8: Table Of Contents
Contents Safety Precautions ... E-1 Main Features ... E-5 Contents ... E-6 General Guide ... E-8 About the display ... E-11 Quick Reference ... E-12 To play the keyboard ... E-12 Power Supply ... E-14 Using batteries ... E-14 Using the AC Adaptor ... E-15 Auto Power Off ... -
Page 9: Contents
Using a Microphone for Sing Along ... E-32 Auto Accompaniment ... E-34 Selecting a Rhythm ... E-34 Playing a Rhythm ... E-35 Adjusting the Tempo ... E-35 Using Auto Accompaniment ... E-35 Using an Intro Pattern ... E-38 Using a Fill-in Pattern ... E-39 Using a Rhythm Variation ... -
Page 10: General Guide
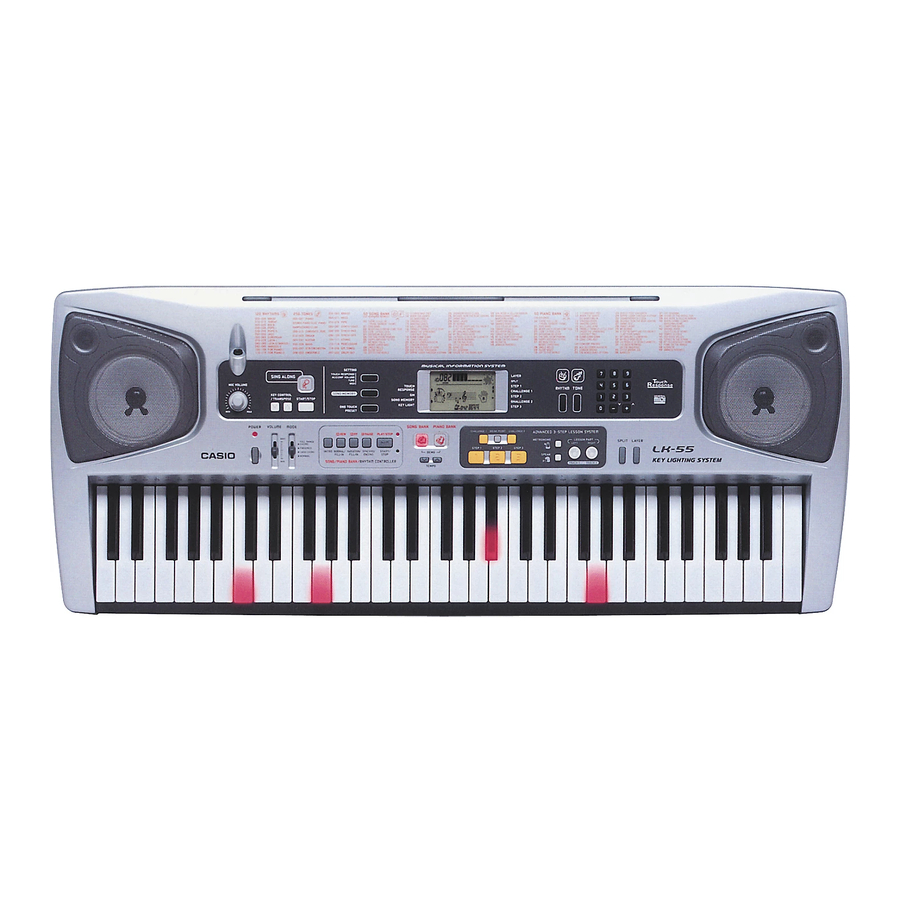
General Guide 642A-E-010A LK55_e_08-21.p65 03.2.17, 15:31... - Page 11 NOTE • Key, button, and other names are indicated in the text of this manual using bold type. • This keyboard has two PLAY/STOP buttons. In this manual, the PLAY/STOP button that is located under the SING ALONG button is indicated as <PLAY/STOP>. POWER button Power indicator VOLUME slider...
- Page 12 General Guide Rear Panel Controller Indicators Song/Piano Bank controller indicator Pressing the SONG BANK, PIANO BANK, or SING ALONG button, or pressing the SONG BANK and PIANO BANK buttons at the same time to start demo tune play causes the Song/Piano Bank controller indicator to light. This indicates that buttons through are currently functioning as playback control buttons.
-
Page 13: About The Display
About the display The icons that appear here indicate whether the keyboard is in the Sing Along Mode, Song Bank Mode, or Piano Bank Mode. Numeric Area: This area displays tone numbers, song numbers, evaluation values, and other numeric data. Text Area: This area displays tone names and song names. -
Page 14: Quick Reference
Quick Reference POWER indicator POWER This section provides a quick overview of keyboard operation using steps one and two of the 3-step lesson feature. To play the keyboard Press the POWER button to turn on power. • This causes the power indicator to light. Set the MODE switch to NORMAL. - Page 15 If you selected lesson Step 1 • Play the notes on the keyboard. • Accompaniment (left-hand part) plays in time with the notes. • With Step 1, the correct melody note is played no matter which keyboard key you press. If you selected lesson Step 2 •...
-
Page 16: Power Supply
Power Supply This keyboard can be powered by current from a standard household wall outlet (using the specified AC adaptor) or by batteries. Always make sure you turn the keyboard off whenever you are not using it. Using batteries Always make sure you turn off the keyboard before loading or replacing batteries. -
Page 17: Using The Ac Adaptor
• Never twist or stretch the cord. • Should the electric cord or plug become damaged, contact your original retailer or authorized CASIO Service Provider. • Never touch the AC adaptor while your hands are wet. Doing so creates the risk of electric shock. -
Page 18: Power On Alert
Power Supply Power On Alert Keyboard keys light to alert you if you leave power on and do not perform any operation for about 6 minutes. Note that keys light only, and no sound is produced. When this happens, press any button or keyboard key to clear the power on alert. -
Page 19: Connections
The wrong type of connector at either end can cause one of the stereo channels to be lost. When connected to a musical instrument amplifier, set the volume of the keyboard to a relatively low level and make output volume adjustments using the amplifier’s controls. -
Page 20: Microphone Jack
Connections Microphone Jack You can connect a commercially available microphone to the microphone jack and sing along with notes played on the keyboard. For details, see “Using a Microphone for Sing Along” on page E-32. Accessories and Options Use only the accessories and options specified for this keyboard. -
Page 21: Basic Operations
Basic Operations SING ALONG POWER VOLUME This section provides information on performing basic keyboard operations. To play the keyboard Press the POWER button to turn the keyboard on. Set the MODE switch to NORMAL. Use the VOLUME slider to set the volume to a relatively low level. -
Page 22: Turning The Key Light System On And Off
Basic Operations Polyphony The term polyphony refers to the maximum number of notes you can play at the same time. The keyboard has 24-note polyphony, which includes the notes you play as well as the rhythms and auto-accompaniment patterns that are played by the keyboard. -
Page 23: Practicing On The Piano
Practicing on the Piano PLAY/STOP Using the PIANO BANK Button Pressing the PIANO BANK button provides instant access to piano tones and piano tune selection. Initial Piano Bank Setting Tone: 000 Stereo Piano To use the piano bank Press the PIANO BANK button. •... -
Page 24: Playing A Built-In Tune
Playing a Built-in Tune PLAY/STOP Your keyboard comes with a total of built-in 100 tunes. You can play back built-in tunes for your own listening pleasure, or you can use them for practice and even sing-along. Built- in tunes are divided between the two groups described below. •... -
Page 25: To Play Back A Piano Bank Tune
To play back a Piano Bank tune Find the tune you want to play in the PIANO BANK List, and note its number. • See page A-11 for the Piano Bank List. Press the PIANO BANK button to specify the Piano Bank group. -
Page 26: To Pause Playback
Playing a Built-in Tune To pause playback Press the PAUSE button while a tune is playing to pause it. Pressing the PAUSE button again resumes play from the point where it was paused. To fast reverse While a tune is playing or paused, hold down the REW button to skip in a reverse direction at high speed. -
Page 27: To Change The Melody Tone
To change the melody tone Press the TONE button. Indicator appears Find the tone you want in the TONE List, and then use the number buttons to input its three-digit number. Example: To select “057 VIOLIN”, input 0, then 5, then •... -
Page 28: Advanced 3-Step Lesson
Advanced 3-Step Lesson With the Advanced 3-Step Lesson System, you can practice the built-in tunes and even plot your progress according to the evaluation points the keyboard awards you. The 3-Step Lesson System lets you practice at your own pace. Fingerings and notes appear on the keyboard’s display, and the keys you should press light up on the keyboard to help you on your way to keyboard mastery. -
Page 29: Evaluation Mode
NOTE • Note length is not indicated when you are using two- hand tunes with 3-step lesson Steps 1 and 2. As soon as you press a lit key, it goes out and the next key to be played starts to flash. •... -
Page 30: Step 1 - Master The Timing
Advanced 3-Step Lesson PLAY/STOP Step 1 – Master the timing. Select the tune you want to use. Press the STEP 1 button to start Step 1 play. • After a count sounds, they keyboard stands by and waits for you to play the first note of the tune. Note pitch A l o h a Oe •... -
Page 31: Step 2 - Master The Notes
Play in accordance with the guidance on the monitor screen and as told by the voice. • To stop evaluation, press the PLAY/STOP button. This displays only the points accumulated up to that point. After you finished playing, your evaluation result appears on the display. -
Page 32: Step 3 - Play At Normal Speed
Advanced 3-Step Lesson PLAY/STOP Step 3 – Play at normal speed. Select the tune you want to play. Press the STEP 3 button to start Step 3 play. • Accompaniment (left hand part) starts to play at normal speed. A l o h a Oe Follow the key light system to press the correct keyboard keys and play the notes. -
Page 33: Voice Fingering Guide
To practice the practice phrase While the Phrase Practice Mode screen is on the display, press the STEP 1, STEP 2, or STEP 3 button. • This starts 3-Step Lesson playback of the practice phrase in accordance with the STEP button you pressed. -
Page 34: Using A Microphone For Sing Along
Using a Microphone for Sing Along MIC jack VOLUME KEY CONTROL/ TRANSPOSE You can select any of the 50 Song Bank/Sing Along Group tunes and sing along with its accompaniment. Using the microphone jack Connecting a commercially available microphone* to the MIC jack makes it possible to sing along with the keyboard’s built- in tunes or with output from a MIDI device. - Page 35 To use a microphone for sing along PREPARATION • Adjust the main volume (page E-19), accompaniment volume (page E-49), and microphone volume (page E- 32). Find the tune you want in the SONG BANK/SING ALONG List, and note its number. •...
-
Page 36: Auto Accompaniment
[+] and decrement it by pressing [–]. • Some rhythms consist of chord accompaniments only, without any drums or other percussion instruments. Such rhythms do not sound unless CASIO CHORD, FINGERED, or FULL RANGE CHORD is selected as the accompaniment mode. -
Page 37: Playing A Rhythm
To use Auto Accompaniment Set the MODE switch to CASIO CHORD, FINGERED, or FULL RANGE CHORD. Press the START/STOP button to start play of the currently selected rhythm. - Page 38 No sound will be produced if you try playing single melody notes on the accompaniment keyboard. E-36 LK55_e_32-40.p65 Chord Types CASIO CHORD accompaniment lets you play four types of chords with minimal fingering. Chord Types Major chords C Major (C)
- Page 39 FINGERED FINGERED provides you with a total of 15 different chord types. following describes “Accompaniment keyboard” and “Melody keyboard”, and tells you how to play a C-root chord using FINGERED. FINGERED Accompaniment Keyboard and Melody Keyboard Accompaniment Melody keyboard keyboard NOTE •...
-
Page 40: Using An Intro Pattern
Auto Accompaniment MODE NORMAL/FILL-IN VARIATION/FILL-IN Example: To play the chord C major. Any of the fingerings shown in the illustration below will produce C major. NOTE • As with the FINGERED mode (page E-37), you can play the notes that form a chord in any combination ( ). •... -
Page 41: Using A Fill-In Pattern
Before starting, you should first select the rhythm you want to use, set the tempo, and use the MODE switch to select the chord play method you want to use (NORMAL, CASIO CHORD, FINGERED, FULL RANGE CHORD). To use synchro start Press the SYNCHRO/ENDING button to put the keyboard into synchro start standby. -
Page 42: Finishing With An Ending Pattern
Auto Accompaniment Finishing with an Ending Pattern You can end your performances with an ending pattern that brings the rhythm pattern you are using to a natural-sounding conclusion. The following procedure describes how to insert an ending pattern. Note that the actual ending pattern played depends on the rhythm pattern you are using. -
Page 43: Song Memory Function
Song Memory Function SONG MEMORY You can store up to two separate songs in song memory for later playback. The song memory function records your keyboard play in real time, as you play it. NOTE • To use song memory, first press the RHYTHM button to enter the Rhythm Mode. -
Page 44: Real-Time Recording To Track 1
Song Memory Function INTRO MODE NORMAL/FILL-IN VARIATION/FILL-IN Record Each press of the TRACK 1 and TRACK 2 button while the keyboard is in record standby (see “SONG MEMORY Button Operation”) toggles recording to the corresponding track on and off. The letter that identifies a track (L or R) flashes on the display whenever recording to that track is turned on. - Page 45 Press the START/STOP button to end recording when you are finished playing. • If you make a mistake while recording, stop the record operation and begin over again from step 1. NOTE • Using real-time recording to record to a track that already contains recorded data replaces the existing recording with the new one.
-
Page 46: Playing Back From Song Memory
Song Memory Function SONG MEMORY MODE Playing Back from Song Memory Use the following procedure to play back song memory contents. To play back from song memory Use the SONG MEMORY button to enter playback standby, and then use [+] and [–] to select 0 or 1 as the song number. -
Page 47: Deleting The Contents Of A Specific Track
Make any of the following settings if you want. • Tone number (page E-19) • If you are not confident about playing at a fast tempo, try using a slower tempo setting (page E-35). Press the START/STOP button to start real-time recording to Track 2 along with playback from Track 1. -
Page 48: Keyboard Settings
Keyboard Settings This section describes how to use layer (to play two tones with a single key) and split (to assign different tones to either end of the keyboard), and how to make touch response, transpose, and tuning settings. NOTE •... -
Page 49: Using Layer And Split Together
To split the keyboard First select the main tone. Example: To select “062 STRINGS” as the main tone, press the TONE button and then use the number buttons or [+] and [–] buttons to input 0, 6 and then 2. S t r i Press the SPLIT button. -
Page 50: Transposing The Keyboard
Keyboard Settings KEY CONTROL/ TRANSPOSE Play something on the keyboard. • Press the LAYER button to unlayer the keyboard, and the SPLIT button to unsplit it. LAYER SPLIT Split Tone (PIZZICATO STRINGS) Main Tone (BRASS) Layered Split Tone (STRINGS) Layered Tone (FRENCH HORN) Split point Transposing the Keyboard Transpose lets you raise and lower the overall key of the... -
Page 51: Adjusting The Accompaniment Volume
Press the SETTING button until the TOUCH RESPONSE SELECT screen appears. T o u c h Use the [+] and [–] or [0] and [1] buttons to change the setting. Example: To select touch response 2. T o u c h •... -
Page 52: Tuning The Keyboard
Keyboard Settings Tuning the Keyboard Use the following procedure to fine tune the keyboard to match the tuning of another musical instrument. To tune the keyboard Press the SETTING button three times to display the tuning screen. T u n e Use the [+], [–], and the number buttons to adjust... -
Page 53: Midi
MIDI What is MIDI? The letters MIDI stand for Musical Instrument Digital Interface, which is the name of a worldwide standard for digital signals and connectors that makes it possible to exchange musical data between musical instruments and computers (machines) produced by different manufacturers. -
Page 54: General Midi
MIDI General MIDI As we have already seen, MIDI makes it possible to exchange musical data between devices produced by different manufacturers. This musical data does not consist of the notes themselves, but rather information on whether a keyboard key is pressed or released, and the tone number. If tone number 1 on a keyboard produced by Company A is PIANO while tone number 1 on a Company B's keyboard is BASS, for example, sending data from Company A's keyboard... - Page 55 KEYBOARD CHANNEL (Default: 1) The keyboard channel is the channel used to send MIDI messages from this keyboard to an external device. You can specify one channel from 1 to 16 as the keyboard channel. Press the SETTING button until the KEYBOARD CHANNEL screen appears.
-
Page 56: Local Control
MIDI MODE To turn off specific sounds before playing back MIDI data that is being received <<Navigate channel on/off>> While playing MIDI data, press the TRACK 2 button. • This cuts the sound of the navigate channel, but on-screen keyboard guide keys continue to light in accordance with the channel’s data as it is received. -
Page 57: Sostenuto
MIDI THRU MIDI OUT Sound Source Sound Source LOCAL CONTROL On LOCAL CONTROL Off Notes played on the keyboard Notes played on the keyboard are sounded by the internal are output as MIDI messages sound source and output as from the MIDI OUT terminal, but MIDI messages from the MIDI not sounded directly by the OUT terminal. -
Page 58: Messages
MIDI # When SUS is set Pedal depressed # When SoS is set Pedal depressed = Keyboard depressed. = Sustained notes SOUND RANGE SHIFT (Default: On) on: Shifts low range tones one octave lower and 020 GLOCKENSPIEL/095 PICCOLO one octave higher. oFF: Plays low range tones and 020 GLOCKENSPIEL/095 PICCOLO at their normal levels. -
Page 59: Program Change
PROGRAM CHANGE This is the tone selection message. PROGRAM CHANGE can contain tone data within the range of 0 to 127. A PROGRAM CHANGE message is sent out through this keyboard’s MIDI OUT terminal whenever you manually change its tone number. Receipt of a PROGRAM CHANGE message from an external machine changes the tone setting of this keyboard. - Page 60 MIDI ALL SOUND OFF This message forces all sound being produced over the current channel to turn off, regardless of how the sound is being produced. ALL NOTES OFF This message turns off all note data sent from an external device and currently being sounded on the channel.
-
Page 61: Troubleshooting
3. Use the VOLUME slider to increase volume. 4. The MODE switch is in the 4. Normal play is not possible on CASIO CHORD or FINGERED the accompaniment keyboard position. while the MODE switch is set to CASIO CHORD or FINGERED. - Page 62 Troubleshooting Problem Key light stays on. Keys are lit though no sound is being produced. When playing with another MIDI instrument, keys or tunings do not match. Cannot record Auto Accompaniment or rhythm. When playing General MIDI data with a computer, playback notes do not match those produced when lit keys on the on-screen keyboard guide are pressed.
-
Page 63: Specifications
255 (118 panel tones + 128 General MIDI tones + 9 drum sets); with layer and split 24 notes maximum (12 for certain tones) Variable (216 steps, = 40 to 255) 3 fingering methods (CASIO CHORD, FINGERED, FULL RANGE CHORD) START/STOP, INTRO, NORMAL/NORMAL FILL-IN, VARIATION/VARIATION FILL-IN, SYNCHRO/ENDING... - Page 64 Specifications Power Supply: Batteries: Battery Life: AC Adaptor: Auto Power Off: Speaker Output: Power Consumption: Dimensions: Weight: • Design and specifications are subject to change without notice. E-62 LK55_e_59-63.p65 2-way 6 AA-size batteries Approximately 2.7 hours continuous operation on alkaline batteries AD-5 Turns power off approximately 6 minutes after last key operation.
-
Page 65: Care Of Your Keyboard
Care of your keyboard Avoid heat, humidity or direct sunlight. Do not overexpose the instrument to direct sunlight, or place it near an air conditioner, or in any extremely hot place. Do not use near a TV or radio. This instrument can cause video or audio interference with TV and radio reception. If this happens, move the instrument away from the TV or radio. -
Page 66: Appendix
Appendix/Apéndice Note Table/Tabla de notas (1): Tone number/Número de sonido (2): Maximum polyphony/Polifonía máxima (3): Range type/Tipo de gama NOTE • The meaning of each range type is described to the right. NOTA • El significado de cada tipo de gama se describe a la derecha. 642A-E-131A LK55_es_appendix.p65 03.2.17, 15:32... - Page 67 Appendix/Apéndice Range Type (Standard type) (Tipo estándar) “020 GLOCKENSPIEL”/ “095 PICCOLO” “020 GLOCKENSPIEL”/ “095 PICCOLO” Low pitch instruments Instrumentos de altura tonal baja (Sound Effect) (Efecto de sonido) ...Keyboard range (SOUND RANGE SHIFT turned on) ...Gama del teclado (SOUND RANGE SHIFT activados) ...Keyboard range (SOUND RANGE SHIFT turned off) ...Gama del teclado (SOUND RANGE SHIFT desactivados) ...Available range (using transpose or MIDI receive)
- Page 68 Appendix/Apéndice 642A-E-133A LK55_es_appendix.p65 03.2.17, 15:32...
- Page 69 Appendix/Apéndice 642A-E-134A LK55_es_appendix.p65 03.2.17, 15:32...
- Page 70 Appendix/Apéndice 642A-E-135A LK55_es_appendix.p65 03.2.17, 15:32...
-
Page 71: Tone List
Appendix/Apéndice Tone List Lista de sonidos b Panel Tones/Sonidos de panel PIANO STEREO PIANO GRAND PIANO BRIGHT PIANO MELLOW PIANO MODERN PIANO DANCE PIANO STRINGS PIANO HONKY-TONK OCTAVE PIANO ELEC.GRAND PIANO MODERN E.G.PIANO ELEC.PIANO CHORUSED EP MODERN E.PIANO SOFT E.PIANO E.PIANO PAD HARPSICHORD COUPLED HARPSICHORD... - Page 72 PIPE PICCOLO FLUTE 1 FLUTE 2 MELLOW FLUTE RECORDER PAN FLUTE WHISTLE SYNTH-LEAD SQUARE LEAD SAWTOOTH LEAD SINE LEAD CALLIOPE VOICE LEAD BASS+LEAD SYNTH-PAD FANTASY WARM PAD WARM VOX POLYSYNTH POLY SAW BOWED PAD HALO PAD ATMOSPHERE BRIGHTNESS ECHO PAD 642A-E-137A LK55_es_appendix.p65 Appendix/Apéndice...
- Page 73 Appendix/Apéndice ENSEMBLE ORCHESTRA STRINGS 1 ORCHESTRA STRINGS 2 SAW.SYNTH-STRINGS 1 SAW.SYNTH-STRINGS 2 VOICE AHH VOICE DOO GM SYNTH-VOICE GM ORCHESTRA HIT GM BRASS TRUMPET GM TROMBONE OCT TUBA OCT MUTE TRUMPET GM FRENCH HORN OCT BRASS GM SYNTH-BRASS 1 GM SYNTH-BRASS 2 GM REED SOPRANO SAX GM...
-
Page 74: Rhythm List
Rhythm List Lista de ritmos POPS I POP 1 WORLD POP SOUL BALLAD 1 POP SHUFFLE POP BALLAD POP 2 BALLAD FUSION SHUFFLE POP 3 SOUL BALLAD 2 POPS II 16 BEAT 1 16 BEAT 2 16 BEAT 3 8 BEAT 1 8 BEAT 2 8 BEAT 3 POP 4... -
Page 75: Song List
Appendix/Apéndice Song List/Lista de canciones Song Bank/Sing Along List Lista del banco de canciones/cantando en conjunto HERO (“SPIDER-MAN” THEME) COMPLICATED HERO MY HEART WILL GO ON (“TITANIC” THEME) LIVIN’ LA VIDA LOCA DAYDREAM BELIEVER STAND BY ME THE GIRL FROM IPANEMA WE WISH YOU A MERRY CHRISTMAS JINGLE BELLS SILENT NIGHT... - Page 76 Piano Bank List Lista del banco de piano ETUDES MINUET (J.S.BACH) GAVOTTE (GOSSEC) ARABESQUE (BURGMÜLLER) CHOPSTICKS FRÖHLICHER LANDMANN INVENTIONEN no.1 AVE MARIA (GOUNOD) JESUS BLEIBET MEINE FREUDE CANON (PACHELBEL) SONATINA op.36 no.1 1st Mov. SONATA op.13 “PATHÉTIQUE” 2nd Mov. SONATA K.331 1st Mov. PRELUDE op.28 no.7 (CHOPIN) VON FREMDEN LÄNDERN UND MANSCHEN JE TE VEUX...
- Page 77 642A-E-142A LK55_es_appendix.p65 03.2.17, 15:32...
- Page 78 642A-E-143A LK55_es_appendix.p65 03.2.17, 15:32...
- Page 79 642A-E-144A LK55_es_appendix.p65 03.2.17, 15:32...
- Page 80 642A-E-145A LK55_es_appendix.p65 03.2.17, 15:32...
- Page 81 642A-E-146A LK55_es_MIDI Chart.p65 03.2.17, 15:32...
- Page 82 642A-E-147A LK55_es_MIDI Chart.p65 03.2.17, 15:32...
- Page 83 This recycle mark indicates that the packaging conforms to the environmental protection legislation in Germany. Esta marca de reciclaje indica que el empaquetado se ajusta a la legislación de protección ambiental en Alemania. CASIO COMPUTER CO.,LTD. 6-2, Hon-machi 1-chome MA0302-A Printed in China Shibuya-ku, Tokyo 151-8543, Japan LK55/56-ES-1 LK55_es_Cover.p65...