Table of Contents
Advertisement
RTD217 EN
3/1/07
5:21 PM
Page 3
User manual
Guide de l'utilisateur
Manual de usuario
RTD217
It is important to read this instruction book prior to using your new product for the first time.
Nous vous recommandons de lire ce manuel d'instructions avant d'utiliser votre nouveau produit pour la première fois.
Es importante leer este manual antes de usar por vez primera su euipo.
Advertisement
Table of Contents

Related Manuals for RCA RTD217


Summary of Contents for RCA RTD217
-
Page 1: User Manual
RTD217 EN 3/1/07 5:21 PM Page 3 User manual Guide de l’utilisateur Manual de usuario RTD217 It is important to read this instruction book prior to using your new product for the first time. Nous vous recommandons de lire ce manuel d’instructions avant d’utiliser votre nouveau produit pour la première fois. -
Page 2: Fcc Information
RTD217 EN[E] 16/5/07 2:57 PM FCC Information This device complies with Part 15 of the FCC Rules. Operation is subject to the following two : (1) This device may not cause harmful interference, and (2) this device must accept any interference received, including interference that may cause undesired operation. -
Page 3: Dvd Copy Protection
RTD217 EN 3/1/07 5:21 PM SERVICE INFORMATION This product should be serviced only by those specially trained in appropriate servicing techniques. For instructions on how to obtain service, refer to the warranty included in this Guide. RFC: CTM-9800723-KS5 Main plug is used as the disconnect device, it shall remain operable and should not be obstructed during intended use. -
Page 4: Table Of Contents
RTD217 EN 3/1/07 5:21 PM Table of Contents Connections and Setup ..1 Connections and setup Connecting to audiovisual equipment ..2 Connecting to the speakers ....3 Positioning speakers . -
Page 5: Connections And Setup
RTD217 EN 3/1/07 5:21 PM Connections and Setup Accessories provided Remote control and 2 non-rechargeable AAA batteries Things to consider before you connect • Ensure that the mains supply in your house complies with that indicated on the identification sticker located on the back of your unit. -
Page 6: Connections And Setup
RTD217 EN 3/1/07 5:21 PM Connections and Setup Connecting the antennas FM 75 Ω The AM and FM antennas connect to the AM and FM terminals on the system’s back panel. They must be hooked up in order to receive clear reception. -
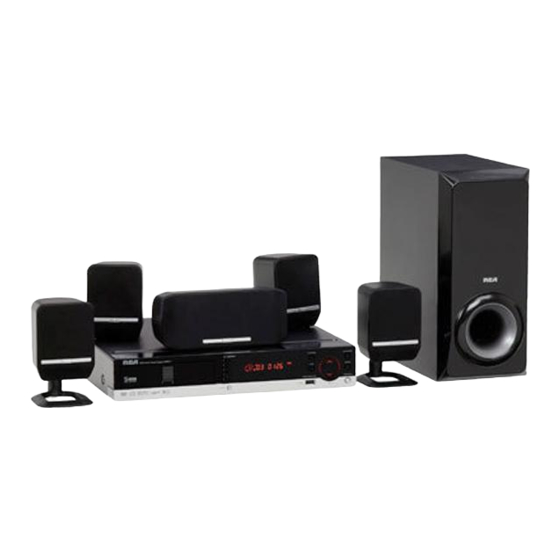
Page 7: Connecting To The Speakers
RTD217 EN 3/1/07 5:21 PM Connecting the speakers One set of speaker wire is provided with each speaker. Speaker wires are color-coded to match the terminals. Connect the speaker wire from the back of each speaker to the corresponding color terminal at the back of the unit. -
Page 8: Positioning Speakers
RTD217 EN 3/1/07 5:21 PM Connections and Setup Positioning speakers 1. Left, Right (Front Speakers) Front speakers carry primarily music and sound effects. 2. Center In surround mode, the center speaker carries most of the dialog as well as music and effects. -
Page 9: Better Surround Placement
RTD217 EN 3/1/07 5:21 PM Better surround placement Location If possible, place surround speakers to either side of the listening area, not behind it. Height If space permits, install surround speakers 2-3 feet above viewers. This helps to minimize localization effects. -
Page 10: Overview Of Controls
RTD217 EN 3/1/07 5:46 PM Overview of Controls Front panel controls Goes to the next slot in the disc tray. Opens and closes the disc tray according to the disc tray number. Remote Control Page 12 Starts/pause playing a disc. -
Page 11: Remote Control Functions In Tuner Mode
RTD217 EN 3/1/07 5:21 PM CLEAR - Quit the current setting manually from the TV screen without saving change or delete files on the USB device. INFO - Accesses the Info menu. TITLE - Accesses the disc menu for DVD disc. -
Page 12: Using The Remote To Navigate Through
RTD217 EN 3/1/07 5:21 PM Overview of Controls Using the remote to Navigate through On-Screen Menus No matter what on-screen display you’re using (the unit's menu, the Info Display that appears during playback, or a disc’s menu), you’ll use the same buttons on the remote control to navigate through the on-screen display;... -
Page 13: Basic Playback Operations
RTD217 EN 3/1/07 5:21 PM Basic playback operations Playback Switch the unit and the TV set on. 1. Press OPEN/CLOSE DISC 1/2/3/4/5 of the unit to open the desired disc tray. 2. Put the disc in with the printed side up (in the case of a single-sided disc). -
Page 14: The Info Menu
RTD217 EN 3/1/07 5:21 PM Playing Discs - Basic Functions Note: • When playing disc in a certain tray (for example, tray1), pressing an empty tray number on the remote (for example, 2) will display " No disc in tray 2" for few seconds. -
Page 15: Title/Chapter (Dvd)/Track
RTD217 EN 3/1/07 5:21 PM CD Info Display track play mode bookmark Title/chapter (DVD)/track (audio CD and VCD) To directly access a title, chapter (DVD) or a track (audio CD and VCD), press INFO, press OK. Select the Title(TT), Track(TRK) or Chapter(CH) icon and enter a number directly with the numeric buttons. -
Page 16: Camera Angle (Dvd)
RTD217 EN 3/1/07 5:21 PM The Info Menu Camera angle (DVD) Some discs offer different camera angles for specific scenes. 1. To change the camera angle, press the ANGLE button on the remote or press the INFO button twice and select the Camera angle icon with the left/right buttons. -
Page 17: Creating A Program List For Play Mode Bookmark/Sleep/Pbc/Introscan(Cd)
RTD217 EN 3/1/07 5:21 PM Creating a program List for program play mode (mp3 CDs) To use program play mode with an mp3 disc, you must first create a program list. You can program up to 16 songs. 1. To create a program list, press the INFO button twice. -
Page 18: Mp3/Wma Files And Jpeg Files
RTD217 EN 3/1/07 5:21 PM Mp3/WMA Files and jpeg Files Playing mp3/WMA files or displaying jpeg files Mp3/WMA is an audio file format which compresses recorded music. The main advantage of the mp3/WMA format is that CD-quality music tracks can be stored on a personal computer in user friendly compressed files. -
Page 19: Radio
RTD217 EN 3/1/07 5:21 PM Radio The unit has a built-in tuner that allows for FM radio function. The AM loop antenna allows for AM radio function. Manual tuning 1. Connect the FM antenna and the AM loop antenna at the back of the unit. Rotate the AM loop for better reception. -
Page 20: Usb Device
RTD217 EN 3/1/07 5:21 PM USB Device An overview This unit supports MSC devices. You can connect your own USB storage devices, then you can start playback. Connecting/Disconnecting USB device to the Unit Insert the USB drive's connector into the main unit’s USB jack of the unit. -
Page 21: Cd Ripping
RTD217 EN 3/1/07 5:21 PM CD Ripping An overview CD ripping allows you to rip tracks on CD to USB device. This unit supports MSC devices. Connect the USB device first before ripping. Ripping CD to USB device 1. During CD playback, press REC on the remote to activate the Ripping Menu. -
Page 22: The Setup Menu
RTD217 EN 3/1/07 5:37 PM The Setup Menu There are four options in the main setup menu: General Setup, Display Setup, Speaker Setup and Language Setup. Press SETUP to bring up the main menu. Select one of the menu icons across the top of the screen using the left/right arrow buttons. -
Page 23: Rating
RTD217 EN 3/1/07 5:21 PM Rating The disc publisher is responsible for coding scenes according to the rating limits. Below is an explanation of Ratings. To change the rating limit, highlight the RATING option and press the right arrow button. Select the rating limit using the up/down arrow buttons and press OK. -
Page 24: Video
RTD217 EN 3/1/07 5:21 PM The Setup Menu Video Progressive Function provides high quality pictures with less flickering. Turn on Progressive Scan if you used the Component Video jacks of the unit to connect a TV or monitor compatible with a progressive scan signal. -
Page 25: Lanugage Setup
RTD217 EN 3/1/07 5:21 PM Language Setup With this menu, you can set the language for unit menus, dialog, subtitles and the disc menus. If you chose “English” during initial set-up, any menus generated by the disc are in English, and so is the language of the dialogs (if this language is available on the disc). -
Page 26: Additional Information
RTD217 EN 3/1/07 5:21 PM Additional Information Troubleshooting Problem Solution The unit • Make sure it is plugged in. does not • Press the ON•OFF button on the switch on. remote control or the ON/STANDBY button on the front of the unit. -
Page 27: Precautions
RTD217 EN 3/1/07 5:21 PM Precautions • If your unit has been stored in a cool place for any length of time, during a journey for example, wait for about 2 hours before using • The openings located on the top and bottom are for ventilation and must not be obstructed. -
Page 28: Compatible Formats
RTD217 EN 3/1/07 5:21 PM Additional Information Compatible Formats In order to ensure playback, discs must conform with DVD, CD, VCD or SVCD standards. This unit may not play some recordings or files due to differences in recording formats, software used &... -
Page 29: Sound Enhancement Systems
RTD217 EN 3/1/07 5:21 PM • Do not record copyright-protected mp3 files. “Securized” files are encrypted and code protected to prevent illegal copying. Important: The above recommendations do not guarantee that the unit will play mp3 recordings, or as an assurance of sound quality. -
Page 30: Technical Specifications
RTD217 EN 3/1/07 5:21 PM Additional Information Technical Specifications: Amplifier Section: RMS Output Power: Dolby Digital Mode with 10% Total Harmonic Distortion Rear Channels: 40 Watts each Channel (1KHz, 4Ohm) Front and Center Channel: 40 Watts each Channel (1KHz, 4Ohm) -
Page 31: Limited Warranty
RTD217 EN 3/1/07 5:21 PM Limited Warranty What your warranty covers: • Defects in materials or workmanship. For how long after your purchase: • One year from date of purchase - Unit exchange, which includes parts and labor. • The warranty for rental units begins with the first rental or 45 days from date of shipment to the rental firm, whichever comes first. - Page 32 Product Registration: • Please complete the online Product Registration on RCA.com/productregistration or complete and mail the Product Registration Card packed with your product. This will make it easier to contact you should it ever be necessary. The return of the card is not required for warranty coverage.
- Page 33 RTD217 EN[E] 16/5/07 2:57 PM Page 2 IMPORTADOR Comercializadora Thomson de México, S.A. de C.V. Álvaro Obregón No. 151. Piso 13. Col. Roma. Delegación Cuauhtémoc C.P. 06700. México, D.F. Telefono: 52-55-11-020360 RFC: CTM-980723-KS5 EXPORTER Thomson Inc. P.O. Box 1976 Indianapolis, IN 46206-1976 ©...