
Related Manuals for Planet 802.11n Wireless PCI Adapter WNL-9330


Summary of Contents for Planet 802.11n Wireless PCI Adapter WNL-9330
- Page 1 802.11n Wireless PCI Adapter WNL-9330 User’s Manual Version: 1.00 Date: December 2007...
-
Page 2: Federal Communication Commission Interference Statement
Copyright © 2007 by PLANET Technology Corp. All rights reserved. No part of this Copyright publication may be reproduced, transmitted, transcribed, stored in a retrieval system, or translated into any language or computer language, in any form or by any means, electronic, mechanical, magnetic, optical, chemical, manual or otherwise, without the prior written permission of PLANET. - Page 3 equipment. This device complies with Part 15 of the FCC Rules. Operation is subject to the Following two conditions: ( 1 ) This device may not cause harmful interference, and ( 2 ) this Device must accept any interference received, including interference that may cause undesired operation. Federal Communication Commission (FCC) Radiation Exposure Statement This equipment complies with FCC radiation exposure set forth for an uncontrolled...
- Page 4 municipal waste and have to collect such WEEE separately. Revision User’s Manual for PLANET 802.11n Wireless PCI Adapter Model: WNL-9330 Rev: 1.0 (November 2007) Part No. EM-WNL9330...
-
Page 5: Table Of Contents
Table of Contents Chapter 1: Introduction ... 6 1-1 Features...6 1-2 Safety Information ...7 1-3 Specification ...8 1-4 Package Contents ...9 Chapter 2: Installation... 10 2-1 Hardware Installation ...10 2-2 Utility Installation... 11 Chapter 3: General Configuration ... 16 3-1 Connection Profile Management ...16 3-1-1 Make a profile for an access point or wireless device ...16 3-1-2 Using 802.1x - Certification ...24 3-1-3 Using 802.1x - CA Server ...26... -
Page 6: Chapter 1: Introduction
Chapter 1: Introduction Complying with the most innovative 802.11n technology, PLANET delivers a reliable and cost effective solution - WNL-9330. WNL-9330 is a PCI 2.2 wireless adapter which integrates one transmit channel and two concurrent receive channels; thus, it supports up to 150Mbps upload and 300Mbps download data rate. -
Page 7: Safety Information
2. DO NOT put this network card at or near hot or humid places, like kitchen or bathroom. Also, do not left this wireless network card in the car in summer. -
Page 8: Specification
1-3 Specification Interface Complaint with PCI 2.2 standard Standards Compliant with 802.11b / 802.11g / 802.11n (draft 2.0) Conformance IEEE 802.11b: 11/5.5/2/1M IEEE 802.11g: 54/48/36/24/18/12/9/6 Data Rate IEEE 802.11n: 300/270/243/240/216/180/162/120/108Mbps in 40Mhz mode 145/130/117/104/ 78Mbps in 20Mhz mode Operating Mode Infrastructure / Ad-Hoc Mode / Soft-AP Mode Security WEP 64/128bit, WPA, WPA2 , WPA-PSK , WPA2-PSK... -
Page 9: Package Contents
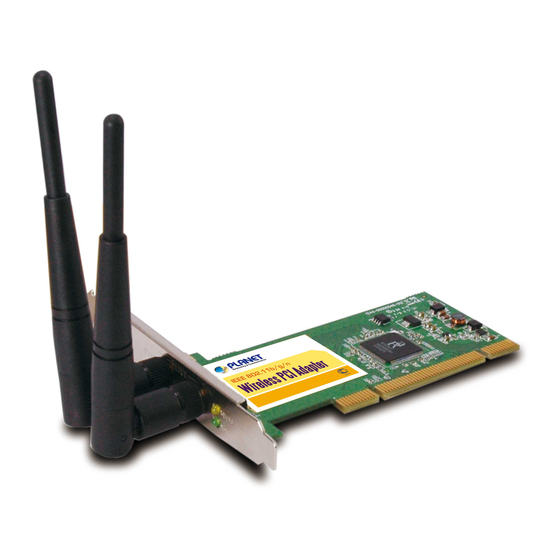
1-4 Package Contents Before you begin the installation, please check the items of your package. The package should include the following items: 1 x WNL-9330 PCI 1 x Driver and User's manual CD 1 x Quick Installation Guide 2 x Antenna If any of the above items is missing, contact your supplier as soon as possible. -
Page 10: Chapter 2: Installation
2-1 Hardware Installation Please follow the instructions to install your new PCI wireless network card: 1. SWITCH THE COMPUTER OFF, remove the cover and insert the wireless network card into an empty PCI slot of your computer. 2. Fasten the antennas to the antenna connectors on the network card by clockwise direction. -
Page 11: Utility Installation
4. To improve radio reception, please adjust antennas to the position shown in the picture. 2-2 Utility Installation Note 1: If you had ever installed another Wireless Cards before, please uninstall the existed drivers and utilities first. Note 2: The installation below is performed in Windows XP system. The installations in Windows 2000 and Vista are similar. - Page 12 message. Click “Cancel” to skip. 2. Insert the bundled CD into the CD-ROM drive to launch the auto run program. Once completed, a menu screen will appear. 3. Click the “WNL-9330 Utility” hyperlink to initiate the install wizard. 4. Read the License Agreement carefully. Click “Yes” to accept it and continue. 5.
- Page 13 6. There are two wireless performance mode you can select here: Optimize for WiFi mode Optimize for performance mode If you want to enhance wireless performance, please select ‘Optimize for performance mode’. However, wireless compatibility is not guaranteed in this mode. If you want to use this mode, you may not be able to communicate with older wireless devices and wireless access point, such as 802.11b devices, but the data transfer rate will be enhanced in this mode.
- Page 14 7. Click “Install” to begin the installation.
- Page 15 8. Please click “Finish” to finish the installation.
-
Page 16: Chapter 3: General Configuration
Chapter 3: General Configuration The Configuration Utility appears as an icon on the system tray of Windows while the card is running. You can open the utility by double-click on the icon. Right click the icon; there are some items for you to operate the configuration utility. Lauch Config Utilities: open the Configuration Utility tool. - Page 17 Parameter Profiles List Add/Delete/Edit Button Activate Button Or, you can add a connected wireless access point or wireless device to a profile by clicking ‘Site Survey’ tab, then click ‘Add to Profile’ button: Description The profiles list display all the profiles and the relative settings of the profiles including Profile Name, SSID, Channel, etc.
- Page 18 And you can set the parameter for this profile here:...
- Page 19 Parameter Profile Name SSID PSM (Power Saving Mode) Network Type Description Define a recognizable profile name for you to identify the different networks. The SSID (up to 32 printable ASCII characters) is the unique name identified in a WLAN. The ID prevents the unintentional merging of two co-located WLANs.
- Page 20 Preamble RTS Threshold Fragment Threshold station in the Wireless LAN network without through an Access Point or Router. The preamble defines the length of the CRC block for communication among wireless devices. This option is only active in the Ad Hoc network. There are two modes including Auto and Long Preamble.
- Page 21 Parameter Description Authentication Type This setting has to be consistent with the wireless networks that the card intends to connect. Open – No authentication is needed among the wireless network. Shared – Only wireless devices using a shared key (WEP Key identified) are allowed to connecting each other.
- Page 22 WPA-PSK – It is a special mode designed for home and small business users who do not have access to network authentication servers. In this mode, known as Pre-Shared Key, the user manually enters the starting password in their access point or gateway, as well as in each wireless station in the network.
- Page 23 encryption key from Key 1 to Key 4 by selected the radio button. Fill the text box by following the rules below. 64-bit – Input 10-digit Hex values (in the “A-F”, “a-f” and “0-9” range) or 5-digit ASCII characters (including “a-z” and “0-9”) as the encryption keys. For example: “0123456aef“...
-
Page 24: Using 802.1X - Certification
only activate a profile a time, and the profile which is activated currently will have a green check ( ) before its name. If the wireless access point is not reachable, a red check ( will be displayed before its name. If you want to change the connection parameters of a specific profile, just select it and click ‘Edit’... - Page 25 PEAP &TTLS – PEAP and TTLS are similar and easier than TLS in that they specify a stand-alone authentication protocol be used within an encrypted tunnel. TTLS supports any protocol within its tunnel, including CHAP, MS-CHAP, MS-CHAPv2, PAP and EAP-MD5. PEAP specifies that an EAP-compliant authentication protocol must be used;...
-
Page 26: Using 802.1X - Ca Server
3-1-3 Using 802.1x - CA Server If you want to use CA server, please click ‘CA Server’ tab. And the following message will be displayed: Parameter Use Certificate Chain Certificate Issuer Allow Intermediate Certificates Server Name Description When the EAP authentication type such as TLS, TTLS or PEAP is selected and required a certification to tell the client what server credentials to accept from the authentication server in order to verify the server, you have to enable this function. -
Page 27: Site Syrvey
Server name must match exactly Domain name must end in specified name 3-2 Site Syrvey From the “Site Survey” screen, all the networks nearby will be listed. You can change the connection to another network or add one of the networks to your own profile list. When selected, the server name must match exactly the server name found on the certificate. - Page 28 Parameter Available Networks Rescan Button Connect Button Add to Profile Button 1. If the access point you selected does not enable encryption (The content of ‘Encryption’ field of the access point you selected is ‘None’, you’ll be connected to this wireless access point within one minute.
- Page 29 access point. Authentication type is selected automatically, please don’t change it. If the access point you selected does not enable encryption and does not require authentication, please skip this step. 5. You’ll see ‘Connected <-> SSID’ (‘SSID’ is the SSID of the AP you connected to) message displayed at lower-left corner of configuration utility.
-
Page 30: View Network Link Status And Statistics
3-3 View Network Link Status and Statistics The configuration utility provides information about network statistics and link status. 3-3-1 Link Status... - Page 31 Parameter Description Status Display the SSID and MAC ID of the network the card is connecting to. Extra Info Display the link status. Channel Display the number of the radio channel and the frequency used for the networking. Link Speed (Mbps) Display the transmission and reception rate of the network.
-
Page 32: Statistics
better the quality. If you want to know the signal strength in the unit of dBm, select this check box. Signal Strength This bar shows the signal strength level. The higher percentage shown in the bar, the more radio signal been received by the card. This indicator helps to find the proper position of the wireless device for quality network operation. -
Page 33: Advanced Settings
3-4 Advanced Settings Parameter Description Wireless Mode 802.11 B/G/N mix – If you have a mix of 802.11b, 802.11g, and 802.11n wireless stations in your network, It is to maximize wireless compatibility with wireless access points and other wireless devices. it is recommended to setting the card to this mode. - Page 34 Wireless Protection If you have a mix of 802.11b and 802.11g wireless stations in the network, it is recommended to enable the protection mechanism. This mechanism can decrease the rate of data collision between 802.11b and 802.11g wireless stations. When the protection mode is enabled, the throughput of the card will be a little lower due to many of frame traffic should be transmitted.
- Page 35 Turn on CCKM During normal operation, LEAP-enabled client devices mutually authenticate with a new access point by performing a complete LEAP authentication, including communication with the main RADIUS server. When you configure your wireless LAN for fast re-association, however, LEAP-enabled client devices roam from one access point to another without involving the main server.
-
Page 36: Qos Setting
3-5 QoS Setting This wireless network card provides QoS (Quality of Service) function, which can improve the performance of certain network applications, like audio / video streaming, network telephony (VoIP), and others. When you enable WMM (Wi-Fi MultiMedia) function of this network card, you can define the priority of different kinds of data, to give higher priority to applications which require instant responding. -
Page 37: Wps Configuration
WMM - Power Save Enable Setting... Direct Link Setup Enable MAC Address Timeout Value Tear Down Note: This function does not support in Windows VISTA. 3-6 WPS Configuration Wi-Fi Protected Setup (WPS) is the latest wireless network technology which makes wireless network setup become very simple. -
Page 38: Wps Setup - Pbc (Push-Button Configuration)
Click ‘WPS Configuration’ tab, and the following settings will appear: 3-6-1 WPS Setup - PBC (Push-Button Configuration) 1.Set ‘Config Mode’ to ‘Enrollee’, and then push the ‘WPS’ button on your wireless access point (the button used to activate WPS standby mode may have another name), or use other way to start WPS standby mode as the instruction given by your wireless access point’s user manual. - Page 39 2. Before you start to establish the wireless connection by using WPS, you can click ‘Rescan’ button to search for WPS-enabled access points near you, to make sure the WPS function of your access point is activated.
- Page 40 3. All access points found will be displayed. Please make sure the access point you wish to connect is displayed. If not, please click ‘Rescan’ few more times. You can also click ‘Information’ button to see the detailed information about selected access point. 4.
- Page 41 Sometime WPS may fail, and you can click ‘PBC’ button few more times to try again. When an access point is connected, you can click ‘Disconnect’ to disconnect your wireless network card from a connected access point, or select another WPS-enabled wireless access point, then click ‘Connect’...
-
Page 42: Wps Setup - Pin
If you want to delete a found access point from the list, select it and click ‘Delete’ button. 3-6-2 WPS Setup - PIN The PIN number of your WNL-9330 is an eight-digit number located at the upper-right position of configuration utility. Remember it, and input the number to your wireless access point as the WPS PIN code (Please refer to the user manual of your wireless access point for instructions about how to do this). - Page 43 Click ‘PIN’ button now, and wait for few seconds to one minute. If a wireless access point with correct PIN code is found, you’ll be connected to that access point:...
- Page 45 You may have to click ‘PIN’ for few more times to try again. If you still can not connect to access point by this way, please make sure the PIN code you provided to access point is correct.
-
Page 46: About
3-7 About By choosing this option, you can click the hyperlink to connect the PLANET website. You can also obtain basic information about the WNL-9330 such as the Driver, Utility and EEPROM Version. The MAC Address of the card is displayed in the screen as well. Please click ‘OK’... -
Page 47: Chapter 4: Soft-Ap Function
‘Switch to Station Mode’. A configuration window will appear after you switch the operation mode to ‘AP’ or click ‘Launch Config Utilities’ after you right-click the WNL-9330 configuration utility, which asks you to assign an existing network card with internet connection:... - Page 48 If your computer has another network card which is connected to Internet, please select it from ‘Name’ dropdown menu, and click ‘Enable ICS’; if your computer does not have another network card with Internet connection, please click ‘Not enable ICS’.
- Page 49 Parameter SSID Channel Wireless Mode Description Please input the SSID (the name used to identify this wireless access point) here. Up to 32 numerical characters can be accepted here, excepting space. Please select the wireless channel you wish to use. The number of channels available here will vary depends on the setting of ‘Country Region Code’.
- Page 50 Default value is 100. Do not modify this value unless you know what will be affected Select the idle time of your wireless network card. Default value is 300. Do not modify this value unless you know what will be...
-
Page 51: Security Settings
Default Apply To exit, click ‘X’ button at the upper-right corner of configuration window. 4-2 Security Settings This wireless card supports wireless encryption in AP mode, which will encrypt the data being transferred over the air to enhance data security level. It’s recommended to enable data encryption unless you wish to open your computer (and its internet connection) to the public. -
Page 52: Access Control
Encryption Type WPA Pre-shared-key Group Rekey Interval WEP Key #1-4 Show Password Cancel 4-3 Access Control If you’re not going to open your computer and wireless resources to the public, you can use MAC address filtering function to enforce your access control policy, so only wireless clients with MAC address you defined by this function can be connected to your software access point. - Page 53 Click ‘Access Control’ tab, and the following messages will appear: Parameter Access Policy MAC Address Description Select the policy type of your access rule: Disable: Allow any wireless client with proper authentication settings to connect to this access point. Allow All: Only allow wireless clients with MAC address listed here to connect to this access point.
-
Page 54: Connection Table
Delete Remove all Apply 4-4 Connection table If you want to see the list of all wireless clients connected to this access point, please follow the following instructions: Click ‘Mac Table’ tab, and a list containing all connected wireless clients will appear: Add the MAC address you inputted in ‘MAC address’... - Page 55 Parameter MAC address Power Saving Mode Status Description Displays the MAC address of this wireless client The serial number of this wireless connection. Displays the capability of power-saving function of this wireless client. Displays additional information of this wireless Connection, like current wireless operating mode and data transfer rate.
-
Page 56: Event Log
4-5 Event Log This software access point will log all wireless-related activities as a log. You can follow the instructions to view the content of the event log: Click ‘Event Log’ tab, and the event log will be displayed: You can click ‘Clear’ to remove all entries in the log. -
Page 57: Statistics
4-6 Statistics If you want to know detailed information about how your software access point works, you can follow the following instructions to view the statistics of the access point: Click ‘Statistics’ tab, and the event log will be displayed: You can click ‘RESET COUNTERS’... -
Page 58: Chapter 5: Appendix
CHAPTER 5: APPENDIX 5-1 Troubleshooting This chapter provides solutions to problems usually encountered during the installation and operation of the adapter. Q. The PLANET WNL-9330 does not work properly. 1. Right click on My Computer and select Properties. Select the device manager and click on the Network Adapter. - Page 59 3. ‘Ad hoc’ function must be enabled for the wireless device you wish to establish a direct wireless link. 4. Please adjust the position of network card (you may have to move your computer if you’re using a notebook computer) and click ‘Rescan’ button for few more times. If you can find the wireless access point or wireless device you want to connect by doing this, try to move closer to the place where the wireless access point or wireless device is located.
-
Page 60: Glossary
/ she can add the MAC address of your network card to his / her access point’s list. Q. The network is slow / having problem when transferring large files 1. - Page 61 copies of data by multiple antenna, to improve data transfer performance. By using multiple antennas, not only data transfer rate is improved, but also the wireless stability.