Orion SKYQUEST XT10 CLASSIC Instruction Manual
Dobsonian reflecting telescopes
Hide thumbs
Also See for SKYQUEST XT10 CLASSIC:
- Instruction manual (20 pages) ,
- Instruction manual (20 pages) ,
- Instruction manual (16 pages)
Table of Contents
Advertisement
instruction Manual
orion
skyQuest
®
Xt6 classic, Xt8 classic
& Xt10 classic
Dobsonian Reflecting Telescopes
customer support (800)676-1343
E-mail: support@telescope.com
Corporate Offices (831) 763-7000
Providing Exceptional Consumer Optical Products Since 1975
89 Hangar Way, Watsonville, CA 95076
OrionTelescopes.com
IN 165 Rev. D 05/08
Advertisement
Table of Contents

Related Manuals for Orion SKYQUEST XT10 CLASSIC


Summary of Contents for Orion SKYQUEST XT10 CLASSIC
- Page 1 Manual orion skyQuest ® Xt6 classic, Xt8 classic & Xt10 classic Dobsonian Reflecting Telescopes customer support (800)676-1343 E-mail: support@telescope.com Corporate Offices (831) 763-7000 Providing Exceptional Consumer Optical Products Since 1975 89 Hangar Way, Watsonville, CA 95076 OrionTelescopes.com IN 165 Rev. D 05/08...
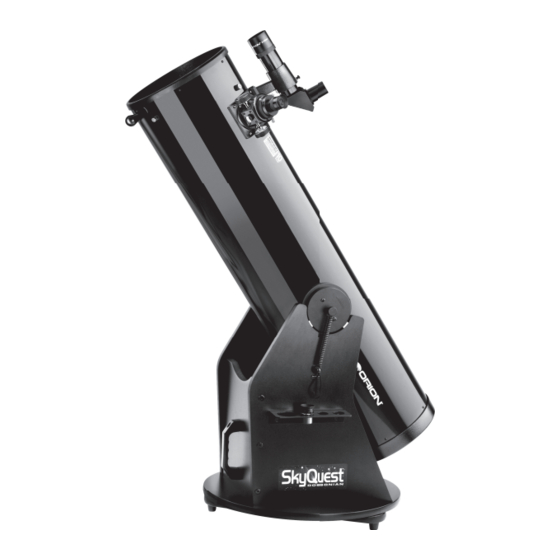
- Page 2 Secondary mirror with 4-vane spider (not shown) EZ Finder II Eyepiece Focus knob Optical tube Altitude side bearing CorrecTension Friction Right side panel Optimization System Front brace Pull loop Handle Eyepiece Rack (optional) Left side panel Top baseplate Ground baseplate Figure 1.
-
Page 3: Table Of Contents
2. Assembly ......4 3. Using Your Telescope ....7 4. -
Page 4: Assembly
Now that you have unpacked the boxes and familiarized your- self with all the parts in front of you, it’s time to begin assembly. The optics of the telescope are already installed in the tube, so most of the required assembly concerns the Dobsonian base. - Page 5 Thumbscrews Figure 6. The EZ Finder II slide the dovetail mounting bracket into the telescope’s dove- tail mounting base and tighten the thumbscrew on the base to secure the mounting bracket. operation The EZ Finder II works by projecting a tiny red dot (it’s not a laser beam) onto a lens mounted in the front of the unit.
- Page 6 Orient the spacer so the narrow end is closest to the knob. Thread the entire assembly into the hole in the center of the telescope’s altitude side bearing until tight. The end ring of the spring should seat onto the narrow end of the spacer.
-
Page 7: Focusing The Telescope
(left/right). The CorrecTension system is now installed and engaged. If you wish to remove the telescope from the base, you will first need to disconnect the springs from the “posts” on the Dobsonian base. The springs will remain captive on the alti- tude side bearings, so they will not get lost. -
Page 8: Replacing The Battery
When the EZ Finder II is properly aligned with the telescope, an object that is centered on the EZ Finder II’s red dot should also appear in the center of the field of view of the telescope’s eyepiece. Alignment of the EZ Finder II is easiest during day- light, before observing at night. -
Page 9: Collimation (Aligning The Mirrors)
Moving the SkyQuest is easy to do. Because the springs of the CorrecTension system hold the optical tube captive on the base, the entire telescope can be carried as one unit (6" and 8" models only). This requires some caution, however. If the telescope is lifted improperly, the front of the tube could swing down and hit the ground. -
Page 10: Aligning The Secondary Mirror
This center mark is also required for best results with other collimating devices, such as Orion’s LaserMate Laser Collimator, obviating the need to remove the primary mirror and mark it yourself. Note: The center ring sticker need not ever be removed from the primary mirror. - Page 11 A simple star test will tell you whether the optics are accurately collimated. star-testing the telescope When it is dark, point the telescope at a bright star and accu- rately center it in the eyepiece’s field of view. Slowly de-focus...
-
Page 12: Cooling The Telescope
Collimated If the scope experiences more than a 40° temperature change, allow an hour or more. In the winter, storing the telescope in a shed or garage greatly reduces the amount of time needed for the optics to stabilize. It also is a good idea to keep the scope covered until the Sun sets so the tube does not heat greatly above the temperature of the outside air. - Page 13 So give yourself at least a little while to get used to the dark before you begin observing.
- Page 14 Starhopping, as it is called by astronomers, is perhaps the simplest way to hunt down objects to view in the night sky. It entails first pointing the telescope at a star close to the object you wish to observe, and then progressing to other stars closer and closer to the object until it is in the field of view of the eyepiece.
-
Page 15: Care And Maintenance
Certain photographic aids, such as the Orion SteadyPix, can help in taking photos by the afocal method. 6. care and Maintenance If you give your telescope reasonable care, it will last a lifetime. -
Page 16: Specifications
To clean the primary mirror, carefully remove the mirror cell from the telescope. To do this, you must remove the screws that connect the entire mirror cell to the steel tube. These screws are located on the outer edge of the mirror cell. - Page 17 skyQuest Xt 10" Primary mirror focal length: 1200mm Primary mirror diameter: 254mm, BK7 optical glass Focal Ratio: f/4.7 Focuser: Crayford, accepts 2" and 1.25" eyepieces with included adapter, collimatible Optical tube material: Rolled steel Eyepiece: 25mm Sirius Plössl, fully coated with multi-coatings, 1.25"...
- Page 18 Warranty This Orion SkyQuest XT telescope is warranted against defects in materials or workmanship for a period of one year from the date of purchase. This warranty is for the benefit of the original retail purchaser only. During this warranty period Orion Telescopes & Binoculars will repair or replace, at Orion’s option, any warranted instrument that proves to be defective, provided it is returned postage paid to: Orion Warranty Repair, 89 Hangar Way, Watsonville, CA 95076.