Motorola S805 User Manual
Dect 6.0 cordless phones with answering system
Hide thumbs
Also See for S805:
- Motomanual (165 pages) ,
- User manual (76 pages) ,
- Quick start manual (6 pages)
Table of Contents
Advertisement
Quick Links
See also:
User Manual
Advertisement
Table of Contents

Related Manuals for Motorola S805


Summary of Contents for Motorola S805
- Page 1 User’s Guide For S801 / S802 / S803 / S804 / S805 DECT 6.0 Cordless Phones with Answering System Warning Use only the power adapters and telephone line cord provided in the box.
- Page 2 Motorola Digital Cordless Phone! Please retain your original dated sales receipt for your records. For warranty service of your Motorola product, you will need to provide a copy of your dated sales receipt to confirm warranty status. Registration is not required for warranty coverage.
- Page 3 This User’s Guide provides you with all the information you need to get the most from your phone. Before you make your first call you will need to set up your phone. Follow the simple instructions in 'Getting Started', on the next few pages.
-
Page 4: Table Of Contents
1. Getting started ...6 2. Getting to know your phone ...9 3. Using the phone...17 3.1 Calls... 17 3.1.1 Make a call ... 17 3.1.2 Predial ... 17 3.1.3 Dial one touch numbers 1 to 9 ... 17 3.1.4 Call from the phonebook ... 17 3.1.5 Call from the calls list ... - Page 5 6. Personal Settings ... 25 6.1 Set Date & Time ...25 6.2 Handset Tones ...26 6.2.1 Set the ringer tone ...26 6.2.2 Set the ringer volume ...26 6.2.3 Key tone on/off ...26 6.2.4 Battery low tone on/off ...26 6.2.5 No coverage tone on/off ...26 6.3 Handset Name ...27 6.4 Set the Display Language ...27 6.5 Set the LCD Contrast ...27...
-
Page 6: Getting Started
1. Getting started WARNING Do not place your phone in the bathroom or other humid areas. Location When choosing a location for your new phone, here are some important guidelines you should consider: • Avoid sources of noise and heat, such as motors, fluorescent lighting, microwave ovens, heating appliances and direct sunlight. -
Page 7: Connecting The Base
Connecting the base 1. Plug the power adapter with smaller pin plug & telephone line cord into the base. Power adapter with bigger pin plug is for charger (for multi-handset pack only). 2. Plug the other end of the power adapter & telephone line cord into the wall jack. - Page 8 BATTERY LOW WARNING If the flashes in the display, you will need to recharge the handset before you can use it again. During charging, the will scroll in the display. BATTERY PERFORMANCE In ideal conditions, a fully charged battery pack should give up to 10 hours talk time or up to 160 hours standby time on a single charge.
-
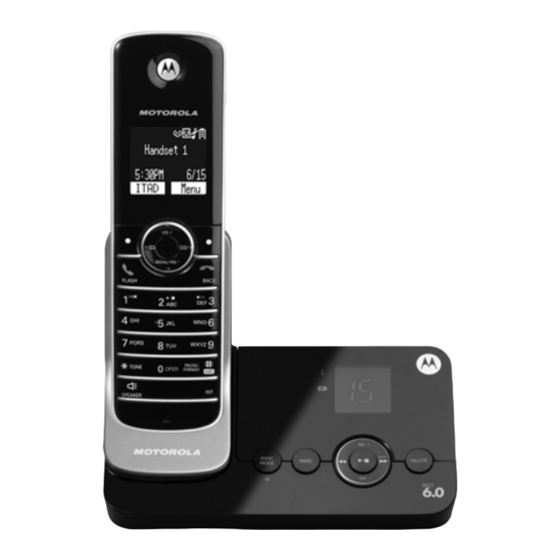
Page 9: Getting To Know Your Phone
2. Getting to know your phone Overview of your handset Getting to know your phone Scroll up/ Volume up In menu mode: press to scroll up. In editing mode: press to move cursor to the left. During a call, press to increase volume. Calls list/phonebook/redial list entry: press to scroll up the list. - Page 10 In pre-dial mode/calls list/redial list entry/answering machine mode: press to exit to idle. During a call: press to end a call. Alphanumeric keypad In idle/pre-dial/editing mode/during a call: press to enter characters/numbers. Long press to activate speed dial. #/ Pause/ ABC/ Format In idle/pre-dial/number editing mode/during a call: Press to insert a "#", press and hold to insert a pause.
-
Page 11: Handset Lcd Display
Handset LCD display Display icons On when speakerphone is turned on. On when ringer volume is turned off. On when answering machine is turned on. Flashes when new answering machine message is received. Getting to know your phone On when there is new voice mail not yet listened to. Off when new voice mail has been listened to. -
Page 12: Overview Of The Base
Overview of the base FIND Press to find/page all registered handsets. Charging LED - Green Steadily ON: When the handset is put into base cradle for charging. In Use LED - Red Steadily ON: During a call or when an extension phone (another registered handset) or the built-in answering machine is off hook. - Page 13 VOLUME - Decrease the loudspeaker volume by one level (0 to 8) in idle, during message playback or during call screening. SKIP BACKWARD Press twice or press once within 4 seconds, counting from the beginning of date/time stamp, to playback the previous message.
-
Page 14: Navigating The Menus
Blinking between announcement or memo is being recorded. The numbers (e.g. ) indicate the total number of messages in answering machine when playing announcement. Flashing: Indicates an incoming call / recording of an incoming call. Steadily ON: Represents Announce Only mode. Flashing: Line Remote access is in progress. -
Page 15: Menu Map
Menu map Main Menu Date & Time Phonebook Sub menu Set Time Set Date Edit Delete Delete All PB Capacity Speed Dial Copy Phonebook Getting to know your phone Setup Handset Setup Base Answer Machine Ringer Tone Dial Mode Answer Mode Ringer Volume Flash Time Announcement... -
Page 16: Character Map
Character map Uppercase Character versus key press number space ‘ Toggle the letter case - ABC / Abc / abc Lowercase & Character versus key press number space ‘ Toggle the letter case - ABC / Abc / abc Getting to know your phone &... -
Page 17: Using The Phone
3. Using the phone Calls 3.1.1 Make a call < 1. Press 2. Enter the phone number (maximum 32 digits). If you make a mistake, press to delete a digit. 3.1.2 Predial 1. Enter the phone number (maximum 32 digits). If you make a mistake, press to delete a digit. -
Page 18: Answer A Call
3.1.7 Answer a call 1. When the phone rings and flashes in the display, press < or press to answer the call via the loudspeaker. WARNING When the phone is ringing, avoid holding the earpiece too close to your ear as it may damage your hearing. Handsfree activation can suddenly increase the volume in the earpiece to a very high level. -
Page 19: Transfer An External Call To Another Handset
NOTE If the handset is not within the valid operation range, this function may not be available. 3.2.2 Transfer an external call to another handset 1. During an external call, press - Your caller is put on hold. 2. Press to the handset you want to call. -
Page 20: Phonebook
4. Phonebook The phonebook memory can store up to 100 names and numbers. NOTE Numbers can be up to 24 digits long and names up to 16 characters long. Entries are stored in alphabetical order. View an Entry 1. Press 2. -
Page 21: Edit An Entry
Enter a pause If your phone is connected to a switchboard, you may need to enter a pause in a stored number. This gives the switchboard time to get an outside line. A pause is normally stored after the switchboard access code (e.g. 9). 1. -
Page 22: Change The Phonebook Entry In A One Touch Number
3. Press to select the speed dial key 1 to 9. 4. Press to the entry you want. 5. Press to save. Change the Phonebook Entry in a One Touch Number 1. Follow steps 1 to 3 in “4.7 Store a Phonebook Entry as a One Touch Number”. -
Page 23: Caller Id
5. Caller ID If you have subscribed to Caller ID, and if the identity of the caller is not withheld, the number of the caller will be displayed together with the date and time of the call (if provided by the network). NOTE •... -
Page 24: Save A Number From The Calls List To The Phonebook
For example, if a caller number is displayed as 888-331-3383, the various formats will be: 331-3383 1-331-3383 888-331-3383 1-888-331-3383 You can choose the desired number format for local and long distance numbers before dialing or saving it into the phonebook. •... -
Page 25: Copy A Redial Number To The Phonebook
5.2.2 Copy a redial number to the phonebook 1. Press to enter the redial list. 2. Press to select the entry you want. Save to PB 3. Press to select 4. Press and edit the number. 5. Press and enter the name. 6. -
Page 26: Handset Tones
Handset Tones WARNING When the phone is ringing, avoid holding the earpiece too close to your ear as it may damage your hearing. 6.2.1 Set the ringer tone Setup Handset 1. Press to select Ringer Tone 2. Press to select 3. -
Page 27: Handset Name
Handset Name Personalize your handset with a name or location, for example Peter or Bedroom. Maximum 14 characters. Setup Handset 1. Press to select Handset Name 2. Press to select 3. Press and enter the handset name. Press delete a character. 4. -
Page 28: Advanced Base Settings
3. Press to select 4. Select and press to enter the registration procedure as below: 1. Place the unregistered cordless handset on the charger. 2. Press and hold for 4 seconds on base. 3. Release once IN USE LED is flashing. 4. -
Page 29: Set The Area Code
3. Press to the flash time you want. (8 options are available: 4. Press to save. Set the Area Code Setup Base 1. Press to select Area Code 2. Press to select 3. Press and enter the area code (3-digit only). Press to delete a digit. - Page 30 Press once to replay current message from the beginning. Press twice to playback the previous message. Skip to play the next message. Delete the current message. Increase the loudspeaker volume by one level (0 to 8). Decrease the loudspeaker volume by one level (0 to 8).
-
Page 31: Delete All Messages
Delete All Messages 1. Press and hold on base to erase all read messages (applicable only when messages in answering machine are all read, new message(s) will not be deleted.) NOTE When answering machine is full, new messages which have not been heard. Answerer Msg will toggle within 2 seconds with to alert user to delete some answering machine messages... -
Page 32: Answering Machine Settings
NOTE • When playing the message, press • When playing the message, pressing and the predefined message is played automatically. Answering Machine Settings 8.4.1 Set the answer mode Answer Machine 1. Press to select Answer Mode 2. Press to select 3. -
Page 33: Call Screening On/Off
4. Press again to stop recording and save the message. The just saved message is played automatically. You can also record memo by pressing and holding base to start recording after a voice prompt and beep sound is heard. Release the key to stop recording and save the message. -
Page 34: Set The Remote Code
The correct sequence of 3 security PIN digits needs to be detected within 5 seconds before entering remote access mode. Random digits detected prior to the correct 3 digits sequence are ignored, and answering machine recording continues until the complete PIN is detected. There is no system prompt to enter the remote access code. -
Page 35: Default Settings
9. Default Settings Items Default values Date & Time Year: 2009 Date: 01/01 Time: 12:00 AM Ringer tone Melody 1 Ringer volume Level 3 Key tone Battery low tone No coverage tone Handset name Handset Language English LCD contrast Level 3 Auto talk Dial mode Tone... -
Page 36: Answering Machine
Poor audio quality The base is too close to electrical appliances, reinforced concrete walls or metal doorframes - move the base away from any electrical appliances. No ring tone • The ring tone is deactivated. • Increase the volume. Caller ID service does not work Check your subscription with your network operator. -
Page 37: General Information
If your product is not working properly... 1. Read this User's Guide or the Quick Start Guide. 2. Visit our website: www.motorola.com 3. Contact Customer Service in the US and Canada at 1-888-331-3383. To order a replacement battery, contact customer service or... -
Page 38: Important Safety Instructions
Important safety instructions Follow these safety precautions when using your phone to reduce the risk of fire, electric shock, and injury to persons or property: 1. Keep all slits and openings of the phone unblocked. Do not set the phone on a heating register or over a radiator. Ensure that proper ventilation is provided at the installation site. -
Page 39: Installation Guidelines
Installation Guidelines 1. Read and understand all instructions and save them for future reference. 2. Follow all warnings and instructions marked on the product. 3. Do not install this product near a bath tub, sink, or shower. 4. Operate this phone using only the power source that is indicated on the marking label. -
Page 40: Battery Safety Instructions
What Does this Warranty Cover? Subject to the exclusions and limitations contained below, Binatone Electronics International LTD. warrants the Motorola branded consumer products that it manufactures (“Products”) and the Motorola branded or certified accessories sold for use with these Products that it manufactures (“Accessories”) to be free from defects in... - Page 41 WARRANTIES AND MOTOROLA AND BINATONE ELECTRONICS INTERNATIONAL LTD. MAKES NO OTHER WARRANTIES OR CONDITIONS, EXPRESS OF IMPLIED. IN NO EVENT SHALL MOTOROLA OR BINATONE ELECTRONICS INTERNATIONAL LTD. BE LIABLE, WHETHER UNDER THIS LIMITED WARRANTY OR IN CONTRACT OR TORT (INCLUDING NEGLIGENCE OR...
- Page 42 YOU ON BEHALF OF ANY THIRD PARTY TO THE FULL EXTENT THESE DAMAGES OR CLAIMS MAY BE DISCLAIMED BY LAW. Some states, countries or jurisdictions do not allow the limitation or exclusion of incidental or consequential damages, or limitation on the length of an implied warranty, so the above limitations or exclusions may not apply to you in such states, countries or jurisdictions.
- Page 43 Product or Accessory to abnormal usage or conditions; or (e) other acts or omissions which are not the fault or neglect of Motorola or Binatone Electronics International LTD., are excluded from coverage. Use of Non-Motorola branded Products and Accessories.
- Page 44 These terms and conditions constitute the complete warranty agreement between you and BINATONE ELECTRONICS INTERNATIONAL LTD. regarding the Products or Accessories purchased by you, and supersede any prior agreement or representations, including representations made in any literature publications or promotional materials issued by BINATONE ELECTRONICS INTERNATIONAL LTD.
- Page 45 To ensure safety of users, the FCC has established criteria for the amount of radio frequency energy that can be safely absorbed by a user or bystander according to the intended usage of the product. This product has been tested and found to comply with the FCC criteria.
- Page 46 If this equipment is malfunctioning, it must be unplugged from the modular jack until the problem has been corrected. Repairs to this telephone equipment can only be made by the manufacturer or its authorized agents. For repair procedures, follow the instructions outlined under the Limited Warranty.
- Page 47 combination of devices subject only to the requirement that the sum of the RENs of all the devices does not exceed five. This product meets the applicable Industry Canada technical specifications. RENSEIGNEMENTS RELATIFS AUX RÈGLEMENTS DE LA COMMISSION FÉDÉRALE DES COMMUNICATIONS 'FCC', DU CONSEIL ADMINISTRATIF DES UNITÉS DE CONNEXION 'ACTA' ET D'INDUSTRIE Canada 'IC'...
- Page 48 Afin de garantir la sécurité des utilisateurs, la FCC a établi les critères relatifs à l'énergie générée par les fréquences radio pouvant être absorbée en toute sécurité par un utilisateur ou par quelqu'un se trouvant à proximité, dépendamment de l'utilisation prévue du produit. Ce produit a été...
- Page 49 somme de tous les numéros 'REN' devrait être de cinq (5.0) ou moins. Pour plus de détails à ce sujet, nous vous suggérons de communiquer avec votre compagnie de téléphone locale. Cet appareil ne peut pas être utilisé conjointement avec des lignes partagées.
- Page 50 Industrie Canada Le fonctionnement est soumis aux deux conditions suivantes : (1) Cet appareil ne doit pas causer d'interférences nuisibles et; (2) Il doit pouvoir supporter les parasites qu'il reçoit, incluant les parasites pouvant nuire à son fonctionnement. L'abréviation 'IC' se trouvant avant cette homologation signifie que la certification fut effectuée selon une déclaration de conformité...
- Page 51 General Information...
- Page 52 MOTOROLA and the Stylized M Logo, and other Motorola trademarks and trade dress are owned by Motorola, Inc. and are used under license from Motorola, Inc. MOTOROLA and the Stylized M Logo are registered in the US Patent &...