Carrier 19XR User Manual
Hermetic centrifugal liquid chillers 50/60 hz with pic ii controls and hfc-134a
Hide thumbs
Also See for 19XR:
- Start-up, operation and maintenance instructions manual (116 pages) ,
- Installation instructions manual (68 pages) ,
- Product data (52 pages)
Table of Contents
Advertisement
Start-Up, Operation, and Maintenance Instructions
Centrifugal liquid chillers are designed to provide safe and
reliable service when operated within design specifica-
tions. When operating this equipment, use good judgment
and safety precautions to avoid damage to equipment and
property or injury to personnel.
Be sure you understand and follow the procedures and
safety precautions contained in the chiller instructions as
well as those listed in this guide.
DO NOT VENT refrigerant relief valves within a building. Outlet
from rupture disc or relief valve must be vented outdoors in accor-
dance with the latest edition of ANSI/ASHRAE 15 (American
National Standards Institute/American Society of Heating, Refrigera-
tion, and Air Conditioning Engineers). The accumulation of refriger-
ant in an enclosed space can displace oxygen and cause asphyxiation.
PROVIDE adequate ventilation in accordance with ANSI/ASHRAE
15, especially for enclosed and low overhead spaces. Inhalation of
high concentrations of vapor is harmful and may cause heart irregular-
ities, unconsciousness, or death. Misuse can be fatal. Vapor is heavier
than air and reduces the amount of oxygen available for breathing.
Product causes eye and skin irritation. Decomposition products are
hazardous.
DO NOT USE OXYGEN to purge lines or to pressurize a chiller for
any purpose. Oxygen gas reacts violently with oil, grease, and other
common substances.
NEVER EXCEED specified test pressures, VERIFY the allowable
test pressure by checking the instruction literature and the design pres-
sures on the equipment nameplate.
DO NOT USE air for leak testing. Use only refrigerant or dry
nitrogen.
DO NOT VALVE OFF any safety device.
BE SURE that all pressure relief devices are properly installed and
functioning before operating any chiller.
RISK OF INJURY OR DEATH by electrocution. High voltage is
present on motor leads even though the motor is not running when a
solid-state or inside-delta mechanical starter is used. Open the power
supply disconnect before touching motor leads or terminal
D
O NOT WELD OR FLAMECUT any refrigerant line or vessel until
all refrigerant (liquid and vapor) has been removed from chiller.
Traces of vapor should be displaced with dry air or nitrogen and the
work area should be well ventilated. Refrigerant in contact with an
open flame produces toxic gases.
DO NOT USE eyebolts or eyebolt holes to rig chiller sections or the
entire assembly.
DO NOT work on high-voltage equipment unless you are a qualified
electrician.
DO NOT WORK ON electrical components, including control pan-
els, switches, starters, or oil heater until you are sure ALL POWER IS
OFF and no residual voltage can leak from capacitors or solid-state
components.
LOCK OPEN AND TAG electrical circuits during servicing. IF
WORK IS INTERRUPTED, confirm that all circuits are deenergized
before resuming work.
AVOID SPILLING liquid refrigerant on skin or getting it into the
eyes. USE SAFETY GOGGLES. Wash any spills from the skin with
Manufacturer reserves the right to discontinue, or change at any time, specifications or designs without notice and without incurring obligations.
PC 211
Catalog No. 531-982
Book 2
Tab
5a
Hermetic Centrifugal Liquid Chillers
With PIC II Controls and HFC-134a
SAFETY CONSIDERATIONS
soap and water. If liquid refrigerant enters the eyes, IMMEDIATELY
FLUSH EYES with water and consult a physician.
NEVER APPLY an open flame or live steam to a refrigerant cylinder.
Dangerous over pressure can result. When it is necessary to heat
refrigerant, use only warm (110 F [43 C]) water.
DO NOT REUSE disposable (nonreturnable) cylinders or attempt to
refill them. It is DANGEROUS AND ILLEGAL. When cylinder is
emptied, evacuate remaining gas pressure, loosen the collar and
unscrew and discard the valve stem. DO NOT INCINERATE.
CHECK THE REFRIGERANT TYPE before adding refrigerant to
the chiller. The introduction of the wrong refrigerant can cause dam-
age or malfunction to this chiller.
Operation of this equipment with refrigerants other than those
cited herein should comply with ANSI/ASHRAE 15 (latest edition).
Contact Carrier for further information on use of this chiller with other
refrigerants.
DO NOT ATTEMPT TO REMOVE fittings, covers, etc., while
chiller is under pressure or while chiller is running. Be sure pressure is
at 0 psig (0 kPa) before breaking any refrigerant connection.
CAREFULLY INSPECT all relief devices, rupture discs, and other
relief devices AT LEAST ONCE A YEAR. If chiller operates in a
corrosive atmosphere, inspect the devices at more frequent intervals.
DO NOT ATTEMPT TO REPAIR OR RECONDITION any relief
device when corrosion or build-up of foreign material (rust, dirt, scale,
etc.) is found within the valve body or mechanism. Replace the
device.
DO NOT install relief devices in series or backwards.
USE CARE when working near or in line with a compressed spring.
Sudden release of the spring can cause it and objects in its path to act
as projectiles.
DO NOT STEP on refrigerant lines. Broken lines can whip about and
release refrigerant, causing personal injury.
DO NOT climb over a chiller. Use platform, catwalk, or staging. Fol-
low safe practices when using ladders.
USE MECHANICAL EQUIPMENT (crane, hoist, etc.) to lift or
s.
move inspection covers or other heavy components. Even if compo-
nents are light, use mechanical equipment when there is a risk of slip-
ping or losing your balance.
BE AWARE that certain automatic start arrangements CAN
ENGAGE THE STARTER, TOWER FAN, OR PUMPS. Open the
disconnect ahead of the starter, tower fans, or pumps.
USE only repair or replacement parts that meet the code requirements
of the original equipment.
DO NOT VENT OR DRAIN waterboxes containing industrial brines,
liquid, gases, or semisolids without the permission of your process
control group.
DO NOT LOOSEN waterbox cover bolts until the waterbox has been
completely drained.
DOUBLE-CHECK that coupling nut wrenches, dial indicators, or
other items have been removed before rotating any shafts.
DO NOT LOOSEN a packing gland nut before checking that the nut
has a positive thread engagement.
PERIODICALLY INSPECT all valves, fittings, and piping for corro-
sion, rust, leaks, or damage.
PROVIDE A DRAIN connection in the vent line near each pressure
relief device to prevent a build-up of condensate or
Printed in U.S.A.
Form 19XR-5SS
19XR,XRV
50/60 Hz
rain water.
Pg 1
6-01
Replaces: 19XR-4SS
Advertisement
Table of Contents
Troubleshooting

Related Manuals for Carrier 19XR


Summary of Contents for Carrier 19XR
-
Page 1: Safety Considerations
Operation of this equipment with refrigerants other than those cited herein should comply with ANSI/ASHRAE 15 (latest edition). Contact Carrier for further information on use of this chiller with other refrigerants. DO NOT ATTEMPT TO REMOVE fittings, covers, etc., while chiller is under pressure or while chiller is running. -
Page 2: Table Of Contents
SAFETY CONSIDERATIONS ..... . 1 INTRODUCTION ........4 ABBREVIATIONS AND EXPLANATIONS . - Page 3 Inspect Wiring........53 Carrier Comfort Network Interface....54 Check Starter .
-
Page 4: Introduction
LIQUID CHILLER ....CL-1 to CL-16 INTRODUCTION Prior to initial start-up of the 19XR unit, those involved in the start-up, operation, and maintenance should be thoroughly familiar with these instructions and other necessary job data. -
Page 5: Chiller Familiarization
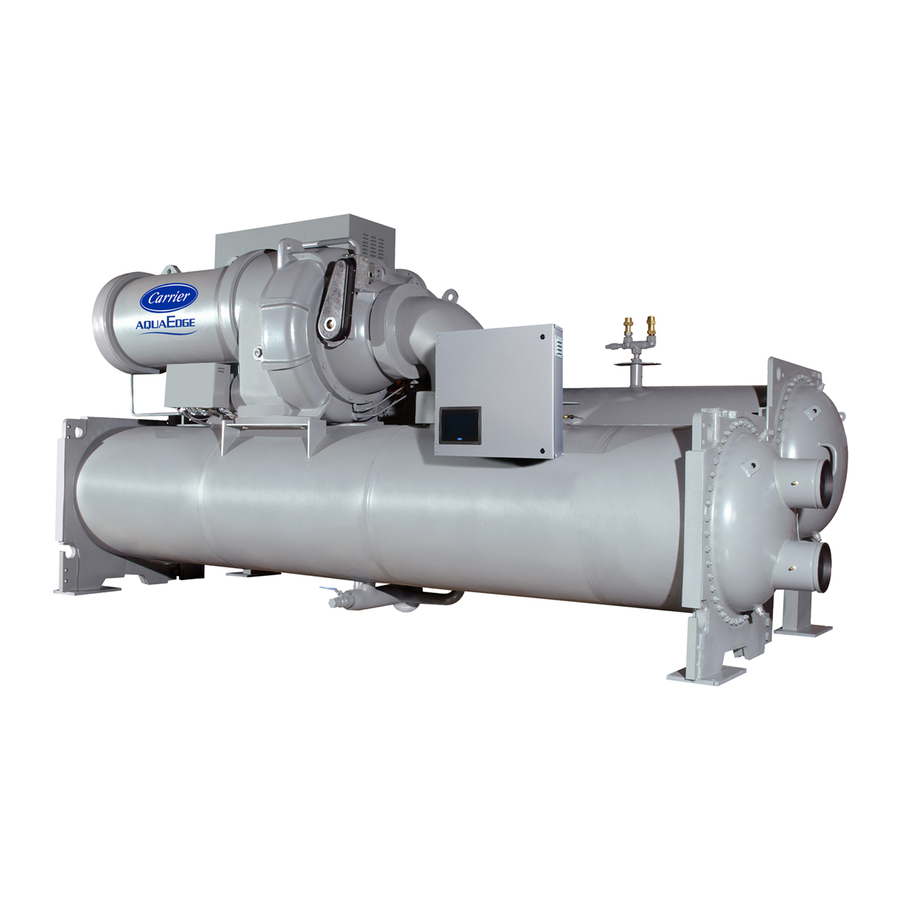
Factory-installed additional components are referred to as options in this manual; factory-supplied but field-installed ad- ditional components are referred to as accessories. The chiller software part number of the 19XR unit is located on the back of the CVC/ICVC. CHILLER FAMILIARIZATION (Fig. -
Page 6: Front/Rear View
31 — Vessel Take-Apart Connector 32 — Discharge Isolation Valve (Optional) 33 — Pumpout Valve 34 — Condenser Pressure Transducer Fig. 2 — Typical 19XR Components LEGEND 1 — Guide Vane Actuator 2 — Suction Elbow 3 — Chiller Visual Controller/ International Chiller Visual Control (CVC/ICVC) 4 —... -
Page 7: Factory-Mounted Starter Or Variable
Factory-Mounted Starter or Variable Fre- quency Drive (Optional) — The starter allows for the proper start and disconnect of electrical energy for the com- pressor-motor, oil pump, oil heater, and control panel. Storage Vessel (Optional) — There are 2 sizes of storage vessels available. -
Page 8: Vfd Cooling Cycle
Flow to the motor cooling system passes through an orifice and into the motor. Once past the orifice, the refrigerant is directed over the motor by a spray nozzle. The refrigerant collects in the bottom of the motor casing and is then drained back into the cooler through the motor refrigerant drain line. -
Page 9: Starting Equipment
This capability is summed up by the phrase “soft starting.” The solid-state starter is available as a 19XR option (factory supplied and in- stalled). The solid-state starters manufacturer name is located inside the starter access door. -
Page 10: Unit-Mounted Wye-Delta Starter
Troubleshooting Guide sections, pages 54 and 76. Unit-Mounted Wye-Delta Starter (Optional) — The 19XR chiller may be equipped with a wye-delta starter mounted on the unit. This starter is used with low-voltage mo- tors (under 600 v). It reduces the starting current inrush by con- necting each phase of the motor windings into a wye configu- ration. -
Page 11: General
DISCONNECT Fig. 8 — Variable Frequency Drive (VFD) Starter Internal View General — The 19XR hermetic centrifugal liquid chiller contains a microprocessor-based control center that monitors and controls all operations of the chiller (see Fig. 9). The microprocessor control system matches the cooling capacity of the chiller to the cooling load while providing state-of-the-art chiller protection. -
Page 12: Optional
CABLES COOLER PRESSURE TRANSDUCER CONNECTION CONDENSER SCHRADER PRESSURE FITTING (HIDDEN) CABLE CONDENSER PRESSURE TRANSDUCER CONNECTION Fig. 9 — 19XR Controls and Sensor Locations PANEL ACTUATOR CABLE PANEL CONDENSER DISCHARGE COMPRESSOR SERVICE ISOLATION DISCHARGE VALVE VALVE ELBOW JOINTS (OPTIONAL) TOP VIEW... -
Page 13: Chiller Visual Controller (Cvc)
The PIC II can interface with the Carrier Comfort Network (CCN) if desired. It can communicate with other PIC I or PIC II equipped chillers and other CCN devices. The PIC II consists of 3 modules housed inside 3 major components. - Page 14 Fig. 12 — Control Panel Fig. 13 — Power Panel...
-
Page 15: Cvc/Icvc Operation And Menus
CVC/ICVC Operation and Menus (Fig. 14-20) GENERAL • The CVC/ICVC display automatically reverts to the default screen after 15 minutes if no softkey activity takes place and if the chiller is not in the pumpdown mode (Fig. 14). • If a screen other than the default screen is displayed on the CVC/ICVC, the name of that screen is in the upper right corner (Fig. -
Page 16: To View Status
• Press to leave the selected decision or field with- QUIT out saving any changes. • Press to leave the selected decision or field and ENTER save changes. • Press to scroll the cursor bar down in order to NEXT highlight a point or to view more points below the cur- rent screen. - Page 17 INCREASE DECREASE RELEASE Modify Control Options DISABLE ENABLE QUIT Fig. 17 — 19XR Chiller Display Menu Structure (CVC/ICVC) MENU (SOFTKEYS) SERVICE (ENTER A 4-DIGIT PASSWORD) (VALUES SHOWN AT FACTORY DEFAULT) 1 1 1 Display The Setpoint Table List the Schedules...
-
Page 18: Alarms And Alerts
DECREASE DISABLE ENABLE SELECT (USE ENTER) TO SCROLL DOWN LID LANGUAGE ENTER EXIT Fig. 18 — 19XR Service Menu Structure List the Control Tests • CCM Thermistors • CCM Pressure Transducers • Pumps • Discrete Outputs • Guide Vane Actuator •... - Page 19 CVC — Chiller Visual Controller ICVC — International Chiller Visual Controller — Integrated Starter Module PIC II — Product Integrated Control II Fig. 18 — 19XR Service Menu Structure (cont) 4 4 4 4 Service Tables: • ISM (STARTER) CONFIG PASSWORD •...
-
Page 20: Time Schedule Operation
For Discrete Points — Press START lect the desired state. Analog Points — Press to select the desired value. DECREASE 3. Press to register the new value. ENTER NOTE: When overriding or changing metric values, it is nec- essary to hold down the softkey for a few seconds in order to see a value change, especially on kilopascal values. -
Page 21: To View And Change Set Points
7. Press to register the values and to move hori- ENTER zontally (left to right) within a period. 8. Press to leave the period or override. EXIT 9. Either return to Step 4 to select another period or over- ride, or press again to leave the current time EXIT schedule screen and save the changes. -
Page 22: Service Operation
CCN or Building Supervisor (BS) software. They are listed in these tables as a convenience to the operator if it is necessary to cross reference CCN/BS documentation or use CCN/BS pro- grams. For more information, see the 19XR CCN literature. DESCRIPTION (PRIMARY MESSAGE) - Page 23 To access this display from the CVC/ICVC default screen: 1. Press MENU 2. Press will be highlighted). STATUS MAINSTAT 3. Press SELECT DESCRIPTION Control Mode Run Status Start Inhibit Timer Occupied? System Alert/Alarm *Chiller Start/Stop *Remote Start Contact Temperature Reset *Control Point Chilled Water Temp *Active Demand Limit...
- Page 24 To access this display from the CVC/ICVC default screen: 1. Press MENU 2. Press STATUS 3. Scroll down to highlight COMPRESS 4. Press SELECT DESCRIPTION Actual Guide Vane Pos Guide Vane Delta **Target Guide Vane Pos Oil Sump Temp **Oil Pump Delta P Comp Discharge Temp Comp Thrust Brg Temp Comp Motor Winding Temp...
- Page 25 To access this display from the CVC/ICVC default screen: 1. Press MENU 2. Press STATUS 3. Scroll down to highlight POWER 4. Press SELECT DESCRIPTION Average Line Current Actual Line Current Average Line Voltage Actual Line Voltage Power Factor Motor Kilowatts **Motor Kilowatt-Hours Demand Kilowatts Line Current Phase 1...
- Page 26 To access this display from the CVC/ICVC default screen: 1. Press MENU 2. Press STATUS 3. Scroll down to highlight ICVC 4. Press SELECT DESCRIPTION Disable Service Password **Remote Reset Option Reset Alarm? CCN Mode? NOTE: All variables with CAPITAL LETTER point names are available for CCN read operation. Those shown with (**) shall support write operations for the CVC/ICVC only.
- Page 27 To access this display from the CVC/ICVC default screen: 1. Press MENU 2. Press SERVICE 3. Scroll down to highlight CONTROL ALGORITHM STATUS 4. Press SELECT 5. Scroll down to highlight OVERRIDE 6. Press SELECT DESCRIPTION Comp Motor Winding Temp Comp Motor Temp Override Condenser Pressure Cond Press Override...
- Page 28 To access this display from the CVC/ICVC default screen: 1. Press MENU 2. Press SERVICE 3. Scroll down to highlight CONTROL ALGORITHM STATUS 4. Press SELECT 5. Scroll down to highlight ISM_HIST 6. Press SELECT DESCRIPTION ISM FAULT HISTORY Values At Last Fault: Line Current Phase 1 Line Current Phase 2 Line Current Phase 3...
- Page 29 To access this display from the CVC/ICVC default screen: 1. Press MENU 2. Press SERVICE 3. Scroll down to highlight EQUIPMENT CONFIGURATION 4. Press SELECT 5. Scroll down to highlight NET_OPT 6. Press SELECT DESCRIPTION Loadshed Function Group Number Demand Limit Decrease Maximum Loadshed Time CCN Occupancy Config: Schedule Number...
- Page 30 To access this display from the CVC/ICVC default screen: 1. Press MENU 2. Press SERVICE 3. Scroll down to highlight EQUIPMENT SERVICE 4. Press SELECT 5. Scroll down to highlight OPTIONS 6. Press SELECT DESCRIPTION Auto Restart Option Remote Contacts Option Soft Stop Amps Threshold Surge / Hot Gas Bypass Surge Limit/HGBP Option...
- Page 31 To access this display from the CVC/ICVC default screen: 1. Press MENU 2. Press SERVICE 3. Scroll down to highlight EQUIPMENT SERVICE 4. Press SELECT 5. Scroll down to highlight SETUP2 6. Press SELECT DESCRIPTION Capacity Control Proportional Inc Band Proportional DEC Band Proportional ECW Band Guide Vane Travel Limit...
- Page 32 To access this display from the CVC/ICVC default screen: 1. Press MENU 2. Press SERVICE 3. Scroll down to highlight EQUIPMENT SERVICE 4. Press SELECT 5. Scroll down to highlight RAMP_DEM 6. Press SELECT DESCRIPTION Pulldown Ramp Type: Select: Temp=0, Load=1 Demand Limit + kW Ramp Demand Limit Source Select: Amps=0, kW=1...
-
Page 33: Pic Ii System Functions
A value of 1° F (0.6° C) is the default setting. DIFFUSER CONTROL — On 19XR FRAME sizes 4 and 5 compressors equipped with a variable discharge diffuser, the PIC II adjusts the diffuser actuator position (DIFFUSER... -
Page 34: Demand Limiting
The PROPORTIONAL ECW GAIN can be adjusted on the CVC/ICVC display for values of 1, 2, or 3; the default setting is 2. Increase this setting to increase guide vane response to a change in entering chilled water temperature. DEMAND LIMITING — The PIC II responds to the ACTIVE DEMAND LIMIT set point by limiting the opening of the guide vanes. -
Page 35: Shunt Trip (Option)
Table 3 — Protective Safety Limits and Control Settings MONITORED PARAMETER TEMPERATURE SENSORS OUT OF RANGE PRESSURE TRANSDUCERS OUT OF RANGE COMPRESSOR DISCHARGE TEMPERATURE MOTOR WINDING TEMPERATURE BEARING TEMPERATURE EVAPORATOR REFRIGERANT TEMPERATURE TRANSDUCER VOLTAGE CONDENSER PRESSURE — SWITCH — CONTROL OIL PRESSURE LINE VOLTAGE —... -
Page 36: Ramp Loading
Ramp Loading — The ramp loading control slows down the rate at which the compressor loads up. This control can pre- vent the compressor from loading up during the short period of time when the chiller is started and the chilled water loop has to be brought down to CONTROL POINT. -
Page 37: Alarm (Trip) Output Contacts
Third party software from building automation systems (BAS) One set of alarm or energy management systems (EMS) can also access the PIC II controls through a Carrier DataLINK™ module and re- set the fault displayed. Both methods would access the CVC_PSWD/ICVC_PSWD screen and force the RESET ALARM? point to YES to reset the fault condition. -
Page 38: Condenser Freeze Prevention
Condenser Freeze Prevention — rithm helps prevent condenser tube freeze-up by energizing the condenser pump relay. The PIC II controls the pump and, by starting it, helps to prevent the water in the condenser from freezing. The PIC II can perform this function whenever the chiller is not running except when it is either actively in pump- down or in pumpdown/lockout with the freeze prevention disabled. -
Page 39: Demand Limit Control Option
HGBP — Hot Gas Bypass — Leaving Chilled Water ∆P = (Condenser Psi) – (Cooler Psi) ∆T = (ECW) – (LCW) Fig. 21 — 19XR Hot Gas Bypass/Surge Prevention with Default English Settings LEGEND — Entering Chilled Water HGBP — Hot Gas Bypass —... -
Page 40: Surge Prevention Algorithm With Vfd
Capacity Overrides. Both of these corrective actions try to reduce the lift experienced by the compressor and help prevent a surge condition. Surge Prevention Algorithm with VFD — an operator configurable feature that can determine if lift con- ditions are too high for the compressor and then take corrective action. -
Page 41: Common Point Sensor Installation
CHILLER COMMUNICATION WIRING — Refer to the chiller’s Installation Instructions, Carrier Comfort Network Interface section for information on chiller communication wiring. LEAD/LAG OPERATION — The PIC II not only has the... -
Page 42: Faulted Chiller Operation
Standby Chiller Configuration and Operation — A chiller is designated as a standby chiller when its LEADLAG: CONFIG- URATION value on the LEADLAG screen is set to “3.” The standby chiller can operate as a replacement for the lag chiller only if one of the other two chillers is in an alarm (*) condition (as shown on the CVC/ICVC panel). -
Page 43: Ice Build Control
Ice Build Control — The ice build control option auto- matically sets the CONTROL POINT of the chiller to a temper- ature that allows ice building for thermal storage. NOTE: For ice build control to operate properly, the PIC II must be in CCN mode. -
Page 44: Return To Non-Ice Build Operations
DEVICE table (LOCAL should be highlighted) and press the softkey to upload the LOCAL device. The CVC/ ATTACH ICVC for the 19XR will be uploaded and default screen will display. NOTE: The CVC/ICVC will not automatically reattach to the local module on the chiller. Press the attach to the LOCAL device and view the chiller operation. -
Page 45: Controls
Service Operation — An overview of the tables and screens available for the SERVICE function is shown in Fig. 18. TO ACCESS THE SERVICE SCREENS — When the SER- VICE screens are accessed, a password must be entered. 1. From the main MENU screen, press the softkey. -
Page 46: Start-Up/Shutdown/Recycle
START-UP/SHUTDOWN/ RECYCLE SEQUENCE (Fig. 26) Local Start-Up — Local start-up (or a manual start-up) is initiated by pressing the menu softkey on the default LOCAL CVC/ICVC screen. Local start-up can proceed when the chiller schedule indicates that the current time and date have been established as a run time and date, and after the internal 15-minute start-to-start and the 1-minute stop-to-start inhibit timers have expired. -
Page 47: Shutdown Sequence
Shutdown Sequence — Chiller shutdown begins if any of the following occurs: • the STOP button is pressed for at least one second (the alarm light blinks once to confirm the stop command) • a recycle condition is present (see Chilled Water Recycle Mode section) •... -
Page 48: Before Initial Start-Up
Figure 28 outlines the proper sequence and procedures for leak testing. The 19XR chillers are shipped with the refrigerant con- tained in the condenser shell and the oil charge in the compres- sor. The cooler is shipped with a 15 psig (103 kPa) refrigerant charge. -
Page 50: Leak Test Chiller
Due to regulations regarding refrig- erant emissions and the difficulties associated with separating contaminants from the refrigerant, Carrier recommends the following leak test procedure. See Fig. 28 for an outline of the leak test procedure. Refer to Fig. 29 and 30 during pumpout procedures and Tables 5A and 5B for refrigerant pressure/ temperature values. - Page 51 Fig. 29 — Typical Optional Pumpout System Piping Schematic with Storage Tank Fig. 30 — Typical Optional Pumpout System Piping Schematic without Storage Tank...
- Page 52 Table 5A — HFC-134a Pressure — Temperature (F) TEMPERATURE, PRESSURE (psig) 6.50 7.52 8.60 9.66 10.79 11.96 13.17 14.42 15.72 17.06 18.45 19.88 21.37 22.90 24.48 26.11 27.80 29.53 31.32 33.17 35.08 37.04 39.06 41.14 43.28 45.48 47.74 50.07 52.47 54.93 57.46 60.06...
-
Page 53: Chiller Dehydration
ANSI/ASHRAE Standard 15 and applicable local safety codes. Piping connections must allow for access to the valve mechanism for periodic inspection and leak testing. The 19XR relief valves are set to relieve at the 185 psig (1275 kPa) chiller design pressure. Inspect Wiring Do not check the voltage supply without proper equipment and precautions. -
Page 54: Carrier Comfort Network Interface
Clean and in- spect the contactors if this has occurred. Carrier Comfort Network Interface — Comfort Network (CCN) communication bus wiring is sup- plied and installed by the electrical contractor. It consists of shielded, 3-conductor cable with drain wire. -
Page 55: Oil Charge
As the 19XR unit is configured, all configuration settings should be written down. A log, such as the one shown on pages CL-1 to CL-16, provides a list for configuration values. -
Page 56: To Change The Password
Without the password, access to the SERVICE menu will not be possible unless the CVC/ ICVC_PSWD menu on the STATUS screen is accessed by a Carrier representative. TO CHANGE THE CVC/ICVC DISPLAY FROM ENGLISH TO METRIC UNITS — By default, the CVC/ ICVC displays information in English units. -
Page 57: If Necessary
CHANGE THE BENSHAW INC., RediStart MICRO™ SOFTWARE CONFIGURATION IF NECESSARY — Ben- shaw starter configurations are checked and modified from the menus in the Benshaw Redistart MICRO Default Display. See Fig. 32 and Table 6 for default display and menu items. To ac- cess the menus to perform checks and modifications, the Ben- shaw starter must be powered up and its self-test must have been successfully completed. -
Page 58: Verify Vfd Configuration And Change
NOTE: Some of the parameters can be changed only when the drive is stopped. It is the operator’s responsibility to distribute access to the passwords. Carrier is not responsible for unauthorized access violations within the operator’s organization. Failure to observe this warning could result in bodily injury. -
Page 59: Necessary
• If Err is displayed a fault has been detected. Perform manual reset by establishing a reset through the small hole under the VFD Keypad. If this does not correct the fault contact your Carrier representative. • If AR with a counting down number is displayed wait for the number to count to 0 and the display should then revert to a 0. -
Page 60: Vfd Control Verification (Running
2. Press STATUS 3. Press COMPRESS 4. Press SELECT 5. Set TARGET VFD SPEED to 0%. Verify that the ACTUAL VFD SPEED shown on the VFD dis- play is within 0 to 1 Hz. 1. Press the softkey on the VFD keypad until all ENTER LEDs on the left side of the keypad are illuminated. -
Page 61: Modify Equipment Configuration
SETUP2 screen. It is labeled DIFFUSER FULL SPAN mA. MODIFY EQUIPMENT CONFIGURATION IF NECES- SARY — The EQUIPMENT SERVICE table has screens to select, view, or modify parameters. Carrier’s certified drawings have the configuration values required for the jobsite. Modify these values only if requested. -
Page 62: Perform A Control Test
Owner-Modified CCN Tables — The following EQUIP- MENT CONFIGURATION screens are described for refer- ence only. OCCDEFCS — The OCCDEFCS screen contains the Local and CCN time schedules, which can be modified here or on the SCHEDULE screen as described previously. HOLIDAYS —... -
Page 63: Controls And Compressor
The standard 19XR chiller is shipped with the refrigerant already charged in the vessels. However, the 19XR may be or- dered with a nitrogen holding charge of 15 psig (103 kPa). Evacuate the nitrogen from the entire chiller, and charge the chiller from refrigerant cylinders. -
Page 64: Initial Start-Up
The full refrigerant charge on the 19XR will vary with chill- er components and design conditions, as indicated on the job data specifications. An approximate charge may be determined by adding the condenser charge to the cooler charge as listed in Table 10. -
Page 65: Dry Run To Test Start-Up Sequence
Dry Run to Test Start-Up Sequence For electro-mechanical starters. 1. Disengage the main motor disconnect (CB1) on the start- er front panel. This should only disconnect the motor power. Power to the controls, oil pump, and starter con- trol circuit should still be energized. 2. -
Page 66: Operating Instructions
OPTIONAL PUMPOUT STORAGE TANK AND PUMP- OUT SYSTEM — Transfer valves and pumpout system, refrig- erant charging and pumpdown procedure, and relief devices. MOTOR COMPRESSOR ASSEMBLY — Guide vane actu- ator, transmission, motor cooling system, oil cooling system, temperature and pressure sensors, oil sight glasses, integral oil pump, isolatable oil filter, extra oil and motor temperature sen- sors, synthetic oil, and compressor serviceability. -
Page 67: After Extended Shutdown
PUMPOUT AND REFRIGERANT TRANSFER PROCEDURES Preparation — The 19XR may come equipped with an optional pumpout storage tank, pumpout system, or pumpout compressor. The refrigerant can be pumped for service work to either the chiller compressor vessel or chiller condenser vessel by using the optional pumpout system. -
Page 69: Chillers With Storage Tanks
— Compressor Overload T’STAT — Internal Thermostat Compressor Terminal Contactor Terminal Overload Terminal Pumpout Unit Terminal *Bimetal thermal protector imbedded in motor winding. Fig. 35 — 19XR Pumpout Unit Wiring Schematic OIL RETURN LINE CONNECTION CONDENSER REFRIGERANT WATER INLET VALVE CONNECTIONS Fig. -
Page 70: Chillers With Isolation Valves
TRANSFER REFRIGERANT FROM CHILLER TO PUMP- OUT STORAGE TANK 1. Equalize refrigerant pressure. a. Valve positions: VALVE 1a 1b 2 3 4 5 6 7 8 10 11 12 13 14 CONDITION b. Slowly open valve 5. When the pressures are equalized, open liquid line valve 7 to allow liquid refrigerant to drain by gravity into the pumpout storage tank. -
Page 71: Procedures
HFC-134a. Removing Refrigerant — OPERATING tem is used, the 19XR refrigerant charge may be transferred to a pumpout storage tank or to the chiller condenser or cooler vessels. Follow the procedures in the Pumpout and Refrigerant Transfer Procedures section when transferring refrigerant from one vessel to another. -
Page 72: Standing Vacuum Test
(Fig. 2). A pump is required when adding oil against refrigerant pressure. The oil charge for the 19XR compressor depends on the com- pressor Frame size: • Frame 2 compressor — 5 gal (18.9 L) When the chiller •... -
Page 73: Scheduled Maintenance
Change the oil filter on a yearly basis or when the chiller is opened for repairs. The 19XR has an isolatable oil filter so that the filter may be changed with the refrigerant remaining in the chiller. Use the following procedure: 1. -
Page 74: Inspect Relief Valves And Piping
During the tube cleaning process, use brushes specially de- signed to avoid scraping and scratching the tube wall. Contact your Carrier representative to obtain these brushes. Do not use wire brushes. Hard scale may require chemical treatment for its preven- tion or removal. -
Page 75: Water Treatment
ISO Viscosity ........68 Carrier Part Number ......PP23BZ103 The total oil charge, 4.5 pints (2.6 L), consists of 3.5 pints... -
Page 76: Troubleshooting Guide
— is also stored into the ALARM HISTORY table. Checking Display Messages — check when troubleshooting the 19XR is the CVC/ICVC dis- play. If the alarm light is flashing, check the primary and sec- ondary message lines on the CVC/ICVC default screen (Fig. -
Page 77: Transducer Replacement
TRANSDUCER REPLACEMENT — Since the transducers are mounted on Schrader-type fittings, there is no need to re- move refrigerant from the vessel when replacing the transduc- ers. Disconnect the transducer wiring. Do not pull on the trans- ducer wires. Unscrew the transducer from the Schrader fitting. When installing a new transducer, do not use pipe sealer (which can plug the sensor). -
Page 78: Troubleshooting
Table 11 — CVC/ICVC Primary and Secondary Messages and Custom Alarm/Alert Messages with Troubleshooting Guides A. MANUAL STOP PRIMARY MESSAGE SECONDARY MESSAGE MANUALLY STOPPED — PRESS CCN OR LOCAL TO START TERMINATE PUMPDOWN MODE TO SELECT CCN OR LOCAL SHUTDOWN IN PROGRESS COMPRESSOR UNLOADING SHUTDOWN IN PROGRESS COMPRESSOR DEENERGIZED... - Page 79 Table 11 — CVC/ICVC Primary and Secondary Messages and Custom Alarm/Alert Messages with Troubleshooting Guides (cont) D. PRE-START ALERTS: These alerts only delay start-up. When alert is corrected, the start-up will continue. No reset is necessary. PRIMARY SECONDARY STATE MESSAGE MESSAGE PRESTART STARTS LIMIT...
- Page 80 Table 11 — CVC/ICVC Primary and Secondary Messages and Custom Alarm/Alert Messages with Troubleshooting Guides (cont) G. NORMAL RUN WITH OVERRIDES PRIMARY SECONDARY STATE MESSAGE MESSAGE RUN CAPACITY HIGH CONDENSER LIMITED PRESSURE RUN CAPACITY HIGH MOTOR LIMITED TEMPERATURE RUN CAPACITY LOW EVAP LIMITED REFRIG TEMP...
-
Page 81: Chiller Protect Limit Faults
Table 11 — CVC/ICVC Primary and Secondary Messages and Custom Alarm/Alert Messages with Troubleshooting Guides (cont) I. CHILLER PROTECT LIMIT FAULTS PRIMARY SECONDARY STATE MESSAGE MESSAGE PROTECTIVE 1M CONTACT LIMIT FAULT PROTECTIVE 2M CONTACT LIMIT FAULT PROTECTIVE MOTOR AMPS LIMIT NOT SENSED FAILURE TO EXCESS... - Page 82 Table 11 — CVC/ICVC Primary and Secondary Messages and Custom Alarm/Alert Messages with Troubleshooting Guides (cont) I. CHILLER PROTECT LIMIT FAULTS (cont) PRIMARY SECONDARY STATE MESSAGE MESSAGE PROTECTIVE OIL PRESS LIMIT SENSOR FAULT PROTECTIVE LOW OIL LIMIT PRESSURE PROTECTIVE LOW CHILLED LIMIT WATER FLOW PROTECTIVE...
- Page 83 Table 11 — CVC/ICVC Primary and Secondary Messages and Custom Alarm/Alert Messages with Troubleshooting Guides (cont) I. CHILLER PROTECT LIMIT FAULTS (cont) PRIMARY SECONDARY STATE MESSAGE MESSAGE PROTECTIVE INVALID DIFFUSER LIMIT CONFIG PROTECTIVE DIFFUSER POSITION LIMIT FAULT PROTECTIVE SPARE TEMPERATURE LIMIT PROTECTIVE SPARE TEMPERATURE...
- Page 84 Table 11 — CVC/ICVC Primary and Secondary Messages and Custom Alarm/Alert Messages with Troubleshooting Guides (cont) J. CHILLER ALERTS (cont) PRIMARY STATE MESSAGE SENSOR ALERT HIGH DISCHARGE TEMP SENSOR ALERT HIGH BEARING TEMPERATURE CONDENSER PUMP RELAY PRESSURE ALERT ENERGIZED RECYCLE EXCESSIVE RECYCLE ALERT STARTS...
- Page 85 Table 12A — Thermistor Temperature (F) vs. Resistance/Voltage Drop PIC II TEMPERATURE RESISTANCE VOLTAGE (Ohms) DROP (V) –25 4.700 98,010 –24 4.690 94,707 –23 4.680 91,522 –22 4.670 88,449 –21 4.659 85,486 –20 4.648 82,627 –19 4.637 79,871 –18 4.625 77,212 –17 4.613...
- Page 86 Table 12B — Thermistor Temperature (C) vs. Resistance/Voltage Drop TEMPERATURE PIC II VOLTAGE DROP (V) –33 4.722 –32 4.706 –31 4.688 –30 4.670 –29 4.650 –28 4.630 –27 4.608 –26 4.586 –25 4.562 –24 4.538 –23 4.512 –22 4.486 –21 4.458 –20 4.429...
-
Page 87: Control Modules
Control Modules Turn controller power off before servicing controls. This ensures safety and prevents damage to the controller. The CVC/ICVC, CCM, and ISM modules perform continu- ous diagnostic evaluations of the hardware to determine its condition. Proper operation of all modules is indicated by LEDs (light-emitting diodes) located on the circuit board of the CVC/ICVC, CCM, and ISM. -
Page 88: Chiller Control Module (Ccm)
The proper software is factory- installed by Carrier in the replacement module. When ordering a replacement chiller visual control (CVC/ICVC) module, specify the complete replacement part number, full chiller model number, and chiller serial number. - Page 89 DISCRETE OUTPUTS ANALOG OUT V/I INPUTS STAT COMM Fig. 41 — Chiller Control Module (CCM) TRIP PUMP TRANS SHUNT EVAP CONTACTS CONTROL INTEGRATED STARTER MODULE CONTACT INPUTS 115 VAC FUSE SPAR ICE REM STRT 1M LL1 LL2 SFTY BLD STRT FLT AUX AUX 1 + C + C + C + C + C + C Fig.
-
Page 90: Scr Removal/Installation
5. Using an ohmmeter, perform the following resistance measurements and record the results: SCR PAIRS MEASURE BEING BETWEEN CHECKED T1 and T6 3 and 6 T2 and T4 2 and 5 T3 and T5 1 and 4 If all measured values are greater than 5K ohms, proceed to Step 10. - Page 91 NUMBER OF TUBES CODE Cooler Condenser — — — — — — 1080 1170 1080 1170 NOTES: 1. Cooler data: based on a cooler with standard wall tubing, 2-pass, 150 psig, nozzle-in-head waterbox with victaulic grooves. Weight includes suction elbow, control panel, and distribution piping. Weight does not include compressor.
- Page 92 NUMBER OF TUBES CODE Cooler Condenser — — — — — — 1080 1170 1080 1170 NOTES: 1. Cooler data: based on a cooler with standard wall tubing, 2-pass, 1034 psig, nozzle-in-head waterbox with victaulic grooves. Weight includes suction elbow, control panel, and distribution pip- ing.
- Page 93 Table 14 — 19XR Additional Data for Marine Waterboxes* HEAT EXCHANGER FRAME, PASS Psig FRAME 2, 1 AND 2 PASS FRAME 2, 2 PASS FRAME 3, 1 AND 2 PASS FRAME 3, 2 PASS FRAME 4, 1 AND 3 PASS...
- Page 94 Table 16 — 19XR Motor Weights Standard and High Efficiency Motors ENGLISH MOTOR Stator Weight* SIZE (lb) 60 Hz 50 Hz 60 Hz 1030 1030 1070 1070 1120 1120 1175 1175 1175 1175 1286 1358 1305 1377 1324 1435 1347...
- Page 95 Table 17A — 19XR Waterbox Cover Weights — English (lb) HEAT WATERBOX EXCHANGER DESCRIPTION NIH, 1 Pass Cover, 150 psig NIH, 2 Pass Cover, 150 psig NIH, 3 Pass Cover, 150 psig NIH/MWB End Cover, 150 psig COOLER/ CONDENSER NIH, 1 Pass Cover, 300 psig...
- Page 96 Table 17B — 19XR Waterbox Cover Weights — SI (kg) HEAT WATERBOX EXCHANGER DESCRIPTION NIH, 1 Pass Cover, 150 psig NIH, 2 Pass Cover, 150 psig NIH, 3 Pass Cover, 150 psig NIH/MWB End Cover, 150 psig COOLER/ CONDENSER NIH, 1 Pass Cover, 300 psig...
- Page 97 Table 18 — Optional Pumpout System Electrical Data MOTOR CONDENSER VOLTS-PH-Hz CODE UNIT 19EA47-748 575-3-60 19EA42-748 200/208-3-60 19EA44-748 230-3-60 19EA46-748 400/460-3-50/60 LEGEND LRA — Locked Rotor Amps RLA — Rated Load Amps Table 19 — Additional Miscellaneous Weights ITEM CONTROL CABINET UNIT-MOUNTED STARTER OPTIONAL ISOLATION VALVES UNIT MOUNTED VFD...
- Page 98 1. All clearances for cylindrical surfaces are diametrical. 2. Dimensions are with rotor in thrust position. 3. Dimensions shown are in inches. 4. Impeller spacing should be performed in accordance with most recent Carrier Service Bulletin on impeller spacing. TORQUE ft.-lb N•m...
- Page 99 –.0005 .0050 .0040 —* *Depends on impeller size, contact your Carrier Service Representative for more information. NOTE: All clearances for cylindrical surfaces are diametrical. Fig. 44 — Compressor Fits and Clearances (cont) VIEW B — HIGH SPEED SHAFT 19XR COMPRESSOR CLEARANCES...
- Page 108 LEGEND HPR — High Pressure Relay AUX — Auxiliary — Integrated Starter Module — Contactor — Main Supply Power — Circuit Breaker — Control Power Supply — Current Transformer — Contactor — Disconnect Switch RES — Resistor — Fuse — Contactor —...
- Page 109 LEGEND HPR — High Pressure Relay AUX — Auxiliary — Integrated Starter Module — Contactor — Circuit Breaker — Main Supply Power — Current Transformer — Control Power Supply — Contactor — Disconnect Switch — Fuse RES — Resistor — Ground —...
- Page 110 LEGEND — Current Transformer — Integrated Starter Module — Variable Frequency Drive Represents Twisted Wire To Door Fig. 51 — Ground Fault Phase Current Option LEGEND — Ammeter — Current Transformer — Main Power Supply — Voltmeter Represents Twisted Wire To Door Fig.
- Page 111 Fig. 53 — Benshaw, Inc. Solid-State Unit Mounted Starter Wiring Schematic (Low Voltage)
- Page 112 — Auxiliary — Bridge Rectifier — Circuit Breaker COND — Condenser — Central Processing Unit PFCC CVC/ Chiller Visual Controller — ICVC — Current Transformer EVAP — Evaporator — Fuse — Ground NOTES: LED status with power applied and prior to run command. Transformer T1 primary fuses FU1/FU2 value dependent on system voltage and model, per Chart 1.
- Page 122 — Auxiliary — Circuit Breaker — Chiller Control Module — Carrier Comfort Network COMM — Communications — Current Transformer — Chiller Visual Controller DP/DL — Data Port/Data Link — Disconnect Switch — Fused Disconnect — Fan Relay — Fuse — Chassis Ground —...
-
Page 123: Index
High Altitude Locations, 63 High Discharge Temperature Control, 36 Ice Build Control, 43 Initial Start-Up, 64 Initial Start-Up Checklist for 19XR,XRV Hermetic Centrifugal Liquid Chiller, CL-1 Inspect the Control Panel, 73 Instruct the Customer Operator, 65 Integrated Starter Module (ISM), 88... - Page 124 Tighten All Gasketed Joints and Guide Vane Packing, 48 Tower Fan Relay Low and High, 38 Trim Refrigerant Charge, 72 Copyright 2001 Carrier Corporation Manufacturer reserves the right to discontinue, or change at any time, specifications or designs without notice and without incurring obligations. Book 2 PC 211 Catalog No.
- Page 125 FOR 19XR, XRV HERMETIC CENTRIFUGAL LIQUID CHILLER MACHINE INFORMATION: NAME ADDRESS CITY STATE DESIGN CONDITIONS: FLOW TONS BRINE RATE COOLER CONDENSER COMPRESSOR: Volts STARTER: OIL PUMP: Volts CONTROL/OIL HEATER: Volts REFRIGERANT: Type: CARRIER OBLIGATIONS: Assemble....
- Page 126 D: Take at least two sets of operational log readings and record. E: After machine has been successfully run and set up, shut down and mark shutdown oil and refrigerant levels. F: Give operating instructions to owner’s operating personnel. G: Call your Carrier factory representative to report chiller start-up. SIGNATURES: CARRIER...
- Page 127 19XR, XRV PIC II SETPOINT TABLE CONFIGURATION SHEET DESCRIPTION Base Demand Limit ECW Setpoint LCW Setpoint Ice Build Setpoint Tower Fan High Setpoint CVC/ICVC Software Number: CVC/ICVC Identification: BUS: RANGE UNITS DEFAULT 40 to 100 10 to 120 DEG F 60.0...
- Page 128 Period 4: Period 5: Period 6: Period 7: Period 8: NOTE: Default setting is OCCUPIED 24 hours/day. ICE BUILD 19XR, XRV PIC II TIME SCHEDULE CONFIGURATION SHEET OCCPC02S Period 1: Period 2: Period 3: Period 4: Period 5: Period 6:...
- Page 129 19XR, XRV PIC II ISM_CONF TABLE CONFIGURATION SHEET DESCRIPTION Starter Type (0=Full, 1=Red, 2=SS/VFD) Motor Rated Line Voltage Volt Transformer Ratio: 1 Overvoltage Threshold Undervoltage Threshold Over/Under Volt Time Voltage% Imbalance Voltage Imbalance Time Motor Rated Load Amps Motor Locked Rotor Trip...
- Page 130 19XR, XRV PIC II OPTIONS TABLE CONFIGURATION SHEET DESCRIPTION Auto Restart Option Remote Contacts Option Soft Stop Amps Threshold Surge/Hot Gas Bypass Surge Limit/HGBP Option Select: Surge=0, HGBP=1 Min. Load Point (T1, P1) Surge/HGBP Delta T1 Surge/HGBP Delta P1 Full Load Point (T2, P2)
- Page 131 19XR, XRV PIC II SETUP1 TABLE CONFIGURATION SHEET DESCRIPTION Comp Motor Temp Override Cond Press Override Comp Discharge Alert Comp Thrust Brg Alert Chilled Medium Chilled Water Deadband Evap Refrig Trippoint Refrig Override Delta T Condenser Freeze Point Evap Flow Delta P Cutout...
- Page 132 19XR, XRV PIC II SETUP2 TABLE CONFIGURATION SHEET DESCRIPTION Capacity Control Proportional Inc Band Proportional DEC Band Proportional ECW Gain Guide Vane Travel Limit Diffuser Control Diffuser Option Guide Vane 25% Load Pt Diffuser 25% Load Point Guide Vane 50% Load Pt...
- Page 133 19XR, XRV PIC II LEADLAG TABLE CONFIGURATION SHEET DESCRIPTION Lead Lag Control LEAD/LAG: Configuration DSABLE=0, LEAD=1, LAG=2, STANDBY=3 Load Balance Option Common Sensor Option LAG% Capacity LAG Address LAG START Timer LAG STOP Timer PRESTART FAULT Timer STANDBY Chiller Option...
- Page 134 19XR, XRV PIC II RAMP_DEM TABLE CONFIGURATION SHEET DESCRIPTION Pulldown Ramp Type: Select: Temp=0, Load=1 Demand Limit + kW Ramp Demand Limit Source Select: Amps=0, kW=1 Motor Load Ramp% Min Demand Limit Prop Band Demand Limit At 20 mA 20 mA Demand Limit Opt...
- Page 135 BROADCAST (BRODEF) CONFIGURATION SHEET DESCRIPTION Time Broadcast Enable Daylight Savings Start Month Start Day of Week Start Week Start Time Start Advance Stop Month Stop Day of Week Stop Week Stop Time Stop Back RANGE UNITS DSABLE/ENABLE 1 to 12 1 to 7 1 to 5 00:00 to 24:00...
- Page 136 UNIT-MOUNTED VFD CONFIGURATION SHEET DESCRIPTION PARAMETER Maximum Speed P.004 Speed Display Scaling P.028 Motor Voltage H.000 Frequency H.001 Motor Amps H.002 Line Voltage H.021 Over Frequency Limit H.022 *Variable by job — refer to component nameplates and labels. RANGE DEFAULT 15 to H.022 10 to 999 100 to 690...
- Page 137 CVC/ICVC DISPLAY AND ALARM SHUTDOWN STATE RECORD SHEET PRIMARY MESSAGE: DATE: TIME: SECONDARY MESSAGE: COMPRESSOR ONTIME: CHW OUT CHW IN EVAP REF CDW IN CDW OUT COND REF AMPS % OILPRESS OIL TEMP COMMUNICATION MESSAGE LOCAL RESET MENU CL-13...
- Page 138 CVC/ICVC DISPLAY AND ALARM SHUTDOWN STATE RECORD SHEET PRIMARY MESSAGE: DATE: TIME: SECONDARY MESSAGE: COMPRESSOR ONTIME: CHW OUT CHW IN EVAP REF CDW IN CDW OUT COND REF OIL TEMP AMPS % OILPRESS COMMUNICATION MESSAGE LOCAL RESET MENU CL-14...
- Page 140 Copyright 2001 Carrier Corporation Manufacturer reserves the right to discontinue, or change at any time, specifications or designs without notice and without incurring obligations. Book PC 211 Catalog No. 531-982 Printed in U.S.A. Form 19XR-5SS Pg CL-16 6-01 Replaces: 19XR-4SS...