Table of Contents
Advertisement
Quick Links
Download this manual
See also:
Setup Manual
Advertisement
Table of Contents

Related Manuals for Extron electronics SW4 3G HD-SDI


Summary of Contents for Extron electronics SW4 3G HD-SDI
- Page 1 User’s Manual SW4 3G HD-SDI Multi-rate SDI Switcher 68-1571-01 Rev. A 07 08...
- Page 2 Safety Instructions • English This symbol is intended to alert the user of important operating and maintenance (servicing) instructions in the literature provided with the equipment. This symbol is intended to alert the user of the presence of uninsulated dangerous voltage within the product’s enclosure that may present a risk of electric shock.
- Page 3 安全须知 • 中文 这个符号提示用户该设备用户手册中 有重要的操作和维护说明。 这个符号警告用户该设备机壳内有暴 露的危险电压,有触电危险。 注意 阅读说明书 • 用 户 使 用 该 设 备 前 必 须 阅 读 并 理 解 所 有 安 全 和 使 用 说 明 。 保存说明书 • 用户应保存安全说明书以备将来使 用。 遵守警告 • 用户应遵守产品和用户指南上的所有安 全和操作说明。...
- Page 5 Quick Start Guide — SW4 3G HD-SDI Installation Step 1 Turn off all of the equipment and disconnect it from the power source. Step 2 (Optional) Mount the switcher on one of the rack options. Step 3 Connect the video input cable(s). Connect up to four video inputs to the switcher’s BNC input connectors 1 through 4.
- Page 6 Quick Start Guide — SW4 3G HD-SDI, cont’d Switcher RS-232 Tx Rx See chapter 3, “Serial Communication,” for Simple Instruction Set (SIS ) commands to communicate with the switcher via RS-232. ™ Step 6 Power up the input and output devices, then connect power to the switcher by connecting the provided IEC power cord to the switcher’s power connector and to an AC outlet.
- Page 7 Quick Start Guide — SW4 3G HD-SDI, cont’d • If you are using auto-input switch mode, no action is necessary. The switcher automatically switches to the highest numbered active input. Outputs 1 and 2 output an identical signal. AUTO SWITCH...
- Page 8 Quick Start Guide — SW4 3G HD-SDI, cont’d SW4 3G HD-SDI • Quick Start Guide QS-4...
-
Page 9: Table Of Contents
...A-4 Included parts...A-4 Optional accessories ...A-4 ... 1-1 ... 1-2 ... 2-2 ... 2-2 ... 2-4 ... 2-8 ... 3-8 ...A-2 SW4 3G HD-SDI • Table of Contents ... 2-1 ... 2-6 ... 2-7 ... 3-1 ... 3-2 ... 3-2... - Page 10 Table of Contents, cont’d All trademarks mentioned in this manual are the properties of their respective owners. 68-1571-01 Rev. A 07 08 SW4 3G HD-SDI • Table of Contents...
-
Page 11: Chapter One • Introduction
SW4 3G HD-SDI Chapter One Introduction About this Manual Features... -
Page 12: About This Manual
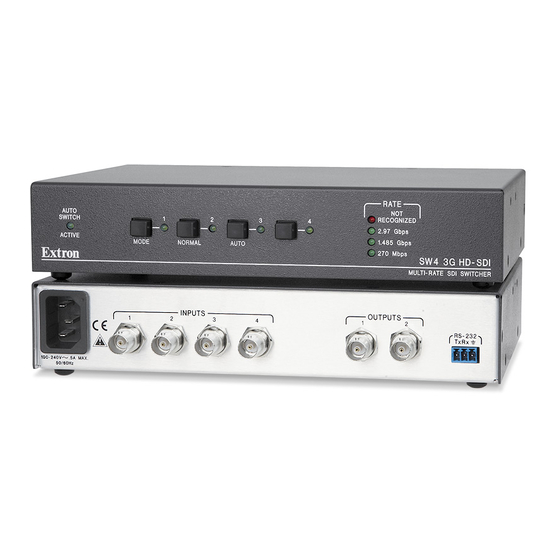
About this Manual The Extron SW4 3G HD-SDI switcher is a four-input, two parallel output, multi-rate switcher. It allows up to four SDI or HD-SDI video input sources to be switched to two identical outputs on female BNC connectors. The SW4 HD-SDI supports multiple SDI rates, including 270 Mbits per second, 1.485 Gbps, and 2.97 Gbps. - Page 13 0 .2 0 -2 Extron -6 0 SW4 3G HD-SDI Multi-Rate SDI Switcher HD-SDI VTR Application diagram for the SW4 3G HD-SDI switcher SW4 3G HD-SDI • Introduction Control System - 2 3 HD-SDI Cameras HD-SDI Monitor HD-SDI Projector...
- Page 14 Introduction, cont’d SW4 3G HD-SDI • Introduction...
-
Page 15: Chapter Two • Installation And Operation
SW4 3G HD-SDI Chapter Two Installation and Operation Installation Overview Rack Mounting Rear Panel Connections Front Panel Controls and Indicators Selecting Auto-input Switch Mode Locking the Front Panel Resetting... -
Page 16: Installation Overview
AC outlet. Rack Mounting The 1U high, half rack width, SW4 3G HD-SDI switcher can be mounted on a rack shelf or placed on a tabletop. For optional rack mounting, use any of the following rack shelves: •... -
Page 17: Rack Mounting Instructions
Install blank panel(s) or other unit(s) to the rack shelf. Front false faceplate uses 2 screws. Mounting the switcher on a 6-inch deep rack shelf SW4 3G HD-SDI • Installation and Operation HalfRack6inchRackShelf 6" Deep Rack Shelf 1/2 Rack Width Front False Faceplate Use 2 mounting holes on opposite corners. -
Page 18: Rear Panel Connections
SDI Outputs 1 and 2 — Connect one or two SDI, HD-SDI, or 3G SDI display devices to these 75 ohm female BNC connectors. The switcher outputs two identical re-clocked SDI signals. SW4 3G HD-SDI • Installation and Operation 1/2 Rack Width Front False Faceplate Use 2 mounting holes on opposite corners. - Page 19 • No parity • 8 data bits See chapter 3, “Serial Communication,” for Simple Instruction Set (SIS) commands to communicate with the switcher via RS-232. SW4 3G HD-SDI • Installation and Operation Computer DB9 connector (female) pinout to control equipment RS-232 Function —...
-
Page 20: Front Panel Controls And Indicators
When the switcher detects a valid rate on the input, the signal is equalized and re-clocked to that rate on the output. If the rate is not a valid one, the input is equalized, but is not re-clocked. SW4 3G HD-SDI • Installation and Operation NORMAL AUTO ) or Auto button ( ) to select the switching mode. -
Page 21: Selecting Auto-Input Switch Mode
While holding down the Mode button, press and hold the Auto (Input 3) button. Release the Mode and Auto buttons simultaneously. See the illustration on the next page. SW4 3G HD-SDI • Installation and Operation Outputs 1 and 2 output identical signals. - Page 22 Release the Mode and Normal buttons simultaneously. AUTO SWITCH ACTIVE Turning off auto-input switch mode The Auto Switch Active LED turns off, and the switcher switches to the previously selected input. SW4 3G HD-SDI • Installation and Operation MODE NORMAL AUTO MODE NORMAL AUTO If power is disconnected from the switcher, the unit retains mode and input settings.
-
Page 23: Locking The Front Panel
Input 1 button and hold it while applying power. All front panel LEDs blink once to indicate that the switcher has been reset. SW4 3G HD-SDI • Installation and Operation RS-232 communication remains enabled while the switcher is in executive mode. - Page 24 Installation and Operation, cont’d SW4 3G HD-SDI • Installation and Operation 2-10...
-
Page 25: Chapter Three • Serial Communication
SW4 3G HD-SDI Chapter Three Serial Communication Setting Up RS-232 Communication Using Simple Instruction Set (SIS) Commands Updating the Firmware... -
Page 26: Setting Up Rs-232 Communication
Setting Up RS-232 Communication The SW4 3G HD-SDI switcher can be configured and controlled by SIS (Simple Instruction Set) commands via the switcher’s RS-232 port. This port is used to connect the switcher to a host or external controlling device, such as a computer or control system, that can generate the proper command codes and recognize the switcher’s responses. -
Page 27: Switcher-Initiated Messages
The switcher-initiated messages are listed below: (c) Copyright 2008, Extron Electronics, SW4 3G HD-SDI, Vx.xx] The switcher issues the copyright message when it first powers on. Vx.xx is the firmware version number. -
Page 28: Using The Command/Response Table
1 = auto-input switch mode = Input rate (0 through 3) 0 = not recognized 1 = 2.97 Gbps 2 = 1.485 Gbps 3 = 270 Mbps (megabits per second) = 0.270 Gbps SW4 3G HD-SDI • Serial Communication •... -
Page 29: Command/Response Table For Sis Commands
0 = front panel lockout if off. X@ ] X@ ] Display front panel lockout on/off status. : 1 = on; 0 = off. X# ] Set to normal or auto-input switch mode. : 1 = normal, 2 = auto. . For... - Page 30 • F • Rate = current selected input 1-4. = current mode: 1 = normal; 2 = auto-input switch. = video mute status: 0 = off; or 1 = on. In3 • F 1 • Vmt 0 • Rate1 Video is selected on input 2 (V2); switcher is in normal mode (F1);...
- Page 31 Command/response table for SIS commands, continued Command ASCII Command (host to switcher) Updating firmware Upload firmware Resetting Reset switcher to factory settings Response (switcher to host) ...go Upload Zxxx Additional Description appears after the upload is complete. Reset the unit to factory default settings (except for the firmware).
-
Page 32: Updating The Firmware
A Release Notes file, giving information on what has changed in the new firmware version, along with a set of instructions for updating the firmware, are also loaded. SW4 3G HD-SDI • Serial Communication... -
Page 33: Loading The Firmware To The Switcher
Extron Electronics > Firmware Loader > Firmware Loader On the first screen that appears, select the RS-232 tab. The SW4 3G HD-SDI has no LAN port. Do not select the TCP/IP tab. From the drop-down menus on the RS-232 screen, select the appropriate Com port number and baud rate (the default is 9600). - Page 34 (By default, the firmware file is placed at c:\Program Files\ Extron\Firmware when downloaded from the Extron site.) SW4 3G HD-SDI • Serial Communication 3-10 The firmware file must have a .s19 extension.
- Page 35 Do not interrupt the firmware upload before it is 100% complete. Interrupting the upload corrupts the firmware and the switcher will not operate properly afterwards. SW4 3G HD-SDI • Serial Communication 3-11...
- Page 36 Current Unit Information field. Click Exit to close the Firmware Loader. SW4 3G HD-SDI • Serial Communication 3-12 If the Firmware Loader utility exits before the status bar has progressed completely across the indicator window, the firmware may be corrupted and may no longer respond to commands.
-
Page 37: Appendix A • Specifications, Part Numbers, And Accessories
SW4 3G HD-SDI A ppendix A Specifications, Part Numbers, and Accessories Specifications Part Numbers... -
Page 38: Specifications
Serial control port ... 1 RS-232, 3.5 mm captive screw connector, Baud rate and protocol ... 9600 baud, 8 data bits, 1 stop bit, no parity Program control... Extron’s Simple Instruction Set (SIS SW4 3G HD-SDI • Specifications, Part Numbers, Accessories SMPTE 424M, ITU-R BT.601, ITU-R BT.1120... - Page 39 Warranty ... 3 years parts and labor All nominal levels are at ±10%. Specifications are subject to change without notice. SW4 3G HD-SDI • Specifications, Part Numbers, Accessories internal 10% to 90%, noncondensing Operating: +32 to +122 °F (0 to +50 °C) /...
-
Page 40: Included Parts
Part Numbers Included parts These items are included in each order for an SW4 3G HD-SDI switcher: Included parts SW4 3G HD-SDI IEC power cord (1) Female 3.5 mm, 3-pole captive screw connector with tail Tweeker (small screwdriver) (4) Rubber feet (not attached) SW4 3G SD-HDI User’s Manual... - Page 41 Extron Electronics warrants this product against defects in materials and workmanship for a period of three years from the date of purchase. In the event of malfunction during the warranty period attributable directly to faulty workmanship and/or materials, Extron Electronics will, at its option, repair or replace said products or components, to whatever extent it shall deem necessary to restore said product to proper operating condition, provided that it is returned within the warranty period, with proof of purchase and description of malfunction to:...
- Page 42 Extron Electronics, USA 1230 South Lewis Street Anaheim, CA 92805 800.633.9876 714.491.1500 FAX 714.491.1517 www.extron.com Extron Electronics, Europe Beeldschermweg 6C 3821 AH Amersfoort, The Netherlands +800.3987.6673 +31.33.453.4040 FAX +31.33.453.4050 © 2008 Extron Electronics. All rights reserved. Extron Electronics, Asia Extron Electronics, Japan 135 Joo Seng Rd.