
Related Manuals for Electrolux EHS 6651 P


Summary of Contents for Electrolux EHS 6651 P
- Page 1 Ceramic glass hob Installation and Operating instructions EHS 6651 P 822 924 114-A-100603...
-
Page 2: Dear Customer
Dear customer Please read these operating instructions carefully. Pay particular attention to the section „Safety Information” on the first pages. Please retain these operating instructions for later reference. Pass them on to any possible new owners of the appliance. The following symbols are used in the text: Safety information Warning! Information which serves your... -
Page 3: Table Of Contents
Operating instructions ... 6 Safety ... 6 Electrical safety ... 6 Safety for children ... 6 Safety during use ... 6 Safety when cleaning ... 6 How to prevent damage to the appliance ... 7 Disposal ... 7 Disposing of the packaging material ... 7 Disposing of old appliances ... -
Page 4: Operating Instructions
Operating instructions Safety The safety aspects of this appliance comply with the accepted technical standards and the German Appliance Safety Law. However, as the manufacturer also believe responsibility to familiarise you with the following safety instructions. Electrical safety • Installation and connection of this new appliance must only be carried out by a qualified personnel. -
Page 5: How To Prevent Damage To The Appliance
How to prevent damage to the appliance • Never use the hob as a work surface or for storage. • The frameless edge of the ceramic glass surface is susceptible to knocks. Be careful when moving pots and pans around. •... -
Page 6: The Key Features Of Your Appliance
The key features of your appliance • Ceramic glass cooking surface: The appliance has a ceramic glass cooking surface and 4 rapid response cooking zones. The particularly powerful radiant heater elements substantially shorten the amount of time taken for the zones to heat up. •... -
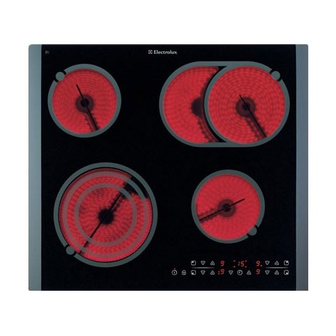
Page 7: Appliance Description
Appliance description Control panel... -
Page 8: Digital Displays
Digital displays The four display fields allocated to the four cooking zones show: • after switching on • on selection of the keep warm setting • , depending on the selected heat setting • for cooking automatic • for residual heat •... -
Page 9: Before Using For The First Time
Before using for the first time First cleaning Wipe the ceramic glass surface with a damp cloth. Important! Do not use any caustic or abrasive cleaners! The surface could get damaged as a result. Operating the cooking area Touch Control-Sensor fields In order to operate the Touch Control sensor fields place your finger from above flat onto the required field until the corresponding display lights up or... -
Page 10: Switching Off The Appliance
Switching off the appliance To switch off the appliance completely, touch the „ON/OFF“ sensor field Touch the „ON/OFF“ sensor field one second. The digital displays extinguish. After switching off an individual cooking zone or the entire hob, the existing residual heat is displayed with „hot“) in the digital displays of the corresponding cooking zones. -
Page 11: Switching The Casserole Cooking Zone On And Off
Switching the casserole cooking zone on and off Depending on the size of the pot or pan, the “casserole cooking zone“ sensor field can be used to switch between the two sizes of the casserole cooking zone. This can only be activated when a heat setting has already been made for the inner heating ring. -
Page 12: Switching The Triple Ring Cooking Zone On And Off
Switching the triple ring cooking zone on and off Depending on the size of the pot or pan, the “triple ring cooking zone” sensor field can be used to switch between the three sizes of the zone. This can only be activated when a heat setting has already been made for the inner heating ring. - Page 13 4. In order to switch off the outer heating ring, touch the „triple ring zone“ sensor field The outer and middle heating ring, respectively, is switched off. The relevant control lamp extinguishes.
-
Page 14: Switching Off The Cooking Zone
Switching off the cooking zone In order to switch off, touch the heat setting selection sensor fields or with sensor field set the heat setting back to zero. Residual heat indicator When an individual cooking zone or the entire cooking area has been switched off, any residual heat is shown with (as „Hot“) in the digital displays of the corresponding cooking zones. -
Page 15: Cooking With The Automatic Warm-Up Function
Cooking with the automatic warm-up function All four cooking zones of the hob can be controlled in nine stages and have an automatic warm-up function: • , lowest heat setting • , highest heat setting • , warm-up function When you select the required heat setting with the heat setting selection sensor field zone will work for a specific time on full power and will then switch automatically to the heat setting... -
Page 16: Cooking Without The Automatic Warm-Up Function
Cooking without the automatic warm-up function If you want to use the cooking zone without the automatic warm-up function, then select the required heat setting with the heat setting selection sensor field Touch the sensor field heat setting selection order to set the required heat setting With the heat setting selection sensor fields setting at all times. -
Page 17: Child Safety Feature
Child safety feature With the child safety feature, the hob can be protected against undesirable use. Switching on the child safety feature The appliance must be switched on in order to switch on the child safety feature. However, no cooking zone must be switched on. 1. - Page 18 Switching off the child safety feature 1. Switch on the appliance. If the child safety feature is active, then indicated. 2. Touch the „locking“ sensor field 3 seconds. As acknowledgement, you hear a signal tone. 3. Touch any of the heat setting selection sensor fields The displays turn dark, the child safety feature is switched...
-
Page 19: Timer
Timer You can use the timer in two ways: • as Switch-off automatic function slow cooking time for a cooking zone, and the cooking zone switches off automatically when the time expires. This function can be used for several cooking zones at the same time. •... - Page 20 For adjusting the remaining slow cooking time, the required cooking zone must be selected with the Timer sensor field . The relevant control lamp then flashes quicker. The adjustment is made with the Timer setting senor fields After expiry of the set slow cooking time, the cooking zone switches off automatically and for two minutes you hear an acoustic signal, the Timer display flashes...
-
Page 21: Locking/Unlocking The Control Panel
Using the minute minder To use the minute minder, the appliance must be switched on but no cooking zone shall be switched 1. Touch the Timer sensor field In the timer display, there appears 2. With the Timer setting sensor fields set the required time period. -
Page 22: Uses, Tables And Tips
Uses, Tables and Tips Pots and pans The better the pot, the better the cooking results. • You can recognise good pots and pans by their bases. The base should be as thick and flat as possible. • When buying new pots and pans, pay particular attention to the diameter of the base. -
Page 23: Tips On Saving Energy
Tips on saving energy You will save valuable energy by observing the following points: • Always position pots and pans before you switch on the cooking zone. • Dirty cooking zones and pot bases increase the power consumption. • Whenever possible, always have the lid firmly placed on the pots and pans so that they are completely covered. -
Page 24: Advice On Cooking With And Without Automatic Warm-Up
Advice on cooking with and without automatic warm-up The automatic warm-up function is suitable for: • Dishes that start off cold, are heated up at high power and do not need to be continually watched when cooking on the lower heat setting. - Page 25 Typical heat settings for cooking The details shown in the following table are guidelines. The heat setting required for cooking depends on the quality of the pans and on the type and quantity of food. Heat Warm-up setting time of the automatic function [Min.]...
-
Page 26: Cleaning And Care
Cleaning and care Cooking area Important! Cleaning agents must not come into contact with the hot ceramic glass surface! All cleaning agents must be removed with plenty of clean water after cleaning because they have a caustic effect when the zones are heated up again. - Page 27 Stubborn soiling 1. To remove food that has boiled over, or to remove stubborn spatters, use a ceramic hob scraper. 2. Place the scraper at an angle to the ceramic glass surface. 3. Remove the soiling by sliding the blade. Scrapers and ceramic glass cleaners are available from Service Force.
-
Page 28: What To Do If
What to do if … Rectifying faults It is possible that faults have been caused by a minor error which you can rectify yourself with the help of the following instructions. Do not attempt any further repairs if the following instructions do not help in each specific case. - Page 29 … the indication lights up? Check whether the cooking zone is overheated. This indicator lights up to show overheating, electronic faults or for safety reasons. … the appliance does not react to activation of a sensor field? The appliance does not react to activation of a sensor field if you touch at the same time another sensor field not designed for a combination.
-
Page 30: Installation Instructions
Installation instructions Important! The new appliance should only be installed and connected up by qualified and approved personnel. Please observe otherwise the guarantee will not cover any damage that may occur. Technical data Appliance dimensions Width Depth Height Cut-out dimensions Width Depth Corner radius... -
Page 31: Regulations, Standards, Directives
Regulations, standards, directives This appliance complies with the following standards • EN 60335-1 and EN 60335-2-6 relating to the safety of electrical appliances for household use and similar purposes • EN 60350 or DIN 44546 / 44547 / 44548 relating to the operating features of electric cookers, hobs, ovens and grills for household use. -
Page 32: Safety Instructions For The Installation Technician
Safety instructions for the installation technician • In the electrical installation a device must be provided which allows the appliance to be disconnected from the mains at all poles with a contact opening width of at least 3 mm. Suitable isolation devices include protecting cut-outs, fuses (screw type fuses are to be removed from the holder), earth leakage trips and contactors. -
Page 33: Electrical Connection
Electrical connection Before connecting, check that the nominal voltage of the appliance, that is the voltage stated on the rating plate, corresponds to the available supply voltage. The rating plate is located on the lower casing of the hob. The heating element voltage is AC230V~. The appliance also works perfectly on older networks with AC220V~ . -
Page 34: Service And Spare Parts
Customer Care For general enquiries concerning your Electrolux appliance or for further information on Electrolux products please contact our Customer Care Department by letter or telephone at the address below or visit our website at www.electrolux.co.uk. -
Page 35: Guarantee Conditions
Standard guarantee conditions We, Electrolux, undertake that if within 12 months of the date of the purchase this Electrolux appliance or any part thereof is proved to be defective by reason only of faulty workmanship or materials, we will, at our option... -
Page 37: Installation
Installation / Montering...