Garmin GPSMAP 396 Pilot's Manual
Portable aviation receiver
Hide thumbs
Also See for GPSMAP 396:
- Owner's manual (192 pages) ,
- Quick reference manual (2 pages) ,
- Mounting instructions (2 pages)
Table of Contents
Advertisement
Advertisement
Table of Contents

Related Manuals for Garmin GPSMAP 396


Summary of Contents for Garmin GPSMAP 396
- Page 1 GPSMAP ® portable aviation receiver pilot’s guide...
- Page 2 All rights reserved. Except as expressly provided herein, no part of this manual may be reproduced, copied, transmitted, disseminated, downloaded or stored in any storage medium, for any purpose without the express prior written consent of Garmin. Garmin hereby grants permission to download a single copy of this manual onto a hard drive...
-
Page 3: About This Manual
GPS, full-featured mapping, XM Radio, and XM WX Weather. Take a moment now to compare the contents of this package with the packing list on the outside of the box. If any pieces are missing, contact your Garmin dealer immediately. -
Page 4: Table Of Contents
Caution ... vi Getting Started ...1 Unit Overview ... 1 Charging the GPSMAP 396 ... 2 Turning On the GPSMAP 396 ... 3 Getting Satellite Signals ... 4 Learning About the Keypad ... 7 Using the GPSMAP 396 ... 8 Simulator Mode ... - Page 5 Display Tab ... 114 Sound Tab ... 115 Setup Tab ... 116 Location Sub Tab ... 120 GPSMAP 396 Pilot’s Guide NTRODUCTION Using XM WX Weather ...126 Viewing XM WX Weather ... 126 Setting XM WX Weather Options ... 127 Using the Weather Explorer Tab ...
- Page 6 LORAN TD Setup ... 165 Map Datums and Location Formats ... 167 Digital Selective Calling (DSC) ... 168 Jeppesen Database Information ... 170 Messages ... 171 Data Field Options ... 174 License Agreement and Warranty ... 176 Index ...181 GPSMAP 396 Pilot’s Guide...
-
Page 7: Warning
Official government charts and notices to mariners contain all information needed to navigate safely. When navigating in an aircraft, use the GPSMAP 396 only as an aid for VFR navigation. Use terrain and obstacle data only as an aid to situational awareness. -
Page 8: Caution
Map Data Information: One of the goals of Garmin is to provide customers with the most complete and accurate cartography that is available to us at a reasonable cost. We use a combination of governmental and private data sources, which we identify in product literature and copyright messages shown to the consumer. -
Page 9: Getting Started
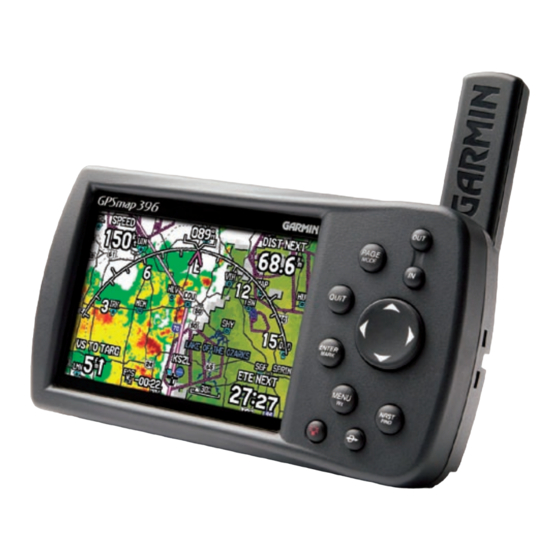
Unit Overview The GPSMAP 396 is an all-in-one, versatile color aviation, automotive, and marine navigator-perfect for air, land, or water. This portable GPS navigator features a 256-color TFT screen that is easy to read in bright sun, a built-in basemap, Jeppesen aviation database, and auto routing to provide you with automatically generated turn-by-turn directions. -
Page 10: Charging The Gpsmap 396
Charging the GPSMAP 396 Before using the unit, you need to charge the battery in the GPSMAP 396. Plug the unit into a 12 Volt connector to charge. You can use the unit while it is charging. To charge the unit’s battery: 1. -
Page 11: Turning On The Gpsmap 396
ENTER to continue. GPSMAP 396 Pilot’s Guide ETTING TARTED 3. To turn off the GPSMAP 396, press and hold the red POWER key again. Adjusting the Backlight and Volume The POWER key controls the 10 level backlight and volume of the optional headphone jack or external speaker with 12/24-Volt Adapter Cable. -
Page 12: Getting Satellite Signals
The GPS Page appears while the unit is gathering satellite signals and acquiring a fix. This process should take only a few minutes. While the GPSMAP 396 is getting satellite signals, the GPS Page shows the status as “Acquiring Satellites.”... -
Page 13: Receiver Status
• Green signal strength bars—the receiver has collected the necessary data from this satellite. As soon as the GPSMAP 396 has collected the necessary data from the best satellites in view to calculate a fix, the status field indicates the status of the receiver. The unit then updates the location, date and time. -
Page 14: Gps Tab Options
Any time you have traveled more than 600 miles with the GPS receiver turned off, the receiver can take longer than normal to initialize and find your location. -
Page 15: Learning About The Keypad
Map Page. POWER Key • Press and hold to turn the unit on or off. • Press and release to adjust the backlighting and external speaker volume. GPSMAP 396 Pilot’s Guide ETTING TARTED EARNING ABOUT THE EYPAD IN/OUT Keys •... -
Page 16: Using The Gpsmap 396
Modes, press and hold PAGE. Use the ROCKER to select a mode, and press ENTER. Understanding Terms The GPSMAP 396 unit’s advanced keypad system is designed to allow quick, convenient selection of navigation options and data entry. As you progress through this Pilot’s Guide, you will often be directed to press a specific key or highlight a field on the screen. -
Page 17: Selecting Options And Entering Data
2. Use the ROCKER to move the highlight up, down, right, or left on the menu to your selection. Selecting an option from an options menu GPSMAP 396 Pilot’s Guide ETTING TARTED To exit a menu or return to the previous setting: 1. - Page 18 The included USB Interface Cable or an optional PC Interface Cable (with a serial connector) is used to transfer MapSource CD-ROM data to the optional Data Card. For compatible MapSource products, refer to the Garmin Web site at http://www.garmin.com/cartography/ database, an Obstacle ®...
-
Page 19: Simulator Mode
Simulator Mode The GPSMAP 396 contains a Simulator Mode. Simulator Mode is helpful for practicing with the unit indoors or when no satellite or XM signals are available or if either antenna is not connected. All waypoints and routes created in Simulator Mode are retained in memory for future use. -
Page 20: Entering A New Location
ASIC AVIGATION Entering a New Location From the GPS options menu you can enter a New Location and New Altitude to simulate from. To enter a New Location using the map: 1. Press MENU twice and highlight GPS from the vertical menu. -
Page 21: Basic Operation In Aviation Mode
Each of these pages has a specific use and each page is discussed later in this manual. Aviation Mode is the default mode for the GPSMAP 396. This manual first addresses each page, such as the Map Page, as shown in Aviation Mode. The manual then describes the page as shown in Automotive and Marine Mode. -
Page 22: Creating A Direct To
4. Press ENTER when the point is shown. 5. With the on-screen Go To button highlighted, press ENTER. The GPSMAP 396 creates a course from your present location to the selected destination. to show the Go To Page. Use the... - Page 23 ENTER and the ROCKER keys. 3. Highlight the on-screen Go To button, and press ENTER. A course is plotted from your present location to the selected destination. GPSMAP 396 Pilot’s Guide ASIC PERATION IN VIATION Viewing Details for the Destination The Show Details option shows detailed information for your destination waypoint or the next waypoint in a route.
- Page 24 (noted with an asterisk), and press ENTER. A Usage Restrictions Page appears describing the restrictions for the selected frequency. 2. To return to the Comm Information Page, press ENTER. Usage Restrictions Page GPSMAP 396 Pilot’s Guide...
-
Page 25: Finding A Nearby Point
While in Aviation Mode Press MENU when the Nearest Page is open to show the Nearest Page options menu. You can Show Arrows (or Show Bearing) and Set Airport Criteria. GPSMAP 396 Pilot’s Guide ASIC PERATION IN VIATION Aviation Nearest Categories... - Page 26 3. Press QUIT to return to the Nearest Pages. You can also highlight any one of the on-screen buttons to perform that action, such as Show Map or Go To. Information Page for a VOR GPSMAP 396 Pilot’s Guide...
- Page 27 2. Use the ROCKER to select the ARTCC or FSS sub tab. 3. Press the ROCKER down to highlight Center or Station (based which tab you are on), and press ENTER. ARTCC Tab GPSMAP 396 Pilot’s Guide ASIC PERATION IN VIATION 4.
- Page 28 NOTE: When an airspace alert appears, press NEAREST to automatically show nearest airspace information. Press NEAREST a second time to quickly show the nearest airports list. Press NEAREST a third time to show the Find Menu. GPSMAP 396 Pilot’s Guide...
-
Page 29: Setting Airport Criteria
2. Press MENU to show the options menu. 3. Select Set Airport Criteria, and then press ENTER. A window appears with the current settings for runway surface and minimum runway length. GPSMAP 396 Pilot’s Guide ASIC PERATION IN VIATION Airport Criteria Page 4. -
Page 30: Selecting An Approach
ELECTING AN Selecting an Approach CAUTION: The approaches provided in the Jeppesen database are for monitoring purposes only. The GPSMAP 396 is not an IFR-approved instrument and should not be used as a primary source of navigation guidance in instrument conditions. -
Page 31: Understanding Vectors
The Vectors? Option, which appears after you select an approach, determines how you navigate to the final approach waypoint. If you select Yes, the GPSMAP 396 creates an extension of the final course, beyond the final approach waypoint in the database (final approach fix [FAF]). -
Page 32: Finding Points On Land
Finding Points on Land To take full advantage of the trip-planning capabilities of the GPSMAP 396, you can find points on the land and then create a turn-by-turn route (auto-route) to that point. For example, you can find a restaurant to eat dinner at when you land. -
Page 33: Marking A Waypoint
Marking a Waypoint Waypoints are locations or landmarks you record and store in your GPSMAP 396. Press the ENTER/MARK to capture your present location to create a new waypoint. You must have a valid 2D or 3D satellite fix to mark your location. Press MENU twice and open the GPS tab to view your satellite receiver status. -
Page 34: Creating A Flight Plan (Route)
4. Highlight Activate Route, and press ENTER. You can also create a flight plan to use at a later time. For more information, refer to “Editing and Managing Routes” “Creating Routes” beginning on page 60 beginning on page GPSMAP 396 Pilot’s Guide... -
Page 35: Following Your Flight Plan
Following your Flight Plan When you have created and started your flight plan (or route), the GPSMAP 396 guides you to the destination using a variety of tools. NOTE: After you perform an update to your Jeppesen Database, verify that all of your flight plans (routes) in your unit are still current. -
Page 36: Aviation Mode
Pages, as well as some additional aviation features, such as E6B. Map Page The GPSMAP 396 features a real-time moving map that can do much more than just plot your course. The Map Page shows map information (digital cartography) that includes airspace boundaries, airports, navaids, lakes, rivers, coastlines, cities, and highways. -
Page 37: Map Orientation
The system has a built-in worldwide database to 20 mile zoom range, with more detailed coverage available through the use of the Jeppesen, BlueChart, or MapSource data. GPSMAP 396 Pilot’s Guide VIATION Map coverage conforms to the following conditions: • Cartography is shown when the selected zoom range is covered by either the internal basemap or other MapSource data loaded onto a data card. -
Page 38: Panning The Map
When a waypoint or map item is selected, it is highlighted on screen with the name and location shown at the top of the screen, along with the distance and bearing from your current location, as shown in the image to the left. GPSMAP 396 Pilot’s Guide... -
Page 39: Airspace Information
4. Select an on-screen button, and press ENTER. 5. Press QUIT to exit the Information Page. Airport Information Page GPSMAP 396 Pilot’s Guide VIATION Airspace Information Pan mode can also be used to retrieve information on airspaces depicted on the map. -
Page 40: Clearing Unwanted Details From The Map
4. Move the arrow to the point want to measure to. The bearing and distance from the reference point and arrow coordinates appear in the data window at the top of the screen. 5. Press QUIT to finish. Push pin indicating the beginning point of the measurement GPSMAP 396 Pilot’s Guide... -
Page 41: Setting The Bug Indicator
You can also set the Bug Indicator on the HSI shown on the Panel Page. Open the Panel Page and press MENU. Follow steps 2 through 4 above. GPSMAP 396 Pilot’s Guide VIATION Setting Up the Map Page The Map Page Setup allows you to adjust the way items appear on the Map Page. -
Page 42: Changing The Page Layout And Data Fields
5. Press up or down on the ROCKER to highlight the data you want to show, and press ENTER. 6. To return the field to the default setting, press MENU and then ENTER. 7. Press QUIT to exit. Changing a Data Field GPSMAP 396 Pilot’s Guide... - Page 43 Additional Map Data You can view the data that is currently loaded on your GPSMAP 396 unit and data card. To review or change data card information: 1. Access the Map Page, and press MENU. 2. From the options menu, highlight Map Information, and press ENTER.
-
Page 44: Terrain Page
Above Ground Level (AGL). Terrain and Obstacle Color Code Red—terrain or obstacle is within 100 feet of the aircraft. Yellow—terrain or obstacle is between the user-defined Caution Elevation and 100 feet below the aircraft. Obstacle Icons GPSMAP 396 Pilot’s Guide... - Page 45 Alerts If you are on another page of the GPSMAP 396 unit, Terrain, Obstacle, and Descent Rate Alerts show in the lower left-hand corner to inform you of the situation. The alert remains on the screen until the flight path has cleared the obstacle or terrain, or until you press QUIT.
- Page 46 The Look Ahead Time for Terrain and Obstacle Alerts determines the time when an alert annunciation occurs. For example, if 120 seconds is selected, the GPSMAP 396 provides an alert 120 seconds before you reach the terrain or obstacle. Alert Sensitivity The three Alert Sensitivity settings (Terrain, Obstacle, and Descent Rate) determines what level of alerts are annunciated.
-
Page 47: Panel Page
GPS. The Panel Page appears only when the GPSMAP 396 is in Aviation Mode. The Panel Page shows a graphic Horizontal Situation Indicator (HSI) surrounded by additional indicators. -
Page 48: Manually Setting A Course
MENU. Highlight Release Hold, and press ENTER. To cancel the OBS course and reset a direct course to the waypoint, press Direct To, highlight Resume Route, and press ENTER to re-start the route. GPSMAP 396 Pilot’s Guide... - Page 49 Altitude” message appears, the time to vertical navigation goes blank, and the VNAV indicator disappears from the Panel Page. CAUTION: The GPSMAP 396 is a VFR navigation tool and should not be used to perform instrument approaches. VNAV is only a VFR navigation aid and is not intended for instrument approaches.
- Page 50 (or Go To) as your reference waypoint. The Indicator reference waypoint defines the target location. VNAV Profile—allows you to select the descent rate. VNAV Messages—enables and disables VNAV alert messages. VNAV Setup Tab GPSMAP 396 Pilot’s Guide...
-
Page 51: Active Route Page
The approaches provide only the final course segment, usually from final approach fix (FAF) to missed approach point (MAP), and are based on existing GPS, RNAV, VOR, NDB, localizer, or ILS approach procedures. All approach procedures are flown as a sequence of waypoints in the route. -
Page 52: Position Data Page
Reset Max Speed—clears the maximum speed. Reset Odometer—clears the running total of the distance traveled since the odometer was last reset. Reset All—clears all trip information including the maximum speed and odometer. page 174 in the GPSMAP 396 Pilot’s Guide... -
Page 53: Flight Log
Flight Log The Flights tab shows a list of any recorded flights, including date, route of flight, and flight time. The GPSMAP 396 saves up to 50 recorded flights while in Aviation Mode. Entries on this list are automatically created for each flight. -
Page 54: Aircraft Information
To select a saved aircraft profile: 1. From the Aircraft Profile tab, use the ROCKER to highlight the Current Aircraft field, and press ENTER. 2. Use the ROCKER to select the aircraft profile, and press ENTER. GPSMAP 396 Pilot’s Guide... - Page 55 Weight & Balance may be used during your pre-flight preparations to verify the weight and balance conditions for your aircraft. By entering the weight and arm values on this page, the GPSMAP 396 can calculate the total weight, moment, and center of gravity (CG) to ensure a safe flight.
-
Page 56: E6B Tab
True Airspeed—(calculated or user-entered figure) determined from entry of calibrated airspeed, baro pressure, and total air temperature. Also can be entered directly for winds aloft calculations. Density Altitude—(calculated figure) determined from entry of indicated altitude, barometric pressure and total air temperature. GPSMAP 396 Pilot’s Guide... - Page 57 The calculated figures for Head Wind, Wind From, and Wind Speed appears. NOTE: If a True North reference is currently selected as the heading reference on your GPSMAP 396, you must enter Heading using a True North reference to determine winds accurately.
-
Page 58: Xm Audio Page
XM audio output on or off. NOTE: You MUST have a GXM 30 smart antenna connected to your GPSMAP 396 and a subscription to XM Radio to use XM Radio features. Additionally, you must use an optional External Speaker with 12/24-Volt Adapter, third-party FM modulator, headphones, or another audio device plugged in to hear the audio. - Page 59 Press the IN or OUT keys to change the category. Highlight the category field, and press ENTER. Use the ROCKER to change the category. GPSMAP 396 Pilot’s Guide VIATION XM Audio Page Options Use the options menu to customize the XM Audio Page. When the XM Audio Page is open, press MENU to open the options menu.
-
Page 60: Using Favorites
2. Highlight Delete Favorite to delete the selected channel from your favorites list, or Highlight Delete All Favorites to delete all channels from your Favorites list. 3. Press ENTER. 4. Highlight OK, and press ENTER again to confirm. GPSMAP 396 Pilot’s Guide... - Page 61 4. Press ENTER. Each channel is played for five seconds, and then advances to the next channel. 5. Press any key to stop scanning and select the current channel. GPSMAP 396 Pilot’s Guide VIATION Turning Audio On or Off To turn audio on or off: 1.
-
Page 62: Basic Operation In Automotive Mode
2. Highlight the Highway Page, Compass Page, or XM Audio Page fields, and press ENTER. Select On, and press ENTER. EQUENCE ASIC PERATION UTOMOTIVE Highway Page Current Route Page (Optional) “Navigating in Trip Computer Page XM Audio (Optional) GPSMAP 396 Pilot’s Guide... -
Page 63: Navigating In Automotive Mode
You can also start a saved route through the Routes tab of the Main Menu. For more information, refer to page GPSMAP 396 Pilot’s Guide ASIC PERATION IN To go to a highlighted map item: 1. Use the ROCKER to highlight the item you would like to navigate to on the Map Page. - Page 64 4. Highlight an item from the list, and press ENTER. 5. Highlight the Go To button, and press ENTER. For complete information about finding an item, refer to the following section. GPSMAP 396 Pilot’s Guide...
-
Page 65: Finding An Item
BlueChart or MapSource data card in the unit. Find Menu Follow the directions on the previous page to search for an item near your current location and then route to it. GPSMAP 396 Pilot’s Guide ASIC PERATION IN UTOMOTIVE Using the Find From Feature The Find option also supports a “find from”... -
Page 66: Recently Found Items
Show Find History—allows you to toggle between showing the items you have searched for recently (Find History) and the items you have recently created a Go To for (Go To History). Remove Point—removes the point that is highlighted in the list. GPSMAP 396 Pilot’s Guide... -
Page 67: Find Menu Options
Information Page 2. Press PAGE or QUIT to exit the information page. You can also highlight one of the on-screen buttons, and press ENTER to perform that operation. GPSMAP 396 Pilot’s Guide ASIC PERATION IN UTOMOTIVE Find Menu Options To view additional options for the Find Menu, press NRST/FIND, and then press MENU. -
Page 68: Creating Routes
UTOMOTIVE REATING Creating Routes The GPSMAP 396 lets you create and store up to 50 reversible routes, with up to 300 waypoints each. Routes can be created in two ways. The first way is to select waypoints from the Find Menu, allowing you to see a list of the route points as you create the route. - Page 69 3. Highlight Activate Route, and press ENTER. 4. The Active Route Page opens. Press MENU. Highlight Follow Roads, and press ENTER. The GPSMAP 396 automatically generates a turn-by-turn route following roads. If you want to follow roads on your route, press MENU and select Follow Roads on the Active Route Page.
-
Page 70: Creating Waypoints
Creating Waypoints Waypoints are locations or landmarks you record and store in your GPSMAP 396. Save your current location as a waypoint by pressing and holding ENTER/MARK. You can also find waypoints using the map or Find Menu and them store them in the unit. - Page 71 You can create a waypoint using the Map Page. When you pan the map and move the arrow over a map item, a highlighted description of that item appears. The GPSMAP 396 uses the map item text shown on the map as the default name and symbol for the new waypoint.
-
Page 72: Creating A Waypoint By Entering Coordinates
AYPOINTS To change the location of a waypoint, highlight the character you want to change in the Location field. Press up or down on ROCKER to change the character. Repeat until the new location is entered. GPSMAP 396 Pilot’s Guide... -
Page 73: Following An Automotive Route
Following an Automotive Route The GPSMAP 396 guides you to your destination using many tools, such as the Map Page and Current Route Page. Track Your Progress with the Map Page You can track the progress of your route on the Map Page. Your route is shown with a magenta line. -
Page 74: Editing Your Route
Press ENTER to select the first point. 6. Move the arrow to the end point and press ENTER. During route calculation and navigation, the GPSMAP 396 avoids the area within the box or the selected area of the road. -
Page 75: Creating A Detour
Creating a Detour If, while navigating a route, there is road construction or a closed road, you can have your GPSMAP 396 create a detour route. While navigating a course, press Direct To Navigate menu. Select the distance you want, and press ENTER. -
Page 76: Automotive Mode Pages And Features
Marine and Automotive modes. The GPSMAP 396 always turns on in location mode, with the last known location centered on the map. When you press ROCKER, the GPSMAP 396 enters pan mode, which moves the map to keep the white arrow (map pointer) within the screen area. -
Page 77: Highway Page
A compass ribbon appears at the top of the page to show your current heading as the violet bar and a red vertical bar indicates the bearing to your course. GPSMAP 396 Pilot’s Guide UTOMOTIVE AGES AND To hide/show the Highway Page: 1. - Page 78 fields. Set Up Highway—shows an options menu with two tabs: Line, and Waypoint. Each tab has On/Off settings for several options, such as enabling the line for the Active Leg and Track Log. Set up Highway GPSMAP 396 Pilot’s Guide...
-
Page 79: Current Route Page
Current Route Page Whenever you have started a route in the GPSMAP 396 in Automotive Mode, the Current Route Page shows each turn of the active route, with the distance to the turn, the street name, and estimated time to arrival and time of arrival. As you navigate a route, the turn list automatically updates to indicate the next turn at the top of the list. -
Page 80: Trip Computer
Reset the Trip Computer before beginning a trip. If you make frequent stops, leave the GPSMAP 396 turned on to allow the unit to accurately measure elapsed time during the trip. Trip Computer Page Trip Computer Page Options Press MENU while on the Trip Computer to show the options menu. -
Page 81: Editing And Managing Routes
ENTER to set the route leg transition (or waypoint transition). Select Distance to enter a radius so that when you are within the entered distance, the GPSMAP 396 leads you to the next point on your route. When you select Manual, you can transition to the next waypoint while navigating a route. -
Page 82: Navigating A Saved Route
3. From the Route Review Page, use the ROCKER to highlight the route name field at the top of the page, and press ENTER. Enter a new Route name here 4. Use the ROCKER to enter the route name. Then press ENTER. Route Review Page GPSMAP 396 Pilot’s Guide... - Page 83 When you return to the Route Review Page, the next point in the route is automatically highlighted. This allows you to review each point on the route by pressing ENTER repeatedly. GPSMAP 396 Pilot’s Guide UTOMOTIVE To add points to the route: 1.
- Page 84 flow measure. You should enter fuel flow rates based on information for your vehicle (such as the operator’s manual or performance specifications) and make note of the units of measure (gallons or liters). GPSMAP 396 Pilot’s Guide...
-
Page 85: Editing And Managing Waypoints
MapSource or BlueChart feature, the Waypoint Review Page can include additional tabs containing information about the other features at that location. Waypoint Review Page GPSMAP 396 Pilot’s Guide UTOMOTIVE AGES AND EATURES DITING AND To access the Waypoint Edit Page: 1. -
Page 86: Viewing The Waypoint On The Map
Measure Distance—allows you to measure the distance and bearing between two points on the map (see Point to on Main Map—returns to the highlighted waypoint on the Map Page and exits the Waypoint Page. page 32 for more information). GPSMAP 396 Pilot’s Guide... -
Page 87: Adding A Waypoint To A Route
Average Location 3. Watch the fields change as the unit calculates the average location of the waypoint. Press ENTER to save the location. NOTE: You must have a GPS satellite fix before you can average a waypoint’s location. ANAGING AYPOINTS... -
Page 88: Projecting A Waypoint
8. When you have adjusted all elements of the projected location, highlight Save, and press ENTER. 9. Make any other changes to the new waypoint data (such as the name or symbol), highlight OK, and press ENTER. “Finding an Item” section on GPSMAP 396 Pilot’s Guide... -
Page 89: Organizing Waypoints Into Categories
1. From any of the waypoint pages or the Points tab, press MENU to open the options menu. 2. Select Edit Categories, and press ENTER. 3. Use the ROCKER to highlight Add, and press ENTER. GPSMAP 396 Pilot’s Guide UTOMOTIVE AGES AND EATURES DITING AND 4. - Page 90 The User Points tab shows a master list of all waypoints currently stored in memory. From the User list, you can review, edit, rename, or delete individual waypoints or delete all user waypoints. section beginning on page User Points Tab GPSMAP 396 Pilot’s Guide “Creating...
-
Page 91: Deleting Waypoints
NOTE: When you delete a waypoint, you cannot recover it from the unit. Back up important waypoints to a computer using the USB cable and software, such as MapSource, or write them down by hand. GPSMAP 396 Pilot’s Guide UTOMOTIVE AGES AND EATURES... -
Page 92: Proximity Points
Because the unit only alerts for one of the overlap points, use caution when navigating in these areas. If you enter an alarm circle overlap, you are only alerted to the closest proximity waypoint. Proximity Points Tab GPSMAP 396 Pilot’s Guide... - Page 93 3. Press ENTER to begin entry of the proximity radius. 4. Use the ROCKER to enter a distance value (up to 99.99 units), and press ENTER. GPSMAP 396 Pilot’s Guide UTOMOTIVE AGES AND To clear one or all proximity waypoints from the list: 1.
-
Page 94: Managing Your Tracks
Map Page as you travel. The track log contains points along its path, including time, and location for each point. The track log starts recording as soon as the GPSMAP 396 gets a location fix. For the best results, clear the track log before you start traveling because when the track log is full, new track points overwrite the oldest track points. - Page 95 3. Use the ROCKER to select Save, and press ENTER. 4. A window pops up asking if you want to save the entire track log. To save the entire track, highlight Yes, and press ENTER. GPSMAP 396 Pilot’s Guide UTOMOTIVE AGES AND EATURES To save a portion of the track log: 1.
- Page 96 8. To view the track on the map, highlight Map, and press ENTER. Press QUIT to return to the Track tab. 9. Highlight OK, and press ENTER to save the track. Press QUIT to exit. Track Review Page GPSMAP 396 Pilot’s Guide...
-
Page 97: Navigating A Saved Track
(TracBack to), and press ENTER. TracBack Tips When a TracBack has been started, the GPSMAP 396 divides the track into segments called legs. Up to 300 temporary turns are created to mark the most significant features of the track in order to duplicate your exact path as closely as possible. -
Page 98: Basic Operation In Marine Mode
Marine Mode features five main pages: the Map, Compass, Highway, Active Route, and Position Data Page, as well as an optional XM Audio Page. If you are connected to a sonar module, such as a Garmin GSD 20, an additional Sonar Page is available. -
Page 99: Navigating In Marine Mode
When you are actively navigating, a magenta line that always runs from your current location to the destination on the Map Page. You can use the Map Page, Compass Page, Highway Page, and Position Data Page to help navigate to your destination. GPSMAP 396 Pilot’s Guide ASIC PERATION IN ARINE... -
Page 100: Marine Mode Pages And Features
Marine and Automotive modes. The GPSMAP 396 always turns on in location mode, with the last known location centered on the map. When you press the ROCKER, the GPSMAP 396 enters pan mode, which moves the map to keep the white arrow (map pointer) within the screen area. -
Page 101: Compass Page
The compass ring and bearing indicators work independently to show the direction of your movement and the direction to your destination. If the arrow points up, you are going directly to the GPSMAP 396 Pilot’s Guide ARINE waypoint. If the arrow points any direction other than up, turn toward the arrow until it points up, then continue in that direction. -
Page 102: Using The Marine Timer
ENTER. 4. Highlight the time field, press ENTER, and then use the ROCKER to enter a new time. The maximum time is 60:00 (minutes: seconds). Press ENTER when finished. Marine Timer on the Compass Page GPSMAP 396 Pilot’s Guide... -
Page 103: Dsc
The chartplotter repeats the call properties received from the VHF radio on the chartplotter. The GPSMAP 396 requires input from a DSC enabled VHF radio to show position, and to sound/show alerts from a Distress Call or Position Report. -
Page 104: Understanding Distress Calls
AGES AND EATURES Understanding Distress Calls When the GPSMAP 396 receives a Distress Call from a connected DSC enabled VHF radio, an alert message and notification page appear, and an alarm tone is sounded. Distress Calls are shown in the DSC Call List, and Log with a checkered symbol. - Page 105 If a second call is received from the same vessel, it replaces the first call in the Call List. Press MENU to sort the list and delete entries. DSC Call List GPSMAP 396 Pilot’s Guide ARINE DSC Log When DSC calls are received, they are automatically stored in the Log, with the latest call at the top.
-
Page 106: Dsc Directory
Another way to input a name is from the Entry Review Page or the DSC Distress Call or DSC Position Report Pages. The Name and MMSI are sent to other Garmin GPS units: Only the MMSI numbers are sent to other non-Garmin DSC users. -
Page 107: Navigating To A Position Report Or Distress Call
Direct To 2. With Go To (MMSI/Name) or (DSC) highlighted, press ENTER. Navigating to a DSC Call GPSMAP 396 Pilot’s Guide ARINE Setting up DSC The DSC Setup tab allows you to turn DSC On and Off. This Setup tab also allows you to simulate Distress Calls and Position Reports while the unit is in Simulator Mode (see is helpful for practice before connecting to the real system. -
Page 108: Main Menu
The Main Menu features some additional pages that are useful to you as you plan trips and use your GPSMAP 396. Some of these pages have already been discussed in-depth in previous sections. This section only contains the additional pages and features found in the Main Menu that have not been discussed yet. -
Page 109: Weather Explorer Tab
XM WX Weather, see page 179. Map Page with XM WX Weather GPSMAP 396 Pilot’s Guide XM Tab The XM tab is where you can view and select XM Radio channels, add or delete favorites, and obtain radio ID and XM WX Satellite Weather service level information. -
Page 110: Flights Tab
Flights Tab The Flights tab shows a list of any recorded flights, including date, route of flight, and flight time. The GPSMAP 396 saves up to 50 recorded flights while in Aviation Mode. Entries on this list are automatically created for each flight. More information on the... -
Page 111: Points Tab
Proximity Sub Tab Use the Proximity sub tab to shows an alarm circle around a stored waypoint location. GPSMAP 396 Pilot’s Guide Track Tab Use the Track tab to specify whether or not to record a track log, define how it is recorded, or save the track log data for future use. -
Page 112: Sonar Tab
The E6B tab in the Main Menu calculates Density Altitude, True Airspeed, and Winds Aloft (Head Wind, Tail Wind, Wind From, and Wind Speed), based on information you enter. Information on the “E6B Tab” is located on “Aircraft Tab” is located on Aircraft Profile Tab page GPSMAP 396 Pilot’s Guide... -
Page 113: Alarms Tab
ENTER to acknowledge the alarm. Press NRST/FIND to view the Airspace Information when an airspace alarm message appears. GPSMAP 396 Pilot’s Guide To set a persistent alarm: 1. Press MENU twice to open the Main Menu. - Page 114 DGPS—sets an alarm to sound when the unit loses a differential fix. Accuracy—sets an alarm to sound when GPS accuracy falls outside of the user-set value. Select On, and then enter a specific distance. GPSMAP 396 Pilot’s Guide...
- Page 115 Marine Warnings—sets an alarm to sound when you enter an area where a marine warning is in effect. GPSMAP 396 Pilot’s Guide Sonar Alarms Sub Tab (Marine Mode Only) You must be receiving sonar NMEA data for Sonar Alarms to work.
-
Page 116: Calendar Tab
MENU on any of the calendar views to open the options menu. To jump to the Sun & Moon Information or Hunt & Fish tab, highlight View Sun and Moon or View Hunt and Fish, and press ENTER. GPSMAP 396 Pilot’s Guide... -
Page 117: Celestial Tab
You can also use the play, fast forward, and stop buttons to view an animation of the Sun & Moon sub tab. GPSMAP 396 Pilot’s Guide To view Sun & Moon information for a different date: 1. Use the ROCKER to highlight the Date field and press ENTER. -
Page 118: Tide Sub Tab
The tide curve shows as a shaded area, with higher tides being taller and lower tides shorter. The bottom of the page indicates the times with the largest and smallest tides. Time Smallest and Largest tides for the PM hours GPSMAP 396 Pilot’s Guide... - Page 119 To use the current date again, highlight the Date field. Press MENU, highlight Use Current Date, and press ENTER. GPSMAP 396 Pilot’s Guide To view a chart’s details for another time during the day (other than current time): 1.
- Page 120 4. On the information page, press ENTER. The unit shows the Hunt & Fish information for the selected location. To use the current location, highlight the From field. Press ENTER, highlight Current Location, and press ENTER. GPSMAP 396 Pilot’s Guide...
-
Page 121: Message Tab
Message Tab The Message tab on the Main Menu shows a list of messages generated by your GPSMAP 396. Use the ROCKER to scroll through the entire list of messages on the Log tab. Use the Log Filter tab to show only the types of messages you want to view. -
Page 122: Display Tab
ROCKER right to increase the intensity or left to decrease. To restore the display to defaults: 1. Press MENU twice to open the Main Menu. 2. Highlight Display from the vertical list of tabs. 3. Press MENU. 4. Highlight Restore Defaults, and press ENTER. GPSMAP 396 Pilot’s Guide... -
Page 123: Sound Tab
Sound Tab The Sound tab of the Main Menu allows you to customize the sounds your GPSMAP 396 makes to suit your needs. To view the Sound tab: 1. Press MENU twice to open the Main Menu. 2. Highlight Sound from the vertical list of tabs. -
Page 124: Setup Tab
WAAS—allows you to Disable and Enable WAAS from this field. External Power Off—allows you to select whether the GPSMAP 396 remains on (Stay On) or the unit turns off (Turn Off) when external power is removed from the unit. External Power On—allows you to turn the GPSMAP 396 on (Turn On) or charge the battery (Charge Battery) when external power is applied to the unit. - Page 125 3. Press right on the ROCKER to select the Road Routing sub tab. Road Routing Sub Tab GPSMAP 396 Pilot’s Guide Route Preference—allows the unit to calculate a route for: • Faster Time—routes calculated are faster to drive, but can be longer in distance.
- Page 126 (Automatic - Silent). You can also turn route recalculation Off. Next Turn—turns the Next Turn window Off, or opens the window when you hold Direct To Only), or Both. Guidance Sub Tab , opens automatically (Automatically GPSMAP 396 Pilot’s Guide...
- Page 127 Time Sub Tab Time Zone—allows you to choose your correct time zone so the GPSMAP 396 shows the correct local time. Select Other to enter a UTC Offset. If the incorrect date is shown, press MENU, highlight Set Date, and press ENTER.
-
Page 128: Location Sub Tab
WGS 84 datum for best overall performance. for more information GPSMAP 396 Pilot’s Guide... -
Page 129: Selecting A Different Heading Reference
Failure to update this setting can result in substantial differences between the information shown on your unit and external references, such as a magnetic compass. GPSMAP 396 Pilot’s Guide Welcome Sub Tab The Welcome sub tab allows you to enter information, such as your name and address, that the unit can show when it is turned on. - Page 130 Serial Data Format—sets the data format to one of the following: • Garmin Data Transfer—the proprietary format used to exchange data with a PC or another Garmin GPSMAP 396. Garmin Data Transfer is disabled when the USB is connected and the unit automatically switches to USB format. When the USB is disconnected, the USB field changes to Transfer...
- Page 131 If you select GARMIN DGPS or RTCM In/NMEA Out format, you can control a differential beacon receiver directly from your GPSMAP 396 using the Interface sub tab. You can have the unit automatically scan for the DGPS beacon signal, or you can enter the beacon frequency and bit rate on the unit, and the information is used to tune the beacon receiver.
- Page 132 1. Press MENU. 2. Highlight Restart Scan, and press ENTER. To manually enter a frequency and bit rate: 1. With the unit set to GARMIN DGPS or RTCM In/NMEA Out, use the ROCKER to highlight the Beacon field, and press ENTER.
-
Page 133: Advanced Nmea Output Setup
Advanced NMEA Output Setup If you are going to interface the GPSMAP 396 with another piece of equipment (such as a radar or autopilot), the unit needs to be set to output NMEA data. The NMEA data transmission can be customized to keep the output rate at two seconds. -
Page 134: Using Xm Wx Weather
179. Map Page with XM WX Weather turned on NOTE: XM Weather data is not saved between power cycles in the unit . If the GPSMAP 396 is turned off, the unit must reload the data. GPSMAP 396 Pilot’s Guide... -
Page 135: Setting Xm Wx Weather Options
You can view a specific weather feature, such as NEXRAD Radar or Storm cells, through the Weather Explorer tab on the Main Menu. For more information, see page 101. GPSMAP 396 Pilot’s Guide SING EATHER ETTING To set up weather options on the Map Page: 1. - Page 136 Use the Avtn Wx tab to set the zoom range at which aviation weather information first appears on the Map Page. METAR, AIRMET, SIGMET—sets the zoom range at which each feature first appears on-screen. Select Auto, Off, or 20 ft to 800 nm. Avtn Wx Tab GPSMAP 396 Pilot’s Guide...
- Page 137 Srfc Wx Tab Surface Winds, Surface Pressure, Fronts, Visibility, County Warnings—sets the zoom range at which each feature first appears on-screen. Select Auto, Off, or 20 ft to 800 nm. GPSMAP 396 Pilot’s Guide SING EATHER ETTING Mrn Wx Tab Use the Mrn Wx tab on the Map Page Options to set up marine weather options.
-
Page 138: Using The Weather Explorer Tab
Map window. window 2. Press right on the ROCKER to highlight the field to the right of Forecast, and press ENTER to display a list of forecast options. Forecast Map Age of the weather report GPSMAP 396 Pilot’s Guide... - Page 139 1. Press MENU twice to open the Main Menu. 2. Highlight the Weather Explorer tab, and press MENU. Declutter On (Off)—allows you to toggle unwanted weather items on or off on the Map window. GPSMAP 396 Pilot’s Guide SING EATHER SING THE Animate Weather (Stop Animation)—animates NEXRAD Radar...
- Page 140 3. Press right on the ROCKER to select the Information sub tab. 4. Press MENU. 5. With Antenna Information highlighted, press ENTER. A window appears displaying the software version loaded to your GXM antenna. 6. Press ENTER to close the window. GPSMAP 396 Pilot’s Guide...
-
Page 141: Finding Weather Information
1. From any page, press FIND. 2. Select Weather Data, and press ENTER. The Weather From Current Location Page appears. Weather From Current Location GPSMAP 396 Pilot’s Guide SING 3. Highlight the Forecast tab to view the weather forecast for your current location. - Page 142 3. Move the map pointer to a different location, and press ENTER. The Weather From (New Location) Page appears with weather information for the selected location. 4. Press MENU, highlight Near Current Location, and then press ENTER to return to the forecast for your current location. GPSMAP 396 Pilot’s Guide...
-
Page 143: Setting Up And Using Sonar
396 when used in conjunction with a GSD 20 Sounder Module. Read the GSD 20 Installation Instructions to properly install the sounder module. When you turn on your GPSMAP 396, the GSD 20 automatically turns on. NOTE: You MUST have a GSD 20 installed and connected to your GPSMAP 396 to use the sonar features. -
Page 144: Using The Sonar Page
2X zoom (Dual 2X) on one half and normal range dual frequency (Dual) on the other half. The current display mode is shown at the bottom of each sonar screen. GPSMAP 396 Pilot’s Guide... -
Page 145: Adjustment Options
You can also press MENU, and highlight the shortcut setting to quickly change to commonly used settings/values. Press ENTER to accept the new setting (or press QUIT to cancel) and return to the Sonar Page. GPSMAP 396 Pilot’s Guide ETTING UP AND SING ONAR... - Page 146 The depth of the line appears in a box on the right side of the line. Press up or down on the ROCKER to move the line on the Sonar Page. for more information. GPSMAP 396 Pilot’s Guide...
-
Page 147: Resizing The Split Screen
ROCKER until the vertical width line shows, then press ENTER. 4. If you want to cancel this operation, press QUIT or press MENU, highlight Stop Resizing, and press ENTER. GPSMAP 396 Pilot’s Guide ETTING UP AND SING ONAR Using the Pointer on the Sonar Page... -
Page 148: Setting Up The Sonar Page
The Keel Offset is reflected in the depth reading. Transducer—select the type of transducer that you are using. If you are using a speed-capable transducer/sensor, select Temp, Spd. GPSMAP 396 Pilot’s Guide... -
Page 149: Calibrating The Water Speed
Water Speed shown on your unit is accurate. The calibration should take place in water having little or no current. The unit automatically uses the GPS ground speed, if it is available, for comparison on the calibration. If a GPS ground speed is not available, use either your boat’s speedometer reading (not always... -
Page 150: Setting Up The Sonar Display
Sonar Page. Background Color—select the color for the Sonar Page and the sonar on the Map split. White Background Temperature Graph Sonar Page with the Sonar Page settings changed Graphic Flasher Color Bar Depth in corners GPSMAP 396 Pilot’s Guide... -
Page 151: Understanding Sonar
fish—sound is reflected back to the transducer. The transducer collects the reflected sound waves and sends the data to the GPSMAP 396 to be processed and shown. The underwater data is shown on the Sonar screen in the order that it is returned: first returned is the first on the screen. -
Page 152: Transducer Coverage
6-foot diameter 40° Cone Angle (50 kHz) 10° Cone Angle (200 kHz) circle at a 30-foot depth. Dual frequency mode combines both frequencies to get the best coverage area and contour/depth readings. GPSMAP 396 Pilot’s Guide... - Page 153 Thermoclines are shown as the weakest colors. One of the unique features offered by Garmin is See-Thru technology, which allows the GPSMAP 396 to hear both weak and strong signals simultaneously so as to identify fish returns under the toughest conditions, such as suspended in thermoclines or even hiding near structures.
-
Page 154: Viewing The Sonar Temperature Tab
IEWING THE Viewing the Sonar Temperature Tab NOTE: You must be receiving proper sonar data from another device, such as a Garmin GSD 20 Sounder Module, to view temperature information. The Temperature sub tab provides a visual graph of water temperature changes over a period of time. -
Page 155: Tis (Traffic Information Service)
TIS Traffic is available to aircraft equipped with a Mode S Data Link such as the Garmin GTX 330 Transponder. TIS Traffic from a GTX 330 Transponder can then be shown on the GPSMAP 396. Surveillance data includes all transponder-equipped aircraft within the coverage volume. -
Page 156: Tis Limitations
Other limitations and anomalies associated with TIS are described in the AIM, Section 1-3-5. Refer to information. NOTE: Garmin is not responsible for Mode S geographical coverage. Operation of the ground stations is the responsibility of the FAA. Refer to the Aeronautical Information Manual for a Terminal Mode S Radar Site Map covering the U.S. - Page 157 Occasionally, aircraft maneuvering causes this algorithm to induce errors in the GPSMAP 396 screen. These errors primarily affect relative bearing information and traffic target track vector (it will lag); intruder distance and altitude remains relatively accurate and may be used to assist in “see and avoid.”...
-
Page 158: Tis Symbology
YMBOLOGY The GPSMAP 396 supports TIS input from a Garmin Mode S transponder, such as the GTX 330. To configure TIS input: 1. Press MENU twice. The Main Menu appears. 2. Highlight the Setup tab. 3. Use the ROCKER to select the Interface sub tab. -
Page 159: Traffic Ground Track
NOTE: TIS audio alerts can be turned off in the Main Menu Sound tab. Traffic Ground Track Traffic ground track is indicated on the GPSMAP 396 screen by a “target track vector”, a short line shown in 45-degree increments, extending in the direction of target movement. -
Page 160: Map Page
Another Map Page feature is panning. Refer to information. When the target pointer is placed on traffic, the traffic range and altitude separation are shown. Displaying traffic range and altitude separation using the Map Panning feature. page 30 for more GPSMAP 396 Pilot’s Guide... -
Page 161: Tis Operational Procedures
This area within 34 seconds Conditions for Traffic Advisories TIS shows a Traffic Advisory (TA) on the GPSMAP 396 when an intruder aircraft approaches your aircraft on a course that intercepts (defined by a 0.5 nm horizontal radius and a relative altitude of ±... -
Page 162: Vhf Comm
VERVIEW VHF COMM The GPSMAP 396 can also output frequency data to a Garmin aviation radio. Currently the two models supported are the SL30 nav/comm and the SL40 comm. Refer to page 159 for wiring information. CAUTION: This interface does not have an FAA installation airworthiness approval. -
Page 163: Appendix
4 to 15 hours based on the XM antenna and backlight usage Source: 11–35 VDC Fuse: 3AG-1.5 Amp GPSMAP 396 Pilot’s Guide Performance Receiver: Differential-ready 12 parallel channel receiver Acquisition Times: Approx. 15 seconds (warm start) Approx. 45 seconds (cold start) Approx. -
Page 164: Care Information
(transferring it to MapSource). Immersing the Unit in Water The GPSMAP 396 is waterproof to IEC Standard 60529 IPX7. It can withstand immersion in 1 meter of water for 30 minutes. Prolonged submersion can cause damage to the unit. After submersion, be certain to wipe and air dry the unit before reuse or charging. -
Page 165: Optional Accessories
Garmin products. Use of such accessories could cause damage to the GPSMAP 396 and void the warranty. Auto Navigation Kit—Provides the parts and map data to use the GPSMAP 396 in an automobile. -
Page 166: Installation Information
GPSMAP 396 to auxiliary devices and removing the antenna. Connecting the Power/Data Cable The power/data cable connects the GPSMAP 396 to an 11–35 VDC system and provides interface capabilities for connecting external devices. The color code in the diagram below and to the right indicates the appropriate harness connections. -
Page 167: Connecting To A Gtx 330 Mode S Transponder
Connecting To A Garmin VHF Comm Radio To output frequency data to an SL40 comm or SL30 nav/comm radio, connect the Data Out pin on the GPSMAP 396 to the RxD pin on the comm radio. (You do not need to connect the comm radio to the GPSMAP 396’s Data In pin.) Set the GPSMAP 396’s Serial Data... -
Page 168: Information About Usb Drivers
To connect your GPS to your computer: 1. Connect the small end of your cable to the lower connector on the back of the GPSMAP 396, shown in the illustration to the left. 2. When using the supplied USB Data Cable, connect the larger end of the cable to an available USB data port (see illustration on the left). -
Page 169: Using Ximage For Customized Waypoint Symbols
Using xImage for Customized Waypoint Symbols xImage allows you to exchange images between your PC and your GPSMAP 396. You can download and save screen shots of any screen shown on your unit. xImage also allows you to download customizable splash screens and waypoint symbols from compatible GPS units, customize them (if you have an image editing program on your PC), and send them back to your GPS unit. - Page 170 GPBOD, GPRTE, and GPWPL. The following are the Proprietary Sentences for NMEA 0183, version 3.01 output: PGRME, PGRMZ, and PGRMM. The GPSMAP 396 also includes NMEA input with support for the BWC, DBT, DPT, MTW, VHW, VTG, and XTE sentences. Garmin’s proprietary communication protocol is available from the Web site (www.garmin.com).
-
Page 171: Learning About Gps
GPS works in any weather conditions, anywhere in the world, 24 hours a day. There are no subscription fees or setup charges to use GPS. For more information refer to the Garmin Web site at and also read the GPS Guide for Beginners, which can garmin.com... -
Page 172: What Is Waas
SBAS system should be capable of providing your GPS unit with increased accuracy at any location in the world. Currently, enabling WAAS on your Garmin GPSMAP 396 in regions that are not supported by ground stations may not improve accuracy, even when receiving signals from an SBAS satellite. -
Page 173: Loran Td Setup
Setup TD field, the active waypoint information does reflect those changes. Since the GPSMAP 396 does not rely on the LORAN signal for navigation, it can reference a different GRI chain and/or secondary stations and still navigate to the location stored in memory. - Page 174 You must know your GRI chain number and/or secondary stations to create a LORAN TD location. For more information read our LORAN TD Position Format Handbook, available at the Garmin Web site, at www.garmin.com/support/userManual.html. GPSMAP 396 Pilot’s Guide...
-
Page 175: Map Datums And Location Formats
Lines of latitude and longitude on a map or chart are referenced to a specific map datum. Every chart has a map datum reference and the GPSMAP 396 can be set to match most of those commonly used. -
Page 176: Digital Selective Calling (Dsc)
Coast Guard when used in an emergency Distress Call. To obtain a Maritime Mobile Service Identity (MMSI) number, users must register their VHF radio with the FCC (Form 605). Garmin does not supply this number! For more information regarding MMSI’s visit http://www.navcen.uscg.gov/marcomms/gmdss/mmsi.htm. -
Page 177: How Are Mmsi Assignments Obtained
DSC support. Any DSC- equipped mariner (on sea or land) within range can receive the call. When the Garmin GPSMAP 396 is connected to a VHF with DSC support, the GPS unit shows a Call List, Log, and a Directory. Basic wiring is required for the Garmin unit and VHF radio to send and receive NMEA data from each other. -
Page 178: Jeppesen Database Information
You need to create a new route with current Jeppesen database points. An optional FlightBook software package is available to assist with your flight record keeping. Visit the Garmin Web site at http://www.garmin.com/aviation. -compatible PCs and requires ®... -
Page 179: Messages
Batteries Low—the battery needs to be recharged. Basemap Failed Unit Needs Repair—there is an internal problem with your unit. Contact Garmin Product Support to have the unit serviced. Boat Is Not Moving Fast Enough to Calibrate—the boat is not moving fast enough for the speed wheel to provide a valid speed. - Page 180 Memory Full—unit memory is full, no further data can be saved. Memory (RAM) Failed Unit Needs Repair—there is an internal problem with your unit. Contact Garmin Product Support to have the unit serviced. Memory (ROM) Failed Unit Needs Repair—there is an internal problem with your unit.
- Page 181 Transducer Disconnected, Sonar Turned Off—the unit has no transducer attached, has a bad cable/transducer, or has a disconnected transducer cable. GPSMAP 396 Pilot’s Guide Transfer Complete—data transfer was completed. USB Connected—the USB cable was recently plugged in.
-
Page 182: Data Field Options
Elevation—the altitude (height) above or below mean sea level (MSL). GPS Status—the current status of the GPS receiver, such as “3D GPS.” Location (Lat/Lon)—your current location as latitude/longitude coordinates. Location (Selected)—your current location described in the selected units of measure (other than lat/lon). - Page 183 Velocity Made Good—the rate of closure on a destination based on your current speed and course of travel. Shown as VMG. Vertical Speed—the rate of climb or descent. GPSMAP 396 Pilot’s Guide Voltage—the direct current voltage level of an external power source. Water Speed (Marine Only)—the data acquired from measurement devices interfaced to the unit is used to calculate your current speed over water.
-
Page 184: License Agreement And Warranty
Registration link on our Home page. Use this area to record the serial number (8-digit number located on the back of the box) in case your GPSMAP 396 is lost, stolen, or needs service. Keep your original sales receipt in a safe place or attach a photocopy inside the manual. -
Page 185: Limited Warranty
Garmin dealer for repairs. The GPSMAP 396 is fastened shut with screws. Any attempt to open the case to change or modify the unit in any way will void your warranty and may result in permanent damage to the equipment. -
Page 186: Weather Data Warranty
If you use XM Services it is your responsibility to exercise prudent discretion and observe all safety measures required by law and your own common sense. You assume the entire risk related to your use of the Services. XM and Garmin assume no responsibility for accidents resulting from or associated with use of the Services. -
Page 187: Xm Satellite Radio Service Agreement
The user agrees to hold harmless the United States National Geospatial-Intelligence Agency. The user’s sole and exclusive remedy is to stop using the DAFIF product. GPSMAP 396 Pilot’s Guide PPENDIX ICENSE XM Satellite Radio Service Agreement XM Satellite Radio Inc. -
Page 188: Fcc Compliance
GREEMENT AND ARRANTY FCC Compliance The GPSMAP 396 complies with Part 15 of the FCC interference limits for Class B digital devices FOR HOME OR OFFICE USE. These limits are designed to provide more reasonable protection against harmful interference in a residential installation, and are more stringent than “outdoor”... -
Page 189: Index
19, 20, 31 Assign Category Nearest Asterisk (*) Alarms 27, 115 AutoLocate Airspace Average Location Anchor Drag Avoids Arrival GPSMAP 396 Pilot’s Guide 36, 37 Backlight 3, 114 Baro Pressure Battery level 36, 37 Pack 1, 2 Saver Mode Beeper... - Page 190 GRI Chain GSD 20 Guidance Tab 45, 170 GXM 30 Antenna Connecting Heading Highways Avoid Highway Page Automotive Mode Data Fields Page Layout 43, 46, 76 Setup 122, 123 Bug Indicator 4–6 Hunt & Fish Tab GPSMAP 396 Pilot’s Guide 69–70...
- Page 191 See MMSI Log Filter Marking a Waypoint Longitude Underwater LORAN TD Setup 165–166 Mark my Location Lost Satellite Reception Maximum Speed GPSMAP 396 Pilot’s Guide MayDay Measuring Distance Messages 113, 176–180 Military Time Mils MMSI 95, 168, 169 Modes 54, 116...
- Page 192 39, 46 1, 176 Speed Filter Split Screen, Sonar Storage Sun & Moon Tab Switch Modes 13, 54, 90 System Alarms System Tab Temperature 120, 146 Terrain Alert Terrain Page Aviation Mode Declutter 43, 76 GPSMAP 396 Pilot’s Guide 11–12 36–38...
- Page 193 Vertical Navigation. See VNAV Vertical Speed TracBack 88, 89 Track Up 6, 29 VHF Comm Traffic Ground Track View Details Traffic Warning Window GPSMAP 396 Pilot’s Guide 140, 144 VNAV 41, 42 Indicator 76, 108 Profile Volume 3, 115 17, 170...
- Page 196 For the latest free software updates (excluding map data) throughout the life of your Garmin products, visit the Garmin Web site at www.garmin.com. © Copyright 2005 Garmin Ltd. or its subsidiaries Garmin International, Inc. 1200 East 151 Street, Olathe, Kansas 66062, U.S.A.