Table of Contents
Advertisement
Quick Links
Advertisement
Table of Contents

Related Manuals for Samsung SCH-U365


Summary of Contents for Samsung SCH-U365
- Page 1 User Manual...
- Page 2 M O B I L E P H O N E User Manual Please read this manual before operating your phone and keep it for future reference. GH68_36603A Printed in Korea...
-
Page 3: Intellectual Property
Intellectual Property All Intellectual Property, as defined below, owned by or which is otherwise the property of Samsung or its respective suppliers relating to the SAMSUNG Phone, including but not limited to, accessories, parts, or software relating there to (the “Phone System”), is proprietary to Samsung and protected under federal laws, state laws, and international treaty provisions. - Page 4 THERETO. NOTHING CONTAINED IN THE INSTRUCTION MANUAL SHALL BE CONSTRUED TO CREATE AN EXPRESS OR IMPLIED WARRANTY OF ANY KIND WHATSOEVER WITH RESPECT TO THE PRODUCT. IN ADDITION, SAMSUNG SHALL NOT BE LIABLE FOR ANY DAMAGES OF ANY KIND RESULTING FROM THE PURCHASE OR USE OF THE PRODUCT OR ARISING FROM THE BREACH OF THE EXPRESS WARRANTY, INCLUDING INCIDENTAL, SPECIAL OR CONSEQUENTIAL DAMAGES, OR LOSS OF ANTICIPATED PROFITS OR BENEFITS.
- Page 5 Trademarks of the SD Card Association. ©2012 Samsung Telecommunications America, LLC. Samsung is a registered trademark of Samsung Electronics Co., Ltd. All product and brand names are trademarks or registered trademarks of their respective companies. Screen images simulated.
-
Page 6: Table Of Contents
Table of Contents Section 1: Getting Started ... 4 Understanding this User Manual ....4 Activating your Phone ......6 Displaying Your Telephone Number . - Page 7 Adding Pauses or Waits ..... . . 47 Finding a Contact ......48 Making Calls using Contacts .
- Page 8 Battery Use and Safety ..... . . 141 Samsung Mobile Products and Recycling ..143 UL Certified Travel Charger .
-
Page 9: Section 1: Getting Started
Section 1: Getting Started This section allows you to quickly start using your phone by installing and charging the battery, activating your service, and setting up voicemail. Understanding this User Manual The sections of this manual generally follow the features of your phone. -
Page 10: Text Conventions
Special Text Throughout this manual, you’ll find text that is set apart from the rest. These are intended to point out important information, share quick methods for activating features, to define terms, and more. The definitions for these methods are as follows: •... -
Page 11: Activating Your Phone
A fully discharged battery can require up to 4 hours of charge time. After the first charge, you can use the phone while charging. Important! Use only Samsung-approved charging devices and batteries. Samsung accessories are designed to maximize battery life. Using other accessories may My Number. -
Page 12: Battery Cover
Battery Cover The battery cover on the back of the phone protects the battery. Removing the battery cover 1. Hold the phone firmly and locate the Cover Release Latch. 2. Firmly “pop” the cover off the phone. Installing the battery cover Align the cover and press it into place, making sure it snaps securely. -
Page 13: Installing The Battery
Installing the Battery 1. Remove the battery cover (see “Removing the battery cover” on page 7). 2. Insert the battery into the phone, aligning the gold contacts on the battery with the gold contacts in the phone. 3. Install the battery cover (see “Installing the battery cover”... -
Page 14: Charging The Battery
Non-Supported Batteries Important! Samsung handsets do not support the use of a non-approved battery. Using a non-approved battery may cause damage to your phone. Use a Samsung approved battery only. -
Page 15: Turning Your Phone On And Off
Turning Your Phone On and Off Turning Your Phone On Press and hold the End/Power Key to turn the phone on or off. While powering on, the phone connects with the home network, then displays the Home screen and active alerts. -
Page 16: Easy Setup
Easy Setup Set basic preferences, to start using your phone quickly. 1. From the Home screen, press the Left Soft Key Menu Settings 2. Follow the prompts to set preferences for these settings: • Font Size Control: When enabled, you can use the Volume Key to control the size of fonts for your phone’s displays, while using the phone. -
Page 17: Tty Mode
Easy Set-up for Displays Use Easy-Setup to configure your phone’s displays, including the wallpaper, menu layout, and clocks. 1. From the Home screen, press the Left Soft Key Menu Settings 2. Follow the screen prompts to choose settings for Personal Banner, Display Backlight, Keypad Backlight, Main Wallpaper, Front Wallpaper, Display Themes, Menu Layout, Dial Fonts, Font Size Control, Main Clock, and Front Clock. -
Page 18: Voicemail
Voicemail All unanswered calls to your phone are sent to voicemail, even if your phone is turned off, so you’ll want to set up your voicemail and personal greeting as soon as you activate your phone. Setting up Voicemail 1. From the Home screen, press the 2. -
Page 19: Section 2: Understanding Your Phone
Section 2: Understanding Your Phone This section outlines key features of your phone as well as screens and icons that display when the phone is in use. Features of Your Phone • All Digital CDMA 1x Technology • Global Positioning (GPS) Technology •... -
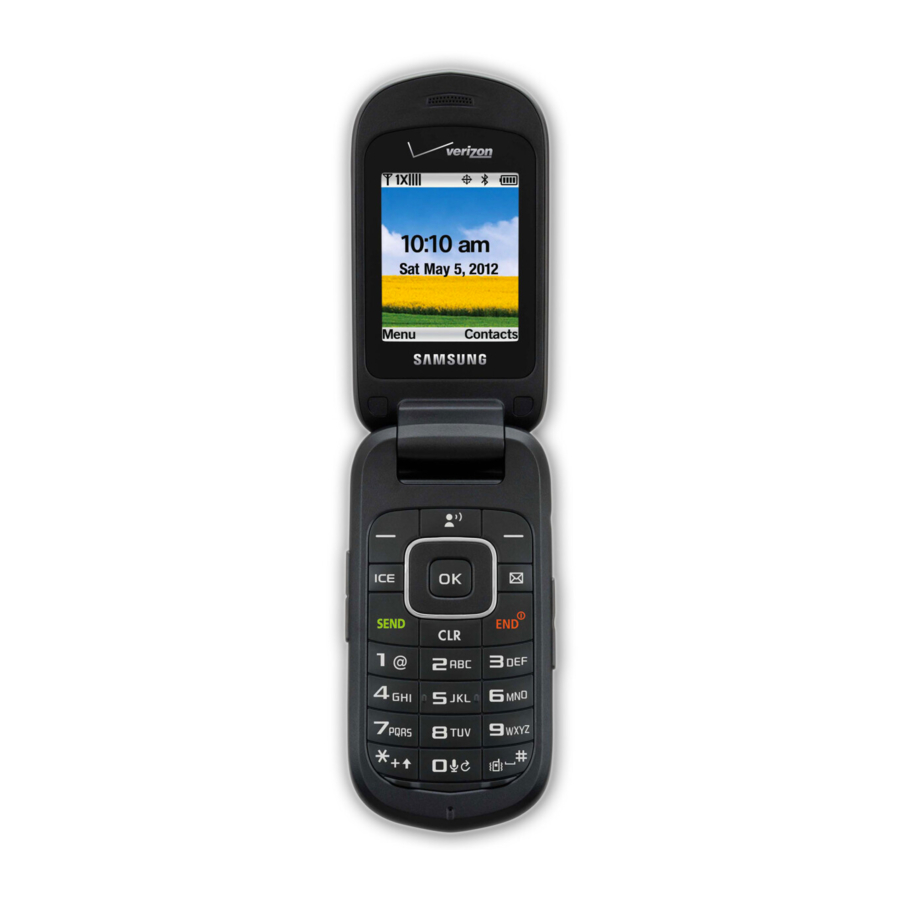
Page 20: Closed View Of Your Phone
Closed View of Your Phone Features 1. Camera Lens: The lens of the built-in camera. 2. Front Screen: Shows signal and battery strength, time, day, and date, plus calls or message notifications. Understanding Your Phone... -
Page 21: Open View Of Your Phone
Open View of Your Phone Features 1. Earpiece: Allows you to hear the caller. 2. Main Screen: Displays phone features. 3. Voicemail Key: Press to access voicemail. 4. Right Soft Key: Press to select the command at the lower right area of the display screen. 5. -
Page 22: Side Views Of Your Phone
Side Views of Your Phone Features 1. Strap Attachment: Attach an optional strap (not included). 2. 2.5 mm Headset Jack: Plug in an optional headset for music, or for safe, convenient conversations. 3. Camera Key: From the Home screen, press to activate the Camera. -
Page 23: Navigation Keys
Navigation Keys Directional Key Press the Directional Key to browse menus and lists, or to launch applications from the Home screen. Directional Key Shortcuts From the Home screen, press a Directional Key Up, Down, Left or Right to launch its corresponding application. My Shortcuts presents a list of shortcuts that you can customize to include your favorite features. -
Page 24: Soft Keys
Soft Keys Soft key functions are defined by what appears above them, in the bottom line of the display. There are three soft keys: the Left Soft Key, the Right Soft Key, and the OK Key. Left Soft Key Left Soft Key Some functions of the Left Soft Key •... -
Page 25: Functional Keys
Functional Keys End/Power Key Use the End/Power Key to end calls, to turn the phone on or off, and to return to a previous menu. For example: • Press and hold the End/Power Key to turn your phone on or off. •... -
Page 26: Messaging Key
Messaging Key Messaging Key accesses the Messaging menu. • From the Home screen, press the Messaging Key to launch the Messaging menu. Clear Key Use the Clear Key to erase or clear numbers, text, or symbols from the display, or to return to a previous menu or to the Home screen from any menu. -
Page 27: Speakerphone Key
Speakerphone Key Use the Speakerphone Key to enable or disable the speakerphone or launch Voice Commands: • During a call with the flip open, press and hold the Speakerphone Key to switch between the earpiece and the speakerphone. • When answering a call with the flip open or closed, press and hold the Speakerphone Key to answer the call with the speakerphone. -
Page 28: Understanding The Home Screen
Understanding the Home Screen The Home screen is the starting point for using your phone. • Annunciator: Presents icons to show network status, battery power, and connection details. For a list of icons, see “Annunciator Icons” on page 24. • Status and Settings: Presents icons indicating active alerts, reminders, alarms and current settings. -
Page 29: Home Screen Icons
Home Screen Icons Annunciator Icons Icons display in the top line of the Home screen to show the status of the phone. For a list of icons, see the Icon Glossary. From the Home screen, press the Left Soft Key Menu Phone Info Icon Glossary. - Page 30 Voice Privacy: The Voice Privacy setting is active, to increase privacy of voice calls. For more information, see “Voice Privacy” on page 129. TTY: TTY Mode is active. For more information, see “TTY Mode” on page 129. Bluetooth On: Bluetooth service is On. For more information, see “Turning Bluetooth On or Off”...
- Page 31 Voicemail: You have new voicemail. Missed Calls: You have missed calls. Calendar Event: You have an active calendar event. Speakerphone: Speakerphone mode is active. Alarm On: You have an alarm set to go off in the next 24 hours. Auto Answer: The Auto w/ Handsfree Answer Option is enabled.
-
Page 32: Understanding The Menu
Understanding the Menu The Menu is the starting point for launching applications and features. From the Home screen, press the Left Soft Key select Menu. Customizing the Menu Setting a Display Theme Display themes offer coordinated looks for all your phone’s screens, including the Menu. - Page 33 Tools: Access productivity tools. For more information, see “Tools” on page 91. ® VZ Navigator : Launch VZ Navigator, for location- based directions and searches. For more information, “VZ Navigator” on page 98. My Pictures: Opens My Pictures, for access to your photos.
-
Page 34: Section 3: Entering Text
Section 3: Entering Text Your phone provides convenient ways to enter words, letters, punctuation, and numbers when you need to enter text. This section describes text input modes and entering characters or symbols, using the keypad. Your phone offers these text entry modes: •... -
Page 35: Entering Text Using T9 Word
Entering Text Using T9 Word T9 Word is a predictive text entry mode that recognizes common English words matching the sequence of your key presses and inserts the most common word into your text. T9 Word requires only one key press per letter of the word, and is much faster than traditional text entry. -
Page 36: Entering Text Using Abc/Abc/Abc Mode
Entering Text using Abc/ABC/abc Mode Abc mode is standard text entry mode for mobile telephones. To switch to Abc mode, press the Left Soft Key Entry Mode Abc. While entering text: • Press the appropriate key once for the first letter on the key, twice for the second letter, three times for the third letter, and four times for the fourth letter. -
Page 37: Entering Symbols
Entering Symbols Use Symbols mode to enter common symbols into a text field. To switch to Abc mode, press the Left Soft Key Entry Mode Symbols. To enter symbols: • Use the Directional Key press OK to insert it. • There are three pages of symbols. -
Page 38: Entering Numbers
Entering Numbers Use 123 mode to enter numbers into a text field. To switch to 123 mode, press the Left Soft Key Entry Mode 123. While entering numbers: • Press the appropriate key for each number. • Press to backspace to clear one number. Press and hold to clear multiple numbers in a string Entering Text... -
Page 39: Section 4: Call Functions
Section 4: Call Functions This section describes how to make, answer, and end calls. It also includes information about the Recent Calls log and Voice Commands. Making a Call Your phone offers multiple ways to make calls: • Enter the phone or speed dial number, then press the Send Key. -
Page 40: Sending Calls To Voicemail
In-Call Options While in a call, use the soft keys to access in-call options: Press the Left Soft Key Mute to mute the microphone so the other caller cannot hear your voice. Press the Right Soft Key Options for these options: •... -
Page 41: Recent Calls
Recent Calls Recent Calls saves a record of every call that you dial, miss, or answer. 1. From the Home screen, press the Left Soft Key Menu Recent Calls. – or – From the home screen, press 2. Use the Directional Key to highlight a call type, then press VIEW to display call records:... - Page 42 Creating or Updating Contacts Using Recent Calls 1. From the Home screen, press the Left Soft Key Menu Recent Calls. – or – From the home screen, press 2. Find a call from All Calls, Missed Calls, Received Calls, or Dialed Calls. 3.
-
Page 43: Fake Call
Deleting All Recent Calls Records 1. From the Home screen, press the Left Soft Key Menu Recent Calls. – or – From the home screen, press 2. Find a call from All Calls, Missed Calls, Received Calls, or Dialed Calls. 3. -
Page 44: Sound Alert Mode
Initiating a Fake Call From idle mode with the phone closed, press the Volume Key Down 4 times. After the Fake Call Timer period elapses, your phone rings to notify you of the fake call. If you entered Fake contact Info, it appears on the screen, or “Restricted”... - Page 45 Enabling Sound Alert Mode Using Settings to Enable Sound Alert Mode 1. From the Home screen, press the Left Soft Key Menu Settings Mode. 2. Use the Directional Key to highlight an option, then press SET: • Caller ID Only: Volume is set to high, and when you receive a call or message, the caller or sender’s name is read out.
- Page 46 When you enable Sound Alert Mode using Voice Commands, Sound Alert Mode is automatically started in ID & Message mode. From the Home screen, press and hold the Voice Commands Key. – or – With the flip closed, press and hold the Speakerphone Key.
-
Page 47: Section 5: Understanding Your Contacts
Section 5: Understanding Your Contacts This section allows you to manage your daily contacts by saving information in Contacts. Contacts provides access to powerful features such as Groups, creating and sending vCards, and viewing the phone number assigned to your phone by Verizon Wireless. To access Contacts List for quick access to most functions: From the Home screen, press the Right Soft Key Contacts. -
Page 48: Contacts Fields
Contacts Fields These icons represent all available fields for Contacts. Mobile 1: Enter the contact’s Primary mobile number. Home: Enter the contact’s Home number. Business: Enter the contact’s Work telephone number. Mobile 2: Enter the Secondary mobile number. Fax: Enter the contact’s Fax telephone number. Personal Email: Enter the contact’s Personal Email address. - Page 49 Adding a New Contact from the Keypad Enter a telephone number with the external keypad, then save it. 1. From the Home screen, use the keypad to enter the telephone number. 2. Press the Left Soft Key Save 3. Use the Directional Key to highlight Mobile 1, Mobile 2, Home, Business or Fax, then press 4.
-
Page 50: Erasing Contacts
Erasing Contacts 1. From the Home screen, press the Right Soft Key Contacts. 2. Press the Right Soft Key Options Contacts Erase. 3. Find a contact, by pressing the browse contacts, or see “Finding a Contact” on page 48. 4. Use the Directional Key to highlight the contact, then press MARK to mark it for erasure, or press the Right Soft Key... - Page 51 Editing a Contact from the Keypad Enter a telephone number with the keypad, then save it to an existing contact. 1. From the Home screen, use the external keypad to enter the telephone number. 2. Press the Left Soft Key Save 3.
-
Page 52: Managing Contacts
Managing Contacts Use Manage Contacts to perform actions such as erasing, locking, or unlocking, on multiple contacts at one time. 1. From the Home screen, press the Right Soft Key Contacts. 2. Press the Right Soft Key Options Contacts. 3. Choose an option: •... -
Page 53: Finding A Contact
Finding a Contact 1. From the Home screen, press the Right Soft Key Contacts. The Contacts List displays, with the cursor in the Go To field. 2. In the Go To field, enter the first few characters of the Contact name to see matching entries. 3. -
Page 54: Groups
Groups You can assign Contact entries to categories, called Groups, to make searching your contacts faster, or to quickly send messages to group members. Adding Contacts to Groups 1. From the Home screen, press the Left Soft Key Menu Contacts 2. -
Page 55: Creating A New Group
Creating a New Group In addition to the default groups, you can create additional groups. 1. From the Home screen, press the Left Soft Key Menu Contacts 2. Press the Left Soft Key New. 3. At the NEW GROUP screen, enter a name of up to 32 characters for the new group in the “Enter Name:”... -
Page 56: Speed Dials
Speed Dials Speed Dials are 1-, 2- or 3-digit shortcuts you assign to contacts, to allow you to quickly call the contact. Note: Some Speed Dials are reserved by default, and cannot be assigned: 1 is reserved for Voicemail. 95 is reserved for Warranty Center (#Warranty). 96 is reserved for Data Usage inquiries (#DATA). -
Page 57: Emergency Contacts
Removing a Speed Dial 1. From the Home screen, press the Left Soft Key Menu Contacts 2. Use the Directional Key to highlight a speed dial, or enter the speed dial digits into the Go To field, then press the Right Soft Key Remove. -
Page 58: Entering Personal Information
Re-assigning or Unassigning Emergency Contacts 1. From the Home screen, press the Left Soft Key Menu Contacts 2. Use the Directional Key to highlight a contact. 3. Press the Right Soft Key Options, then choose an option: • Re-assign: Choose another contact from Contacts List, or create a new contact for this assignment. -
Page 59: My Name Card
My Name Card My Name Card is your personal contact entry in Contacts, which you can send to recipients as a virtual business card (vCard) attached to a message, or via Bluetooth. Editing My Name Card By default, My Name Card contains your mobile telephone number. - Page 60 Sending My Name Card (vCard) by Bluetooth Send your contact information, as My Name Card, to Bluetooth devices that support vCards. 1. From the Home screen, press the Left Soft Key Menu Contacts 2. Press the Right Soft Key Options, then select Send via Bluetooth and press 3.
- Page 61 5. At the CHOOSE DEVICE screen, use the Directional Key to highlight an option, then press • Add New Device: Search for a new Bluetooth device for pairing. • <Device Name>: Send to a previously-paired Bluetooth device. 6. Continue with the Bluetooth transfer. For more information about adding devices and sending via Bluetooth, see “Bluetooth”...
-
Page 62: Backup Assistant
5. Continue creating the text or picture message as desired. For more information, see “Messaging” on page 58. Note: A vCard contains all contact information except Group, Ringtone, and Emergency (ICE) contact status. Backup Assistant Backup Assistant is a wireless service that saves a copy of your Contacts List to a secure web site. -
Page 63: Section 6: Messaging
Section 6: Messaging Types of Messages Your phone can send and receive: • Text Messages, also known as SMS (Simple Messaging Service) • Picture Messages, also known as MMS (Multimedia Messaging Service) • Voice Messages (Multimedia Messaging Service) • Mobile Email •... - Page 64 Favorites: Choose contacts you have marked as Favorites. – Groups: Choose a contacts Group. – To Contacts: If a recipient is not saved to contacts, you can save it as a new contact or update an existing one. 3. Use the Directional Key to move to the Text: field to compose your message.
-
Page 65: Creating And Sending Picture Messages
Creating and Sending Picture Messages Note: Available in the Verizon Wireless Enhanced Services Area. Picture Messages combine text, pictures, and sound, and can be sent to other mobile phones, to Email addresses, to your Online Album, or to a blog. 1. - Page 66 • Paste: If you have already copied text, insert the copied text into the message. • Add Slide/Remove Slide: Add a second slide to the message, or delete the current slide from the message. • Priority Level: Set the urgency, High or Normal. •...
-
Page 67: Creating And Sending Voice Messages
Creating and Sending Voice Messages Voice Messages combine text and voice recordings, and can be sent to other mobile phones, or to Email addresses. Note: Available in the Verizon Wireless Enhanced Services Area. 1. From the Home screen, press the New Message Voice Message. -
Page 68: Receiving Messages
• Copy: Select text to copy, for pasting in another field. Use the Directional Key to highlight the text, then press • Paste: If you have already copied text, insert the copied text into the message. • Priority Level: Set the urgency, High or Normal. •... -
Page 69: Viewing Text Messages
Viewing Text Messages When you receive a text message, the alert sounds (unless turned off), and New TXT Message appears in the display. 1. At the New TXT Message prompt, press Now. 2. While viewing the message, you have these options: •... - Page 70 Viewing Picture or Voice Messages When you receive a Picture or Voice message, the alert sounds (unless turned off), and New Media MSG appears in the display. 1. At the New Media MSG prompt, press Now. 2. After loading, the attachment (and text, if any), the message appears in the display.
-
Page 71: Message Folders
Message Folders Messages are stored in the message folders, depending on your selections for Inbox View in Message Settings. Tip: To scroll through all messages in the Messages, Sent, or Drafts folder, open one message, then press the Directional Key Left or Right. Note: The Messaging menu depends on the Inbox View setting. -
Page 72: Inbox Folder
• Sort Alphabetically: Display message threads by contact/ phone number. • Messaging Menu: Return to the Messaging menu. • Social Networks: Update your status, or access Facebook and Twitter to share posts, photos and links. Viewing Messages by Time When the Inbox View setting is set to Time, incoming messages are stored in the Inbox, and sent messages are stored in the Sent folder, sorted by time. - Page 73 • Extract Addresses: Display numbers, Email Addresses, and URLs from the message, to call, send an email, or open the web page. • Message Info: Display details about the highlighted message. • Manage Inbox: Perform actions on messages, including Erase, Lock, Unlock, Mark as Read, and Mark as Unread. •...
-
Page 74: Drafts Folder
• Resend: Send the message again, to the original recipient(s), plus new recipients if desired. • Add To Contacts: Save the number of the sender to Contacts as a new entry or additional to an existing entry. • Message Info: Display details about the message. •... -
Page 75: Voicemail
Voicemail From the Messaging menu, you can view the total of your new voicemail messages, clear the voicemail counter, and call voicemail to check messages. Note: Text Messaging charges do not apply when checking voicemail. 1. From the Home screen, press the Voicemail. -
Page 76: Social Networks
Social Networks Use the Social Networks feature to update Facebook or Twitter, or access the mobile Facebook or Twitter sites. Setting up Your Phone with Facebook or Twitter Set up your phone to access Facebook and Twitter to share posts, photos and links. You can activate your phone with your Facebook or Twitter account’s mobile account settings. -
Page 77: Updating Your Status
Updating your Status After you register your phone with Facebook or Twitter, updating your status is easy and quick. 1. From the Home screen, press the Social Networks Update Status. 2. Enter text, then press SEND. 3. Select sites to update. Use the highlight sites, then press Right Soft Key Mark All to select Facebook and... -
Page 78: Emergency Alerts
Emergency Alerts This device is designed to receive Wireless Emergency Alerts from the Commercial Mobile Alert Service (CMAS). Emergency Alerts are geographically-targeted, and alert customers to imminent threats to their safety within their area. There is no charge for receiving an Emergency Alert. There are three types of Emergency Alerts: •... - Page 79 • TXT Auto View: Choose On to automatically display text messages when they arrive, or Off to have the phone prompt you. • MMS Auto Receive: Choose On to automatically accept new multimedia messages. Choose Off to have the phone prompt you to download new multimedia messages.
- Page 80 • Callback #: Choose On to add a callback phone number to your messages, and set the phone number. Choose Off to omit a callback number (you can manually add a callback number when composing messages). • Signature: Choose Custom to add a signature to all messages, then use the Directional Key to move to the signature field to create the signature.
-
Page 81: Section 7: Bluetooth
Section 7: Bluetooth Bluetooth is a short-range wireless communications technology capable of exchanging information over a distance of about 30 feet, without a physical connection. You don't need to line up the devices to send information with Bluetooth. If the devices are in range, you can exchange information between them, even if they are located in different rooms. -
Page 82: Turning Bluetooth On Or Off
Turning Bluetooth On or Off Turn Bluetooth on to exchange information with a Bluetooth device. To save battery life, or in situations where use of wireless devices is prohibited, turn Bluetooth off. 1. From the Home screen, press the Left Soft Key Menu Settings 2. -
Page 83: Adding A New Device
Adding a New Device Search for a Bluetooth device and pair with it, to exchange information between your phone and the device. 1. From the Home screen, press the Left Soft Key Menu Settings Device. Bluetooth turns on, if it is not already on. 2. -
Page 84: Section 8: Media Center
Section 8: Media Center Media Center includes applications for downloading, creating, viewing and managing multimedia content, right on your phone. From the Home screen, press the Left Soft Key Menu Media Center. Note: Before downloading multimedia content, check available memory. For more information, see “Memory” on page 131. -
Page 85: Get Ringback Tones
Get Ringback Tones Ringback Tones play to callers while the system is connecting their call. Use Get Ringback Tones to download new tones. 1. From the Home screen, press the Left Soft Key Menu Media Center Get Ringback Tones. 2. Follow the prompts to download the Verizon Tones application and subscribe to Verizon Tones service. - Page 86 My Sounds In My Sounds, record and manage sounds for use as alerts for calls and messages. 1. From the Home screen, press the Left Soft Key Menu Media Center My Sounds. 2. Use the Directional Key to highlight a sound, then choose one of these actions: •...
-
Page 87: Pictures
Recording a new sound 1. From the Home screen, press the Left Soft Key Menu Media Center My Sounds. 2. Use the Directional Key to highlight Record New, then press 3. Press the Left Soft Key RecTime to set the recording time. -
Page 88: My Pictures
My Pictures View and manage pictures pre-loaded on your phone, taken with the built-in camera, or downloaded to your phone. Note: Pictures protected by copyright, including the pictures pre-loaded on your phone, cannot be uploaded or sent as a message attachment. Viewing and Managing Pictures 1. -
Page 89: Editing Pictures
Editing Pictures 1. From the Home screen, press the Left Soft Key Menu Media Center Pictures. 2. Use the Directional Key to browse the list of photos. Highlight the photo, then press open it for editing. Press the Right Soft Key Options for editing options (other options appear in the list;... -
Page 90: Sharing Pictures
Sharing Pictures Send pictures you’ve taken or downloaded to your phone as an attachment to a Picture Message or Email, via Bluetooth, or post them to a blog, your Online Album, or to Facebook. Note: Pictures protected by copyright, including the pictures pre-loaded on your phone, cannot be uploaded or sent as a message attachment. -
Page 91: Taking Pictures
Taking Pictures Your phone’s built-in Camera takes pictures in JPEG format. From the Camera, you can send pictures as attachments to email or by Bluetooth, or upload pictures to your social networks. You can take pictures with the flip open or closed. Caution! Do not take pictures of people without their permission. -
Page 92: Camera Options
Taking Pictures with the Phone Closed Take pictures, including self-portraits, without opening the flip. 1. With the phone closed, press and hold the Camera Key on the right side of the phone. 2. Using the front screen as a viewfinder, compose your picture by aiming the lens at your subject. -
Page 93: Online Album
• White Balance: Choose a setting for the light source, from Auto, Daylight, Incandescent, Fluorescent, or Cloudy. • Exposure metering: Select a setting for measuring light before taking a picture, from Matrix, Center-weighted, or Spot. • Preview Mode: Choose a mode for viewing pictures after you take them, from Full Screen or Standard Screen. -
Page 94: Games
Games Play fun and interesting Games, right on your phone. 1. From the Home screen, press the Left Soft Key Menu Media Center 2. Use the Directional Key to highlight a game, then press OK to launch the game. 3. To browse and download new games, use the Directional Key to highlight Get Applications. -
Page 95: Extras
Extras Browse and download extra items to your phone. 1. From the Home screen, press the Left Soft Key Menu Media Center 2. Use the Directional Key to highlight an application, or highlight Get New Applications, then press 3. Follow the prompts to download and install the application. -
Page 96: Section 9: Tools
Section 9: Tools Voice Commands Voice Commands is advanced speech recognition software that recognizes your spoken commands to dial phone numbers, create messages, and launch phone features such as Contacts, Calendar and My Pictures. To use Voice Commands, speak naturally into your phone, at a distance of 3-12 inches. -
Page 97: Calculator
Using Voice Commands 1. From the Home screen, press and hold the Commands Key. 2. At the prompt “Please say a command”, speak a command. Available commands display for reference: • Call <Name or #>: Speak the name of a contact, or a number. •... - Page 98 Calculate a tip and how much each person should pay. 1. From the Home screen, press the Left Soft Key Menu Tools Calculator 2. Use the Directional Key to move to each field: • Bill: Enter the amount of the bill. •...
-
Page 99: Calendar
Calendar Schedule events, with reminders, so that you can track them. Set alarms for events to be alerted of an upcoming event. 1. From the Home screen, press the Left Soft Key Menu Tools Calendar. 2. From the Calendar screen, find an event: •... -
Page 100: Alarm Clock
Alarm Clock Set up to ten alarms, to go off once, or periodically at the same time. Once set, alarms are easy to change or turn off. Note: Alarms coming up in the next 24 hours will cause the Alarm icon to appear in the Event Status line on the Home screen. -
Page 101: Stop Watch
Erasing Alarms 1. From the Home screen, press the Left Soft Key Menu Tools Alarm Clock. 2. Press the Right Soft Key Options, then select Erase to erase the highlighted alarm, or Erase All to delete all alarms. Follow the prompts to complete the action. Stop Watch Measure lap times and total elapsed time. -
Page 102: World Clock
World Clock View the local time, and the time in time zones around the world. 1. From the Home screen, press the Left Soft Key Menu Tools World Clock. 2. Choose a time zone with one of these methods: • Use the Directional Key to scroll through the time zones around the world. -
Page 103: Phone Search
Phone Search Search for items on your phone. 1. From the Home screen, press the Left Soft Key Menu Tools Phone Search. 2. Enter characters to use as criteria for your search. For more information, see “Entering Text” on page 29. 3. -
Page 104: Section 10: Web
Section 10: Web This section outlines the web and social networking applications available on your phone. Mobile Web Browse the web from your phone. Note: This feature is only available in the United States, in the Verizon Wireless Enhanced Services Area. When the Data Call icon appears in the Annunciator Line, you are connected to the Internet and billed... -
Page 105: Entering A Url
Entering a URL Enter a URL, or web address, to go to the web page or create a Favorite bookmark. 1. From the Home screen, press the Left. 2. Mobile Web launches, displaying Verizon Services. 3. Press the Right Soft Key Menu, then select Go to URL. -
Page 106: Using Favorites
Left Soft Key: The Left Soft Key function depends on the type of content that’s highlighted. For example: • Select: Press to open a list of items, then use the Directional Key to highlight an item. Press the Left Soft Key again, or press •... - Page 107 1. From the Home screen, press the Left. 2. Mobile Web launches, displaying Verizon Services. 3. Use the Directional Key to highlight Favorites, then press the Left Soft Key 4. Use the Directional Key to highlight ADD FAVORITES, then press the Left Soft Key 5.
-
Page 108: Mobile Web Menu
Mobile Web Menu While browsing, press the Right Soft Key from a list of menu options: 1. From the Home screen, press the Directional Key Up. Mobile Web launches displaying the VZW Today page. 2. Press the Right Soft Key Menu for these options: •... - Page 109 • Key Press Time Out: Set the length of time Mobile Web will wait before a key press times out, to Slow, Medium, or Fast, or choose Off. • Connection Time Out: Set the length of time Mobile Web will wait for a page to load before timing out, from 30 seconds or 60 seconds.
-
Page 110: Section 11: Settings
Section 11: Settings My Verizon My Verizon connects to the Verizon Wireless Mobile Web, where you can manage your account and browse the web. From the Home screen, press the Left Soft Key Menu Settings Volume Set the default Volume for all the sounds on your phone. 1. -
Page 111: Bluetooth
Bluetooth Use Bluetooth to exchange information over a distance of about 30 feet without requiring a physical connection. For more information, see “Bluetooth” on page 76. From the Home screen, press the Left Soft Key Menu Settings Sounds Customize your phone’s sounds. Easy Set-up Quickly set Sounds settings. -
Page 112: Alert Sounds
Alert Sounds Choose sounds for new message alerts, emergency tones, missed calls, and device connection alerts. 1. From the Home screen, press the Left Soft Key Menu Settings 2. Make selections for the following settings: • TXT Message: Choose a Tone, Vibrate setting and Reminder options for incoming text messages. -
Page 113: Keypad Volume
Keypad Volume Set the volume of tones played for keypad presses. 1. From the Home screen, press the Left Soft Key Menu Settings Volume. 2. Press the Directional Key or Volume Key to highlight a volume level, Off, Low, Medium Low, Medium, Medium High, or High, then press Digit Dial Readout Enable or disable the readout of numbers as you dial. - Page 114 Power Control whether your phone plays sounds when you turn the phone on or off. 1. From the Home screen, press the Left Soft Key Menu Settings 2. Choose Power On or Power Off to control the sounds. Sound Alert Mode When Sound Alert Mode is On, all visual alerts on your phone are converted to sounds.
-
Page 115: Display
Display Customize the appearance of your phone’s screens. From the Home screen, press the Left Soft Key Menu Settings Easy Set-Up Quickly configure Display settings. 1. From the Home screen, press the Left Soft Key Menu Settings 2. Follow the screen prompts to choose settings for Personal Banner, Display Backlight, Keypad Backlight, Main Wallpaper, Front Wallpaper, Display Themes, Menu Layout, Dial Fonts, Font Size Control, Main Clock, and... - Page 116 ERI banner When enabled, the ERI banner appears on the Home screen to indicate network coverage. 1. From the Home screen, press the Left Soft Key Menu Settings Banner. 2. Press the Directional Key Left or Right to highlight On or Off. 3.
-
Page 117: Front Screen
Wallpaper Select a background image for the Main (Home) Screen and Front Screen, from pre-loaded images, or your own pictures. Main Screen 1. From the Home screen, press the Left Soft Key Menu Settings Main Screen. 2. Use the Directional Key to highlight a picture from My Pictures, or press the Right Soft Key choose Take Picture with the Camera. -
Page 118: Menu Layout
Themes Customize the appearance of your phone’s menus and screens. 1. From the Home screen, press the Left Soft Key Menu Settings 2. Use the Directional Key to highlight a display theme, then press SET. Choose from White, Aqua, or Wave (default). - Page 119 You can replace some items on the Menu with your own choices, for easier access to your favorite features. 1. From the Home screen, press the Left Soft Key Menu Settings Replace Item. 2. Use the Directional Key to highlight an item, then press EDIT.
- Page 120 Reset Menu If you’ve customized your phone’s menus, you can choose to return settings to their defaults. 1. From the Home screen, press the Left Soft Key Menu Settings Reset Menu. 2. Use the Directional Key to highlight an item, then press OK to reset the item.
-
Page 121: Clock Format
Font Size Control When Font Size Control is set to On, you can adjust the size of fonts by pressing the Volume Key while viewing a screen, such as message text or the dialer. 1. From the Home screen, press the Left Soft Key Menu Settings Size Control. -
Page 122: Front Contrast
Front Clock 1. From the Home screen, press the Left Soft Key Menu Settings Front Clock. 2. Press the Directional Key Left or Right to highlight Digital 12, Digital 24, or Off. 3. Press the Directional Key Down to the Clock Color selector, then press Right or Left to highlight a color for the clock display. -
Page 123: Phone
Phone Choose settings for the phone’s behavior. From the Home screen, press the Left Soft Key Menu Settings Airplane Mode When Airplane Mode is set to On, all wireless functions of your phone are disabled, and you cannot send or receive calls or messages. -
Page 124: Side Key Lock
Directional Keys From the Home screen, you can press the Key Up, Down, Left or Right to quickly access features. You can customize the Up, Left and Down shortcuts to your favorites. For more information about the Directional Key, see “Directional Key Shortcuts”... - Page 125 Voice Commands Configure the Voice Commands feature of your phone. You can also access Voice Command settings from Voice Commands. For more information, see “Voice Commands” on page 91. 1. From the Home screen, press the Left Soft Key Menu Settings Commands.
- Page 126 Language Choose the language for the phone’s operation and displays. 1. From the Home screen, press the Left Soft Key Menu Settings 2. Use the Directional Key to highlight a language, then press Location Detection Choose whether your phone’s GPS (Global Positioning System) location is available to the network at all times, or only when you’ve dialed an Emergency Number, such as Phone...
- Page 127 Set Country To assure that your phone works properly when you travel, set the country, so that the correct Country Code is applied when you dial. 1. From the Home screen, press the Left Soft Key Menu Settings 2. Use the Directional Key to highlight a country, then press Security...
- Page 128 Set a new Phone Only Lock Code (for locking and unlocking the phone) or Calls & Services Lock Code (for restricting access to calls and services). 1. From the Home screen, press the Left Soft Key Menu Settings 2. Enter the Phone Only Lock Code at the prompt. The default lock code is the last four digits of your phone number.
- Page 129 6. Use the Directional Key to highlight Calls to set restrictions for calls, then press • Incoming Calls: Choose Allow All to allow all incoming calls. Choose Contacts Only to allow only callers that are in your Contacts List. Choose Block All to block all incoming calls. •...
-
Page 130: Lock Phone Now
You can manually lock your phone, to prevent access until you unlock it with the Phone Only Lock Code. This is a one- time lock; your phone returns to its Phone Lock Setting after you unlock it. 1. From the Home screen, press the Left Soft Key Menu Settings 2. -
Page 131: Reset Settings
Reset Settings Return all settings to factory defaults. This setting does not erase user data such as pictures, videos, music, messages, contacts or downloaded applications stored on the phone. 1. From the Home screen, press the Left Soft Key Menu Settings 2. -
Page 132: System Select
System Select Set system selections for roaming. For more information about roaming, see “Roaming” on page 12. 1. From the Home screen, press the Left Soft Key Menu Settings 2. Use the Directional Key to highlight a setting, then press SET: •... -
Page 133: Call Settings
Call Settings Customize settings related to placing and receiving calls. Answer Options Select a method for answering incoming calls. 1. From the Home screen, press the Left Soft Key Menu Settings 2. Use the Directional Key to highlight option(s) and press MARK to mark them for selection, or press the Right Soft Key... -
Page 134: One Touch Dial
TTY Mode Your phone is TTY-compatible, allowing you to connect a TTY device to the phone’s headset jack. Before you can use your phone with a TTY device, you’ll need to enable TTY Mode. Enabling TTY Mode 1. From the Home screen, press the Left Soft Key Menu Settings 2. -
Page 135: Data Settings
Data Settings Select a port for connecting the phone to a PC, and set connection speed. 1. From the Home screen, press the Left Soft Key Menu Settings 2. Configure these data settings: • Select Port: Choose USB to allow connections via the USB port, or NULL to allow no connections. -
Page 136: Memory
Fake Call Use the Fake Call feature to have your phone ring with a fake call when you press the times in a row with the phone closed. 1. From the Home screen, press the Left Soft Key Menu Settings 2. -
Page 137: Phone Info
Phone Info View software and hardware information for your phone, your assigned telephone number, an icon glossary, and manage software updates. 1. From the Home screen, press the Left Soft Key Menu Settings 2. Use the Directional Key to highlight My Number, then press OK to display the Mobile Device and Identification numbers. -
Page 138: Section 12: Health And Safety Information
Section 12: Health and Safety Information This section outlines the safety precautions associated with using your phone. The terms “mobile device” or “cell phone” are used in this section to refer to your phone. Read this information before using your mobile device. Exposure to Radio Frequency (RF) Signals The U.S. - Page 139 The energy levels associated with radio frequency energy, including both radio waves and microwaves, are not great enough to cause ionization of atoms and molecules. Therefore, RF energy is a type of non-ionizing radiation. Other types of non-ionizing radiation include visible light, infrared radiation (heat), and other forms of electromagnetic radiation with relatively low frequencies.
- Page 140 (COSMOS) The COSMOS study aims to conduct long-term health monitoring of a large group of people to determine if there are any health issues linked to long-term exposure to radio frequency energy from cell phone use. The COSMOS study will follow approximately 300,000 adult cell phone users in Europe for 20 to 30 years.
- Page 141 The FDA also is working with voluntary standard-setting bodies such as the Institute of Electrical and Electronics Engineers (IEEE), the International Commission on Non-Ionizing Radiation Protection (ICNIRP), and others to assure that safety standards continue to adequately protect the public. Reducing Exposure: Hands-Free Kits and Other Accessories Steps to Reduce Exposure to Radio Frequency Energy...
-
Page 142: Children And Cell Phones
Studies have shown that these products generally do not work as advertised. Unlike “hands-free” kits, these so-called “shields” may interfere with proper operation of the phone. The phone may be forced to boost its power to compensate, leading to an increase in RF absorption. Children and Cell Phones The scientific evidence does not show a danger to any users of cell phones from RF exposure, including children and... -
Page 143: Specific Absorption Rate (Sar) Certification Information
• US Food and Drug Administration: http://www.fda.gov/Radiation-EmittingProducts/ RadiationEmittingProductsandProcedures/ HomeBusinessandEntertainment/CellPhones/default.htm. Specific Absorption Rate (SAR) Certification Information Your wireless phone is a radio transmitter and receiver. It is designed and manufactured not to exceed the exposure limits for Radio Frequency (RF) energy set by the Federal Communications Commission (FCC) of the U.S. -
Page 144: Fcc Part 15 Information To User
Pursuant to part 15.21 of the FCC Rules, you are cautioned that changes or modifications not expressly approved by Samsung could void your authority to operate the device. This device complies with part 15 of the FCC Rules. Operation is subject to the following two conditions: (1) This... -
Page 145: Commercial Mobile Alerting System (Cmas)
Samsung is committed to promoting responsible driving and giving drivers the tools they need to understand and address distractions. -
Page 146: Battery Use And Safety
If the phone and/or battery get wet, have them checked by your service provider or contact Samsung, even if they appear to be working properly. Health and Safety Information... - Page 147 Samsung-approved chargers which are specifically designed for your phone. WARNING! Use of a non-Samsung-approved battery or charger may present a risk of fire, explosion, leakage, or other hazard. Samsung's warranty does not cover damage to the phone caused by non-Samsung-approved batteries and/or chargers.
-
Page 148: Samsung Mobile Products And Recycling
Recycling programs for your mobile device, batteries, and accessories may not be available in your area. We've made it easy for you to recycle your old Samsung mobile device by working with respected take-back companies in every state in the country. -
Page 149: Ul Certified Travel Charger
The Samsung Mobile Take-Back Program will provide Samsung customers with a free recycling mailing label. Just go to http://www.samsung.com/us/aboutsamsung/citizenship/ usactivities_environment_samsungrecyclingdirect.html?INT=ST A_recyle_your_phone_page and follow the instructions to print out a free pre-paid postage label and then send your old mobile device or battery to the address listed, via U.S. -
Page 150: Display / Touch-Screen
“Standard Limited Warranty”. GPS & AGPS Certain Samsung mobile devices can use a Global Positioning System (GPS) signal for location-based applications. A GPS uses satellites controlled by the U.S. Government that are subject to changes implemented in accordance with the Department of Defense policy and the 2008 Federal Radio navigation Plan (FRP). -
Page 151: Emergency Calls
Samsung, and other third-parties providing services. Use of AGPS in Emergency Calls When you make an emergency call, the cellular network may activate AGPS technology in your mobile device to tell the emergency responders your approximate location. -
Page 152: Care And Maintenance
Keep your Samsung Mobile Device away from: Liquids of any kind Keep the mobile device dry. Precipitation, humidity, and liquids contain minerals that will corrode electronic circuits. -
Page 153: Responsible Listening
Paint Do not paint the mobile device. Paint can clog the device’s moving parts or ventilation openings and prevent proper operation. Responsible Listening Caution! Avoid potential hearing loss. Damage to hearing occurs when a person is exposed to loud sounds over time. The risk of hearing loss increases as sound is played louder and for longer durations. - Page 154 • Do not turn the volume up to block out noisy surroundings. If you choose to listen to your portable device in a noisy environment, use noise-cancelling headphones to block out background environmental noise. By blocking background environment noise, noise cancelling headphones should allow you to hear the music at lower volumes than when using earbuds.
-
Page 155: Operating Environment
National Institute for Occupational Safety and Health (NIOSH) 395 E Street, S.W., Suite 9200 Patriots Plaza Building Washington, DC 20201 Voice: 1-800-35-NIOSH (1-800-356-4674) 1-800-CDC-INFO (1-800-232-4636) Outside the U.S. 513-533-8328 Email: cdcinfo@cdc.gov Internet: http://www.cdc.gov/niosh/topics/noise/ default.html 1-888-232-6348 TTY Operating Environment Remember to follow any special regulations in force in any area, and always switch your mobile device off whenever it is forbidden to use it, or when it may cause interference or danger. - Page 156 • Should read and follow the directions from the manufacturer of your implantable medical device. If you have any questions about using your wireless mobile device with an implantable medical device, consult your health care provider. For more information see: http://www.fcc.gov/oet/rfsafety/rf- faqs.html#.
-
Page 157: Fcc Hearing Aid Compatibility (Hac) Regulations For Wireless Devices
Do not turn on your device if it is wet. If your device is already on, turn it off and remove the battery immediately (if the device will not turn off or you cannot remove the battery, leave it as-is). Then, dry the device with a towel and take it to a service center. -
Page 158: Restricting Children's Access To Your Mobile Device
Hearing devices may also be rated. Your hearing aid manufacturer or hearing health professional may help you find this rating. Higher ratings mean that the hearing device is relatively immune to interference noise. Under the current industry standard, American National Standards Institute (ANSI) C63.19, the hearing aid and wireless mobile device rating values are added together to indicate how usable they are together. -
Page 159: Fcc Notice And Cautions
Keep the mobile device and all its parts and accessories out of the reach of small children. FCC Notice and Cautions FCC Notice The mobile device may cause TV or radio interference if used in close proximity to receiving equipment. The FCC can require you to stop using the mobile device if such interference cannot be eliminated. - Page 160 • For vehicles equipped with an air bag, remember that an air bag inflates with great force. Do not place objects, including installed or portable wireless equipment near or in the area over the air bag or in the air bag deployment area. If wireless equipment is improperly installed and the air bag inflates, serious injury could result.
-
Page 161: Section 13: Warranty Information
Limited Warranty does not cover any battery if (i) the battery has been charged by a battery charger not specified or approved by SAMSUNG for charging the battery; (ii) any of the seals on the battery are... - Page 162 (iii) the battery has been used in equipment other than the SAMSUNG phone for which it is specified. What are SAMSUNG’s obligations? During the applicable warranty period, provided the Product is returned in accordance with the terms of this Limited Warranty, SAMSUNG will repair or replace the Product, at SAMSUNG’s sole...
- Page 163 What is the procedure for resolving disputes? ALL DISPUTES WITH SAMSUNG ARISING IN ANY WAY FROM THIS LIMITED WARRANTY OR THE SALE, CONDITION OR PERFORMANCE OF THE PRODUCTS SHALL BE RESOLVED EXCLUSIVELY THROUGH FINAL AND BINDING ARBITRATION, AND NOT BY A COURT OR JURY.
- Page 164 Product’s sale, condition or performance. You may opt out of this dispute resolution procedure by providing notice to SAMSUNG no later than 30 calendar days from the date of the first consumer purchaser’s purchase of the Product. To opt out, you must send notice by e-mail to optout@sta.samsung.com, with the subject...
-
Page 165: End User License Agreement For Software
To avoid unintended information leaks and other problems of this sort, it is recommended that the device be returned to Samsung’s Customer Care Center for an Extended File System (EFS) Clear which will eliminate all user memory and return all settings to default settings. - Page 166 Software. 4. CONSENT TO USE OF DATA. You agree that Samsung and its affiliates may collect and use technical information gathered as part of the product support services related to the Software provided to you, if any, related to the Software.
- Page 167 8. TERMINATION. This EULA is effective until terminated. Your rights under this License will terminate automatically without notice from Samsung if you fail to comply with any of the terms and conditions of this EULA. Upon termination of this EULA, you must cease all use of the Software and destroy all copies, full or partial, of the Software.
- Page 168 DISCLOSURE OF INFORMATION OR ANY OTHER PRACTICES OF ANY THIRD-PARTY APPLICATION PROVIDER. 10. Disclaimer of Warranty Regarding Third-Party Applications. SAMSUNG DOES NOT WARRANT OR MAKE ANY REPRESENTATIONS REGARDING THE AVAILABILITY, USE, TIMELINESS, SECURITY, VALIDITY, ACCURACY, OR RELIABILITY OF, OR THE RESULTS OF THE USE OF, OR...
- Page 169 THIS DISCLAIMER OF WARRANTY REGARDING THIRD-PARTY APPLICATIONS, OR TO CREATE ANY WARRANTY. 11. Limitation of Liability. SAMSUNG WILL NOT BE LIABLE FOR ANY DAMAGES OF ANY KIND ARISING OUT OF OR RELATING TO THE USE OR THE INABILITY TO USE ANY...
- Page 170 The award of arbitration shall be final and binding upon the parties. 14. ENTIRE AGREEMENT; SEVERABILITY. This EULA is the entire agreement between you and Samsung relating to the Software and supersedes all prior or contemporaneous oral or written communications, proposals and representations with respect to the Software or any other subject matter covered by this EULA.
-
Page 171: Index
Index Accessory Port 17 Adding a New Contact 42 Alarm Clock disabling alarms 95 setting an alarm 95 Answer Options 128 Auto Retry 128 Backup Assistant 57 Banners ERI 111 personal 110 Battery 6 charging 9 indicator 6 installing 8 removing 8 use of non-supported batteries 9 Battery Use &... - Page 172 Converter 93 Data Settings 130 Directional Key 16 Display backlight 111 Easy Set-up 110 external 15 language 121 settings 110 themes 113 Display / Touch-Screen 145 Do cell phones pose a health hazard? DTMF Tones 130 Earpiece 16 Easy Set-up Displays 12 Sounds 11 Easy Setup 11...
- Page 173 Icons annunciator line 24 Event Status 25 In Case of Emergency assigning emergency contacts 52 entering personal info 53 removing emergency contacts 53 Installing the Battery 8 Left Soft Key 16 Lock edit codes 123 setting 124 Making a call 34 Media Center Extras 90 Tunes &...
- Page 174 Responsible Listening 148 Restricting Children's Access to Your Mobile device 153 Right Soft Key 16 Ringtones 80 get new 79 Samsung Mobile Products and Recy- cling 143 Security 122 edit lock code 123 lock phone 124 restoring default settings 125...
- Page 175 Text Messages creating and sending 58 sending name cards (vCards) 56 viewing 64 Tip Calculator 93 Tools Alarm Clock 95 Calculator 92 Calendar 94 Notepad 97 Stop Watch 96 Tip calculator 93 Voice Commands 91 World Clock 97 TTY Mode enabling 129 Tunes &...