Advertisement
Quick Links
®
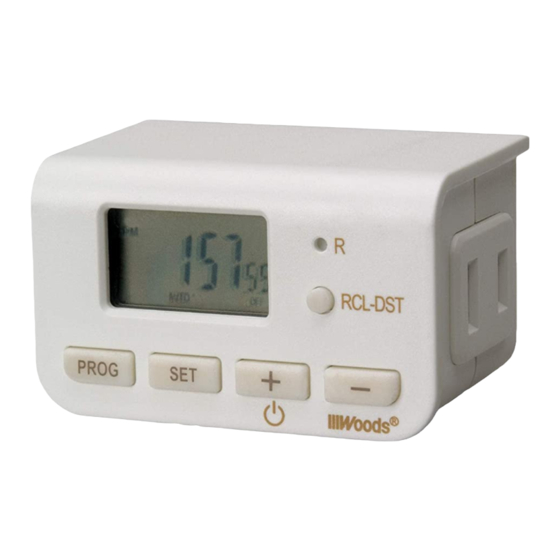
IIIWoods
Model 50007/50027 Indoor 24-Hour Digital Timer 2-C
Modele 50007/50027 minuterie numerique interieure de 24 heures 2-C
Temporizador digital de 24 horas para interiores 2-C Modelo 50007/50027
Instructions
Charge the Battery:
Plug the timer into wall outlet for l O minutes to charge internal battery. Note:
You can then unplug the timer from the wall outlet and comfortably hold it in
your hand to program the timer.
Clear the Memory:
Press the R button with a tooth pick to erase any previous settings.
To Set the Current Time:
Press and hold the SET button for 2 seconds. The hour will begin to flash,
press the+ or - button to adjust the hour up or down. To change from AM to
PM press the+ or - button 12 times. Press the SET button again to advance
to the minute setting. The minutes will begin to flash, press the+ or - button
to adjust the minutes up or down. Press the PROG button to exit setting time
of day.
To Program the Timer:
l. Press the PROG button once to display the first setting "l ON -:--"
2. Press the SET button once to enter the hour setting mode.
3. The hour will begin to flash, press the+ or - button to adjust the hour up
or down.
4. Press the SET button again to enter the minutes setting mode.
5. The minutes will begin to flash, press the+ or - button to adjust the
minutes up or down.
6. Press the SET button again to enter the program setting mode.
7. Press the+ button once to display the second setting "l OFF -:-"
8. Repeat the procedure to create the "off" setting.
Repeat steps l thru 8 for additional "on/off" settings.
Press the PROG button to exit program setting mode.
Review On/Off Settings:
It is important to review all settings, even if you only use one, to make sure
there are no extra, unintended settings. Press the PROG button once to display
the first setting ·1 ON". Press the+ button to advance and cycle through the
settings. Stop on any setting you want to change or remove.
l. To Change a Setting: press the SET button once to enter the timer
program setting mode
2. To Remove or Restore a Setting: press the PROG button to display the
first setting "l ON" and press the+ button until the display shows the
setting you want to remove. Press the RCL-DST button once to remove a
setting. The display will replace the setting with dashes"-:-·. Press the
RCL-DST button again to restore a setting (and press SET if you then want
change the setting)
Daylight Savings Time Feature:
Press RCL-DST button to advance the time of day one hour for daylight savings
time. " + l h" will appear in the lower left corner of the display. Press the button
again to set the time back one hour.
To Connect the Timer:
Plug device into the timer and turn the device on. Plug timer into wall outlet.
To Override the Timer:
Press the + button as necessary to display:
"ON" – the plugged in device is always ON (overrides programming).
"OFF" – the plugged in device is always OFF (overrides programming).
"AUTO ON" – the plugged in device is currently ON and will turn OFF at
next programmed OFF setting.
"AUTO OFF" – the plugged in device is currently OFF and will turn ON at
the next programmed ON setting.
FCC STATEMENT:
This device complies with part 15 of the FCC Rules. Operation is subject to
the following two (2) conditions: (l) This device may not cause harmful
interference and (2) this device must accept any interference received
including interference that may cause undesired operation.
CAN ICES-3(B)/NMB-3(B)
Consumer Support/ Service d'aide a la clientele / Servicio al consumidor (800) 561-4321
125V ac / 60Hz
l DA/ 1250W resistive • resistive • resistivo
4A / 500W tungsten • tungstene • tung steno
4A ballast• ballast• ballastro
Instructions
Chargez la batterie :
Branchez la minuterie dons une prise murale pendant l O minutes pour
charger la batterie interne. Remarque : Vous pouvez alors debrancher la
minuterie de la prise murale et la tenir confortablement dons la main pour la
programmer.
Effacez la memoire :
Enfoncez le bouton R avec un cure-dent pour effacer tous les reg loges
precedents.
Pour regler l'heure du jour :
Appuyez et gardez le bouton SET (regler) enfonce pendant 2 secondes.
L'heure commencera a clignoter, appuyez sur le bouton + ou le - pour
ajuster l'heure vers le haut ou vers le bas. Pour changer de am a pm
appuyez le bouton + ou - 12 fois. Appuyez sur le bouton SET (regler) a
nouveau pour avancer au reglage des minutes. Les minutes commenceront
a clignoter, appuyez sur le bouton + ou le - pour ajuster les minutes vers le
haut ou vers le bas. Appuyez sur le bouton PROG pour sortir du reglage
d'heure du jour.
Pour programmer la minuterie :
l. Appuyez sur le bouton PROG une fois pour afficher le premier reglage
« 1 ON -- -- »
2. Appuyez une fois sur le bouton SET pour entrer dans le mode de reglage
d'heure.
3. L'heure commencera a clignoter, appuyez sur le bouton
+ ou le - pour ajuster l'heure vers le haut ou vers le bas.
4. Appuyez a nouveau sur le bouton SET pour entrer dans le mode de reglage
de minutes.
5. Les minutes commenceront a clignoter, appuyez sur le bouton + ou
le - pour ajuster les minutes vers le haut ou vers le bas.
6. Appuyez a nouveau sur le bouton SET pour entrer dans le mode de reglage
du programme.
7. Appuyez une fois sur le bouton + pour afficher le deuxieme reglage,
« 1 OFF -- -- »
8. Repetez la procedure pour creer le reglage off (arret).
Repetez les etapes 1 et 8 pour d'autres reglages on/off (marche/arret). Appuyez
sur le bouton PROG pour sortir du mode pour regler le programme.
Revisez les reglages marche/arret :
II est important de revoir tous les reglages, meme si vous n'en utilisez qu'un
pour vous assurer qu'il n'y a pas de reglages supplementaires, imprevus.
Appuyez sur le bouton PROG une fois pour afficher le premier reglage « l ON»
Appuyez sur le bouton + pour avancer et passer par le cycle complet des
reglages. Arretez-vous a tout reglage que vous desirez changer ou retirer.
l. Pour changer un reglage : appuyez une fois sur le bouton SET (regler)
pour entrer dans le mode de reglage de programme de minuterie .
2. Pour retirer ou remettre un reglage : appuyez sur le bouton PROG pour
afficher le premier reglage « l ON » et appuyez sur le bouton + jusqu'a ce
que l'affichage montre le reglage que vous desirez retirer. Appuyez sur le
bouton RCL-DST une fois pour retirer un reglage. L'affichage remplacera le
reglage par des tirets « -- : - ». Appuyez sur le bouton RCL-DST a nouveau
pour remettre un reglage (et appuyez sur SET si vous voulez ensuite
changer le reglage)
Fonction d'heure d'ete :
Appuyez sur le bouton RCL-DST pour avancer l'heure du jour d'une heure pour
l'heure d'ete. « + l h » apparaTtra dans le coin inferieur gauche de l'affichage.
Appuyez sur le bouton a nouveau pour regler l'heure en reculant d'une heure.
Pour brancher la minuterie :
"ON" - l'appareil est branché toujours (la programmation est annulée)
"OFF" - l'appareil branché est toujours éteint (la programmation est
annulée).
"AUTO ON" Lʼappareil branché est présentement en marche (ON) et sʼéteindra
au prochain cycle de fermeture (OFF)
"AUTO OFF" - Lʼappareil branché est présentement éteint (OFF) et sʼallumera
au prochain cycle de mise en marche (ON)
Advertisement

Related Manuals for Woods 50007


Summary of Contents for Woods 50007
- Page 1 DA/ 1250W resistive • resistive • resistivo Modele 50007/50027 minuterie numerique interieure de 24 heures 2-C 4A / 500W tungsten • tungstene • tung steno Temporizador digital de 24 horas para interiores 2-C Modelo 50007/50027 4A ballast• ballast• ballastro Instructions...
- Page 2 ® HIWoods Pour contourner lo minuterie : Funci6n de horario de verano: presione el bot6n RCL-DST para avanzar la Appuyez sur le bouton ON-OFF au besoin pour afficher : hora del dfa una hora para el horario de verano. Aparecera ·+ l h" en la «...