Table of Contents
Advertisement
Quick Links
Advertisement
Table of Contents

Related Manuals for Creative Nomad Muvo2


Summary of Contents for Creative Nomad Muvo2
- Page 2 Creative NOMAD MuVo² Information in this document is subject to change without notice and does not represent a commitment on the part of Creative Technology Ltd. No part of this manual may be reproduced or transmitted in any form or by any means, electronic or mechanical, including photocopying and recording, for any purpose without the written permission of Creative Technology Ltd.
- Page 3 Contents...
-
Page 4: Table Of Contents
Step 2: Install Software ... 3-2 Step 3: Transfer Songs ... 3-3 Step 4: Play Songs ... 3-5 4 Using Your Player Transferring Files ... 4-1 Using Windows Explorer ... 4-1 Using Creative MediaSource Organizer ... 4-2 Playing Songs ... 4-2... - Page 5 Playing a song ... 4-2 Playing an album ... 4-2 Playing a playlist ... 4-3 Playing recorded audio ... 4-3 Locking Your Player ... 4-3 Deleting Songs ... 4-4 Recording Audio ... 4-4 Formatting Your Player ... 4-4 Charging the Battery ... 4-5 Creating and Managing Playlists ...
- Page 6 B About Music Files Overview ... B-1 Downloading from the Internet ... B-1 "Ripping" audio CDs ... B-1 C Frequently Asked Questions Installation ... C-1 Usage ... C-2 Updates ... C-4 D Maintenance and Safety Advice E Specifications iii iii...
-
Page 7: Introduction
Introduction... -
Page 8: Package Contents
CD-ROM/DVD-ROM drive ❑ USB port (USB 2.0 port recommended for faster transfer speeds) ❑ Internet access for Music Service Provider support (optional) The Sports Case and Armband are supplied with 512 MB Creative NOMAD MuVo player ® ® Windows 98 Second Edition (SE), Windows 2000, Windows Millennium ®... -
Page 9: Product Registration
Enjoy a host of benefits by registering your product during installation, or at www.creative.com/register. Benefits include: Registration ❑ Service and product support from Creative ❑ Exclusive updates on promotions and events Technical Support information can be found on the Installation CD. -
Page 10: Optional Accessory
The Creative FM Wired Remote (available separately) lets you access the controls Optional of your player without having to take the player out of your bag. In addition, the Accessory FM Tuner stores up to 32 preset FM channels, and the built-in microphone lets you make voice recordings. -
Page 11: Your Player At A Glance
Your Player At A Glance... -
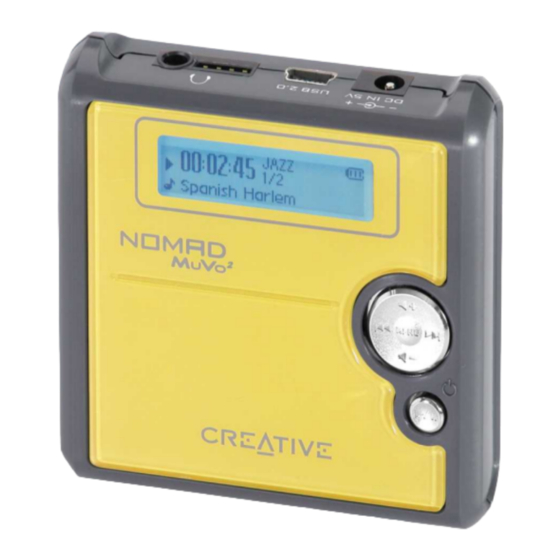
Page 12: Front View
Your Player At A Glance Front View MENU Figure 2-1 Press and hold to turn your player on and off. Press once to start playing tracks, and press again to pause playback. Press to display Menu options on the LCD. Press again to select a Menu option. -
Page 13: Side View
Figure 2-2 Connects to a power outlet using the supplied power adapter. Connects to your computer’s USB port using the supplied USB cable. Connects to headphones, or the Creative FM Wired Remote (available separately). Your Player At A Glance 2-2... -
Page 14: Using The Sports Case And Armband
The Sports Case and Armband are supplied with 512 MB Creative NOMAD MuVo Using the players only. Sports Case and Armband Figure 2-3 Your Player At A Glance 2-3... -
Page 15: Getting Started
Getting Started... -
Page 16: Step 1: Charge Battery
Getting Started Insert the supplied battery into your player. Step 1: Charge Battery Figure 3-1 Getting Started 3-1... -
Page 17: Step 2: Install Software
CD-ROM/DVD-ROM drive. For more details, see "Installation" on page C-1. Follow the instructions on the screen to complete the installation. Creative MediaSource™ and Windows 98 SE drivers (only if applicable) will be installed on your computer. When prompted, restart your computer. -
Page 18: Step 3: Transfer Songs
Step 3: Connect your player to your computer’s USB port using the supplied USB cable. Transfer Songs Your computer’s USB port may be located on the front panel. Launch Windows Explorer on your computer. Your player is recognized as a Removable Disk in Windows Explorer. - Page 19 After the transfer is complete, make sure you stop your player before disconnecting it from your computer. To stop your player in Windows 98 SE In Windows Explorer, right-click the Removable Disk icon, click the Eject option, and disconnect your player when you are prompted to do so. To stop your player in Windows 2000, Windows Me or Windows XP Click the Safely Remove Hardware icon remove USB Mass Storage Device, and disconnect your player when you...
-
Page 20: Step 4: Play Songs
(Figure 3-7) on your desktop. For more information about using Windows Explorer, refer to its online Help. For more information about using Creative MediaSource, refer to its online Help. For more information about transferring songs, see "Transferring Files" on page 4-... -
Page 21: Using Your Player
Using Your Player... -
Page 22: Transferring Files
Using Your Player You can use either Windows Explorer or Creative MediaSource Organizer to Transferring transfer files from your computer to your player. Only MP3 and WMA files, however, Files can be viewed and played back on your player. For more information about music files, see "About Music Files"... -
Page 23: Using Creative Mediasource Organizer
MediaSource Launch Creative MediaSource Organizer by clicking the Creative Organizer MediaSource Player/Organizer icon on your desktop. If you are not already in Creative MediaSource Organizer, click the Player/Organizer View button. Creative MediaSource Click the Show/Hide Right Panel button. Organizer also lets you In the Sources window, select the disk drive where your file is located. -
Page 24: Playing A Playlist
Press Press MENU to select this option. Browse to the Folder (Root) tracks organized according to folder names. Browse to an album that you want to play and press Press MENU. Playing a playlist Press Press MENU to select this option. Browse to the Playlist organized according to file names. -
Page 25: Deleting Songs
For more song management functions, use Creative MediaSource Organizer. For more information about using Creative MediaSource, refer to its online Help. You can only record audio when the Creative FM Wired Remote (available Recording separately) is connected to your player. -
Page 26: Charging The Battery
Right-click the Removable Disk icon, click the Format option, and follow the instructions on the screen to format your player. After the formatting is complete, make sure you stop your player before disconnecting it from your computer. See "Usage" on page C-2 for instructions on stopping your player. -
Page 27: Creating And Managing Playlists
M3U files only list the names and order of music files, and do not actually contain any music files. As such, when you create a playlist in your player, Creative MediaSource Organizer will transfer the music files listed in the playlist to your player. -
Page 28: Adding Tracks To A Playlist
Launch Creative MediaSource Organizer by clicking the Creative MediaSource Player/Organizer icon on your desktop. If you are not already in Creative MediaSource Organizer, click the Player/Organizer View button. Click the Show/Hide Right Panel button. In the Sources window, select the PLAYLIST folder listed under your player's icon. -
Page 29: Deleting A Playlist
Launch Creative MediaSource Organizer by clicking the Creative MediaSource Player/Organizer icon on your desktop. If you are not already in Creative MediaSource Organizer, click the Player/Organizer View button. In the Sources window, click the PLAYLIST folder listed under your player's icon. -
Page 30: Setting Preferences
Setting Preferences... -
Page 31: Play Mode
Setting Preferences Press MENU. Play mode Press Press MENU to select this option. Browse to one of the following options, and press MENU to select it: • Repeat track Repeats the current song. When you select this, right corner of the LCD. •... -
Page 32: Defining Custom Eq
EQ is a collection of equalizer settings that can enhance the sound of your music. Select preset settings such as Rock or Jazz, or customize your own setting. Press MENU. Press Press MENU to select this option. Browse to one of the following options, and press MENU to select it: •... -
Page 33: Settings
Browse to this EQ option. Press MENU. Settings Press Press MENU to select this option. Browse to one of the following options, and press MENU to select it: • Contrast Adjusts the contrast of the LCD. • Backlight Adjusts backlight duration. •... -
Page 34: A Lcd Guide
LCD Guide... -
Page 35: Mode Overview
LCD Guide Mode Overview Music Elapsed time Play Status icon Music icon Record Elapsed time Record icon Play Mode icon EQ icon Track title Recording status bar Lock icon Battery Status icon Current track/ Total tracks Lock icon Battery Status icon Available memory Available recording time... -
Page 36: Play Status Icons
Play Status Play status icons appear at the left side of the LCD. Icons Play Pause Skip forward within track Skip back within track Next track Previous track LCD Guide A-2... -
Page 37: Information Diagrams
Information The following information diagrams may appear on the LCD. Diagrams Player is connected to your computer. To use your player, disconnect it from your computer. Files are being transferred to your player. DO NOT disconnect your player. Corrupted recorded voice file. Check that your recorded voice file is not corrupted, or reformat your player. -
Page 38: B About Music Files
About Music Files... -
Page 39: Overview
CD. Encoding is the second phase, where the audio data is converted into MP3 or WMA files. To "rip" audio CDs, you will need a CD-ROM/DVD-ROM drive that can extract digital audio data, and a program such as Creative MediaSource Organizer that can extract and encode this data. With Creative MediaSource Organizer, you can "rip"... - Page 40 Player/Organizer View button. In the Sources window, select [d:] Audio CD (replace d: with your CD-ROM/DVD-ROM drive). In the Task bar, click the Rip Now button. For more information about using Creative MediaSource, refer to its online Help. About Music Files B-2...
-
Page 41: C Frequently Asked Questions
Frequently Asked Questions... -
Page 42: Installation
To start the installation program through Windows Explorer In Windows Explorer, search and locate the d:\ctrun folder (replace d:\ with the drive letter of your CD-ROM/DVD-ROM drive). Double-click the ctrun.exe file. www.creative.com and select your region. Frequently Asked Questions C-1... -
Page 43: Usage
Usage Why does the player skip certain tracks? The player will only play valid media formats (MP3 and WMA files). Other types of media formats will be skipped. Why are some files/tracks corrupted when transferred to the player? Transfer may have been interrupted. Before disconnecting your player from your computer, stop your player first. - Page 44 Yes, you can. For more information, refer to "Transferring Files" on page 4-1. Can I jog with the Creative NOMAD MuVo Yes, but only if you are using the 512 MB Creative NOMAD MuVo models have hard disk drives that may be damaged during vigorous activities like jogging.
-
Page 45: Updates
No. The power adapter may not be compatible with your player, and may even damage it. You should get a replacement adapter from Creative at www.NOMADworld.com, or your local Creative office/distributor. Where can I get official information on all NOMAD products? Updates Visit NOMADworld (www.NOMADworld.com) for updates and downloads relating to... -
Page 46: D Maintenance And Safety Advice
Maintenance and Safety Advice... - Page 47 Only clean the product with a soft dry cloth. Do not use liquid cleaners. ❑ Only qualified personnel should repair or service the product. ❑ Do not use the 1.5 GB Creative NOMAD MuVo jogging. ❑ Remember to set the volume at a moderate level. Listening to music at high volumes can impair your hearing.
- Page 48 Specifications...
-
Page 49: Specifications
Specifications 66.5 mm (2.6") x 67.0 mm (2.6") x 20.0 mm (0.8") Size (WxHxD) 512 MB Creative NOMAD MuVo Weight (3.1 oz) with battery 1.5 GB Creative NOMAD MuVo (3.2 oz) with battery 132 x 32 pixel backlit display 512 MB (flash memory) or 1.5 GB (HDD) - Page 50 USB 1.1 and USB 2.0 compatible USB Connectivity Specifications E-2...