
Related Manuals for Brother P-touch 1750


Summary of Contents for Brother P-touch 1750
- Page 1 1750 User’s Guide • Read this User’s Guide before you start using your P-touch. • Keep this User’s Guide in a handy place for future reference.
- Page 2 You no longer have to worry about urgent tasks that require professional printing. In the office, the factory, the lab and the home, the quality and performance of the P-touch 1750 makes it an extremely versatile and practical machine.
-
Page 3: Table Of Contents
Getting Started GENERAL DESCRIPTION ... 2 GENERAL PRECAUTIONS... 3 BATTERIES ... 4 OPTIONAL AC ADAPTER ... 5 TAPE CASSETTE ... 5 ATTACHING LABELS ... 6 PRINT HEAD & ROLLERS... 8 For Your Information POWER KEY... 9 CURSOR KEYS ... 9 CODE &... -
Page 4: Getting Started
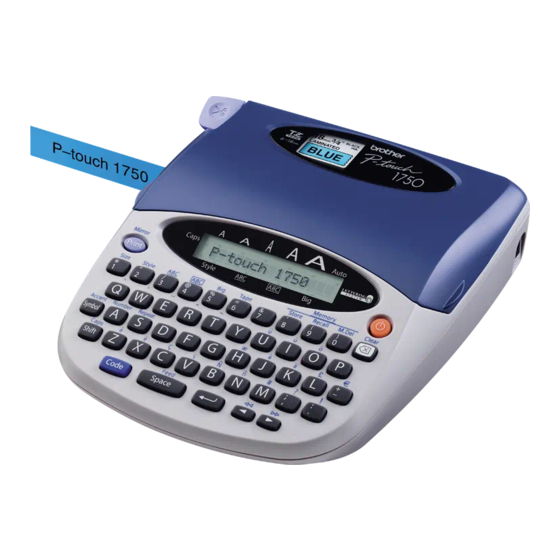
Getting Started TOP VIEW Keyboard BOTTOM VIEW GENERAL DESCRIPTION Tape cutter lever Tape compartment cover AC adapter connector LCD display Tape exit slot Battery compartment cover... -
Page 5: General Precautions
KEYBOARD & LCD DISPLAY GENERAL PRECAUTIONS • Use only Brother TZ tapes with this machine. Do not use tapes that do not have the mark. • Do not pull on the tape being fed from the P-touch. This may damage the tape cassette. -
Page 6: Batteries
• Do not try to disassemble the AC adapter. • When the machine is not being used for a long period of time and it is not necessary to keep the text files stored in the memory, disconnect the AC adapter, and remove the bat- teries to prevent them from leaking and damaging the machine. -
Page 7: Optional Ac Adapter
The AC adapter (model AD-30) allows you to use this machine wherever there is an electri- cal outlet. To connect the optional AC adapter: Insert the plug on the adapter cord into the connector marked DC IN 7.0V on the right side of the machine. -
Page 8: Attaching Labels
Insert the tape cassette firmly into the tape compartment, making sure that the entire back of the cassette touches the bottom of the compartment. When inserting the tape cassette, make sure that the inner ribbon does not catch on the corner of the metal guide. Close the compartment cover, then turn on the machine if it is off. - Page 9 LAMINATED TAPE The enclosed stick enables you to easily remove the backing from labels printed on lami- nated tapes. Hold the tape in your left hand, with the printed surface facing up, and hold the stick in your right hand. Pass the tape halfway through the long narrow hole in the stick.
-
Page 10: Print Head & Rollers
Occasionally, specks of dust or dirt become attached to the machine’s print head and rollers. This is particularly likely when you are using the unit outdoors or in a very dusty environ- ment. If a section of the print head is covered with dust, a blank horizontal streak may appear through the label text. -
Page 11: For Your Information
For Your Information The power key ( b ) is located in the top right-hand corner of the keyboard. If batteries have been installed or the machine has been plugged in using the optional AC adapter, the previous session’s information is displayed when the machine is turned on. This feature allows you to stop work on a label, turn off the machine, and return to it later without having to re-enter the text. -
Page 12: Code & Shift Keys
RIGHT CURSOR KEY To move the cursor one character to the right: Press > once. To move the cursor several characters to the right: Hold down > until the cursor moves to the desired position. To move the cursor to the end of the text line: Hold down f and press >. -
Page 13: Space Key
EXAMPLE To type in “%”: Hold down e and press 5. The Caps mode is similar to holding down e. It allows you to type capital letters continu- ously. To type in many capital letters: Hold down f and press e. The Caps indicator on the left side of the display lights Press the keys of the desired letters or symbols. -
Page 14: Return Key
EXAMPLE To add a space: Press g. Like on a typewriter or word processor, this machine’s return key ( h ) is used to end a line of text and start another one. When you have finished entering one line, press the return key to make a new line and move the cursor to it. -
Page 15: Bs Key
To select an item from a list: Press h. To answer “yes”: Press h. The delete key ( c ) allows you to remove characters to the left of the cursor’s current posi- tion. It differs from the left cursor key ( < ), which only moves the cursor without deleting any characters. -
Page 16: Accent Function
EXAMPLE To clear the text: Hold down f and press c. The Accent function can also be used to add accented characters to your text. The accented characters are grouped according to the capital or small letter that they are combined with. -
Page 17: Symbol Function
To type in an accented character: Hold down f and press d. The message “A – U?” appears on the display. Press the key of the letter in the desired accented character. To type a capital letter, hold down e (or hold down f and press e to turn on Caps mode) before pressing the letter key. - Page 18 The following symbols are available: Group Æ § To type in a symbol: Press d. The message “1-4?” appears on the display. Press a key 1 to 4 to choose the set that contains the desired symbol. Press < or > until the cursor is under the desired symbol. Press h.
-
Page 19: Size Function
The character size can be adjusted using the Size function. The following table shows the character sizes. Size SIZE 1 SIZE 2 SIZE 3 SIZE 4 SIZE 5 AUTO The default size setting is AUTO. The currently selected size setting is always shown by the indicator above the display. -
Page 20: Style Function
EXAMPLE To select SIZE3: While holding down f, press 1 once, and keep f held down. While still holding down f, continue pressing 1 until SIZE3 is displayed. Release f. You can choose from nine different character styles to apply to your text. Characters printed using the smaller sizes may be difficult to read if certain style set- tings (e.g., ITALIC+SHADOW) are selected. -
Page 21: Underline Function
EXAMPLE To select the ITALIC+SHADOW style setting: While holding down f, press 2 once, and keep f held down. While still holding down f, continue pressing 2 until ITALIC+SHADOW is displayed. REFERENCE Style NORMAL OUTLINE BOLD SHADOW ITALIC You can emphasize your text by underlining it. The default underline setting is OFF. -
Page 22: Frame Function
To turn on or off the Underline function: While holding down f, press 3 once, and keep f held down to display the current underline setting. While still holding down f, continue pressing 3 until the desired underline setting is displayed. The Underline indicator lights up when the UNDERLINE setting is selected. -
Page 23: Big Size Function
While still holding down f, continue pressing 4 until the desired frame setting is displayed. The Frame indicator lights up when any setting other than TEXT is selected. Release f to apply the selected frame setting to the entire text. EXAMPLE To select the CANDY frame setting: While holding down f, press 4... - Page 24 The default setting is OFF. When you turn the Big Size function ON, the Big indicator will light up in the bottom right of the display. If you change any of the Size, Style, Underline, or Frame settings after making the Big Size setting, the Big Size font will automatically return to the default value and Size, Style, Underline, or Frame settings will take precedence.
-
Page 25: Tape Margin Function
TAPE MARGIN FUNCTION The Tape margin function allows you to adjust the size of the margins on the left and right sides of your text. The default tape margin setting is FULL; however, three other settings are also available. FULL (1”... -
Page 26: Mirror Printing Function
MIRROR PRINTING FUNCTION With this function, you can print your text so that the characters can be read from the tape side of the tape. If mirror-printed labels are attached to glass or some other clear material, they can be read correctly from the opposite side. When using the Mirror printing function, the text should be printed on clear tape. -
Page 27: Print Key & Feed Function
PRINT KEY & FEED FUNCTION After you have entered your text and chosen the desired format settings, you are ready to print. To print a label: Press a once. The message “PRINTING” is displayed. To feed the tape: Hold down f and press g once. 1” (25 mm) of tape is fed out. To cut the tape: Push down on the tape cutter lever. - Page 28 Press down on the tape cutter lever to cut the tape, and then use scissors to cut along the printed dots to separate the labels. EXAMPLE To print three labels with numbers 1, 2 and 3: Position the cursor below “1”. Hold down f and press A.
-
Page 29: Repeat Printing Function
REPEAT PRINTING FUNCTION This function allows you to print up to 9 copies of the same text. To use the Repeat printing function: Hold down f and press S. The message “REPEAT:1-9?” appears in the display. Press the number key ( 1 to 9 ) of the number of labels that you want. To cancel the Repeat printing, hold down f and press S (or press just c ). -
Page 30: Memory Functions
You can use the memory to store your most frequently used text files. The text remains in the memory, even after all characters are removed from the display using the Clear function (holding down f and pressing c ). When each file is stored, it is given a number to make recalling it easier. Up to 9 text files or about 300 characters can be stored in the memory. - Page 31 Press the key ( 1 to 9 ) of the file number containing the text that you wish to recall. The text stored under the selected file number is shown. To quit the Recall function without recalling text, hold down f and press 9 (or press just c ).
- Page 32 To recall the text from file number 4: Hold down f and press 9. Press 4. Press h. To delete the text stored under file number 4: Hold down f and press 0. Press 4. Press h. RECALL:1-9? 4? John Smith John Smith M.DEL:1-9? 4? John Smith...
-
Page 33: Troubleshooting
Problem 1. The display stays blank after you have turned on the machine. 2. The machine does not print or the printed characters are blurred. 3. The text files that you stored in the memory are no longer there. 4. The printed characters are not formed properly. -
Page 34: Error Message List
Error Message 2 LINE LIMIT! BATTERY WEAK! BUFFER EMPTY! BUFFER FULL! CHANGE ADAPTER ERROR MESSAGE LIST Cause This message appears if two lines already exist when you press h. This message appears when the installed batteries become weak. • This message appears if you try to print, but no text has been entered. - Page 35 Error Message CUTTER ERROR! This message appears if the tape cutter lever is pressed down while a label is being printed. INVAL. CHRS! This message appears if the cursor is not below a number when you hold down f and press A.
-
Page 36: Specifications
HARDWARE Input Device: Keyboard - 49 keys LCD: 5 dots 15 characters 11 indicators Print Tape: Pressure-sensitive, Adhesive-based 26’ 3” (8 m) long Four widths available: Power Supply: Six AA batteries (AA/SUM-3/AM3/R6/LR6) or optional AC adapter Auto power-off if no key is pressed for 5 minutes Print Head: 64 dot / 180 dpi Dimensions:... -
Page 37: Accessories
Supplies Obtain tape cassettes from your nearest authorized dealer. Use only Brother TZ tapes with this machine. Brother cannot be held responsible for trouble caused by the use of unauthorized supplies. Do not use tapes that do not have mark. - Page 38 Stock No. TZ-325 White characters on black adhesive TZ-421 Black characters on red adhesive Industrial (strong adhesive) black characters on TZ-S221 white adhesive 1/4” (6mm)-wide laminated tapes TZ-111 Black characters on clear adhesive TZ-211 Black characters on white adhesive TZ-315 White characters on black adhesive Industrial (strong adhesive) black characters on TZ-S211...
- Page 39 Stock No. Description Name: Address: City: State/Zip: Daytime Phone: SEND ORDER FORM TO: Brother International Corp. Attn: Consumer Accessory Div. P.O. Box 341332 Bartlett, TN38184-1332 Method of payment (Check one) ) Visa ( ) MasterCard ( Account Number Expiration Date...
- Page 41 Stock No. Description Name: Address: City: State/Zip: Daytime Phone: SEND ORDER FORM TO: Brother International Corp. Attn: Consumer Accessory Div. P.O. Box 341332 Bartlett, TN38184-1332 Method of payment (Check one) ) Visa ( ) MasterCard ( Account Number Expiration Date...
- Page 43 To order by mail or pay by check, please complete the accessory order form and mail it Brother Customer Service has installed an easy to use Fax-Back System so you can get instant answers to common technical questions and product information for all Brother This system is available 24 hours a day, 7 days a week.
- Page 45 GUIA DE INSTRUCCIONES...
- Page 46 Ya no hay por qué preocuparse por tareas urgentes que requieren impresión profesional. En la oficina, la fábrica, el laboratorio, o en casa, la calidad y el rendimiento de la P-touch 1750 la convierten en una máquina muy versátil y práctica.
- Page 47 ÍNDICE PRECAUCIONES GENERALES ...2 PILAS ...2 ADAPTADOR DE CA OPCIONAL ...3 CASETES DE CINTA...4 COLOCACIÓN DE ETIQUETAS...5 CABEZAL DE IMPRESIÓN Y RODILLOS...6 TECLA DEL CURSOR...7 TECLAS CODE Y SHIFT ...7 TECLA DE RETORNO ...8 TECLA DE BORRADO (BS) ...9 FUNCIÓN DE REPOSICIÓN (CLEAR) ...9 FUNCIÓN DE ACENTOS...10 FUNCIÓN DE SÍMBOLOS ...10 FUNCIÓN DE TAMAÑO ...11...
-
Page 48: Precauciones Generales
PRECAUCIONES GENERALES • Con esta máquina emplee sólo cintas TZ Brother. No emplee cintas que no tengan la marca • No tire de la cinta que se alimenta desde la P-touch. Podría dañar el casete de cinta. • No utilice la máquina en lugares polvorientos, y manténgala alejada de la luz solar directa y la lluvvia. -
Page 49: Adaptador De Ca Opcional
Para cambiar las pilas: Extraiga la cubierta del comparti- miento de las pilas de la parte posterior de la máquina. Si ya hay pilas instaladas, extráigalas. Inserte seis pilas AA nuevas, asegurán- dose de que quedan orientadas en la dirección correcta. Coloque la cubierta del comparti- miento de las pilas. -
Page 50: Casetes De Cinta
Un casete de TZ se suministra con la unidad. Sin embargo, para esta máquina hay dispo- nibles una amplia gama de casetes de cinta TZ de distintos colores y tamaños, es posible crear etiquetas diferentes codificadas por colores o tamaños. Para cambiar el casete de cinta: Levante la cubierta del compartimiento de la cinta para abrirla. - Page 51 Abra la tapa del compartimiento de la cinta. Empuje la punta de la varilla hacia usted con el dedo. Tome la varilla por la punta y tire de ella hacia arriba para sacarla. CINTA LAMINADA La varilla suministrada permite que, en las cintas laminadas, usted pueda extraer facilmente el papel del dorso de la etiqueta.
-
Page 52: Cabezal De Impresión Y Rodillos
CABEZAL DE IMPRESIÓN Y RODILLOS De vez en cuando, motas de polvo o suciedad se adhieren al cabezal de impresión y a los rodillos de la máquina. Suele suceder cuando se emplea la unidad en exteriores o en lugares con mucho polvo. Si alguna parte del cabezal de impresión está cubierta de polvo, es posi- ble que aparezca una franja horizontal blanca por el texto de la etiqueta. -
Page 53: Tecla Del Cursor
El visualizador de LCD de esta máquina muestra uno fila de 15 caracteres; sin embargo, el texto que usted cree puede tener hasta 60 caracteres de longitud. Podrá revisar y editar el texto empleando las teclas del cursor para moverlo y que muestre las distintas partes en el visualizador. -
Page 54: Tecla De Retorno
TECLA SHIFT Para escribir una letra mayúscula o un símbolo impreso en la esquina superior izquierda de la tecla: Mantenga presionado e y presione la tecla de la letra o símbolo deseado. El modo Caps (mayúsculas) es similar a mantener presionada e. Le permite escribir letras mayúsculas continuamente. -
Page 55: Tecla De Borrado (Bs)
TECLA DE BORRADO (BS) La tecla de borrado ( c ) le permite eliminar caracteres situados a la izquierda de la posi- ción actual del cursor. Se diferencia de la tecla del cursor izquierda ( < ) que sólo mueve el cursor sin borrar ningún carácter. -
Page 56: Función De Acentos
La función de acentos también podrá utilizarse para añadir caracteres acentuados al texto. Los caracteres acentuados se agrupan de acuerdo con la letra mayúscula o minúscula con la que se combinan. Hay disponibles los siguientes caracteres acentuados: Letras Para escribir un carácter acentuado: Mantenga presionado f y presione d. -
Page 57: Función De Tamaño
Presione < o > hasta que el cursor se coloque debajo del símbolo deseado. Presione h. El símbolo aparecerá en el texto. El tamaño de los caracteres puede ajustarse empleando las funciones de tamaño (Size). La tabla siguiente indica los tamaños de caracteres. Tamaño SIZE 1 SIZE 2... -
Page 58: Función De Subrayado
Hay disponibles los siguientes ajustes de estilos: NORMAL OUTLINE (perfilado) BOLD (negrilla) SHADOW (sombreado) ITALIC (cursiva) El ajuste de estilo predeterminado es NORMAL. El indicador de estilo de la parte inferior derecha del visualizador mostrará el ajuste de estilo actual cuando seleccione un estilo que no sea NORMAL. -
Page 59: Función De Marcos
Con la función de marcos, podrá seleccionar diversos marcos y funciones destacadas para hacer un diseño más decorativo o una etiqueta con más énfasis. Los ajustes de marcos siguientes están disponibles: TEXT, ROUND, WOODEN, POINTING, CANDY El ajuste inicial de marco es TEXT, aunque hay también otros ajustes. Si se selecciona cual- quier ajuste que no sea TEXT, se encenderá... -
Page 60: Función De Cinta
El ajuste inicial es OFF. Cuando ajuste la función de tamaño grande a ON, el indicador de tamaño grande se encenderá en la parte inferior izquierda del visualizador. Si cambia cualquiera de los ajustes de Tamaño, Estilo, Subrayado, o Cuadro después de haber ajustado el tamaño grande, éste volverá... -
Page 61: Función De Impresión De Espejo
Para cambiar el ajuste de la cinta: Manteniendo presionada f, pulse una vez 6, y mantenga presionada f para hacer que se visualice la cinta actualmente ajustado. Siguiendo manteniendo presionada f, continúe presionando 6 hasta que se visualice la cinta actualmente ajustado mediante el indicador del mismo. Para aplicar el ajuste de la cinta seleccionado a todo el texto, suelte f. -
Page 62: Función De Numeración
Para cortar la cinta: Presione la cinta sobre la palanca de la cuchilla. Para evitar daños en la cinta, no trate de cortarla durante la impresión ni el avance. Si presiona demasiado la palanca de la cuchilla, puede romperse. FUNCIÓN DE NUMERACIÓN Esta función podrá... -
Page 63: Funciones De La Memoria
FUNCIONES DE LA MEMORIA Usted podrá utilizar la memoria para almacenar sus archivos de texto más frecuentemente utilizados. El texto permanecerá en la memoria, incluso después de haberlo eliminado del visualizador utilizando la función de borrado (manteniendo presionada f y presionando Cuando almacena cada archivo, a éste se le asignará... - Page 64 Par reescribir un archivo almacenado con otro nuevo: Presione h para borrar el archivo previamente almacenado y almacenar el nuevo con el número seleccionado. Para retroceder y elegir otro número de archivo sin reescribir el archivo de texto, presione c , y después presione una tecla numérica correspondiente a un número de archivo diferente.
-
Page 65: Solución De Problemas
SOLUCIÓN DE PROBLEMAS Problema 1. El visualizador se queda en blanco des- pués de haber conectado la alimenta- ción de la máquina. 2. La máquina no imprime o los caracte- res impresos quedan borrosos. 3. Los archivos de texto almacenados en la memoria ya no están ella. -
Page 66: Lista De Mensajes De Error
LISTA DE MENSAJES DE ERROR Mensaje de error 2 LINE LIMIT! Este mensaje aparece si ya exis- ten cuatro líneas dos presiona BATTERY WEAK! Este mensaje aparece cuando las pilas instaladas están gastadas. BUFFER EMPTY! • Este mensaje aparece si intenta imprimir, pero sin haber intro- ducido texto. - Page 67 Mensaje de error INVAL. CHRS! Este mensaje aparecerá si el cur- sor está al final del texto cuando mantenga pulsada f y pre- sione A. LINE LIMIT! Este mensaje aparece si el número de líneas del texto es mayor que el número máximo de líneas posible para la cinta insta- lada.
-
Page 68: Especificaciones
HARDWARE Dispositivo de entrada: LCD: Cinta de impresión: Alimentación: Cabezal de impresión: Dimensiones: Peso: SOFTWARE Tamaño de la memoria intermedia: Tamaño de la memoria: Tamaño de caracteres: Estilos de impresión: ESPECIFICACIONES Teclado de 49 teclas 5 puntos 15 caracteres 1 línea 11 indicadores Sensible a la presión, base adhesiva, 8 m (26´3”) de longitud Cuatro anchos disponibles:... -
Page 69: Accesorios
Adquiera los casetes de cinta en el distribuidor autorizado que le quede más cerca. Emplee sólo cintas Brother TZ con esta máquina. Brother no puede hacerse responsa- ble por los problemas causados por el empleo de accesorios de consumo no autoriza- dos. - Page 70 N.º de producto TZ-325 Caracteres blancos sobre adhesivo negro TZ-421 Caracteres negros sobre adhesivo rojo Caracteres negros industriales (adhesivo fuerte) TZ-S221 sobre adhesivo blanco Cintas laminadas de 6 mm (1/4”) TZ-111 Caracteres negros sobre adhesivo transparente TZ-211 Caracteres negros sobre adhesivo blanco TZ-315 Caracteres blancos sobre adhesivo negro Caracteres negros industriales (adhesivo fuerte)
- Page 71 Printed in USA USP000084...