Table of Contents
Advertisement
Quick Links
Advertisement
Table of Contents

Related Manuals for Sony PEG-N710C Memory Stick Gate v2.0


Summary of Contents for Sony PEG-N710C Memory Stick Gate v2.0
- Page 1 Read This First Personal Entertainment Organizer PEG-N710C © 2001 Sony Corporation 4-653-877-11(1) Chapter 1 What is the Sony CLIE Handheld? Chapter 2 Setting up your Sony CLIE Handheld - Basics Chapter 3 Setting up your Sony CLIE Handheld - Advanced...
- Page 2 Notes...
-
Page 3: Table Of Contents
Handheld ... 20 Charging with the cradle ... 20 Charging directly from the power supply ... 21 Step 2: Turning on your Sony CLIE Handheld for the first time ... 22 Step 3: Entering data into your Sony CLIE Handheld ... 26 Step 4: Installing the Palm ™... -
Page 4: About This Manual
About this manual Read This First (this guide) - Page 5 Operating Instructions Add-on Application Guide...
-
Page 6: Which Manual To Read
Chapter 3 Exchanging and updating data using a HotSync operation ® Operating Instructions Chapter 4 Communicating using your Sony CLIE Handheld Add-on Application Guide Chapter 1 Playing audio files (Audio Player) Add-on Application Guide Chapter 2 Viewing image files (PictureGear Pocket) - Page 7 Installation CD-ROM. Contents What can you do with your Sony CLIE Handheld? ... 8 System requirements ... 9 Sony CLIE Handheld components ... 10 Locating front panel controls ... 10 Locating back panel components ...
-
Page 8: What Can You Do With Your Sony Clie Handheld
What can you do with your Sony CLIE Handheld? -
Page 9: System Requirements
System requirements Notes... -
Page 10: Sony Clie Handheld Components
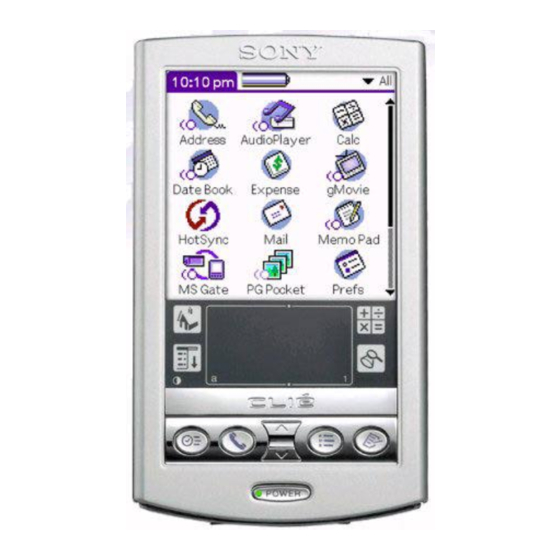
Sony CLIE Handheld components Locating front panel controls 1 Headphones jack 2 Jog Dial™ Navigator 3 Back Button 4 HOLD Switch... - Page 11 5 POWER Button 6 Screen 7 Graffiti Writing Area 8 Scroll Button 9 Application Buttons...
-
Page 12: Locating Back Panel Components
Sony CLIE Handheld components Locating back panel components 1 Stylus ® 2 “Memory Stick 3 “Memory Stick” Slot 4 Infrared Communication Port ” access indicator... - Page 13 5 Reset Button 6 Interface Connector Removing the supplied protective soft cover from your CLIE handheld Lift here to remove the cover.
-
Page 14: Locating Cradle Components
Sony CLIE Handheld components Locating cradle components 1 AC Adapter Connector 2 Interface Connector 4 HotSync Button 4 Cradle Indicator 5 USB Connector... -
Page 15: Elements Of The Clie Interface
Elements of the CLIE interface 1 Battery Icon 2 Home Icon 3 Menu Icon 4 Brightness Adjustment Icon Note Continued on next page... - Page 16 Sony CLIE Handheld components 5 Application Icon 6 Scroll Bar 7 Calculator Icon 8 Find Icon 9 Graffiti Writing Area Note on display resolutions Note Tip i icon...
-
Page 17: What Is On The Clie Installation Cd-Rom
What is on the CLIE Installation CD-ROM? CD-ROM contents PC applications Palm OS applications Continued on next page... -
Page 18: How To Read The Pdf Manuals On The Cd-Rom
What is on the CLIE Installation CD-ROM? Manuals How to read the PDF manuals on the CD-ROM... -
Page 19: Setting Up Your Sony Clie Handheld - Basics
Charging with the cradle ... 20 Charging directly from the power supply ... 21 Step 2: Turning on your Sony CLIE Handheld for the first time ... 22 Step 3: Entering data into your Sony CLIE Handheld ... 26 Step 4: Installing the Palm™ Desktop for CLIE software onto your computer ... -
Page 20: Step 1: Charging Your Sony Clie Handheld
Step 1: Charging your Sony CLIE Handheld Charging with the cradle Note Before you use your CLIE handheld for the first time, make sure to charge it. To the wall outlet When charging is completed Notes Insert your CLIE handheld at an angle to the cradle and lay it back to fit it into place. -
Page 21: Charging Directly From The Power Supply
Chapter 2 Charging directly from the power supply Connect the AC adapter to the CLIE interface connector. To remove the AC adapter from your CLIE handheld To the wall outlet Squeeze both sides of the connector and pull it out. -
Page 22: Step 2: Turning On Your Sony Clie Handheld For The First Time
Step 2: Turning on your Sony CLIE Handheld for the first time Press the POWER button. Press the POWER button. Take out the Stylus. Note... - Page 23 Press lightly on the screen with the stylus. Tap anywhere onscreen. Following the instruction onscreen, tap the center of the displayed mark. Note Continued on next page...
- Page 24 Step 2: Turning on your Sony CLIE Handheld for the first time Tap the Set Time box. Tap the arrow v or V to set the hour to the current time. Tap each number of the minute, and then tap the arrow v or V to set the minutes to the current time.
- Page 25 Tap the arrow b or B next to the year to select the current year. Tap the current month, and then tap the current date. Tap Next. Tap Next. Tap Done.
-
Page 26: Step 3: Entering Data Into Your Sony Clie Handheld
Step 3: Entering data into your Sony CLIE Handheld Graffiti writing Write letters here Onscreen keyboard Tap here for alphabetic keyboard Graffiti writing examples: A, B, C, D, and E Write numbers here Division marks Tap here for numeric keyboard... -
Page 27: Computer Keyboard
Note Caps lock Caps shift Tap here to display alphabetic keyboard Numeric Tap here to display numeric keyboard Computer keyboard Alphabetic Backspace Carriage return International Tap here to display international keyboard... -
Page 28: Step 4: Installing The Palm Desktop For Clie Software Onto Your Computer
Step 4: Installing the Palm™ Desktop for CLIE software onto your computer Notes Exit all applications running on Windows Insert the Installation CD-ROM into the CD-ROM drive of your computer. ®... - Page 29 Click Install Palm Desktop for CLIE. Click Next. On Intellisync Lite installation Continued on next page...
- Page 30 Step 4: Installing the Palm™ Desktop for CLIE software onto your computer Fill in the customer registration following the instructions shown onscreen. Fill in the user name in the Install Tool dialog box, confirm the contents, and then close the dialog box. Upgrading the existing Palm Desktop software Notes Click Start from the Windows...
- Page 31 Desktop for CLIE software onto your computer’s hard disk. Copy the user folders in the temporary folder to the new Palm Desktop for CLIE folder (by default, “C:\Program Files\Sony Handheld”). Note Follow the procedures in the next section and perform a HotSync operation to quickly synchronize your existing data with your new CLIE handheld.
-
Page 32: Step 5: Connecting Your Sony Clie Handheld And Your Computer Via The Cradle
Step 5: Connecting your Sony CLIE Handheld and your computer via the cradle Connect the USB connector of the cradle to a USB connector on your computer. Place your CLIE handheld on the cradle. To the wall outlet Insert your CLIE handheld at an angle to the... -
Page 33: Step 6: Performing A Hotsync ® Operation For The First Time
Step 6: Performing a HotSync for the first time What is a HotSync operation? Press the HotSync When the New User dialog box is displayed on your computer screen, enter the user name. Note Click OK on your computer screen. ®... - Page 34 If the HotSync operation does not start To open the Palm™ Desktop for CLIE software, double- ® click the Palm Desktop for CLIE icon on the Windows desktop or click Start, point to Programs, Sony Handheld, and then click Palm Desktop for CLIE.
-
Page 35: Setting Up Your Sony Clie Handheld - Advanced
Installation CD-ROM onto your computer, and installing add-on applications onto your CLIE handheld. Contents Checking the bundled applications on your Sony CLIE Handheld ... 36 Overview of basic Palm OS Overview of Sony applications ... 40 Installing the supplied applications onto your computer ... -
Page 36: Checking The Bundled Applications On Your Sony Clie Handheld
Checking the bundled applications on your Sony CLIE Handheld To open an application from the Application Launcher screen Tap the Home Tap the Home icon Do either of the following: Home screen Address Book Date Book To quit the application and open another application icon. -
Page 37: Overview Of Basic Palm Os ® Applications
® Overview of basic Palm OS applications Date Book Address Book Continued on next page... - Page 38 Checking the bundled applications on your Sony CLIE Handheld To Do List Memo Pad...
- Page 39 Calculator Expense Continued on next page...
-
Page 40: Overview Of Sony Applications
Checking the bundled applications on your Sony CLIE Handheld Overview of Sony applications Audio Player Ver. 1.1 PictureGear Pocket... - Page 41 MS Gate gMovie player MS Autorun...
-
Page 42: Installing The Supplied Applications Onto Your Computer
Installing the supplied applications onto your computer Installing the OpenMG™ Jukebox for CLIE software Insert the Installation CD-ROM into your computer’s CD-ROM drive. Click Install CLIE Audio Software. Click Install OpenMG Jukebox for CLIE. After the installation is complete, select “Yes, restart computer now”... -
Page 43: Installing Realjukebox For Sony
Installing RealJukebox Insert the Installation CD-ROM into your computer’s CD-ROM drive. Click Install CLIE Audio Software. Click Install RealJukebox for Sony. Click Next. Select all the components in the list box and then click Next. ® for Sony... -
Page 44: Installing Picturegear™ 4.3Lite
Installing the supplied applications onto your computer Installing PictureGear™ 4.3Lite Insert the Installation CD-ROM into your computer’s CD-ROM drive. Click Install CLIE Image Software. Click Install PictureGear Lite. Installing QuickTime 4 Insert the Installation CD-ROM into your computer’s CD-ROM drive. Click Install CLIE Image Software. -
Page 45: Installing Directx ® 6
Click Install QuickTime. ® Installing DirectX Insert the Installation CD-ROM into your computer’s CD-ROM drive. Click Install CLIE Image Software. Click Install DirectX 6. ® Installing AvantGo Insert the Installation CD-ROM into your computer’s CD-ROM drive. and other add-on applications Continued on next page... -
Page 46: Installing Acrobat Reader ® 4.05
Installing the supplied applications onto your computer Click Install FREE Entertainment Software. Click AvantGo. Installing Acrobat Reader Insert the Installation CD-ROM into your computer’s CD-ROM drive. Click Exit to close the installation launcher window. Click Start from the task bar, then click Run. Type or select “D:\Acrobat\Setup.exe”... -
Page 47: Uninstalling The Supplied Applications
Uninstalling the supplied applications Click Start from the task bar, point to Settings, and then click Control Panel. Double-click Add/Remove Programs. In the Install/Uninstall tab, select the software that you want to remove in the list box. Click Add/Remove. Click OK to remove the software. -
Page 48: Installing Add-On Applications Onto Your Sony Clie Handheld
Sony CLIE Handheld Note Installing add-on applications from the Palm™ Desktop for CLIE software Copy or download the application you want to install into the Add-on folder in the Sony CLIE Handheld folder on your computer. (example : C:\Program Files\Sony Handheld\Add-on) - Page 49 Double-click the Palm Desktop for CLIE software icon on the Windows ® desktop or click Start on the task tray, point to Programs, Sony Handheld, and then click Palm Desktop for CLIE. Click Install. From the User drop-down list, select a user name to use.
- Page 50 Click Done. Perform a HotSync operation. To access the Install Tool dialog box Click Start on the task bar, point to Programs, Sony Handheld, and then click Install Tool. Double-click any file with a PRC, PDB, or PNC file extension.
-
Page 51: Installing Add-On Applications From "Memory Stick " Media
Installing add-on applications from “Memory Stick Insert the supplied “Memory Stick” media into the “Memory Stick” slot of your CLIE handheld. Tap the MS Gate Press the Jog Dial™ navigator. Tap the application you want to install. Tap Copy. ® icon on your CLIE handheld. -
Page 52: Installing Add-On Applications By Beaming Them From Another Palm Os Device
Installing add-on applications onto your Sony CLIE Handheld Installing add-on applications by beaming them from another Palm OS ® device Tap the Home Tap the Menu Tap Beam. IR port icon. icon. - Page 53 Tap the application you want to transfer. Note Tap Beam. When the Beam dialog box appears, point the IR port directly at the IR port of the receiving handheld. Wait for the Beam dialog box to indicate that the transfer is complete before you continue working on your CLIE handheld.
-
Page 54: Removing Add-On Applications
Installing add-on applications onto your Sony CLIE Handheld Removing add-on applications Note Tap the Home Tap the Menu Tap Delete. Tap the application you want to delete, and tap Delete. Tap Yes. Tap Done. icon. icon. -
Page 55: Recommendation For Installing The Up-Date File
Recommendation for installing the Up-date file How the Up-date file works Double-click the Palm™ Desktop for CLIE software icon on the Windows point to Programs, Sony Handheld, and then click Palm Desktop for CLIE. Click Install. Select the user name from the user list. -
Page 56: Customer Registration
Customer registration Double-click the Sony CLIE Registration icon on the ® Windows desktop or click Start on the task tray, point to Programs, Sony Handheld, and then click Sony CLIE Registration. Click http://www.sony.com/clie/register/. Follow the instructions onscreen. - Page 57 For the latest support information, check our official Sony CLIE Web site http://www.sony.com/clie Printed in Japan...