Table of Contents
Advertisement
Quick Links
Advertisement
Table of Contents

Related Manuals for Baumatic TITAN2


Summary of Contents for Baumatic TITAN2
- Page 1 TITAN2 Stainless steel side by side frost free fridge/freeze...
- Page 2 USER MANUAL FOR YOUR BAUMATIC TITAN2 Stainless steel side by side 541 litre frost free fridge/freezer NOTE : This User Instruction Manual contains important information, including safety & installation points, which will enable you to get the most out of your appliance. Please keep it in a safe place so that it is easily available for future reference, for you or any person not familiar with the operation of the appliance.
-
Page 3: Table Of Contents
Energy efficiency class Cubic capacities Specifications of your appliance Description of the appliance Description of the product features Using your Baumatic fridge freezer Before switching on During first use Control panel Turning on the appliance Setting the thermostat in the freezer... -
Page 4: Environmental Note
This should be undertaken by a competent person. Disable the door lock to make sure that children cannot get stuck inside the appliance. o The packaging materials that Baumatic uses are environmentally friendly and can be recycled. o Please discard all packaging material with due regard for the... -
Page 5: Important Safety Information
Important safety information Your safety is of the utmost importance to Baumatic. Please make sure that you read this instruction booklet before attempting to install or use the appliance. If you are unsure of any of the information contained in this booklet, please contact the Baumatic Technical Department. - Page 6 Do not place electrical devices inside of the appliance, such as mixers or ice cream makers. Service You should not attempt to repair the appliance yourself, as this could cause injury or a more serious malfunction. If you require a service call then please contact the Baumatic Service Department.
-
Page 7: Specifications Of Your Fridge Freezer
Specifications of your fridge freezer Congratulations on purchasing a Baumatic fridge freezer Dimensions of your appliance o Height: 1790 mm o Width: o Depth: Energy efficiency class o Energy class: Cubic capacities o Gross capacity (fridge): o Gross capacity (freezer):... -
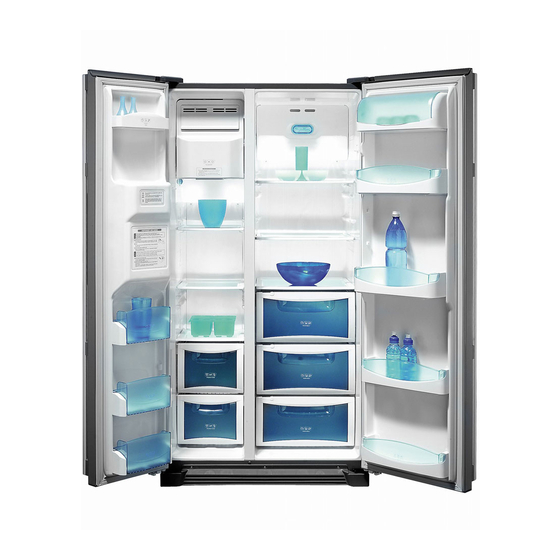
Page 8: Description Of The Appliance
Description of the appliance Freezer section Door storage compartments Freezer shelves (x 4) Dried foods compartment Meat storage compartment Fridge section Refrigerator shelves (x 4) Movable egg container Salad/vegetable drawer Fruit drawer Dairy compartment 10) Door storage compartments 12) Wine rack... -
Page 9: Description Of The Product Features
Shelves o The shelves may be placed in any of the guide slots within the interior of the appliance. They are protected from sliding out. o To remove a shelf: Take off all of the items that are stored on the shelf that you want to remove. - Page 10 o For storing salad and vegetables, the drawer is designed to keep the contents fresh for as long as possible. Fruit drawer o For storing fruits, the drawer is designed to keep the contents fresh for as long as possible. o Care should be taken when storing tropical fruit (bananas and pineapples etc) and tomatoes.
-
Page 11: Using Your Baumatic Fridge Freezer
Using your Baumatic fridge freezer Before switching on o Make sure that it has been installed by a suitably qualified person, as per the information contained in Baumatic’s installation instructions. o After delivery, wait for eight hours before connecting the appliance to your mains supply. -
Page 12: Control Panel
The control panel is located in the front of the freezer door, above the dispenser. This should always be displayed when the appliance is connected to the mains supply. It shows that the digital control system is operating the appliance. This should always be displayed when the appliance is connected to the mains supply. -
Page 13: Turning On The Appliance
o You switch on your appliance by connecting it to your mains supply. Setting the thermostat in the freezer o Press the FREEZER SET button to set the temperature in the freezer section. o The temperature that you have selected will show in the digital display next to the FREEZER SET button. -
Page 14: Turning On The Super Freezer Option
sequence shown below:- o We would recommend that the fridge section is set to a minimum temperature of 5°C. o When the desired temperature appears on the digital display, release the REFRIGERATOR SET button, after a few seconds the temperature will be selected. o On the maximum setting (2°C), the fridge section will work harder to maintain a lower temperature. -
Page 15: Turning On The Super Refrigerator Option
This setting should be used if you want to chill something quickly, it will ensure that a powerful supply of cold air enters the fridge compartment. o Press the SUPER REFRIGERATOR button to turn on the super refrigerator option. o The QUICK symbol will light to confirm that the super refrigerator option has been switched on. - Page 16 close completely. Particular attention should be given to bottles that may protrude when placed on shelves inside the main section of the refrigerator. o Some organic solutions, such as the oils in lemon/orange peel and acid in butter, can cause damage to the plastic parts contained inside of the refrigerator.
-
Page 17: The Freezer Compartment
freezer compartment The freezer compartment is suitable for storing and freezing food. o The freezer compartment temperature must have already reached -18 degrees centigrade (or lower) before you attempt to store food that is already frozen or freezing fresh food. o The freezer compartment is only able to freeze a certain quantity of fresh food at one time. -
Page 18: Tips On Freezing
o Freezer bags, polythene wraps, aluminium foil (extra thick) and special cans for frozen foods are suitable packaging for storing frozen goods in. o Tape, rubber bands or plastic clips are suitable for sealing bags and wrappings. o Before sealing a suitable bag, you should compress the air out of it, as this will help the food to freeze more easily. -
Page 19: The Dispenser
When your fridge/freezer is first connected to your mains supply, it will automatically select chilled water mode and the water symbol will light. Before first use You should not attempt to dispense ice for 24 hours after the appliance is first connected to your mains supply. o Once the fridge and freezer sections have cooled sufficiently place a cup against the PUSH pad in the dispenser and pour out a couple of glasses of water. -
Page 20: The Ice Maker
few seconds it will dispense water, cubed ice or crushed ice. What comes out of the dispenser will depend on what option you selected before pushing the pad. o You should place the glass directly underneath the water/ice chute and not rest it on the base of the dispenser. Otherwise water/ice can spill or splash. -
Page 21: Dispenser And Ice Maker Warnings
If the ice is still discoloured then change the water filter. o If the ice is STILL discoloured after changing the water filter, then contact the Baumatic Service Department. o If there is a power cut you should remove all ice from the ice cube storage case. -
Page 22: Removing And Replacing The Ice Cube Storage Case
o If the storage case does not fully slide back into position, remove it from the freezer again. Rotate the coil inside of the case a quarter of a turn and then slide the storage case back into place. Water filter change icon o Six months after you connect your appliance to the mains supply for the first time, the FILTER CHANGE icon will come on. -
Page 23: Cleaning And Maintenance
Cleaning and maintenance WARNING: PLEASE ENSURE THAT YOUR APPLIANCE IS DISCONNECTED FROM YOUR MAINS SUPPLY BEFORE ATTEMPTING TO CLEAN IT. o Do not clean the appliance by p or spraying water over it. o The refrigerator and freezer compartment should be cleaned periodically, using a solution of bicarbonate of soda and lukewarm water. - Page 24 Fridge and freezer shelves Salad/Vegetable and fruit drawers Interior parts Door seal Rear grill To remove a fridge or freezer door compartment, hold both ends and pull upwards. Open the appliance doors fully. To remove a shelf, pull them forwards. To remove a drawer, lift up a little and pull forward.
-
Page 25: Defrosting The Freezer Compartment
Defrosting the Your appliance is frost free, so you should not need to manually defrost the freezer section. However if for example the door is left open for a prolonged period of time or the door gasket is not sealing correctly, then you could get ice building in the freezer section. -
Page 26: Replacing The Light Bulb
that is immediately in front of the appliance. In case any defrost water comes out of the freezer section and onto the floor. o Once all the ice that has built up has melted, then the inside of the freezer compartment should be dried thoroughly. Failure to do this will result in immediate ice build when the appliance is turned back on. - Page 27 Push the cover back into position and fully tighten the screws that hold it in place. Freezer section The light bulbs can be found behind the light cover that is below the top shelf. Push the cover back into position and fully tighten the screws that hold it in place.
-
Page 28: Installation
Installation IMPORTANT: Before installation and usage read all the instructions and make sure that the voltage (V) and the frequency (Hz) indicated on the rating plate are exactly the same as the voltage and frequency in your home. The rating plate can be found on the front left edge of the inside of the refrigerator. -
Page 29: Positioning
o It is advisable that your appliance is only installed in a location where the ambient temperature of the room, corresponds with the climate classification that is stated on the rating plate of your appliance. Your appliance may not function correctly if the ambient temperature falls outside of the following ranges. -
Page 30: Installation Preparation
IMPORTANT: A minimum of two people should complete all of the installation steps given in this manual. o Check that the appliance will easily pass through all doorways en route to its final position. o Appliance dimensions: 1790 mm(h) x 900 mm(w) x 730 mm(d). (including door handles). - Page 31 Turn the top hinge fastener anti-clockwise 3-4 times and then disconnect the harness wires. IMPORTANT: One person should support the door before attempting this next step. Lift up the front of the hinge and remove it from the appliance. Whilst still supporting the door, slowly lift it upwards to disengage it from the lower hinge.
-
Page 32: Removing The Fridge Door
Unscrew the top hinge cover using a screwdriver. Insert a thin screwdriver into the side groove of the cover to remove it. Turn the top hinge fastener anti-clockwise 3-4 times and then disconnect the harness wires. IMPORTANT: One person should support the door before attempting this next step. -
Page 33: Replacing The Freezer Door
Firstly insert the water tube into the hole in the bottom hinge and then insert the bottom of the freezer door into the bottom hinge too. Make sure that the hinge pin has been inserted into the hole in the bottom of the freezer door. Insert the back of the top hinge in the groove on the top of the cabinet. -
Page 34: Replacing The Fridge Door
Push down the left hand collar of the coupling and then insert the water tube as far as it will go into the coupling. When it is securely in position, release the left hand collar. Replacing the fridge door Insert the bottom of the fridge door into the bottom hinge, making sure that the hinge pin has been inserted into the hole in the bottom of the fridge door. -
Page 35: The Water Inlet Hose And Water Filter
Place the top hinge cover back into position and using a screwdriver, fully tighten it to the top of the cabinet. The water inlet hose and water filter o The water pressure should be 2 bar or higher to allow the icemaker to operate correctly. - Page 36 o Leave the tap open until clear water is flowing out of the appliance side end of the inlet hose. IMPORTANT- The running of water through the inlet hose and filter must be done, to make sure that any impurities from the manufacturing process are washed out.
- Page 37 o Clip the water filter into the filter holder. 5) Remove the cover at the bottom rear of the appliance. o Insert the fastening ring into the water inlet, you must ensure that you follow the direction of the nut. o Insert the water inlet into the top of the water valve (the valve is located to the right of the compressors), then turn the nut clockwise to securely fasten it.
- Page 38 inlet or no leaks, replace the rear cover. You should make sure that the water inlet sits between the groove of the refrigerator back and the compressor cover. IMPORTANT- Check for all connections and make sure that there is no sign of leaks before placing the appliance in its final location. You should ensure that the inlet hose does not get crushed or kinked.
-
Page 39: Levelling The Appliance And Adjusting The Doors
The appliance must be situated on a level and even floor; otherwise the doors may not hang properly or seal correctly. The front of the appliance should be a little higher than the rear of the fridge freezer. This will allow for easy closing of the doors. -
Page 40: Replacing The Water Filter
Check for leaks and then dispense water from the appliance. Troubleshooting IMPORTANT: If your fridge freezer appears not to be operating properly, before contacting the Baumatic Service Department, please refer to the checklist below. My fridge freezer does not appear to be working/there is no power to my appliance. - Page 41 My fridge freezer is noisy o The refrigerant gas that circulates the pipework of the appliance may make a slight noise, even if the compressor is not running. o If the noise worsens or the appliance gets louder than normal; check that it is levelled off correctly, that nothing is touching the rear of the fridge freezer and that nothing placed inside the appliance is rattling.
-
Page 42: Baumatic Ltd. Conditions Of Guarantee
Baumatic appliance. * In addition, your appliance is covered by a 5 year parts warranty. Baumatic Ltd will provide free of charge the parts required to repair the appliance, only if they are fitted by a Baumatic engineer, for any defect that arises due to faulty materials or workmanship within a period of 5 years from the original purchase date. -
Page 43: Contact Details
Headquarters Baumatic Ltd. Baumatic Buildings, 6 Bennet Road, Reading, Berkshire RG2 0QX, United Kingdom Sales Telephone +44 118 933 6900 Sales Fax +44 118 931 0035 Service Telephone +44 118 933 6911 Service Fax +44 118 986 9124 Spares Telephone... - Page 44 44 44...