Avaya 6424D+M User Manual
6400 series multi-line telephones
Hide thumbs
Also See for 6424D+M:
- User manual (178 pages) ,
- Quick reference card (6 pages) ,
- Features manual (4 pages)
Table of Contents
Advertisement
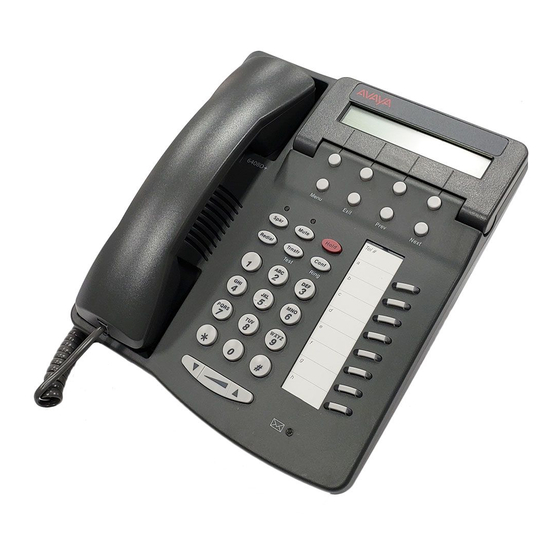
6408+, 6408D+, 6416D+, 6416D+M, 6424D+,
and 6424D+M Telephones
User's Guide
Conte nts
6400 Series Multi-line Telephones . . . . . . . . . . . . . . . . . . . 5
Headsets . . . . . . . . . . . . . . . . . . . . . . . . . . . . . . . . . . . . . . . . 6
Headpieces . . . . . . . . . . . . . . . . . . . . . . . . . . . . . . . . . . . . 7
Using the Softkeys. . . . . . . . . . . . . . . . . . . . . . . . . . . . . . . . 8
Using the Softkey Feature Menus . . . . . . . . . . . . . . . . . . 8
Call-Handling Features . . . . . . . . . . . . . . . . . . . . . . . . . . . . 9
Getting Messages . . . . . . . . . . . . . . . . . . . . . . . . . . . . . . . 13
Selecting a Personalized Ring . . . . . . . . . . . . . . . . . . . . . 13
Selected Voice Features . . . . . . . . . . . . . . . . . . . . . . . . . . 14
Display Features . . . . . . . . . . . . . . . . . . . . . . . . . . . . . . . . 21
Time and Date . . . . . . . . . . . . . . . . . . . . . . . . . . . . . . . . . 21
Call Information . . . . . . . . . . . . . . . . . . . . . . . . . . . . . . . 21
Modular Interface Capabilities . . . . . . . . . . . . . . . . . . . . . 24
Telephone Installation . . . . . . . . . . . . . . . . . . . . . . . . . . . . 25
Desktop Installation . . . . . . . . . . . . . . . . . . . . . . . . . . . . 25
Wall Installation . . . . . . . . . . . . . . . . . . . . . . . . . . . . . . . 26
Removing the Telephone Tray . . . . . . . . . . . . . . . . . . . 29
Installing the Designation Card. . . . . . . . . . . . . . . . . . . 30
Line and Feature Button Lights . . . . . . . . . . . . . . . . . . . . 32
555-230-739
Comcode 108339029
Issue 3
April 1999
Advertisement
Table of Contents

Related Manuals for Avaya 6424D+M


Summary of Contents for Avaya 6424D+M
-
Page 1: Table Of Contents
6408+, 6408D+, 6416D+, 6416D+M, 6424D+, and 6424D+M Telephones User’s Guide Conte nts 6400 Series Multi-line Telephones ....5 Headsets ........6 Headpieces . - Page 2 Avaya will not be responsible for any charges that result from such unauthorized use. Product administration to prevent unauthorized use is your...
- Page 3 INSTRUCTIONS The most careful attention has been devoted to quality standards in the manufacture of your new telephone. Safety is a major factor in the design of every set. But, safety is YOUR responsibility too. Please read carefully the helpful tips listed below and on the next page. These suggestions will enable you to take full advantage of your new voice terminal.
-
Page 4: Save These Instructions
• To reduce the risk of electric shock, do not disassemble this telephone. There are no user serviceable parts. Opening or removing covers may expose you to hazardous voltages. Incorrect reassembly can cause electric shock when the telephone is subsequently used. Service 1. -
Page 5: Controls & Features
2-line by 24-character display, and a two-way speakerphone. • The 6424D+ and 6424D+M Telephones — have 24 call appearance/ feature buttons, a 2-line by 24-character display, and a two-way speakerphone. Note: Only the 6416D+M and 6424D+M have modular capabilities. -
Page 6: Headsets
Handset jack (shown as 3 in FIGURE 2 The Headset Attached to the Handset Jack on a 6400 Series Telephone (via a Modular Base Unit) On the 6416D+M and 6424D+M sets, there is a jack provided for ONLY the headset. In Figure 3, the headset is shown as 1;... -
Page 7: Headpieces
6400 Series telephones. Note that this does NOT apply to headsets plugged into the Headset jack on the back of the 6416D+M and 6424D+M telephones that do not require a modular base. For more information, see the instructions for the Whisper Page feature in the Voice Features section. -
Page 8: Using The Softkeys
75 percent. Note: For direct connection to the Headset jack on the 6416D+M and 6424D+M, use the following cord: HIC-01; Comcode: 408122950; PEC: 3124-IC/A. Using the Softkeys The softkeys are the four unlabeled round keys located directly below the display. -
Page 9: Other Softkey Features That May Be On Your Display
The top line of each softkey feature menu screen shows you the status of each of the four features. An arrow appears above the feature name or abbreviation if that feature is active. In the above example, the arrow above the Timer feature indicates that feature is active. - Page 10 Hold The Hold feature puts a call on hold until you can return to it. To put a call on hold while you answer another call or perform another task 1. Press Hold To answer a new call while active on another 1.
- Page 11 If you have a display, it shows the volume level: (There are eight volume levels.) To turn off the speaker and return to handset 1. Pick up the handset. To end a call (while the handset is on-hook and only the speaker is active) 1.
- Page 12 4. If you have a display, it shows the volume level: (There are eight volume levels.) To change from the speakerphone to the handset 1. Pick up the handset and talk. To change from the handset to the speakerphone 1. Press Spkr 2.
-
Page 13: Getting Messages
4. Press again to complete the transfer. Trnsfr 5. Hang up. Note: If your telephone is connected to a DEFINITY Release 6.3.2 or a later release, your administrator may have chosen Transfer-on-Hang-up. In this case, you can transfer a call by pressing number to which the call is to be transferred, and then hanging up. -
Page 14: Selected Voice Features
This Automatic Dialing number can be up to 16 digits and characters. For all 6408+ telephones, and all 6408D+, 6416D+ and 6416D+M, and 6424D+ and 6424D+M telephones connected to DEFINITY switches 6.2 and prior releases, or when using the Program feature access code... - Page 15 For 6408D+, 6416D+ and 6416D+M, and 6424D+ and 6424D+M telephones connected to a DEFINITY ECS Release 6.3 or later To program an Abbreviated Dialing button on the softkey feature menu screens or on a feature button Note: If you make a mistake while programming an AD button on your display, you CANNOT move back a space to erase it.
- Page 16 To place an AD call 1. Press the selected AD button, either a feature button or the softkey below the AD feature on the feature menu screens. To program or reprogram an outside number, extension, or feature access code into an AD personal list 1.
- Page 17 Without a display: Press the on-hook or off-hook) or Dial the Call Forward access code (while off-hook). Note: If you have console permission, next, dial the extension number whose calls are to be forwarded; receive dial tone. 2. Dial the extension or number where calls will be sent. 3.
- Page 18 Call Pickup and Directed Call Pickup The Call Pickup feature lets you answer a call at your telephone for another extension in your pickup group. If you can use the Directed Call Pickup feature, you can pick up a call ringing at a specific extension without the person’s being a member of your pickup group.
- Page 19 Without a display: Press the Calling access code (while off-hook). 2. Dial the extension. Message light goes on at the called telephone (if so equipped). 3. Hang up. To cancel a Leave Word Calling message Note: You cannot cancel a message left for an AUDIX subscriber. 1.
- Page 20 4. Press the button on which you wish to assign this feature. If the feature is successfully administered on the feature button, the display shows: “Button Programmed!” Go on to Step 5. Note: If there is already a feature programmed on that button, you see the following screen: XXXXX FEATURE ON BUTTON Replace...
-
Page 21: Display Features
Display Features Note: To ensure easier display visibility, the display on the 6408D+, 6416D+ and 6416D+M, and 6424D+ and 6424D+M can be left in its horizontal position or can be raised to a slightly steeper angle. Check which viewing angle is best for your workstation. - Page 22 (on the 6416D+ and 6416D+M) and through x (on the 6424D+ and 6424D+M). When the display shows appearance button. The next button down would be shown as so on.
- Page 23 Directory The Directory feature allows you to search for the extension of another user in your location by keying in the user’s name at the dial pad. To search the directory for a name 1. Press the Menu button and then press the softkey below Dir or, if Dir is not available on your display, press the (if administered).
-
Page 24: Modular Interface Capabilities
Step 2 to see another stored number. Modular Interface Capabilities If you are using a 6416D+M or 6424D+M telephone, you can install a module in the telephone’s desktop stand for increased set functionality. the rear of the desktop stand on these telephones. Number 1 in shows the module opening on the back of the stand. -
Page 25: Telephone Installation
Note: These modules can ONLY be used in the desktop position; they CANNOT be used if the telephone is to be wall-mounted. FIGURE 5 A Rear View of the 6416D+M and 6424D+M Telephones Telephone Installation All of the 6400 Series telephones described in this manual can be either desk-mounted or wall-mounted. -
Page 26: Wall Installation
Figure 6) on the bottom of the telephone. 4. If you are installing a 6416D+ or 6416D+M or a 6424D+ or 6424D+M with a connected expansion module, snap one end of the expansion module cord into the “XM24” jack (4 in 5. - Page 27 — In order to release the handset retainer hook, press down on the hook and slide it toward the top of the telephone. (See b in — Rotate the hook 180 degrees (as in c in back into its slot so the bottom part now sticks out from the top. (See d in Figure 7.) Snap the hook firmly into place.
- Page 28 5. Reverse the desktop stand so that the larger end is facing down. 6. Snap the line cord into the “LINE” jack in the bottom of the telephone and coil the excess cord in the back of the deskstand. 7. Snap one end of the coiled handset cord into the Handset jack (labeled ).
-
Page 29: Removing The Telephone Tray
Removing the Telephone Tray You may wish to remove the tray from the base of the telephone, especially if you are wall-mounting the telephone. See 1. Pull the tray from the base of the telephone as far as it will go. 2. -
Page 30: Installing The Designation Card
Installing the Designation Card Use the button designation card to write the telephone number, extension, name, or feature that each call appearance/feature button can access. In order to help you match the designation cards with the call appearance/feature buttons on the telephone, the columns of button labels are marked with the 6400 Series multi-line telephone model with which the label can be used. -
Page 31: Tones And Their Meaning
Tones and Their Meaning Note: The tables below describe the defaults for each ringing and feedback tone. Check with your system manager to verify if the descriptions in the Meaning column are accurate for your system. Ringing Tones are produced by an incoming call. Ringing Tones Rings 1 ring... -
Page 32: Line And Feature Button Lights
Feedback Tones Tones coverage dial intercept/ time-out recall dial reorder ringback Line and Feature Button Lights Line and Feature Button Lights Light Steady red Steady green Blinking green (continued) Meaning One short burst of tone; indicates your call will be sent to another extension to be answered by a covering user.