Table of Contents
Advertisement
Quick Links
10/8/2015
Hardware
UAD2 + PlugIns
Home
>
Support
>
Apollo Twin Support Page
Apollo Twin Support Information
Latest Technical News
Please review the information on this page carefully before installing or using Apollo Twin.
Note: The latest UAD software is compatible with system sleep/wake and Thunderbolt hotplugging.
Apollo Twin is compatible with other Apollo models when using UAD v8 software. See the compatibility section below for
details.
UAD v8 software features significant enhancements for the Apollo Thunderbolt platform and is recommended for all users.
As of UAD v8 software, UAD authorization is automatic. See About UAD v8 Software below for details.
Support Videos to Help You Get Started
General Information
Apollo Twin documentation
After software installation, all Apollo and UAD operation manuals are at this location on the system drive:
Macintosh HD/Applications/Universal Audio
All operation manuals can be accessed from the Help menu within the Console application, or by clicking the "View
Documentation" button in the Help panel within the UAD Meter & Control Panel application.
All operation manuals can also be downloaded here.
http://www.uaudio.com/support/apollotwinsupport#quickstart
Apollo Twin Support Page
Store
Blog
Support
This page is dedicated to Apollo Twin compatibility and support. The following
information is subject to change and may not always be up to date due to OS
and DAW updates, or other factors beyond Universal Audio's control.
Last Updated: September 10, 2015
Jump to:
Latest News & Updates
Support Videos
About UAD v8 Software
System Requirements
Quick Start
Setting I/O Levels
Click here for the Apollo Twin Start Video
Visit the support videos blog for more videos to help you set up and use
Apollo Twin:
Apollo Interfaces Basic Setup & Recording (Console 2.0) w/ Fab
Dupont
Apollo Console 2.0 Part 1 (Getting Started)
Apollo Console 2.0 Part 2 (Console Sections)
Apollo Console 2.0 Part 3 (Expanded Systems, Flex Driver)
My.Uaudio – Creating and navigating your My.Uaudio account
Pro Tools – Setting up Apollo with Avid Pro Tools
Logic Pro – Setting up Apollo with Apple Logic Pro
Cubase – Setting up Apollo with Steinberg Cubase
Live – Setting up Apollo with Ableton Live
Studio Basics
All UAD support videos
About
General Info
Device Compatibility
General Usage Notes
Search Site
My.Uaudio
Pressroom
Contact
Cart
Enter your email address
Online Support
Contact Us
Phone Support
USA (toll free)
8776982834
International
+18314401176
Germany, Austria, Switzerland,
France and Benelux
+31 (0) 20 800 4912
Fax
+18314611550
Customer support is available from 9am
to 5pm, Monday through Friday, PST
Contact Support
Submit a Request
Press, Review, and Advertising
Inquiries
Amanda Whiting
+18314401176
Mailing Address
Universal Audio, Inc.
4585 Scotts Valley Dr.
Scotts Valley CA 95066
1/8
Advertisement
Table of Contents

Related Manuals for Universal Audio Apollo Twin


Summary of Contents for Universal Audio Apollo Twin
- Page 1 10/8/2015 Apollo Twin Support Page Search Site Hardware UAD2 + PlugIns Store Blog Support About My.Uaudio Pressroom Contact Cart Home > Support > Apollo Twin Support Page Enter your email address Online Support Apollo Twin Support Information This page is dedicated to Apollo Twin compatibility and support. The following information is subject to change and may not always be up to date due to OS and DAW updates, or other factors beyond Universal Audio's control. Last Updated: September 10, 2015 Contact Us Jump to: Phone Support Latest News & Updates Support Videos General Info USA (toll free) 8776982834 About UAD v8 Software System Requirements Device Compatibility Quick Start Setting I/O Levels General Usage Notes International +18314401176 ...
-
Page 2: Device Compatibility
10/8/2015 Apollo Twin Support Page Additional Information Latest Apollo Twin software Apollo Twin product page – General product information Thunderbolt support page – Using Thunderbolt with UAD devices Apollo Twin FAQ – Frequency asked questions UAD2 FAQ – UAD questions that aren't specific to Apollo Twin Compatible DAW Applications – Using audio software with Apollo Twin UAD Instance Count Chart – How much DSP each UAD plugin uses UAD2 support pages – Technical information related to Apollo Twin's UAD2 functionality Pro Tools Compatibility – RTAS and AAX 64 information Troubleshooting Basics – Steps you can take if the system is not operating properly UAD Software Release Notes About UAD v8 software New UAD v8 Features In addition to new UAD plugins, UAD v8 software offers significant enhancements for the UAD Thunderbolt platform, including: Apollo Expanded, featuring: Mixandmatch compatibility with up to four Apollo interfaces New Console 2.0 application with over 25 new userrequested features Flex Driver enables custom I/O routes and names at the Core Audio driver level Compatibility with up to six UA devices Simplified UAD authorization (Internet connection required) Apollo Unison technology for new Distortion Essentials Pedals Mac OS X Yosemite compatibility Simplified UAD Authorization As of UAD v8 software, UAD authorization is automatic (Internet connection required). When the UAD software is updated, authorization happens in the background when the computer is started and/or when the UAD Meter & Control Panel application is opened. It is no longer necessary to manually authorize after updating UAD software; you can begin working immediately. After purchasing a UAD plugin, the UAD software requires manual authorization. The web store guides you through the process. Apollo Twin System Requirements Thunderbolt Systems UAD Powered PlugIns version 8 Apple Mac computer with available Thunderbolt or Thunderbolt 2 port Mac OS X 10.8.5 Mountain Lion, 10.9.x Mavericks, or 10.10.x Yosemite 4 gigabytes available disk space Internet connection to download software and authorize UAD plugins Compatible VST, Audio Units, RTAS, or AAX 64 plugin host DAW software Thunderbolt cable (sold separately) -
Page 3: Quick Start Overview
10/8/2015 Apollo Twin Support Page *Exception: One Apollo Twin can be used To use UAD2 PCIe cards, a compatible ThunderbolttoPCIe chassis is required Up to two UAD2 Satellite FireWire units are compatible Note: All compatibility information for this device still apply when using UAD Thunderbolt Software All Apollo units must be connected via Thunderbolt Apollo FireWire connections are incompatible FireWire Device Compatibility with UAD v8 Thunderbolt Software FireWire devices such as external hard drives are compatible FireWire devices may be connected directly to the computer's FireWire port (if available) or an available Thunderbolt or Thunderbolt 2 port via the Apple Thunderbolt to FireWire Adapter Device Driver and UAD PlugIn Compatibility Apollo Twin requires Mac OS X version 10.8.5 and higher (the lowest OS version that supports Thunderbolt 2) UAD Powered PlugIns are 32bit and 64bit compatible Console 2.0 is a Retinacompatible 64bit application Thunderbolt Connections Connecting Apollo Twin to the computer Connect Apollo Twin to any available Thunderbolt port on the Thunderbolt bus with a Thunderbolt cable (sold separately). The connection can be either directly to the computer's Thunderbolt port, or to an available Thunderbolt port on a Thunderbolt peripheral attached to the computer's Thunderbolt port. Thunderbolt 1 or Thunderbolt 2 ports and devices may be mixed and/or matched for any/all Thunderbolt connections. Note: All Thunderbolt devices must be connected to the same Thunderbolt port on the computer. Apollo Twin cannot be bus powered via Thunderbolt. The included external power supply must be used. See the Apollo Thunderbolt support page for specific instructions on how to connect and use two or more Apollo units together. Universal Audio Thunderbolt devices are tested with authentic Apple Thunderbolt Cables and Thunderbolt Optical Cables by Corning. Using offbrand cables may cause unpredictable results. Connecting additional Thunderbolt peripherals Universal Audio Thunderbolt devices are officially certified as Thunderbolt compliant and are therefore compatible with other certified Thunderbolt devices when used in the same chain. The Startech Thunderbolt Docking Station is tested inhouse and is known to be compatible with UA Thunderbolt devices. This device has an HDMI display output which can be used for an external display to free the Thunderbolt port for Apollo Twin. All Thunderbolt devices must be connected to the same Thunderbolt port on the computer. The Thunderbolt protocol supports a maximum of six Thunderbolt peripherals per Thunderbolt bus. Thunderbolt and Mini DisplayPort For general information about Thunderbolt ports and displays, see Apple's Thunderbolt ports and displays FAQ. Apollo Twin cannot be used by connecting it to a Mini DisplayPort connector. Although Thunderbolt and Mini DisplayPort devices have the same physical connector, the underlying communication protocol used by these devices is different. The type of device port can be determined by the icon next to the port. Thunderbolt ports have a "lightning bolt" icon, while Mini DisplayPort ports have a "display" icon. The difference between these ports and icons is shown in the illustration below. -
Page 4: Hardware Setup
10/8/2015 Apollo Twin Support Page Quick Start Overview Follow the steps below to setup Apollo Twin. For a short video of the setup process, click here. Setup includes connecting the hardware, installing the software, and registration to authorize bundled UAD plugins. For more detailed explanations (and offline authorization procedures), see the UAD System Manual. Hardware Setup Connect to computer and power on Note: Before powering Apollo Twin, lower the volume of the monitor speakers and remove headphones from your ears. 1. Connect a Thunderbolt cable (sold separately) between Apollo Twin and the Mac computer. 2. Connect the included external power supply to an AC outlet (Apollo Twin cannot be bus powered). 3. Connect the power supply to the 12VDC input on Apollo Twin's rear panel. Important: Apollo Twin has a locking power supply connector to prevent accidental disconnection. When inserting, first align the two tab "wings" on the power cable's barrel connector to the notches on the power input. Then rotate the barrel clockwise to secure it to the Apollo Twin chassis. 4. Power on Apollo Twin with the rear panel power switch. Connect to Input Sources and Monitor System(s) One typical setup is illustrated below. Note that because the HiZ Instrument input on the front panel uses channel 1, the microphone is connected to channel 2 so both sources can be used at the same time. For complete details about all of Apollo Twin's connectors and controls, see the Apollo Twin Hardware Manual. Software Setup Install the Apollo Twin software and register 1. Download the latest UAD Powered PlugIns software installer. The installer file is downloaded to the disk location specified in the web browser's preferences. You can watch the Apollo Twin Start Video that appears after clicking the download button to help you get started. 2. Doubleclick the downloaded installer file to open it. The installer guides you through the process (update the firmware if prompted; see below). Be sure to restart the computer when prompted by the installer. 3. After restarting the computer and Apollo Twin is detected by the UAD software, the default web browser opens. Follow the instructions on the web pages to create an account, register the hardware, and authorize bundled UAD plugins. -
Page 5: Setting Hardware Input & Output Levels
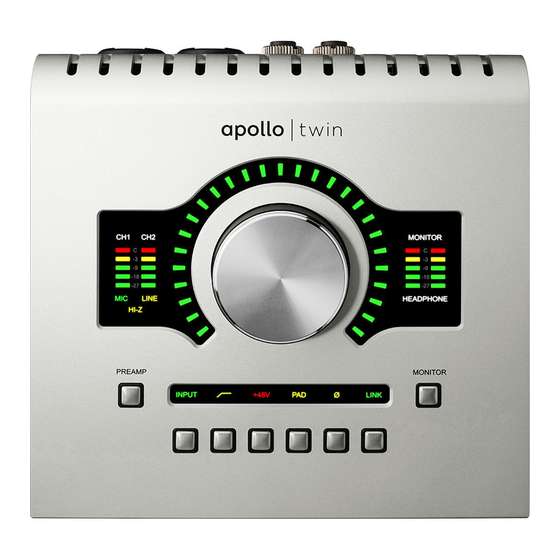
10/8/2015 Apollo Twin Support Page Firmware updates for the Apollo Twin hardware may be included within the software to enhance system functionality. For optimum results, always update the firmware by clicking "Load" if prompted by the software. The software will guide you through the firmware update process; be sure to follow the instructions on screen. Most importantly, power off then power on the unit after the "Power Off UAD Device" window appears. The Apollo Twin software prompts for firmware updates automatically (if available). For complete firmware update information, see the firmware support page. Important: Do not interrupt system power during any firmware update routines. What Next? Learn how to set gain levels for the mic, line, and instrument inputs, and output levels for the monitor speakers and headphones. Instructions are in the next section. Setting Hardware Input & Output Levels This section explains how to operate the panel controls so you can set input gain levels for the inputs (mic, line, and HiZ), and adjust volume levels for the outputs (monitors and headphones). Refer to the top panel illustration below for the control names and numbers mentioned in this section. For detailed descriptions of all Apollo Twin controls, see the Apollo Twin Hardware Manual. Important: Before proceeding, lower the volume of the monitor speakers and remove headphones from your ears. Apollo Twin's top panel Set Input Gains 1. Select the input channel to be adjusted by pressing the PREAMP button (9) until the Channel Selection Indicator (3) displays the desired channel (CH1 or CH2). 2. Select the input type (mic or line) by pressing the INPUT Select button (11) until the Input Type indicator (5) displays the desired input jack* (see note below). 3. Adjust the channel's input gain by increasing the Level knob (1) until the input meter for the channel (4) approaches maximum, but does not reach the red clip LED when the input signal is present. If the level is too high to avoid clipping (when the red “C” LED illuminates), press the PAD button (11). To set the input gain for the other input channel, repeat steps 1 – 3. Adjust Output Volumes 1. Select the output volume to be adjusted (monitor or headphones) by pressing the MONITOR button (10) until the Monitor Selected (6) or Headphone Selected (8) indicator is lit. 2. Adjust the volume level by carefully increasing the Level knob (1) until the desired volume is reached (you may need to adjust the volume of the speakers). -
Page 6: General Usage Notes
10/8/2015 Apollo Twin Support Page 2. Press the Level knob (1) to mute the monitor outputs. The Volume Level Indicator LEDs (2) are red when the monitors are muted and Monitor is selected (6). 3. To toggle the monitor mute state, press the Level knob (1) whenever Monitor (6) is selected. Notes: *The HiZ input is automatically selected, overriding the channel 1 Mic and Line inputs, when a ¼” mono TS (tipsleeve) plug is connected to the HiZ Instrument jack (12) on the front panel. To control both channels simultaneously when a stereo source is connected, press the LINK button (11) when an input is selected (9). Line outputs 3 & 4 are accessed and controlled via software only (Console or DAW). What Next? Refer to the Apollo Software Manual to learn how to configure the audio interface settings, use the Console application and Realtime UAD Processing for live input monitoring, use the Console Recall plugin in a DAW, and much more. Exploring Console Opening Console To open the application, click its icon in the Mac OS X Dock. Explore the interface For complete Console details, see the Apollo Software Manual. General Usage Notes Console Application (Apollo Twin DUO only) Realtime UAD Processing with UAD plugins in Console uses DSP differently than when UAD plugins are used within a DAW. To maintain the lowest possible input latency, UAD plugins used on a single Console input are “chained” and must be processed within a single DSP chip. Therefore, it is possible to get a DSP/PGM/MEM limit exceeded message even though the UAD gauges may indicate there is plenty of DSP/PGM/MEM available. Session, plugin, and I/O preset files saved within Console will not be saved if the "/" (forward slash), "\" (back slash), or "?" (question mark) characters are in the filename. Avoid these and other special characters when saving Console presets of any type. Sample Rate Changes http://www.uaudio.com/support/apollotwinsupport#quickstart... - Page 7 10/8/2015 Apollo Twin Support Page For optimum results when using Console without a DAW, perform sample rate changes within the Console application (instead of within Mac OS X's Audio MIDI Setup application). For optimum results when using a DAW, perform sample rate changes within the DAW itself (instead of the Console application or within Mac OS X's Audio MIDI Setup application). For optimum results when Apollo's current sample rate is different from the sample rate set within a DAW session, change Apollo's sample rate within Console to match the sample rate of the DAW session before loading the DAW session. UAD Resource Usage Apollo Twin uses DSP and memory for its internal DSP mixer. Therefore, the UAD Meter & Control Panel application will show some DSP and memory usage even when UAD plugins are not in use. UAD Presets When logged into the computer under an account that does not have administrator privileges, saving UAD preset files via the UAD Toolbar will result in an "Unable to save preset file" dialog. If this occurs, either log in with an administrator account, or use the DAW's preset management tools. What is the lowest hardware buffer setting I can use with Apollo Twin for stable operation? The audio interface hardware I/O portion of Apollo Twin can run at any hardware buffer setting that is stable within the DAW itself. Results may vary as a result of how much the DAW session stresses the computer system. This can be influenced by: Session track count and sample rate How many processorintensive native plugins (such as virtual instruments, convolution reverbs, etc.) are in the session Processor type, speed, and overall power of the computer Of course, for the lowest possible latency when monitoring live inputs, we recommend using the included Console application to take advantage of Apollo Twin’s unique Realtime UAD Processing feature, where DAW I/O buffering does not apply at all. System Sleep System sleep is compatible with the latest Apollo Twin software. However, disabling sleep when using DAW software is generally recommended. For optimum results when using Apollo Twin with DAW software, follow these guidelines: Disable sleep. Open the Energy Saver panel within System Preferences* and drag the “Computer Sleep” slider (if present) to “Never” (the far right position). Before sleeping the system, quit any DAW software using UAD plugins. If UAD2 Satellite FireWire is connected, system sleep MUST be disabled. Sleep is not compatible with UAD FireWire devices (UAD2 Satellite Thunderbolt is compatible with system sleep). *To access System Preferences, click the Apple icon in the OS X Menu Bar (upper left of screen) then select the application from the drop menu. Computer sleep is disabled in the Energy Saver panel within the System Preferences application Home Hardware UAD2 + PlugIns Store Blog Support My.Uaudio LA610 MkII...
- Page 8 10/8/2015 Apollo Twin Support Page http://www.uaudio.com/support/apollotwinsupport#quickstart...