Advertisement
Quick Links
Manual Version 1.0
Quickstart Guide (English)
Box Contents:
Video Archiver
1/8" (3,5 mm) to RCA Audio-Video Cable
USB Charging Adapter
Quickstart Guide
Setup
Items not listed under
Box Contents
are sold separately.
1.
Use the included 1/8" (3.5 mm)-to-RCA audio-video cable to connect the output of your video
source (VCR, camcorder, etc.) to the AV In port of Video Archiver. Make sure to match colors
when making connections: yellow for composite video, red (right) and white (left) for stereo
audio.
2.
Optional: Use either a standard HDMI cable or a 1/8" (3.5 mm)-to-RCA audio-video cable to
connect the output of Video Archiver to the inputs of your television or monitor.
IMPORTANT: Do not use the HDMI Out and AV Out at the same time. If both are connected,
only the AV Out will work. To resume using HDMI, remove both the HDMI and AV Out cables,
then reattach only the HDMI cable.
3.
If the battery is low, connect the mini-USB cable from the mini-USB port to the included
charging adapter.
4.
Once all connections have been properly made, power Video Archiver on by pressing and
holding the Power button.
5.
Select TV In or Recorder to preview in incoming video or audio, respectively, from Video
Archiver's built-in display and speaker, or from your connected screen.
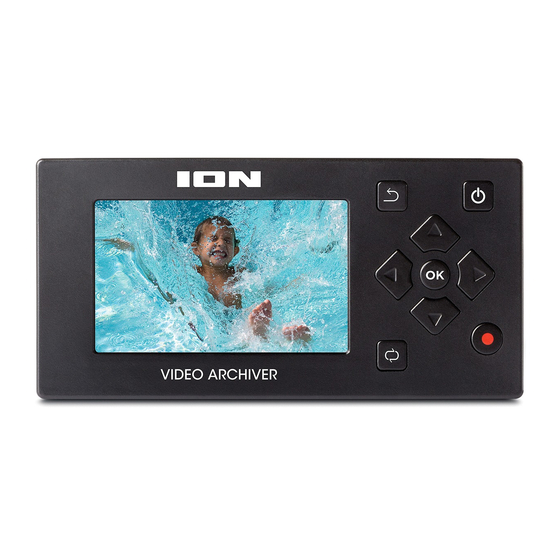
Features
2
3
6
1
7
4
5
1.
Display: Use this display to operate Video Archiver and preview connected video sources.
2.
Back: Press this button to return to the previous menu.
3.
Power Button: Press and hold this button for 3 seconds to power Video Archiver on and off.
4.
Record Button: Press this button to begin recording. Press it again to stop and save the file.
5.
Audio Mode Button: Press this button to cycle between 6 different audio playback modes:
Random Play, Random Repeat, Introduction, Sequence, Repeat Once and Repeat All.
6.
Cursor Buttons: Use these buttons to navigate the menus and files.
7.
OK Button: Press this button to select an option.
8.
Mini-USB Port: Use the included mini-USB cable to connect this port to the included DC 5V
charger. You can also connect the mini-USB cable to your computer to manage files or update
firmware.
9.
Micro SD Card Slot: For additional storage, insert a micro SD card into this slot until you hear
it "click." When a card is inserted, files will automatically be saved to it instead of the internal
memory. To save and view files from the internal drive, set the Save Path option in the
Settings back to Internal. To remove the card, gently push the card in until it releases.
Note: Micro SD cards must be formatted as either FAT32 or exFAT and less than 32 GB in
size. We also recommend using an empty SD card when recording.
10. AV In: Use the included 1/8" (3.5 mm)-to-RCA audio-video cable to connect this input to the
RCA audio and composite video outputs of your VCR, camcorder or other playback device.
Make sure to match colors when making connections: yellow for composite video, red (right)
and white (left) for stereo audio. You can also connect a 1/8" (3.5 mm) stereo audio cable from
this input to the output of an audio device and record audio only.
11. HDMI Out: Use a standard HDMI cable to connect this output to your television or monitor.
12. AV Out: Use a 1/8" (3.5 mm)-to-RCA audio-video cable to connect this output to the audio
and video inputs of your television or monitor.
13. Headphone Out: Connect this 1/8" (3.5 mm) output to headphones or speakers to monitor
audio playback.
IMPORTANT:
• Do not connect the HDMI Out and AV Out at the same time.
• When either the HDMI Out or AV Out is in use, the display will turn off.
• When the HDMI Out port is being used, no audio will be sent to the Headphone Out.
14. Speaker (rear panel): This internal speaker will play sound from input sources or recorded files
directly.
15. Reset (rear panel): Press this button to reset Video Archiver to factory default settings.
Operation
Menu
When Video Archiver is powered on, the display will show the main menu. From here, you can
access the following functions:
• Videos: Select this to playback recorded videos.
• Music: Select this to play back recorded audio.
• Pictures: Select this to view pictures stored on the inserted micro SD card.
• TV In: Select this to preview and record the video input.
• Recorder: Select this to preview and record audio input only.
• Settings: Select this to change the device settings.
The main menu also shows the current time, micro SD and mini-USB cable connections, and battery
life.
Recording
Before recording, make sure you have followed the
been made properly, power on Video Archiver.
Recording Video
1. Select TV In from the main menu to see a preview of your connected device on the display.
2. To start recording, press the Record button or the OK button.
3. To stop recording and save the file, press the Record button again. You can also press the OK
button to stop recording, then press Back to save the file.
Video Archiver
Remote Control
RCA Audio-Video Coupler
Mini-USB Cable
9
8
10
11
12
13
Setup
directions. When all connections have
ionaudio.com/support
ionaudio.com/warranty
For technical support.
For complete warranty information.
Para información completa sobre la garantía
Para soporte técnico.
Recording Audio
1. Select Recorder from the main menu to hear a preview of your connected audio device.
2. To start recording, press the Record button or the OK button.
3. To stop recording and save the file, press the Record button again. You can also press the OK button
to stop recording, then press Back to save the file.
Note: After 2 hours and 42 minutes of recording, Video Archiver will automatically save the file and start
recording to a new file.
IMPORTANT: Do not connect any audio/video cables while recording is in progress, or you will lose the
recording.
Playback
To play back recorded video files:
1. Select Videos from the main menu.
2. Use the Cursor buttons to select a file, then press OK to begin playback.
To play back recorded audio files:
1. Select Music from the main menu.
2. Use the Cursor buttons to select a file, then press OK to begin playback.
When playing back audio files, press the Audio Mode button to change the audio playback mode:
Random, Random Repeat, Introduction, Sequence, Repeat Once and Repeat All.
When playing back files:
• Use the Up and Down cursors to change the volume.
• Press and hold the Left and Right cursors to rewind and fast-forward.
• Press Back to return to the previous menu.
You can also view pictures stored on the attached micro SD card. To view pictures, select Pictures from
the main menu.
Note: Only files from the selected Save Path will be viewable. To switch between viewing files on the
internal memory and card memory, change the Save Path option in the Settings menu.
Managing Files
To delete a saved video, audio or picture file, select and play the file, then press and hold the Mode
button.
To transfer files:
1. Use the included mini-USB cable to connect the mini-USB Port on Video Archiver to an available USB
port on your computer.
2. On Video Archiver's display, or on the display of a connected screen, select the Power & Data option.
3. You can now access the micro SD card from your computer as an external drive.
4. Files will be automatically saved to the micro SD card using default file names. You can copy these files
to your internal hard drive for viewing in standard media software.
You can also remove the micro SD Card from Video Archiver and insert it directly into your computer or a
compatible SD card reader.
Settings
Select the Settings page from the main menu to adjust the following settings.
• Display: Adjust the backlight timer for saving energy.
• Power Saving: Set the idle and sleep timers for saving energy.
• Date & Time: Sets the current date and time.
• Language: Set the operating language: English, Japanese, Simplified Chinese, Traditional Chinese,
French, German or Spanish.
• Advanced: Enter this menu to adjust the following advanced settings:
o Information: Displays the current firmware version and available internal memory.
o Save Path: Set the default save path, either internal or card memory.
IMPORTANT: The path selected here will be the only path available for saving and viewing files. To
switch between saving and viewing files from the internal path or the card memory path, change this
setting.
o Format Internal Memory: Select this to format the internal memory, erasing all files. This action
cannot be undone.
o Format Card: Select this to format an inserted micro SD card, erasing all files. This action cannot be
undone.
o Reset Default Settings: Select this to return Video Archiver to its factory default settings.
• TV: Enter this menu to adjust the following settings:
o TV In: Set the input encoding to PAL or NTSC.
o TV Out: Set the output encoding to PAL or NTSC.
Technical Specifications (English)
Dimensions
2.4" x 4.9" x 0.8"
(width x depth x height)
61 x 125 x 20 mm
Weight
0.26 lb. / 120 g
Connections
Audio-Video Input: 1/8"-to-RCA
composite
Audio-Video Outputs: HDMI,
1/8"-to-RCA composite
Audio Output: 1/8" stereo audio
Power
Via mini-USB (5 VDC, 1 A)
Via internal battery (950 mAh
lithium ion, about 2 hours
charge)
Trademarks & Licenses (English)
ION Audio is a trademark of ION Audio, LLC, registered in the U.S. and other countries. The
and logos are owned by the Bluetooth SIG, Inc. and any use of such marks by ION Audio is under license. SD is a
registered trademark of SD-3C, LLC. All other product names, company names, trademarks, or trade names are
those of their respective owners.
.
Internal Memory
8 GB
Compatible Media
Micro SD, < 32 GB (FAT32 or exFAT format)
Record Quality
480, 30 fps.
PAL: 720 x 576
NTSC: 720 x 480
8.5 MB/minute (video, .avi)
1.4 MB/minute (audio, .mp3)
Playback File
Video: .rm, .rmvb. .avi, .mkv, .wmv, .vob,
Format
.mov, .flv, .asf, .dat, .mp4, .3gp, .mpg,
.mpeg
Audio: .mp3, .wma, .ogg, .ape, .flac, .wav, .aac
word mark
Advertisement

Related Manuals for ION Video Archiver

Summary of Contents for ION Video Archiver
- Page 1 ION Audio is a trademark of ION Audio, LLC, registered in the U.S. and other countries. The word mark and logos are owned by the Bluetooth SIG, Inc. and any use of such marks by ION Audio is under license. SD is a Before recording, make sure you have followed the Setup directions.
- Page 2 ION Audio is a trademark of ION Audio, LLC, registered in the U.S. and other countries. The Bluetooth word mark and logo are owned by the Bluetooth SIG, Inc. and any use of such marks by ION Audio is under license. SD is a registered trademark of IMPORTANTE: No conecte ningún otro cable de audio/video mientras la grabación esté...