Table of Contents
Advertisement
Advertisement
Table of Contents

Related Manuals for Yamaha QR10


Summary of Contents for Yamaha QR10
- Page 2 If these corrective measures do not produce satisfactory results, please contact the local retailer authorized to distribute this type of product. If you can not locate the appropriate retailer, please contact Yamaha Corporation of America, Electronic Service Division, 6600 Orangethorpe Ave, Buena Park, CA 90620 The above statements apply ONLY to those products distributed by Yamaha Corporation of America or its subsidiaries.
-
Page 3: Special Message Section
This product should be used only with the components supplied or; a cart, rack, or stand that is recommended by Yamaha. If a cart, etc., is used, please observe all safety markings and instructions that accompany the accessory product. -
Page 4: Table Of Contents
Bulk Dump ... 43 Bulk Reception of Song & Pattern Data ... 43 MIDI Synchronization Mode ... 44 The QR10 as an ABC Expander ... 44 The ABC Settings ... 44 ABC: MIDI ABC Mode ON/OFF ... 45 LOWr: Lower ABC Zone Limit ... 45 UPPr: Upper ABC Zone Limit ... -
Page 5: Power Supply
Precautions Your QR10 will give you years of reliable service if you follow the simple rules given below: Location Do not expose the instrument to the following conditions to avoid deformation, discoloration, or more serious damage. • Direct sunlight (e.g. near a window). -
Page 6: About This Manual
The icons also make it easier to differentiate between information that you should read immediately and information that can be skipped until later, helping you to become familiar with the QR10 in the quickest, most efficient manner possible. -
Page 7: Features
(> page 19). Applications Here are a few ideas on how you can use the QR10. There’s no way we can cover all possibilities, but the ideas presented might help to spark some new and interesting applications. - Page 8 1: QR10 Features & Applications (continued) Use It as a Drum Machine Use the rhythm tracks of the preset patterns or program your own. The QR10’s drum Develop Musical Ideas Use it in a MIDI Music System Use It as a Tone...
-
Page 9: Power Supply
Never unplug the AC adaptor from the QR10 when a set of batteries is installed and the power is turned ON. Turn the power O F F f i r s t . -
Page 10: Setting Up Your System
OUTPUT jack (above), or the PHONES jack (also above) as required. The INPUT GAIN function described on page 5 should be used to match the input gain of the QR10 to the connected instru- ment or source. -
Page 11: Audio Connections
Audio Connections The simplest way to monitor the QR10 sound is via the built-in speaker. If you want to keep the QR10 sound to yourself, without bothering others, a pair of stereo headphones (miniature stereo phone plug type) plugged into the PHONES jack provides convenient monitoring while automatically shutting off the internal speaker system. -
Page 12: Power Switch
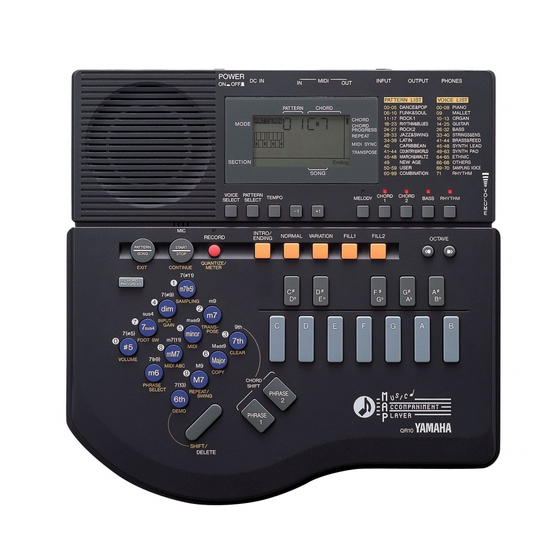
3: The QR10 Controls The QR10 has simple, consistent control interface that, once understood, makes operation fast and easy. The main functions of the controls are summarized below. Full operational details are given in the following sections. 1 POWER Switch Press in to turn the QR10 on. -
Page 13: Octave Keys
8 [PATTERN/SONG] Key Use this key to switch between the QR10’s PATTERN and SONG modes. It also functions as an [EXIT] key that allows you to exit from any of the QR10’s other functional modes (> pages 10, 23). 9 [START/STOP] Key... -
Page 14: Volume Control
The VOLUME control adjusts the volume of the sound delivered via both the OUTPUT and PHONES jacks. Slide the control toward you (i.e. toward the front of the QR10) to decrease the volume or toward the rear panel to increase the volume. -
Page 15: Play The Demo
Demo song number 1 shows how the QR10 Phrase function (page 26) can be used to add variety DETAIL and interest to your songs. Any of 100 phrases can be added at any point in a song simply by pressing one of the QR10 PHRASE keys. Demo song number 2 plays all 50 preset songs in sequence. -
Page 16: Selecting & Playing A Pattern
The procedures for creating original combination and user patterns are described later in the manual. For now we’ll learn how to select and play the QR10’s preset patterns and their variations. Selecting & Playing a Pattern... -
Page 17: The Beat Display
Using a Footswitch for Start/Stop Control If the QR10 FOOT SW function is turned ON, you can use an optional footswitch (Yamaha FC4 or FC5) connected to the rear-panel INPUT jack to start and stop pattern playback instead of the panel [START/STOP] key. This leaves your hands free to play an instrument or perform other operations. -
Page 18: Using The Pattern Variations
The sound of an instrument or IMPORTANT other external audio source will not be heard via the QR10 speaker when the FOOT SW function is turned on. Connecting an instrument or audio source to the INPUT jack when the FOOT SW function is turned on may actually damage the connected device. -
Page 19: Changing The Tempo
You can change sections directly by pressing the appropriate section key. The newly selected section — INTRO, NORMAL, VARIATION, or ENDING — will begin playing from the top of the next measure. FILL 1 and FILL 2 begin as soon as the key is pressed. -
Page 20: Changing Chords
Tempo settings you make for original combination and user patterns (pages 36 and 37), however, are retained in memory even if the QR10 power is turned off and it is disconnected from the power supply (i.e. the batteries are removed or the AC adaptor is unplugged). - Page 21 The chord types listed above the chord type keys are accessed by pressing the chord type key while holding either of the [CHORD SHIFT] keys (these are the same as the [PHRASE 1] and [PHRASE 2] keys). To change the chord’s root without changing the chord type, just press the appropriate micro- keyboard key.
-
Page 22: The Chord Types
ON, if the LED is not lit, the track is OFF (muted). Simply press the appropriate track key to turn that track on or off. The MELODY track is only available when the QR10 is in the SONG mode (page 30). It cannot be turned on in the PATTERN mode. -
Page 23: Changing Voices
Changing Voices The QR10 has 70 preset voices, including a “rhythm” voice that contains 60 different drum and percussion instruments, that can be assigned to any of the accompaniment tracks. You can also record two original “sampling voices” that can be assigned in the same way (voice sampling is described in the next section). -
Page 24: The Melody, Chord, And Bass Tracks
Change the Octave As Required Use the OCTAVE keys to select the required octaves from the QR10’s five-octave range. Return to the Pattern Play Mode Return to the pattern play mode either by pressing the [VOICE SELECT] key a second time, or by pressing the [EXIT] key (this is the same as the [PATTERN/SONG] key). -
Page 25: Voice Sampling
DETAIL Record Recording will begin automatically as soon as the QR10 detects sound either via the built-in microphone or a source connected to the rear-panel INPUT jack. The [RECORD] key indicator will flash during recording, then recording will end automatically when the sampling memory is full (the recording time depends on the sampling frequency, which can be set as described in the following section). -
Page 26: Setting The Sampling Frequency
[SHIFT] again from this mode takes you back to the sampling voice number selection display), or press the [EXIT] key to exit. Sampled voice data can be saved to an external MIDI data recorder such as the Yamaha MDF2 DETAIL MIDI Data Filer in addition to the pattern and song data (page 43). -
Page 27: Adjusting The Volume Of The Tracks
Transposition The TRANSPOSE function makes it possible to transpose the overall playback pitch of the QR10 up or down in semitone increments over a range of two octaves (one up and one down). A transpose setting of “0” produces normal pitch. Transposi- tion can be carried out while playback is stopped or during playback, so you can immediately hear the effect. -
Page 28: Making Your Patterns Swing
5: More Creative Control (continued) Engage the TRANSPOSE Function. Press the [TRANSPOSE] key (the number “2” key) while holding the [SHIFT] key. Set the Required Degree of Transposition Use the [–1] and [+1] keys to set the transpose value as required. The transposition range is from “–12”... -
Page 29: Selecting & Playing A Song
6: Playing the Preset Songs Selecting & Playing a Song Select the Song Mode is showing in the upper left corner PATTERN of the display, press the [PATTERN/SONG] key to switch to the mode. SONG Select a Song Number Use the [–1] and [+1] keys or the numeric keys to select the number of the song you want to play. -
Page 30: To Continue Playback From The Point At Which It Was Stopped
Repeat Playback The QR10 has a REPEAT function which causes the song being played to repeat continuously until stopped by pressing the [START/STOP] key. To activate the REPEAT function: Measure Number... -
Page 31: Segment Repeat
Engage the REPEAT Function Press the [REPEAT/SWING] key (the number “9” key) while holding the [SHIFT] key. Turn REPEAT ON or OFF Use the [+1] key to turn the repeat function ON, or the [–1] key to turn the repeat function OFF, as required. -
Page 32: The Phrase Keys
Selecting Different Phrases The QR10 PHRASE SELECT function makes it possible to independently select different phrases for the [PHRASE 1] and [PHRASE 2] keys. You can, for example, select the phrases from two different songs for use while playing a third song. -
Page 33: Setting The Phrase Volume
Select a Phrase Use the [–1] and [+1] keys or the number keys to select the desired phrase number (between 00 and 49). You can hear the selected phrase by pressing the selected phrase key. Exit Press the [EXIT] key to exit from the PHRASE SELECT function when done. Play Play the current song and use the PHRASE keys as required. -
Page 34: Basic Song Recording
Basic Song Recording With the QR10, recording original songs is a straightforward, simple process: once you’ve engaged the record mode and made the initial settings, all you have to do is start recording and enter the required section and chord changes. -
Page 35: Start Recording
[RECORD] or [EXIT] key. Start Recording Press the [START/STOP] key to start recording. The QR10 metronome will sound and you will be given a two-measure count-in. The count-in is indicated on the display, below the triangular beat indicator, by minus numbers from “–8”... -
Page 36: Overdubbing
“Overdubbing” refers to the technique of recording additional section, chord, or pattern changes to a song which has already been recorded. With the QR10 this is a simple process. Simply press the [RECORD] key to engage the record ready mode, press [START/STOP] to start recording, and record the required changes. The initially recorded data is not affected by the overdubbing process, and you can overdub as many times as necessary to build up complicated chord changes, for example. -
Page 37: Stop Recording
DETAIL next step) by pressing the [RECORD] or [EXIT] key. The QR10 lets you record the [PHRASE] key phrases as well as individual notes. If you intend HINT to use the [PHRASE] keys during recording, you should also select the phrases you want to use at this point. -
Page 38: Fixing Mistakes - Deleting Unwanted Changes
Voice changes are deleted by holding the [SHIFT/DELETE] key and pressing the [VOICE SELECT] key. Phrases entered by using the QR10 [PHRASE] keys are deleted by holding the [SHIFT/DELETE] key and pressing the appropriate [PHRASE] key. Stop Recording... -
Page 39: Easy "Chord Progression" Recording
Easy “CHORD PROGRESSION” Recording The QR10 features a special CHORD PROGRESSION recording mode that makes it easy to enter complicated chord progressions and fast chord changes. Record the Required Chord Changes Use the normal song recording procedure to record the required chord changes (page 28). Don’t worry about the timing of the chords, just enter the chords in the proper sequence. -
Page 40: The Song Clear & Copy Functions
The SONG mode CLEAR function completely erases the selected “user” song. If you want to save the song data before clearing the song from the QR10 memory to make room for new material, use the MIDI BULK DUMP function, described on page 43, to transfer the song data to a MIDI data recorder such as the Yamaha MDF2 MIDI Data Filer. -
Page 41: Song Copy
IMPORTANT song when the copy function is executed. If the QR10 memory becomes full due to a copy operation, the memory full error display — “ERR DETAIL 3” — will appear. If this happens, use the pattern clear (page 40) and song clear (page 34) functions as necessary to erase unwanted data to make room for the data to be copied. -
Page 42: Recording The Combination Patterns
8: Recording Original Patterns The QR10 provides two types of patterns that you can program yourself and then use in songs in the same way as the preset patterns: • 50 through 59 are “user” patterns that you can program from scratch. -
Page 43: Recording The User Patterns
Select a Track Press the track key corresponding to the part you want to change (the MELODY track cannot be selected in this mode). Enter a Pattern Number Use either the [–1] and [+1] or number keys to enter the number of the pattern from which the part for the selected track is to be taken. -
Page 44: Quantize
8: Recording Original Patterns (continued) Engage the Record Ready Mode and Set the Quantization, Time Signature, and Pattern Length (Measure) Each time the [RECORD] key is pressed while the [SHIFT] key is held, the quantize, time signature, and pattern length (Measure) functions are selected in sequence. -
Page 45: Select A Voice
Although you can select the chord you want to record with (to make recording easier), the IMPORTANT QR10 actually memorizes the recorded pattern in CM7. The ABC system converts the pattern to the specified chord during playback. As a result, the pattern may not be played back exactly as it was recorded. -
Page 46: The Pattern Clear & Copy Functions
The PATTERN mode CLEAR function completely erases the specified section of the selected user pattern. If you want to save the pattern data before clearing the pattern from the QR10 memory to make room for new material, use the MIDI BULK DUMP function, described on page 43, to transfer the song data to a MIDI data recorder such as the Yamaha MDF2 MIDI Data Filer. -
Page 47: Pattern Copy
Press [START/STOP] to Clear Press the [START/STOP] key to actually clear the selected pattern, or [EXIT] to exit from the CLEAR function. Turning the QR10 power OFF during execution of the clear or copy function may result in loss CAUTION of all data and possibly damage the QR10! Any previous data in the specified pattern will be completely erased. - Page 48 IMPORTANT source pattern when the copy function is executed. If the QR10 memory becomes full due to a copy operation, the memory full error display — “ERR DETAIL 3” — will appear. If this happens, use the pattern clear (page 40) and song clear (page 34)
-
Page 49: Bulk Dump
QR10 is the Yamaha MDF2 MIDI Data Filer. To save all pattern and song data from the QR10 to the MDF2 (the sampling voice data is also saved), first connect the QR10 MIDI OUT to the MDF2 MIDI IN via a MIDI cable, and prepare the MDF2 for reception (refer to the MDF2 operation manual). -
Page 50: Midi Synchronization Mode
An indicator block will appear next to “MIDI SYNC” on the display. Please note that the QR10 will not run on its own when this parameter is turned “on”. The QR10 as an ABC Expander... -
Page 51: Abc: Midi Abc Mode On/Off
UPPr number. The opposite is also true: i.e. the LOWr parameter cannot be set to a higher number than the UPPr parameter. When ABC is ON, the QR10 will not sound in the specified ABC zone. DETAIL... -
Page 52: Total Reset Procedure
Voice List & Polyphony Information The QR10 has 28-note “polyphony.” This simply means that it can produce a maximum of 28 notes at the same time. If the maximum polyphony is exceeded — this includes all notes on the accompaniment and melody tracks — some of the notes will be truncated and will therefore not sound. -
Page 53: Preset Pattern & Song List
Preset Pattern & Song List Category Name Signature Dance & Pop Disco Euro Beat Dance Pop House Dance Shuffle Funk & Soul Funk Shuffle 16Beat Ballad 16Beat Pop 24Beat Pop Soul Ballad Rock1 Piano Ballad Analog Ballad Folk Ballad 8Beat Pop1 8Beat Pop2 8Beat Rock Rhythm Voice List... -
Page 54: Troubleshooting
Preset data! You have attempted to edit a preset parameter that can not be changed. E;:01 Illegal input! You have attempted to enter a value that is outside the range of the selected parameter or is not recognized by the QR10. E;:0@ E;:0#... -
Page 55: Specifications
Headphone (mini stereo phone jack) EXT IN (mono phone jack) DC IN 9V DC Input impedance … 330k , Output impedance … 1k 1.5V (SUM3 or equiv.) Yamaha PA-3 242.6 245.4 45.7 mm 930 grams w/o batteries PA-3 AC Adaptor, FC-5/4 Footswitch Appendix (continued) -
Page 56: Midi Data Format
1-1. Reception Data & Conditions SW1: MIDI sync ON/OFF. Determines whether the internal clock or an external MIDI clock signal controls the QR10. 1-2. Reception Data 1-2-1. System Realtime Message * After FEH has been received at least once, valid MIDI data must be received within 400 millisecond (max.) otherwise all notes and the... - Page 57 Turns transmission ON or OFF for each track. The transmit channel is fixed for each channel (0 – 3,6,7,9). SW2: MIDI sync ON/OFF. Determines whether the internal clock or an external MIDI clock signal controls the QR10. 2-2. Transmission data 2-2-1. System Realtime Message Appendix (continued) * FEH transmitted approximately once every 180 milliseconds.
-
Page 58: Midi Implementation Chart
Appendix (continued) MIDI IMPLEMENTATION CHART... - Page 59 Index [–1]/[+1] keys ... 7, 10 ABC ... 44 ABC zone ... 45 AC adaptor ... 3 Applications ... 1 Audio connections ... 5 Backup ... i, 43 Batteries ... 3 Beat display ... 11 Bulk dump ... 43 Chord display ... 14, 23 Chord progress key ...
- Page 60 For details of products, please contact your nearest Yamaha or the authorized distributor listed below. Pour plus de détails sur les produits, veuillez-vous adresser à Yamaha ou au distributeur le plus proche de vous figurant dans la liste suivante. NORTH AMERICA CANADA Yamaha Canada Music Ltd.