Table of Contents
Advertisement
MULTITRACK MD RECORDER
Owner's Manual
1
1
GAIN
LINE
PB
FLIP
CUE
L
0
HIGH
–15
MID
F
250
G
–15
LOW
–15
AUX
1
0
2
0
1
GROUP ASSIGN
3
PAN
L
ODD
10
9
8
7
6
5
4
3
2
1
0
1
INSERT I/O
2
INSERT I/O
3
4
5
6
7
8
MIC/LINE INPUT
2
3
4
5
6
GAIN
GAIN
GAIN
GAIN
GAIN
MIC
LINE
MIC
LINE
MIC
LINE
MIC
LINE
MIC
LINE
MIC
MIC/
PB
MIC/
PB
MIC/
PB
MIC/
PB
MIC/
PB
MIC/
LINE
LINE
LINE
LINE
LINE
LINE
FLIP
FLIP
FLIP
FLIP
FLIP
CUE
CUE
CUE
CUE
CUE
P
P
P
P
P
P
A
A
A
A
A
A
N
N
N
N
N
N
R
L
R
L
R
L
R
L
R
L
R
L
L
L
L
L
L
E
E
E
E
E
E
V
V
V
V
V
V
E
E
E
E
E
E
L
L
L
L
L
L
10
0
10
0
10
0
10
0
10
0
10
HIGH
HIGH
HIGH
HIGH
HIGH
+15
–15
+15
–15
+15
–15
+15
–15
+15
–15
+15
MID
MID
MID
MID
MID
F
F
F
F
F
5k
250
5k
250
5k
250
5k
250
5k
250
5k
G
G
G
G
G
+15
–15
+15
–15
+15
–15
+15
–15
+15
–15
+15
LOW
LOW
LOW
LOW
LOW
+15
–15
+15
–15
+15
–15
+15
–15
+15
–15
+15
AUX
AUX
AUX
AUX
AUX
1
1
1
1
1
10
0
10
0
10
0
10
0
10
0
10
2
2
2
2
2
10
0
10
0
10
0
10
0
10
0
10
2
1
2
1
2
1
2
1
2
1
2
GROUP ASSIGN
GROUP ASSIGN
GROUP ASSIGN
GROUP ASSIGN
GROUP ASSIGN
4
3
4
3
4
3
4
3
4
3
4
PAN
PAN
PAN
PAN
PAN
R
L
R
L
R
L
R
L
R
L
R
EVEN
ODD
EVEN
ODD
EVEN
ODD
EVEN
ODD
EVEN
ODD
EVEN
10
10
10
10
10
9
9
9
9
9
8
8
8
8
8
7
7
7
7
7
6
6
6
6
6
5
5
5
5
5
4
4
4
4
4
3
3
3
3
3
2
2
2
2
2
1
1
1
1
1
0
0
0
0
0
2
3
4
5
6
9
10
11
12
1
2
LINE INPUT
AUX SEND
7
8
9-10
11-12
GAIN
GAIN
LINE
MIC
LINE
MIC
0
10
0
10
PB
MIC/
PB
MIC/
LINE
LINE
FLIP
FLIP
1
2
1
2
CUE
CUE
GROUP ASSIGN
GROUP ASSIGN
P
P
A
A
3
4
3
4
N
N
L
R
L
R
L
L
E
E
V
V
E
E
GROUP
CUE
L
L
MASTER
MASTER
0
10
0
10
1
HIGH
HIGH
–15
+15
–15
+15
0
10
0
10
MID
MID
CUE MIX
TO STEREO
F
F
2
250
5k
250
5k
G
G
0
10
MONITOR
SELECT
–15
+15
–15
+15
2TR IN
LOW
LOW
3
–15
+15
–15
+15
1
3
AUX
AUX
0
10
GROUP
1
1
2
4
4
0
10
0
10
STEREO
2
2
0
10
CUE
0
10
0
10
1
2
1
2
GROUP ASSIGN
GROUP ASSIGN
3
4
3
4
MONITOR
DISPLAY
LEVEL
PAN
PAN
MIN
MAX
L
R
L
R
REPEAT
ODD
EVEN
ODD
EVEN
10
10
10
10
9
9
9
9
A
8
8
8
8
7
7
7
7
6
6
6
6
5
5
5
5
AUTO
PUNCH I/O
4
4
4
4
3
3
3
3
2
2
2
2
1
1
1
1
REHE
0
0
0
0
7
8
STEREO
PHONES
MULTITRACK MD RECORDER
REC SELECT
CH 1
CH 2
CH 3
CH 4
CH 5
CH 6
CH 7
CH 8
GROUP
1
2
3
4
5
6
7
8
1
2
3
4
1
2
3
4
PITCH
ADJUST
EDIT
UTILITY
MARK SEARCH
MARK
B
LAST REC SEARCH
SET
EXIT
ENTER
IN
OUT
SONG SEARCH
PAUSE
REC
PLAY
STOP
TOC WRITE
DATA
CURSOR
+ –
PUNCH I/O
E
Advertisement
Table of Contents

Related Manuals for Yamaha MD8


Summary of Contents for Yamaha MD8
- Page 1 MULTITRACK MD RECORDER Owner’s Manual INSERT I/O INSERT I/O GAIN GAIN GAIN LINE LINE LINE MIC/ MIC/ LINE LINE FLIP FLIP FLIP HIGH HIGH HIGH –15 –15 –15 –15 –15 –15 –15 –15 –15 GROUP ASSIGN GROUP ASSIGN GROUP ASSIGN EVEN EVEN MIC/LINE INPUT...
- Page 2 This product, when installed as indicated in the instructions contained in this manual, meets FCC requirements. Modifications not expressly approved by Yamaha may void your authority, granted by the FCC, to use the product. 2. IMPORTANT: When connecting this product to accessories and/or another product use only high quality shielded cables.
-
Page 3: Safety Instructions
C A U T I O N RISK OF ELECTRIC SHOCK DO NOT OPEN CAUTION: TO REDUCE THE RISK OF ELECTRIC SHOCK, DO NOT REMOVE COVER (OR BACK). NO USER-SERVICEABLE PARTS INSIDE. REFER SERVICING TO QUALIFIED SERVICE PERSONNEL. SEE BOTTOM OF ENCLOSURE FOR GRAPHIC SYMBOLS MARKING. - Page 4 fire and electrical shock hazard. • If you plan not to use the MD8 for a long period of time (such as when you are on vaca- tion), remove the AC power cord from the AC outlet. Leaving the MD8 connected is a fire hazard.
-
Page 5: Package Contents
If interference does occur, relocate the affected equipment. Copyright © 1997 Yamaha Corporation. All rights reserved. No part of the MD8 software or this Owner’s Manual may be reproduced or distributed in any form or by any means without the prior written authorization of Yamaha Corporation. Trademarks MD DATA and MiniDisc are trademarks of Sony Corporation. -
Page 6: Table Of Contents
Buying Discs for the MD8 ........ - Page 7 Peak Hold ........... . . 72 MD8—Owner’s Manual...
- Page 8 Controlling the MD8 with MMC ........80...
-
Page 9: Welcome To The Md8
With a tape-based recorder, for example, you have to keep at least one track free for ping-pong. With the MD8, however, you can record on all eight tracks and then ping-pong (i.e., eight-track playback with ping-pong). - Page 10 MTC (MIDI Timecode) or MIDI Clock (with Tempo Map) output for synchronization within a MIDI-based system. • MMC (MIDI Machine Control) for remote MD8 control. • Jog and shuttle dial for ease of operation. For some quick answers about the MD8, see the Q&A Section on page 89. MD8—Owner’s Manual...
-
Page 11: Buying Discs For The Md8
TOC needs to be updated, usually after a new recording or edit. You must update the TOC before ejecting a disc or turning off the MD8. It’s also a good idea to update the TOC at regular intervals just in case of a power failure. Failure to update the TOC can result in data being lost. -
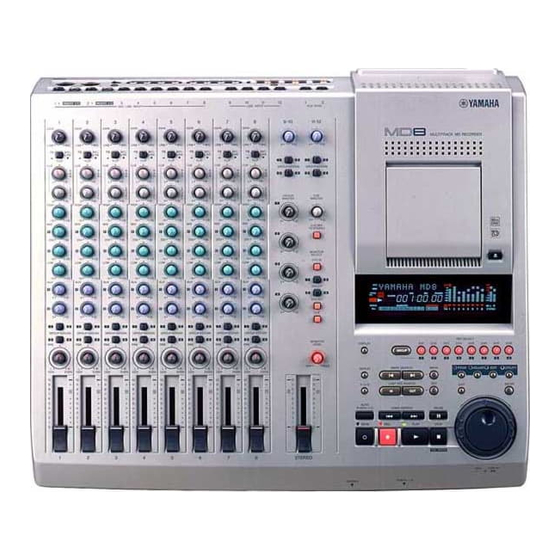
Page 12: Touring The Md8
Touring the MD8 Touring the MD8 This chapter takes you on a tour of the MD8, identifying the various parts to help you become familiar with your new recorder. Topside View INSERT I/O INSERT I/O MIC/LINE INPUT GAIN GAIN GAIN... -
Page 13: Input Channels
These rotary controls are used to send the input channel signal to the AUX SEND outputs for processing by external effects processors. –5 Frequency [Hz] HIGH 15 dB at 12 kHz—shelving type MID 15 dB at 250 Hz–5 kHz—sweepable peaking type LOW 15 dB at 80 Hz—shelving type Input Channels Sweepable range MD8—Owner’s Manual... -
Page 14: Pan Control
Touring the MD8 GROUP ASSIGN switches These switches are used to assign (i.e., send) the input channel signal to groups. They work in conjunction with the PAN control. For example, with GROUP ASSIGN switch [1–2] ON and the PAN control set midway, the channel signal is sent equally to Groups 1 and 2. With the PAN control turned fully counterclockwise (L/ODD), however, the channel signal is sent only to Group 1. -
Page 15: Master Section
This allows you to monitor track signals, which is useful for punch in/out. MONITOR LEVEL control This rotary control adjusts the level of the monitor signal that is sent to the MONITOR OUT and PHONES connectors. Master Section MD8—Owner’s Manual... -
Page 16: Display
MD8 is generating MIDI Timecode, MIDI Clock appears when it’s generating MIDI Clock, and MMC appears when the MD8 is set to receive MIDI Machine Control com- mands. Normally, playback continues through all the songs on a disc. When one of these indicators is lit, however, playback stops when the end of a song is reached. - Page 17 These indicators show which tracks are selected for recording. The DIR indicators light up when the input channel signal is selected for direct recording, and the GRP indicators light up when the group signal is selected for recording. Display MD8—Owner’s Manual...
-
Page 18: Disc Transport Section
PAUSE—This button is used to pause playback, recording, or rehearsal. STOP/TOC WRITE—This button is used to stop playback, rehearsal, and recording. It’s also used to write the TOC data to disc when the MD8 is stopped. AUTO PUNCH I/O button This button is used to turn on the Auto Punch In/Out function. -
Page 19: Function Buttons
The central dial (called DATA) is used to set and select parameters (+/– DATA). When the MD8 is stopped or paused, the DATA dial can be used to move through a song in frame steps. The outer shuttle (CURSOR) is used to select items on the display. When the MD8 is stopped or paused, the shuttle can be used to move through a song at high speed. -
Page 20: Rear Panel
This switch is used to turn on and off the MD8. MIDI IN, OUT & THRU The MD8 receives MMC (MIDI Machine Control) commands via the MIDI IN port, and outputs MIDI Clock or MTC (MIDI Timecode) from the MIDI OUT port. The MIDI THRU port outputs MIDI data received at the MIDI IN port. -
Page 21: Aux Send
They can also be used to return the processed stereo signals from external effects processors. The processed signals can then be mixed into the MD8 ste- reo mix or recorded to tracks. MIC/LINE INPUTs 3–8 These 1/4-inch phone jacks are used to con-... - Page 22 These inputs are used to connect balanced condenser microphones and balanced line-level signal sources to the MD8 (unbalanced sources can also be connected). Each input features a XLR-type connector and TRS phone jack connector. Phantom power is available on the XLR-type connector for use with condenser microphones.
-
Page 23: Front Connectors
The head- phone signal is the same as the MONITOR OUT signal. PUNCH I/O An optional footswitch, such as the Yamaha FC5, can be connected here for foot-controlled playback, rehearsal, recording, or punch in/out. Front Connectors 1/4" TRS phone plug MD8—Owner’s Manual... -
Page 24: The First Session
The First Session The First Session This chapter explains how to record and mix your first MD8 session. If this is your first time with a multitrack recorder, we recommend that you start with this chapter and follow all the procedures closely. -
Page 25: Connecting The Power Cord
3. Close the disc compartment. When a disc is loaded, the MD8 reads the TOC to see what the disc contains. If it’s a new disc, the message Blank Disc appears. If the disc contains some songs, the disc title appears for a few seconds and then scrolls off the display. -
Page 26: Making The Connections (Grp & Dir)
The TRK 1 GRP indicator flashes, indicating that track 1 is set to record from group Bus 1. 4. Set the GROUP MASTER 1 level control to the 7–8 mark (highlighted posi- tion). 5. Proceed to Monitoring & Recording (GRP & DIR). MD8—Owner’s Manual Destination Group/Track EVEN EVEN... -
Page 27: Dir Method
A compressor can be patched directly into channel 1 or 2 using INSERT I/O. The MD8 is now ready to record. All you have to do to start recording is press the [PLAY] button. So make sure that your music source is ready to go. If you want to cancel Record Pause mode, press the [STOP] button. -
Page 28: Overdubbing
16. Press the [PLAY] button to play back what you‘ve recorded. If you just rehearsed the overdub, there won’t be anything to play back yet. Repeat this procedure until you’ve recorded all tracks. Then you’re ready for mixdown. MD8—Owner’s Manual... -
Page 29: Mixdown
See Applying Effects on page 48 for more information. See Mixdown on page 88 for a more detailed look at mixdown techniques. 10. Record the Final Mix to your stereo master recorder. That’s it! You’ve completed your first session with the MD8. Mixdown MD8—Owner’s Manual... -
Page 30: An Overview Of Multitrack Recording
Ping-Pong—This technique allows you to mix and record several tracks onto another track. This is often used to free up tracks for more recording. So although the MD8 is an eight-track recorder, you can record more than just eight parts using the ping-pong tech- nique. -
Page 31: About Monitoring
STEREO OUT signals and is typically used during mixdown. It can also be used to monitor signals that are not going to be recorded by the MD8, such as a MIDI tone generator that is controlled by a MIDI sequencer. In this case, the tone generator is only monitored while other sounds are recorded on the MD8. -
Page 32: Multi-Source Mixing
LINE FLIP HIGH –15 –15 –15 GROUP ASSIGN 3. Set the PAN and CUE PAN controls on each input channel to their center positions. MD8—Owner’s Manual Up (MIC/LINE) MIC/ LINE Track 1 (disc) Input 1 (jack/XLR) EVEN GAIN LINE Down (PB) - Page 33 MD8 input. If you are using the MIC/LINE inputs to connect MIDI-controlled instruments, such as tone generators, synthesizers, and samplers, you can use the EQ and effects functions built into these devices.
-
Page 34: Recording & Mixing Techniques
When extending a song, NEW REC appears on the display when recording extended into the blank area. You can use the REMAIN Time Counter mode to check how much recording time, including the blank area, is available. For rehearsal, the MD8 always stops at the end of a song. -
Page 35: Setting The Recording Mode
MD8. The MD8, however, is capable of playing back MD4 4TR data. Note that you can convert an 8-track MD8 song to a 4-track song an MD4 can read. See Copying & Converting Songs on page 62 for more information. -
Page 36: Recording
Titling Discs & Songs When a disc with a title is first loaded into the MD8, the title appears on the display for a few seconds and then scrolls off to the left. When a song with a title is selected, the title appears on the display next to the song number. -
Page 37: Manual Punch In/Out
If you’re operating the MD8 and playing or singing the part to be recorded, you’ll find it much easier to use the Auto Punch In/Out function, which performs the punch in/out automatically. See Auto Punch In/Out on page 32 for more information. -
Page 38: Using The Rec Select Buttons
Through the CUE monitor you’ll hear the existing sounds playback. Instead of pressing the [PLAY] button you could have pressed the [REC SELECT] button to punch out. In this case the MD8 remains in Play Record Wait mode, so you can punch in again using the [REC SELECT] buttons. -
Page 39: Using A Footswitch
9. Press the [STOP] button to finish. The following illustration shows how punch in/out works with a footswitch. SELECT A footswitch can also be used to control other MD8 functions. See Using a Footswitch on page 47 for more information. Manual Punch In/Out... -
Page 40: Auto Punch In/Out
The following illustration shows how the IN and OUT points are set. SELECT PLAY The positions of the LAST REC IN and OUT points can be adjusted using the Adjust func- tion. See Adjusting Markers on page 54 for more information. MD8—Owner’s Manual In Point Play Play REHE... - Page 41 The display now briefly shows the message MARK OUT . Again, the Punch Out point can also be set while the MD8 is stopped or paused. These points are also available for quick loca- tion, i.e., press LAST REC SEARCH [IN] to locate to the previously set Punch In position, or [OUT] to locate to the Punch Out position.
-
Page 42: Single Take Auto Punch In/Out
Auto Punch In/Out for real. If you pressed the [REPEAT] button in Step 3, the MD8 will rehearse the Auto Punch In/Out repeatedly until you press the [STOP] button. - Page 43 OUT indicator disappears. Playback continues up to the Post-Roll point. Then the Pre-Roll point is located automati- cally. Auto Punch I/O mode is cancelled and the MD8 waits in Play Pause mode. Press the [PLAY] button to audition the punch in/out.
- Page 44 OUT indicator disappears. Playback continues up to the Post-Roll point. Then the Pre-Roll point is located automati- cally, and the MD8 waits in Play Pause mode. Press the [PLAY] button to audition the punch in/out. The following illustration shows the Auto Punch Record sequence with a footswitch.
-
Page 45: Multi Take Auto Punch In/Out
Auto Punch In/Out for real. If you pressed the [REPEAT] button in Step 2, the MD8 will rehearse the Auto Punch In/Out repeatedly until you press the [STOP] button. See the illustration on page 34 for a graphic overview of the sequence but substitute MULTI TAKE for SINGLE TAKE . - Page 46 Playback continues up to the Post-Roll point. Then the Pre-Roll point is located automati- cally, and the MD8 waits in Play Pause mode. The message NEXT TAKE now flashes on the display, signalling that the MD8 is ready to record the next take.
- Page 47 Note: It is not possible to permanently save all takes. You have to choose one of them before leaving Multi Take Auto Punch mode by pressing [AUTO PUNCH I/O], or before switch- ing off the MD8. If you do not perform the following steps, the MD8 returns to the excerpt marked as ORIGIN (i.e., the original recording).
-
Page 48: Setting The Pre-Roll & Post-Roll Times
OUT point at which playback stops. The default time for both Pre-Roll and Post-Roll is 5 seconds. You can change the values independently using the PrePost Roll function, as explained below. These settings are stored when MD8 is turned off. Pre-Roll Time 1. -
Page 49: Ping-Pong Recording
This is possible because the MD8 is able to read audio data from a track before writing new audio data to it. When the ping-pong operation is complete, the previous audio data on that track is lost. However, you can rehearse ping-pong operations. -
Page 50: Preparing For Ping-Pong
Ping-Pong does not yield the desired result in DIR mode (direct connection between the inputs and tracks). 6. Press the MONITOR SELECT [GROUP] switch for the destination track. This sets the monitor source to the destination track. 7. Set the MONITOR LEVEL control as required. MD8—Owner’s Manual GAIN GAIN GAIN GAIN... -
Page 51: Rehearsing Ping-Pong
[FLIP] switch back to MIC/LINE (up position). You also need to set the CUE LEVEL control of the destination track to midway. 18. Press the [PLAY] button to start playback. You should now be able to hear the new combined track. Ping-Pong Recording MD8—Owner’s Manual... -
Page 52: Ping-Pong With Overdub
1. Connect a sound source to an unused input channel (i.e., one you don’t need during the ping-pong operation). If you decide to ping-pong all eight MD8 tracks, you can still use LINE INPUTs 9–10 and 11–12 for adding new parts. This only works for line-level signals (synthesizers, samplers, drum machines, etc.), however. - Page 53 During rehearsal, balance the level of the new source with the existing tracks. If you are also using channels 9–10 and 11–12, set their levels with the [9–10] and [11–12] controls. Ping-Pong with Overdub 9-10 11-12 GROUP ASSIGN GROUP ASSIGN MD8—Owner’s Manual...
-
Page 54: Pitch
Note: The Pitch value you set here is memorized when the MD8 is turned off. Next time you turn on the MD8, this value will still be there but the MD8 defaults to FIX mode. See below for how to toggle between FIX and VARI speed. -
Page 55: Using A Footswitch
Using a Footswitch An optional footswitch can be used to control the MD8. Apart from a few small differences, footswitch operation is essentially the same as pressing the MD8 [PLAY] button. Connect the footswitch to the PUNCH I/O jack at the front of the MD8. -
Page 56: Applying Effects
The input channel AUX controls are used to send signals to the effects processors. The pro- cessed signal is returned to the MD8 through LINE INPUTs 9–10 and 11–12 and mixed with the original, unprocessed signal to achieve a balance before being recorded to an MD8 track, or the master recorder during mixdown. -
Page 57: Applying Effects When Recording
Use the input channel fader to adjust the level of the unprocessed signal. Press MONITOR SELECT [GROUP 1–3] or [GROUP 2–4] to monitor both signals. With the balance set, you’re ready to perform the ping-pong operation. Applying Effects when Recording MD8—Owner’s Manual... -
Page 58: Patching In Signal Processors
MD8 to the external processor and the ring carrying the output signal from the external processor back into the MD8. You need special insert cables to do this. A wiring diagram for an insert cable is shown below. -
Page 59: Quick Search Functions
] SONG SEARCH buttons can be used for locating songs at any time ] SONG SEARCH button locates the previous song and CUE x2 CUE x4 CUE x8 REV x4 REV x8 Quick Search Functions ] SONG SEARCH CUE x16 CUE x32 REV x16 REV x32 MD8—Owner’s Manual... -
Page 60: Locating Specific Points
8. Press the [PLAY] button to start playback at the selected position. Playback starts. To locate the specified point and have the MD8 wait in Pause mode, press the [ENTER] but- ton instead of the [PLAY] button. The PLAY indicators now flash to signal that the MD8 is waiting in Pause mode. -
Page 61: Searching For Markers
For a song with no markers inserted, you can only locate the Start and End markers. Every time you jump to a marker using this method, the MD8 auto- matically switches to Playback Pause mode. -
Page 62: Adjusting Markers
CURSOR shuttle to the left. You can toggle between these two playback modes by turning the CURSOR shuttle to the left, or right. Each time you do so the sound data is played. MD8—Owner’s Manual 1.5 sec 1.5 sec... - Page 63 Press the [EXIT] button if you don’t want to store the new marker position. 6. When you’ve finished, press the [EXIT] or [ADJUST] button to leave the Adjust mode. 7. Press the [TOC WRITE] button to update the TOC with the new marker positions. Adjusting Markers MD8—Owner’s Manual...
-
Page 64: Erasing Markers
If you decide you do not want to erase the selected marker after all, press the [EXIT] button instead. 7. When you’ve finished, press the [ADJUST] or [EXIT] button. 8. Press the [TOC WRITE] button to update the TOC. MD8—Owner’s Manual Marker to be erased... -
Page 65: Repeat, Cue List & Program Play
3. Press the [REPEAT] button to cancel All Song Repeat playback. All Song Repeat playback is cancelled automatically when the [STOP] button is pressed. Repeat, Cue List & Program Play Song 1 Song 2 Play Repeatedly Song 1 Song 2 Play Repeatedly Song 3 Song 3 MD8—Owner’s Manual... -
Page 66: A-B Repeat
A-B points active, use the [PAUSE] button instead of the [STOP] button to tem- porarily stop A-B Repeat playback. The A and B points are not stored when MD8 is turned off. Tip: To stop playback at the end of each song, set MIDI Sync to either MTC or MIDI Clock. -
Page 67: Cue List Playback & Copy
7. Press the [ENTER] button. If you chose List PLAY? , the MD8 waits in Pause mode. Press [PLAY] to play the Cue List. The time counter starts at zero and counts up continuously until the last step of the Cue List has been played. -
Page 68: Program Playback
6. When you’ve set all the required steps, press the [ENTER] button. The display shows S1: X¬ Y and the MD8 waits in Pause mode (the upper case “S” indi- cates that the Program can be or is being played). -
Page 69: Editing Songs & Tracks
5. Press the [EXIT] or [UTILITY] button to leave the Utility mode. Note: On the MD8, songs are recorded contiguously (i.e., there are no gaps between them). Other MD recorders, however, may record songs non-contiguously (i.e., scattered across a disc). -
Page 70: Erasing Discs
The display shows Erase EXE? 3. Press the [ENTER] button. As this operation erases all data on disc, the MD8 asks you again whether you are absolutely sure: Really? 4. Press the [ENTER] button to proceed or the [EXIT] button to cancel. - Page 71 You can also use this function to reshuffle the tracks of an existing eight-track song. Note: Be careful to include all the tracks you want the copy to contain. The MD8 indeed also allows you to set things like 8T:22222222 , which is not very meaningful.
-
Page 72: Renumbering Songs
1. Press the [EDIT] button to call up the Edit menu. 2. Use the DATA dial to select the Song Renum function. 3. Press the [ENTER] button. The display will show Renum EXE? MD8—Owner’s Manual Track 1 Track 2 Track 3... -
Page 73: Moving Songs
After renumbering the songs, the display will briefly show TOC Write to signal that the TOC is being updated. Note: On the MD8, songs are recorded contiguously (i.e., there are no gaps between them). Other MD recorders, however, may record songs non-contiguously (i.e., scattered across a disc). -
Page 74: Dividing Songs
Song 2 When a song is divided, subsequent songs are renumbered. For example, Song 1 is divided into Song 1 and Song 2. The previous Song 2 then becomes Song 3, and so on. MD8—Owner’s Manual Divide Point... -
Page 75: Combining Songs
Song 1 after combine When songs are combined, subsequent songs are renumbered. For example, Song 1 and Song 2 are combined into Song 1. The previous Song 3 then becomes Song 2, and so on. Combining Songs Combine Point MD8—Owner’s Manual... -
Page 76: Erasing Songs
5. Press the [ENTER] button to erase. Press the [EXIT] button to cancel. You can abort the Track Erase operation at anytime by pressing the [STOP] button. Data up to the point that you pressed the [STOP] button is erased. MD8—Owner’s Manual... -
Page 77: Erasing Parts
The display shows Erase EXE. to signal that the Erase operation is performed. You can abort the Part Erase operation at anytime by pressing the [STOP] button. Data up to the point that you pressed the [STOP] button is erased. [IN] [OUT] Part Erase Erasing Parts MD8—Owner’s Manual... -
Page 78: Copying Tracks
The display shows COPY EXE. to signal that the copy operation is performed. You can abort the track copy operation at anytime by pressing the [STOP] button. Data up to the point where you pressed the [STOP] button is copied. MD8—Owner’s Manual... -
Page 79: Copying Parts
The display shows Copy EXE. and the DIR indicator lights up, signalling that the Copy operation is being performed. You can abort the track copy operation at anytime by pressing the [STOP] button. Data up to the point that you pressed the [STOP] button is copied. [IN] [OUT] Copy Copying Parts MD8—Owner’s Manual... -
Page 80: Other Functions
The Frame Disp function allows you to choose whether the display counter shows 86 frames per second, the standard frame count for MiniDisc, or 30 frames per second for when the MD8 is generating MTC. 1. Press the [UTILITY] button and use the DATA dial to select the Frame Disp function. -
Page 81: The Md8 & Midi
The MD8’s MIDI OUT jack should be connected to the MTC input of your MIDI sequencer if you are using MTC, or a normal MIDI IN if you are using MIDI Clock. The MD8 transmits MTC or MIDI Clock during play, record, and rehearsal. When the MIDI sequencer receives MTC or MIDI Clock from MD8, it locates to the same time position as MD8 and plays along in synchronization. -
Page 82: Setting Up A Synchronized Midi System
Acoustic sounds are recorded to the MD8, while MIDI instruments are controlled by a MIDI sequencer, which receives MTC or MIDI Clock from the MD8. Remote MD8 con- trol is possible with a sequencer that supports MMC (MIDI Machine Control). See Control- ling the MD8 with MMC on page 80 for more information. -
Page 83: Using Mtc
5. Press the [EXIT] or [UTILITY] button to leave the Utility mode. The MD8 is now ready for synchronized operation. When MTC is on, the MD8 stops playback at the end of each song. MTC is turned off auto- matically if the Cue List or Program Play function is used. -
Page 84: Using Midi Clock
MIDI sequencer will locate to the current song position and play along in synchroni- zation. Because the MD8 can locate quickly, some MIDI sequencers may not be able to syn- chronize immediately with the MD8, especially when the MD8 is playing in A–B Repeat mode. - Page 85 “000-0” for the remaining steps means that the tempo change occurs before the song actually starts (in measure 0), which is another way of saying that the step in question is not being used. The A flashes. Using MIDI Clock MD8—Owner’s Manual...
- Page 86 The MD8 & MIDI 5. Use the CURSOR shuttle to select the measure, beat, and tempo param- eters and set the desired values using the DATA dial. The measure can be set from 1 to 999. The beat parameter depends on the number of beats per measure, which is specified by the Meter setting.
-
Page 87: Selecting Midi Clock For Synchronization
4. Press [EXIT] or [UTILITY] button to leave the Utility mode. The MD8 is now ready for synchronized operation. When MIDI CLK lights, the MD8 stops playback at the end of each song. It is turned off automatically if the Cue List or Program Play function is used. -
Page 88: Controlling The Md8 With Mmc
(MMC) commands. MMC is short for a set of MIDI messages that can be used to control audio and video (tape) machines, disc recorders, and other equipment. Typically, MMC commands include Stop, Play, and Pause. As you will see, the MD8 understands a lot more MMC messages. -
Page 89: Setting The Mmc Device Id
Setting the MMC Device ID Because MMC messages are universal commands, you may have to set the MD8 so that it only responds to certain MMC messages. This is only necessary, however, if you are control- ling several MMC-compatible devices that must not execute the same messages. A Device ID is a means of identifying a unit (“send it to unit number X”). -
Page 90: Tempo Map Chart
The MD8 & MIDI Tempo Map Chart Meter Step Measure MD8—Owner’s Manual Time Step Measure -Beat Signature Tempo Tempo 001–1... -
Page 91: Md8 Applications
PUNCH I/O jack, one of the musicians can stop and start MD8 recording. A stereo pair of headphones is used for monitoring. Using the DIR recording method, up to eight tracks can be recorded simultaneously. -
Page 92: Midi Home Studio
In this system, acoustic instruments are recorded to the MD8, while MIDI instruments are controlled by a MIDI sequencer, which receives MTC or MIDI Clock from the MD8. Since the MIDI sequencer provides repeatable playback and is synchronized to the MD8, the MIDI instruments need not be recorded until the final mixdown. -
Page 93: Using The Md8 With Another Mixer
Using the MD8 with Another Mixer In this system, the MD8 is used in conjunction with another mixer, in this case, a Yamaha 03D Digital Mixing Console. Track signals are fed to the 03D via the MD8’s DIRECT OUTs. The 03D offers 4-band parametric EQ, two stereo multi-effects processors, scene memories, and mix automation, which can be synchronized to the MTC or MIDI Clock coming from the MD8, for fully automated mixing. -
Page 94: Beyond The Basics
Beyond the Basics Beyond the Basics This chapter provides some advanced tips and techniques for MD8 recording. Effects Return You can use LINE INPUTs 9, 10, 11, and 12 with an external effects processor. But they can also be used as extra stereo inputs. They accept line-level signals that can be assigned to tracks or sent to the stereo mix. -
Page 95: Pitch Applications
MD8. Then record the solo at the slower speed and pitch. When you play back the record- ing at normal pitch, you have a super-fast guitar solo that’s in tune with everything else. -
Page 96: Mixdown
Also remember that the MD8 allows you to mix the signals of eight recorded tracks along with 12 additional signals: the eight inputs and the four LINE INPUTs. These are typically used for MIDI instruments whose signals do not require extensive tonal corrections and that may be fitted with effects processors. -
Page 97: Q&A Section
Do I need to format an MD DATA Disc before recording with the MD8? Yes and no. The MD8 uses MD DATA discs straight out of the wrapper. No fuss. An MD DATA disc that has been used to store computer data, however, must be erased before use with MD8. - Page 98 Do I have to sacrifice one track to record timecode? No. The MD8 generates MTC (MIDI Timecode) or MIDI Clock from the disc’s internal sync signals. So even in a synchronized MIDI system, all eight tracks are available for sound recording.
-
Page 99: Troubleshooting
Troubleshooting If you’re having difficulty operating the MD8 or if it doesn’t seem to work as expected, look up the symptoms in the following table and follow the advice provided. Symptom The MD8 cannot be turned Cannot listen to a connected... - Page 100 Make sure your MIDI sequencer is set to synchronize to an external MTC or MIDI Clock source. Refer to the MIDI sequencer’s user man- ual. The MD8 can locate quickly, so some MIDI sequencers may not be able to synchronize immediately, especially when the MD8 is in A–B Repeat mode.
-
Page 101: Appendix
New song recording is paused. The Auto Punch In/Out function has been acti- — — vated and the MD8 is standing by to start the Auto Punch recording sequence. The Auto Punch recording sequence has — started and is currently between the Pre-Roll point and the Punch IN point. -
Page 102: Display Messages
This song cannot be copied because it’s copy protected. The MD8 cannot record over this type of song, so you cannot overwrite this C C C C a a a a n n n n ' ' ' ' t t t t R R R R E E E E C C C C song. -
Page 103: Specifications
(–10 to –50 dB) Unbalanced phone jack x4 (–10 dB) TRS phone jack x2 (–10 dB) Phono x2 (–10 dB) Phono x8(–10 dB) Phono x2 (–10 dB) Phono x2 (–10 dB) Phone jack x2 (–10 dB) Stereo phone jack (8–40 ) MD8—Owner’s Manual... -
Page 104: General
Dimensions (W x H x D) Weight Operating Conditions Supplied Accessories Optional Accessories Specifications subject to change without notice. MD8—Owner’s Manual USA & Canada: 120 V/60 Hz, Others: 230 V/50 Hz 40 W 484 x 102 x 412.3 mm 6.4 kg Temperature 5˚C–35˚C (41˚F–95˚F) -
Page 105: Block Diagram
Block Diagram HIGH Block Diagram HIGH MD8—Owner’s Manual... -
Page 106: Dimensions
Appendix Dimensions W: 484 mm Unit: mm MD8—Owner’s Manual... -
Page 107: Glossary
Clipping—The unwanted distortion effect of overloading an audio circuit with a signal that is too large. Care must be taken when setting the MD8 GAIN controls so as not to overload the recording circuits. See Recording the First Track on page 17 for more information. - Page 108 MiniDiscs can only be used for 2-track or mono recording with the MD8. MiniDiscs recorded on the MD8 can be played on a normal Mini- Disc deck. See also Random Access, ATRAC, and MD DATA Disc.
- Page 109 Ping-Pong—A recording technique used to transfer (i.e., mix and rerecord) one or more tracks to other tracks to free up those tracks for further recording. The MD8 allows you to record on all eight tracks and then ping-pong (i.e., 8-track playback with ping-pong). A fea- ture unique to the MD8.
-
Page 110: Index
Basic multitracking 22 Beyond the basics 86 Block diagram 97 Bouncing tracks 41 Brightness 72 Bus, definition 99 Buying discs 3 MD8—Owner’s Manual Channel inputs 5 Clipping, definition 99 Combining Songs 67 Compiling a program 60 Confidence monitoring, definition 99... - Page 111 INPUTs 1 and 2 14 INPUTs 3-8 13 MID EQ 5 MIDI Definition 100 Home studio setup 84 Implementation chart 107 IN, OUT, and THRU connectors 12 MCLK indicator 8 MMC indicator 8 MTC indicator 8 Synchronization 73 MD8—Owner’s Manual...
- Page 112 Powering on 17 PrePost Roll 40 Pre-roll setting 40 PRG Play 60 Program playback 60 Project studio setup 84 Protecting MD8 recordings 89 Punch in/out Manual operation 29 Overview 22 Using a footswitch 31 Using REC button 29 Using REC SELECT buttons 30...
- Page 113 Stereo level meters 9 STEREO MONITOR SELECT switch 7 STEREO OUT connectors 14 Stop 93 STOP button 10 Sub mixer operation 85 Switching on the MD8 17 Synchronization Operation 73 Overview 22 System setup 74 Take Auditioning 39 Moni 39...
-
Page 114: Midi Implementation Chart
YAMAHA [Multitrack Recorder] Model: MD8 Function... Basic Default Channel Changed Default Mode Messages Altered Note Number True Voice Note On Velocity Note Off After Keys Touch Ch’s Pitch bend Control Change Prog Change :True# System Exclusive :Song Pos System :Song Sel... - Page 115 YAMAHA CORPORATION VZ47900 R1 1 IP 116 P.O.Box 1, Hamamatsu, Japan 97 11 2000 CP Printed in Japan...