Advertisement
Quick Links
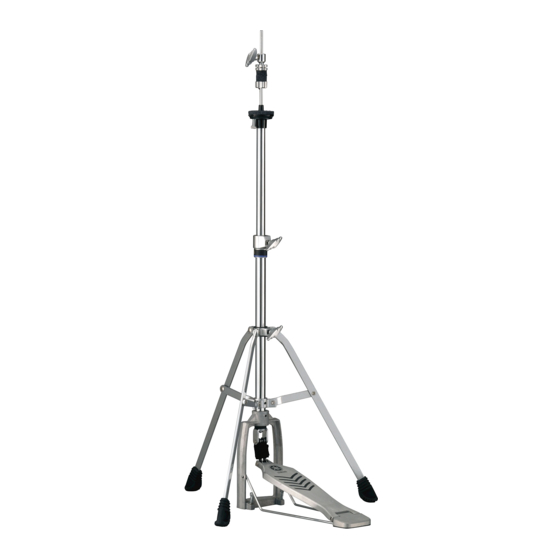
HI-HAT STAND
HS650
OWNER'S MANUAL
Introduction
Thank you for purchasing a Yamaha Hi-Hat Stand.
Please read this owner's manual thoroughly before use.
CAUTION
• To prevent the Hi-Hat Stand from coming loose during
performance, tighten all securing bolts and adjustment
bolts firmly.
• To maintain smooth action, apply some grease-grade oil
(ex. lithium grease) to all of the moving parts as needed.
* Specifications and design are subject to change without notice.
q Cymbal Support Plate
To install the bottom hi-hat cymbal, remove the hi-hat clutch assembly and
place the cymbal on the felt washer on the cymbal support plate. The angle of
the bottom cymbal can be adjusted by turning the angle bolt on the underside
of the support plate.
To adjust the angle of the hi-hat cymbal, use the Knob Bolt located on the
underside of the cymbal support.
w Hi-Hat Clutch
To install the top hi-hat cymbal, loosen the wing bolt and remove the
entire hi-hat clutch assembly from the upper pull rod. Next, remove
the clutch nut and position the cymbal between the two clutch felts.
After installation, tighten the clutch nut on to the clutch assembly to
secure the cymbal. Place the entire assembly onto the hi hat upper
pull rod and tighten the wing bolt to secure the desired position of the
top cymbal.
The lock nuts on the top of the clutch can adjust the feel and sound of
the hi hat cymbals. To obtain a loose sound, open the nuts off of the
felt; for a tight sound, close the nuts onto the felt. Once the desired
sound has been obtained, tighten firmly the lock nuts onto each other.
e Position Clamp
Once the bottom hi-hat cymbal height has been decided, the position
clamp can be used to mark the settings for future set ups and to
prevent unintentional changes during musical performances. Use a
drum key to firmly tighten the position clamp into place.
r Footboard Stabilizer Rod
The Footboard stabilizer rod should attach to holes in the frame at the
bottom of the hi-hat base.
t Spur
The large heavy-duty rubber feet prevent unwanted movement of the
hi-hat stand during playing conditions.
To minimize slippage further, there are two spurs in the frame.
These spurs can be extended as needed by adjusting the turn screws
provided on either side of the frame base.
Note:
To maintain smooth action, occasionally apply some grease-grade
oil to all of the moving parts.
Be careful not to use excessive force when tightening the extender
base nut as this may damage the nylon bushing inside the tube.
● Cymbal Support Plate
● Hi-Hat Clutch
Felt
Fiber
Clutch Bolt
Felts
Cymbal
Support
Knob Bolt
Plate
Hi-Hat Shaft
Hi-Hat Clutch
Cymbal Support Plate
Knob Bolt
Position Clamp
Extender Base
Spur
Footboard Stabilizer Rod
Wing Bolt
Lock Nut
Clutch Nut
Footboard
Printed in Indonesia
Advertisement


