Bosch 11316evs Operating/Safety Instructions Manual
Bosch power drill operating instructions 11316evs
Hide thumbs
Also See for 11316evs:
- Operating/safety instructions manual (33 pages) ,
- Operating information (3 pages) ,
- Parts list (2 pages)
Table of Contents
Advertisement
Available languages
Available languages
BM 1619929470 2-05
IMPORTANT:
Read Before Using
11316EVS
Call Toll Free
for Consumer Information
& Service Locations
1-877-BOSCH99 (1-877-267-2499) www.boschtools.com
For English
See page 2
2/18/05
12:02 AM
IMPORTANT :
Lire avant usage
Operating/Safety Instructions
Consignes de fonctionnement/sécurité
Instrucciones de funcionamiento y seguridad
Pour renseignement des
consommateurs et centres
de service, appelez au
numéro gratuit :
Parlez-vous français?
Voir page 10
Page 1
Leer antes de usar
ubicaciones de servicio
IMPORTANTE:
Llame gratis para
obtener información
para el consumidor y
¿Habla español?
Ver página 18
Advertisement
Table of Contents

Related Manuals for Bosch 11316evs


Summary of Contents for Bosch 11316evs
- Page 1 BM 1619929470 2-05 2/18/05 IMPORTANT: Read Before Using Operating/Safety Instructions Consignes de fonctionnement/sécurité Instrucciones de funcionamiento y seguridad 11316EVS Call Toll Free for Consumer Information & Service Locations 1-877-BOSCH99 (1-877-267-2499) www.boschtools.com For English See page 2 12:02 AM Page 1...
-
Page 2: Power Tool Safety Rules
BM 1619929470 2-05 2/18/05 Read and understand all instructions. Failure to follow all instructions WARNING listed below, may result in electric shock, fire and/or serious personal injury. Work Area Keep your work area clean and well lit. Cluttered benches and dark areas invite accidents. - Page 3 Contact with a "live" wire will make exposed metal parts of the tool "live" and shock the operator. Do not drill, fasten or break into existing walls or other blind areas where electrical wiring may exist. If this situation is unavoidable, disconnect all fuses or circuit breakers feeding this worksite.
- Page 4 BM 1619929470 2-05 2/18/05 develops intense percussive forces during operation and you may lose control if attempting one hand operation. Position yourself to avoid being caught between the tool or side handle and walls or posts. Should the bit become bound or jammed in the work, the reaction of the tool could crush your hand or leg.
- Page 5 Current Frequency (cycles per second) Power Weight Time Time Size of drill bits, grinding wheels, etc. Rotational speed, at no load orbits etc. per minute Zero speed, zero torque... Speed, torque or position settings. Higher number means greater speed Speed is increasing from 0 setting...
-
Page 6: Functional Description And Specifications
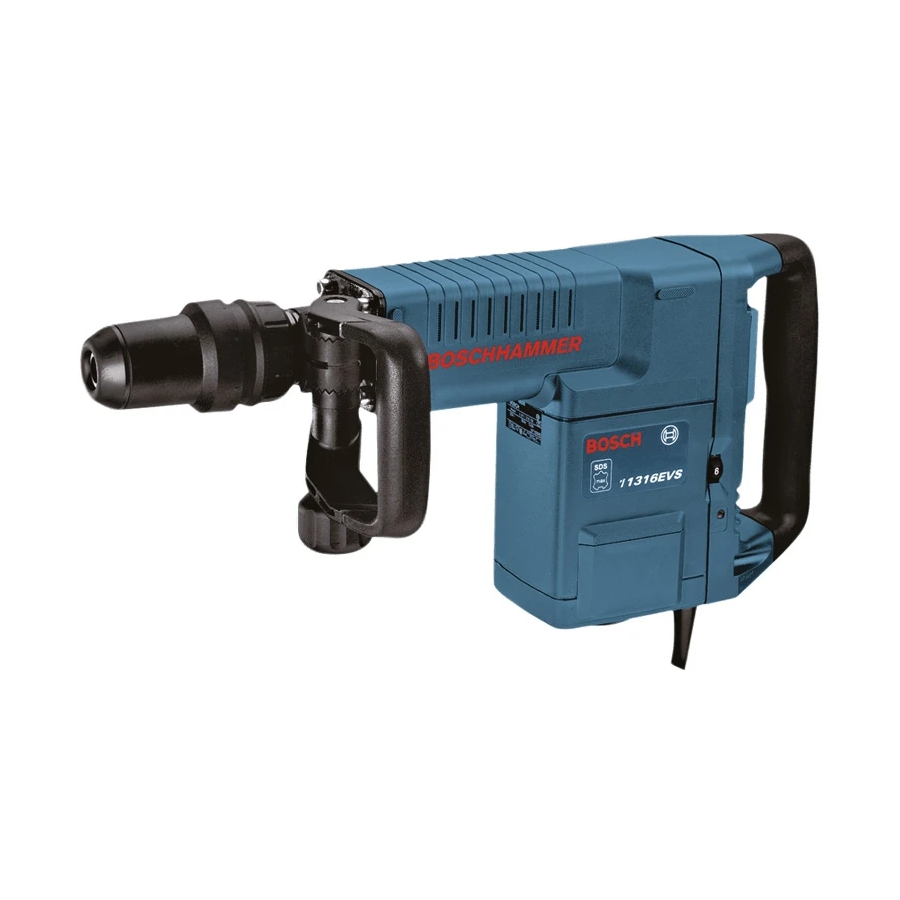
HAND GRIP Model number Shank style NOTE: For tool specifications refer to the nameplate on your tool. 12:02 AM Page 6 Demolition Hammer AUXILIARY HANDLE VENTILATION OPENINGS 11316EVS SDS Max FIG. 1 SLIDE ON/OFF SWITCH VARIABLE SPEED DIAL SERVICE REMINDER LIGHT... -
Page 7: Operating Instructions
BM 1619929470 2-05 2/18/05 SLIDE "ON-OFF" SWITCH The tool is switched "ON" by the slide switch 9 located in the rear handle. TO TURN THE TOOL "ON" slide the switch to the right. TO TURN THE TOOL"OFF " slide the switch to the left. - Page 8 BM 1619929470 2-05 2/18/05 AUXILIARY HANDLE The tool must be supported with the auxiliary handle , which can be swiveled 360˚. To reposition and/or swivel the handle, loosen the hand grip, move the handle to the desired position along the barrel and securely retighten the hand grip.
-
Page 9: Maintenance
BM 1619929470 2-05 2/18/05 Service Preventive maintenance WARNING performed by unauth- orized personnel may result in misplacing of internal wires and components which could cause serious hazard. We recommend that all tool service be performed by a Bosch Factory Service Center or Authorized Bosch Service Station. -
Page 10: Règles De Sécurité Générales
BM 1619929470 2-05 2/18/05 Vous devez lire et comprendre toutes les instructions. Le non-respect, même AVERTISSEMENT partiel, des instructions ci-après entraîne un risque de choc életrique, d'incendie et/ou de blessures graves. Aire de travail Veillez à ce que l'aire de travail soit propre et bien éclairée. - Page 11 BM 1619929470 2-05 2/18/05 sécuritaire. Respectez aussi la vitesse de travail qui lui est propre. N'utilisez pas un outil si son interrupteur est bloqué. Un outil que vous ne pouvez pas commander par son interrupteur est dangereux et doit être réparé. Débranchez la fiche de l'outil avant d'effectuer un réglage, de changer d'accessoire oude ranger l'outil.
- Page 12 BM 1619929470 2-05 2/18/05 risquez d’en perdre le contrôle si vous le maniez d’une seule main. Placez-vous de manière à éviter d'être pris entre l'outil ou la poignée latérale et les murs ou les montants. Si l’embout vient à brider ou à se coincer dans l’ouvrage, la réaction de l’outil risque de vous écraser la main ou la jambe.
- Page 13 BM 1619929470 2-05 IMPORTANT : Certains des symboles suivants peuvent être utilisés sur votre outil. Veuillez les étudier et apprendre leur signification. Une interprétation appropriée de ces symboles vous permettra d'utiliser l'outil de façon plus efficace et plus sûre. Symbole Volts Ampères Hertz...
-
Page 14: Description Fonctionnelle Et Spécifications
Type de tige REMARQUE : Pour spécifications de l'outil, reportez-vous à la plaque signalétique de votre outil. 12:02 AM Page 14 Marteau de démolition POIGNÉE AUXILIAIRE PRISES D’AIR 11316EVS SDS Maxi. -14- FIG. 1 INTERRUPTEUR MARCHE-ARRET VARIATEUR DE VITESSE INDICATEUR... -
Page 15: Consignes De Fonctionnement
BM 1619929470 2-05 2/18/05 INTERRUPTEUR MARCHE-ARRET L’outil est mis en marche au moyen de l’interrupteur situé dans la poignée arrière. POUR METTRE L’OUTIL SOUS TENSION, glissez l’interrupteur à droite. POUR METTRE L’OUTIL HORS TEN-SION, glissez l’interrupteur à gauche. VARIATEUR DE VITESSE Votre outil est équipé... - Page 16 BM 1619929470 2-05 2/18/05 POIGNÉE AUXILIAIRE La poignée auxiliaire, qui pivote sur 360°, doit être utilisée pour supporter l’outil. Pour repositionner et/ou faire pivoter la poignée, desserrez la manette, déplacez la poignée à la position désiré le long du cylindre, puis resserrez fermenment la manette. CONSEILS PRATIQUES Pour de meilleurs résultats dans le béton, exercez une pression uniforme sans excès de force.
-
Page 17: Entretien
BM 1619929470 2-05 2/18/05 Service Tout entretien préventif AVERTISSEMENT effectué personnels non autorisés peut résulter en mauvais placement de fils internes ou de pièces, ce qui peut présenter un danger grave. Nous vous conseillons de faire faire tout l’entretien par un centre de service d’usine Bosch ou une station service agréée Bosch. - Page 18 BM 1619929470 2-05 2/18/05 Normas de seguridad para herramientas mecánicas Lea y entienda todas las instrucciones. El incumplimiento de todas las instrucciones ADVERTENCIA indicadas a continuación puede dar lugar a sacudidas eléctricas, incendios y/o lesiones personales graves. Area de trabajo Mantenga el área de trabajo limpia y bien iluminada.
- Page 19 BM 1619929470 2-05 2/18/05 el cuerpo resulta inestable y puede ocasionar pérdida de control. No fuerce la herramienta. Use la herramienta correcta para la aplicación que desea. La herramienta correcta hará el trabajo mejor y con más seguridad a la capacidad nominal para la que está...
- Page 20 BM 1619929470 2-05 2/18/05 Utilice siempre ambos mangos para lograr el máximo control sobre este martillo. Nunca intente utilizar esta herramienta con una sola mano. Esta herramienta desarrolla intensas fuerzas percusivas durante su funcionamiento y es posible que usted pierda el control si intenta utilizar la herramienta con una sola mano.
- Page 21 BM 1619929470 2-05 2/18/05 IMPORTANTE: Es posible que algunos de los símbolos siguientes se usen en su herramienta. Por favor, estúdielos y aprenda su significado. La interpretación adecuada de estos símbolos le permitirá utilizar la herramienta mejor y con más seguridad. Símbolo Nombre Volt...
-
Page 22: Descripción Funcional Y Especificaciones
NOTA: Para obtener las especificaciones de la herramienta, consulte la placa del fabricante colocada en la herramienta. 12:02 AM Page 22 Martillo de demolición MANGO AUXILIAR ABERTURAS DE VENTILACIÓN 11316EVS SDS Max -22- FIG. 1 INTERRUPTOR CORREDIZO “ON/OFF” (DE ENCENDIDO Y APAGADO) DIAL DE... -
Page 23: Instrucciones De Funcionamiento
BM 1619929470 2-05 2/18/05 Instrucciones de funcionamiento INTERRUPTOR CORREDIZO “ON/OFF” (DE ENCENDIDO Y APAGADO) La herramienta se enciende (posición “ON”) mediante el interruptor corredizo ubicado en el mango posterior. PARA ENCENDER LA HERRAMIENTA (POSICION “ON”), deslice el interruptor ha-cia la derecha. PARA APAGAR LA HERRAMIENTA (POSICION “OFF”), deslice el interruptor hacia la izquierda. - Page 24 BM 1619929470 2-05 2/18/05 MANGO AUXILIAR La herramienta se debe sujetar con el mango auxiliar, el cual se puede girar 360°. Para reposicionar y/o hacer girar el mango, afloje la empuñadura, mueva el mango hasta la posición deseada a lo largo del cuerpo cilíndrico y vuelva a apretar firmemente la empuñadura.
-
Page 25: Mantenimiento
BM 1619929470 2-05 2/18/05 Servicio El mantenimiento preventivo ADVERTENCIA realizado por personal no autorizado pude dar lugar a la colocación incorrecta de cables y componentes internos que podría constituir un peligro serio. Recomendamos que todo el servicio de las herramientas sea realizado por un Centro de servicio de fábrica Bosch o por una Estación de servicio Bosch autorizada. - Page 26 BM 1619929470 2-05 2/18/05 12:02 AM Page 26 Notes: -26-...
- Page 27 BM 1619929470 2-05 2/18/05 12:02 AM Page 27 Remarques : Notas: -27-...
- Page 28 BOSCH Factory Service Center or Authorized Service Station. For Authorized BOSCH Power Tool Service Stations, please refer to your phone directory. THIS LIMITED WARRANTY DOES NOT APPLY TO ACCESSORY ITEMS SUCH AS CIRCULAR SAW BLADES, DRILL BITS, ROUTER BITS, JIGSAW BLADES, SANDING BELTS, GRINDING WHEELS AND OTHER RELATED ITEMS.