Table of Contents
Advertisement
Quick Links
Advertisement
Table of Contents

Related Manuals for VocoPro Carry-Oke Microphone


Summary of Contents for VocoPro Carry-Oke Microphone
- Page 1 CARRY-OKE Plug & Play Karaoke System...
-
Page 3: Table Of Contents
Table of Contents Safety Instructions FCC Information Listening for a Lifetime Welcome Features Features Connections Getting Started Getting Started Returns and Warranty Getting Connected Connecting the Power Adapter Connecting the CARRY-OKE to a TV or Stereo Removing the AVP Cable Battery Installation Descriptions &... -
Page 4: Safety Instructions
Safety Instructions CAUTION RISK OF SHOCK CAUTION: To reduce the risk of electric shock, do not remove cover (or back). No user-ser- viceable parts inside. Only refer servicing to qualified service personnel. Explanation of Graphical Symbols The lightning flash & arrowhead symbol, within an equilateral triangle, is intended... - Page 5 Safety cont. 9. Heat - The appliance should be situated away from heat sources such as radiators, heat registers, stoves, or other appliances (including amplifiers) that produce heat. 10. Power Sources - The appli- ance should be connected to a power supply only of the type described in the operating instructions or as marked on the appliance.
-
Page 6: Fcc Information
FCC requirements. Modifica- tions not expressly approved by Vocopro may void your authority, granted by the FCC, to use this product. 2. IMPORTANT: When connect- ing this product to accessories and/or another product use only high quality shielded cables. - Page 7 FCC Information cont. 1. To ensure the finest perfor- mance, please read this man- ual carefully. Keep it in a safe place for future reference. 2. Install your unit in a cool, dry, clean place - away from win- dows, heat sources, and too much vibration, dust, mois- ture or cold.
-
Page 8: Listening For A Lifetime
Selecting fine audio equipment such as the unit youʼve just purchased is only the start of your musical enjoyment. Now itʼs time to consider how you can maximize the fun and excitement your equipment offers. VocoPro and the Electronic Industries Associationʼs Consumer Electronics Group want you to get the most out of your equipment by playing it at a safe level. -
Page 9: Welcome
Welcome ������ ���� � ���� ����������� ���� ���������� ����� ��������� ���� ��������� ��������� �������� ����� ������ ��� ����������� ��� ���� ������ �������������� ���������� �������� ��� �� �������� ������������� ��� �������� ����������� ���� ���� ����� ���������� �������� ��� ������ ���������� ��������� ������ ���� ����������� ���������� ���� ������������... -
Page 10: Features
Features Features: • Plug and Play device allows you to connect to any TV and Stereo System for an Instant Karaoke Party • Utilizes versatile SD Memory • Transport hundreds of Karaoke Video Files (AVI,Mp4) • On screen Karaoke controls including Digital Echo, Effect and Key Control •... -
Page 11: Getting Started
In the unlikely event that the CARRY-OKE would need to be shipped for repair, it is recommended that you keep all the product packaging and receipt. For detailed warranty information, please visit www.vocopro.com/ warranty_extended.html. To find a VocoPro Authorized Service Center near you, please visit www.vocopro. com/servicecenter.html... -
Page 12: Getting Connected
Getting Connected Connecting the Power Adapter What you will need: • A/V Power Cable (Included) • AC Power Adapter (Included) • Surge Protector [Recommended) or a power outlet 1. Connect the round, six-pin end of the AVP cable to the six-pin AVP Connector on the base of the CARRY-OKE, lining up the arrows on the mic and connector. -
Page 13: Connecting The Carry-Oke To A Tv Or Stereo
Getting Connected cont. Connecting the CARRY-OKE to a TV Connecting Video using the RCA Video Output What you will need: • AVP cable (included) • A TV and/or Stereo with RCA video input Connecting to a TV: 1. Connect the red/white/yellow ends of the AVP cable to the RCA audio/video input jacks on a TV ��... - Page 14 Getting Connected cont. Connecting to a TV and Stereo: 1. Connect the yellow end of the AVP cable to the yellow RCA video input jack on a TV 2. Connect the red/white ends of the AVP cable to the red/white RCA stereo input jacks on a Stereo System �...
-
Page 15: Removing The Avp Cable
Getting Connected cont. Removing the AVP Cable To remove the AVP Cable, you must simultaneously pull back the notched cap and pull the cable in an outward motion. �� ��� Battery Installation • Three AA batteries (Not Included) can be used to power the unit instead of AC Power. -
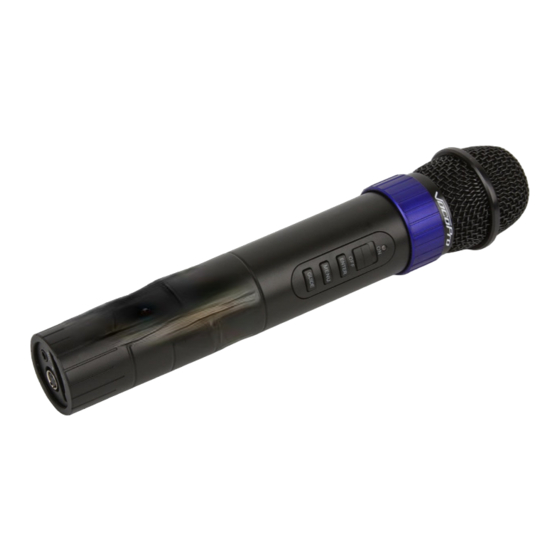
Page 16: Descriptions & Functions
Descriptions & Functions Microphone Controls 1. Control Ring - This will allow you to make on-screen selections in the menu and guide. The control ring controls volume during playback. 2. Power Indicator - Blue Light: Power On, Red Light: Standby, Red Light (blinking): Low Battery Power 3. - Page 17 Descriptions cont. � � � � � � � �� ��� �� � �...
-
Page 18: Operations
Operations Transferring Karaoke Video Files Transferring from DIVX disc: What you will need: • PC • DIVX Karaoke DVD (Not Included) • SD Card Reader (Not Included) 1. Insert the SD memory card you will be using with your CARRY-OKE into you PC’s SD card reader 2. -
Page 19: Using The Carry-Oke
Operations cont. Using the CARRY-OKE Once you have the CARRY-OKE connected (page 16), you can begin the performance right away. 1. Turn the CARRY-OKE on and wait for the song list to load. If the screen indicates “NO CARD” at start- up, despite the presence of an SD memory card, allow for the loading to complete after several seconds. -
Page 20: System Setup Menu
System Setup Menu Main Menu Operation Press the MENU button to display the main menu screen • Rotate the control ring to place the selector on any of the following: - Play List - Song List - Setting - System Play List Operation This is a list of selected songs that are queued for playback on your CARRY-OKE... -
Page 21: Song List Operation
System Setup Menu cont. Song List Operation This is the entire list of songs on your memory card • Select Song for Playlist: Use the control ring to move to the song you would like to add to the playlist. An ARROW will indicate that the song has been selected. -
Page 22: System Operation
System Setup Menu cont. clockwise. For a better sounding performance, it is recommended that you set the volume up to 50% and adjust the volume of your TV or Stereo to your preference. 2. Echo: Adjust the amount of echo effect on your voice. -
Page 23: Sleep Mode And Auto Shut Off
System Setup Menu cont. Sleep Mode and Auto Shut Off The CARRY-OKE will enter sleep mode after it is idle for 8 minutes. Press any button to wake the CARRY- OKE from sleep mode. The unit will power off after 4 minutes of sleep mode. -
Page 24: Troubleshooting
Troubleshooting 1. No Power Possible Causes: • The power cable or adapter may be improperly connected • Battery at low power or dead Remedy: • Ensure the cable is connected to the base of the CARRY-OKE, and the adapter is properly plugged in. •... - Page 25 Troubleshooting cont. 4. The screen reads NO CARD when I turn the CARRY-OKE on Possible Causes: • There is no SD card in the CARRY-OKE Remedy: • You may need to insert the SD memory card into the CARRY-OKE. Make sure the CARRY-OKE is powered OFF before doing so.
- Page 26 Notes...
- Page 27 Notes...
- Page 28 ���������������� © ������������ ���������������...