
Related Manuals for Universal Electronics Titan M2056-C

Summary of Contents for Universal Electronics Titan M2056-C
- Page 1 Titan Remote Control Users Guide Pour les instructions en français, veuillez consulter www.urcsupport.com Para instrucciones en español, por favor consulte www.urcsupport.com PREPROGRAMMED FOR YOUR SET-TOP BOX...
-
Page 2: Table Of Contents
TABLE OF CONTENTS Features ..........3 Features and Functions . -
Page 3: Features
LEARNING section of this Users Guide. Backlighting The Titan universal remote control includes a keypad backlight. This allows for easy key navigation in dark ambient light conditions. If you wish to disable this feature, please refer to the BACKLIGHTING section of this Users Guide. -
Page 4: Features And Functions
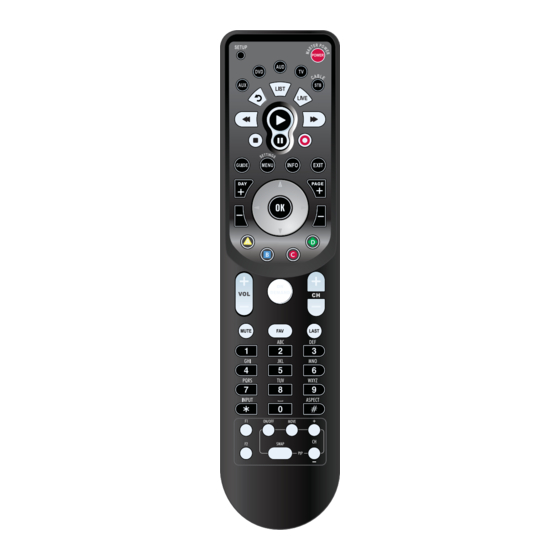
FEATURES AND FUNCTIONS Use the illustration below to locate features on the Titan Remote Control and then study the Key Charts (on the next three pages) to learn how they function. www.urcsupport.com... -
Page 5: Key Charts
Key Charts SETUP Function Use SETUP for all programming sequences. Press POWER once to turn on or off a home theater device. For MASTER POWER control, see “Using the Master Power Key” on page 19. Press AUX, DVD, AUD, TV, or STB once to select a home entertainment device to control. - Page 6 Function Use PAGE+ (or PAGE-) to page up (or page down) through menu screens and the program guide. Use A, B, C, or D as shortcuts to access additional features available honour set-top box menu screens, program guide, and interactive applications. Use VOL+ (or VOL-) to raise (or lower) the audio volume.
-
Page 7: Installing Batteries
INSTALLING BATTERIES On the back of the remote control, press your thumb on the indentation on the battery door and slide the battery door off. Locate the two (2) enclosed AA batteries. Match the + and - marks with those in the battery case, then insert them. -
Page 8: Basic Setup: Programming Device Control
BASIC SETUP: PROGRAMMING DEVICE CONTROL The Titan universal remote control comes pre- programmed to operate the set-top box that is supplied by your service provider. In addition, Titan can be programmed to control four (4) additional home theater equipment devices. -
Page 9: Searching For Your Code
NOTE: If the selected mode LED emits a long blink, the entry is invalid. Repeat steps 2 through 4 and try entering the same code again. Aim the remote control at the device and press POWER once. The device should turn off. - Page 10 Turn on your TV. On the remote control, press TV once; it blinks once. Then press and hold SETUP until the TV key blinks twice. Enter 9 9 1. The TV key blinks twice. Enter one of the following four digits: COMPONENT TYPE Set-Top Boxes (Cable, Sat, etc.) DVD/VCR/DVR...
-
Page 11: Checking The Codes
CHECKING THE CODES If you have programmed one of your Titan remote's mode keys by searching for your device code (on the previous page), you may need to find out which five- digit code is operating your equipment. For example, to find out which code is operating your TV: On the remote control, press TV once;... -
Page 12: Programming A Learned Key
• Learning capacity is approximately 16 to 25 keys, depending on the code being learned. • Certain device functions are not learnable including multi-frequency types, some high frequency ones, and other unusual formats. • For optimum learning, avoid high levels of ambient light such as natural sunlight or energy-efficient fluorescent lights. -
Page 13: Deleting A Single Learning Key
tions” on the previous page. If needed, also see “Troubleshooting” on page 23. After review, start programming again at step 1. Repeat steps 2 through 4 for another mode and/or key or press and hold SETUP to exit SETUP programming. Deleting a Single Learning Key This process returns the key to its original programming for the mode you select. -
Page 14: Programming Volume Lock
PROGRAMMING VOLUME LOCK Volume Lock allows you to set your remote to direct all volume commands to whichever home theater device you designate as your audio source. By default, Global (All) Volume Lock is set to TV, so you can control TV volume while in any mode on your remote. -
Page 15: Programming Channel Lock
Press each mode key that relates to the devices that you do not use for volume control. These will be the modes in which the volume functions control the device related to the mode key you pressed in step 1. Any mode omitted from this step will have all volume controls assigned to that mode's device. -
Page 16: Locking Channel Control For Specific Device Modes
Enter 9 7 3. The mode LED (e.g., TV) blinks twice. Press CH+ once. The mode LED (e.g., TV) blinks once. Press the mode key for the device that you want to use for channel-changing. The mode LED blinks twice. Now, regardless of what mode you select, the channel keys will only change channels on the assigned device. -
Page 17: Unlocking Channel Control
Unlocking Channel Control To unlock Channel Lock and thus allow the channel control functions to work with the device associated to the active operating mode, follow these steps: Press and hold SETUP until the mode LED SETUP blinks twice. Enter 9 7 3. The mode LED blinks twice. Press CH- once. -
Page 18: Programming A Macro Key
Programming a Macro Key On the remote control, press and hold SETUP SETUP until the mode LED blinks twice. Enter 9 9 5. The mode LED blinks twice. Select a macro key (for example, F1) and press it once. The mode LED blinks once. Press the key sequence you want to program into the macro. -
Page 19: Using The Master Power Key
page 18). If desired, repeat these to clear another Tune- In key. USING THE MASTER POWER KEY The Titan Remote Control has a unique feature that allows you to sequentially turn up to five of your home entertainment devices on or off with a single key press. NOTE: MASTER POWER only works in the STB mode. -
Page 20: Using The Master Power Key
Using the Master Power Key Press STB once. Press POWER. The remote sends a power command to each device that was included in the Master Power Macro. Clearing the Master Power Key On the remote control, press STB once. Press and hold SETUP until the mode LED blinks twice. -
Page 21: Clearing Custom Programming
BACKLIGHTING The Titan Remote Control is equipped with backlit keys to make it easy to use in dark ambient lighting. By default, Titan's backlighting is enabled to light after keys are pressed (other than the OK key). You can disable the backlighting by following the steps below: Disabling Backlight Press and hold SETUP until the mode LED... -
Page 22: Re-Programming Set-Top Box Control
RE-PROGRAMMING SET-TOP BOX CONTROL The Titan Remote Control comes pre-programmed to control the set-top box supplied by your service provider. In addition, it is locked to prevent inadvertent deletion or change of set-top box control. In the event that you need to change the STB key to control a different brand/model of set-top box, follow these steps: Using the list of Manufacturer's Codes in the back of this manual, locate the brand of set-... -
Page 23: Troubleshooting
TROUBLESHOOTING PROBLEM: Device mode key does not blink when you press a key. SOLUTION: Replace the batteries with two (2) new AA batteries (see “Installing Batteries” on page 7). PROBLEM: Device key blinks when you press a key, but home entertainment device does not respond. SOLUTION: Make sure you are aiming the remote control at your home entertainment device and that you are within 15 feet of the device you are trying to control. -
Page 24: Fcc Notice
FCC NOTICE This equipment has been tested and found to comply with the limits for a class B digital device, pursuant to part 15 of the FCC Rules. These limits are designed to provide reasonable protection against harmful interference in a residential installation. This equipment generates, uses and can radiate radio frequency energy and if not installed and used in accordance with the instructions, may cause harmful interference to radio... -
Page 25: Manufacturer's Codes
MANUFACTURER’S CODES Setup Codes for Audio Amplifiers Bose Carver Durabrand Harman/Kardon Left Coast Lenoxx Marantz McIntosh Optimus Philips Pioneer Polk Audio Realistic Soundesign Victor Wards Yamaha Setup Codes for Audio Receivers Aiwa Alco Amphion Media Works Anam Apex Digital Arcam Audio Control Audiotronic Audiovox... - Page 26 Bose Cambridge Soundworks Capetronic Carver Coby Daewoo Denon Fisher Garrard Harman/Kardon Hitachi Insignia Integra Kenwood Koss Linn Magnavox Marantz McIntosh Micromega Mitsubishi Myryad Nakamichi Norcent Nova Onkyo Optimus Oritron 30639, 31253, 31629, 31841, 31933 31370 30531 31189, 30189, 30121, 31289 31389 31250 31360, 30121, 31142,...
- Page 27 Panasonic Philips Pioneer Polaroid Polk Audio Proscan Rotel Samsung Sansui Sanyo Sharp Sharper Image Sherwood Sherwood Newcastle Sonic Blue Sony Soundesign Stereophonics Sunfire Teac Technics Thorens Toshiba Venturer Victor Wards Yamaha Zenith 31308, 31518, 30367, 31288, 31316, 31548, 31633, 31763 31189, 31269, 30189, 30391, 31266 31023, 30014, 30150,...
-
Page 28: Setup Codes For Audio Accessories
Setup Codes for Audio Accessories Accurian Altec Lansing Apple Griffin iDeck iHome iLive Monitor Audio Setup Codes for Cable Boxes/Converters Amino Cisco Comcast Digeo Director General Instrument GoldStar i3 Micro Jerrold Memorex Motorola Myrio Pace Panasonic Paragon Philips Pioneer Pulsar Quasar Runco Samsung... -
Page 29: Setup Codes For Dvd Players
Supercable Torx Toshiba Zenith Setup Codes for Cable/DVR/PVR Combos Amino Cisco Comcast Digeo General Instrument Jerrold Motorola Myrio Pace Panasonic Pioneer Scientific Atlanta Sony Supercable Setup Codes for DVD Players Accurian Advent Aiwa Akai Alco Allegro Amphion Media Works Apex Digital Arrgo Aspire Digital Astar... - Page 30 Bose Broksonic California Audio Labs Cinea CineVision Citizen Coby Craig CyberHome D-Vision Daewoo Daytek Denon Desay DigitalMax Disney Durabrand DVD2000 Emerson Enterprise Fisher Funai Gateway Go Video GoldStar Gradiente Grundig Harman/Kardon Hello Kitty Hitachi Hiteker Humax 22023 20695, 20868 20490 20831 20876, 20833, 20869 20695, 21277...
- Page 31 Initial Insignia Integra Jensen jWin Kawasaki Kenwood Koss Lasonic Lecson Lenoxx LiteOn Loewe Magnavox Marantz McIntosh Memorex Microsoft Mintek Mitsubishi NexxTech Norcent Onkyo Oppo Panasonic Philco 21348, 21472 21472 21268 20571, 20627, 21769 20702 21016 21423 20558, 20623, 20867, 21164, 21275, 21550, 21602 21049 20790...
- Page 32 Philips PianoDisc Pioneer Polaroid Polk Audio Presidian Prima Proceed Proscan ProVision RJTech Rotel Sampo Samsung Sansui Sanyo Sensory Science Sharp Sherwood Shinsonic Sonic Blue Sony Sungale Superscan Sylvania Symphonic Teac Technics Theta Digital Tivo Toshiba 20503, 20539, 22056, 20646, 20675, 20854, 21260, 21267, 21340, 21354, 22084 21024 20525, 20571, 20142, 20631,...
-
Page 33: Setup Codes For Dvr/Pvr
Tredex Urban Concepts Venturer Vizio Vocopro Xbox Yamaha Yamakawa Zenith Zoece Setup Codes for DVR/PVR Alienware CyberPower Dell DirecTV Gateway Go Video Hewlett Packard Howard Computers Hughes Network Systems 20739 Humax Hush iBUYPOWER Linksys Media Center PC Microsoft Mind Niveus Media Northgate Panasonic Philips... -
Page 34: Setup Codes For Satellite Set-Top Boxes
Stack 9 Systemax Tagar Systems Tivo Toshiba Touch Viewsonic Voodoo ZT Group Setup Codes for Satellite Set-Top Boxes Bell ExpressVu Chaparral DirecTV Dish Network System Dishpro Echostar Expressvu General Instrument Hitachi Hughes Network Systems 01142, 00749, 01749, 01442 Jerrold Mitsubishi Motorola Next Level Panasonic... -
Page 35: Setup Codes For Tvs
Tivo Toshiba UltimateTV Voom Zenith Setup Codes for TVs Accurian Action Admiral Advent Aiko Akai Alaron Albatron Ambassador America Action Anam Aomni Apex Digital Astar Audiovox Aventura Axion Bell & Howell BenQ Boxlight Bradford Broksonic Byd:sign Candle Carnivale 01142, 01442 00749, 01749 01640 00869... - Page 36 Carver Celebrity Celera Changhong Citizen Clairtone Clarion Commercial Solutions Concerto Contec Craig Crosley Crown Curtis Mathes Cytron Daewoo Dell Denon Denstar Diamond Vision Digital Lifestyles Digital Projection Inc. Dumont Durabrand Dwin Dynex Electroband Electrograph Electrohome Emerson 10054 10000 10765 10765 10060, 10030, 10092, 10056, 11935 10185...
- Page 37 Emprex Envision Epson Fisher Fujitsu Funai Futuretech Gateway Gibralter Go Video GoldStar Grundig Grunpy H & B Haier Hallmark Hannspree Harley Davidson Harman/Kardon Harvard Havermy Helios Hello Kitty Hewlett Packard Hisense Hitachi Hyundai Infinity InFocus Initial 11422, 11546, 11765 10030, 10813, 11365 10833, 10840, 11122, 11290, 11735 10812, 10171, 11944, 11963...
- Page 38 Insignia Inteq Jensen Kenwood Konka Kost Kreisen Lloyd's Luxman Magnavox Marantz Matsushita Maxent Megapower Megatron 11564, 10171, 11204, 11326, 11517, 11641, 11710, 11963, 12002 10017 10877 10054 10000 10761, 10815, 10817, 11299, 11933 10053, 10650, 10731, 11253, 11302, 11633, 11774, 11923 11498 10180 10030...
- Page 39 Memorex Micro Midland Mintek Minutz Mitsubishi Monivision Motorola Moxell Multitech NetTV Nikko Niko Norcent Norwood Micro Olevia Olympus Onwa Optimus Optoma Optonica Orion Panasonic Penney Petters Philco 10154, 10463, 10150, 10178, 10179, 10877, 11911, 11926 10150, 10178, 10030 11436 10047, 10017, 10051 11603, 11990 10021 11250, 10093, 10150,...
- Page 40 Philips Pilot Pioneer Planar Polaroid Portland Prima Princeton Prism Proscan Proton Protron Proview Pulsar Puneet Quasar RadioShack Realistic RevolutionHD Rhapsody Runco Sampo Samsung 11454, 10054, 10690, 11154, 11483, 11744, 11961 10030 11457, 10166, 10679, 10866, 11260, 11398, 11717 11496 11523, 10765, 10865, 11276, 11314, 11316, 11326, 11341, 11498, 11766, 11962, 11991,...
- Page 41 Sansui Sanyo Sceptre Scotch Scott Sears Sharp Sheng Chia Sherwood Sole Sony Soundesign Sova Soyo Spectroniq Squareview Starlite Studio Experience Superscan Supreme Sylvania Symphonic Syntax Tandy Tatung Technics Technol Ace Techview Techwood 10463, 11409, 11904, 11911, 11929, 11935 10154, 10088, 10799, 10893, 11142 10878, 11217, 11360, 11599 10178...
- Page 42 Teco Teknika Telefunken Thomas TNCi Toshiba Tosonic TruTech US Logic Vector Research Victor Vidikron Vidtech Viewsonic Viore Vizio Wards Waycon Westinghouse White Westinghouse Wyse Yamaha Zenith 11040 10054, 10180, 10150, 10060, 10092, 10056, 10179 10702, 10056 11904 10178, 10056, 10177 10017 11524, 10154, 10156, 11256, 10060, 12006,...
-
Page 43: Setup Codes For Tvs (Lcd)
Setup Codes for TVs (LCD) Accurian Action Akai Aomni Apex Digital Astar Audiovox BenQ Byd:sign Citizen Dell Digital Lifestyles Emerson Emprex Envision Funai Go Video H & B Haier Hannspree Hewlett Packard Hitachi Hyundai Initial Insignia Jensen Kreisen Magnavox Marantz Maxent 11803 10873... - Page 44 Micro Mintek Mitsubishi NetTV Niko Norcent Norwood Micro Olevia Panasonic Petters Philips Pioneer Planar Polaroid Prima Protron Proview Puneet RevolutionHD Runco Sampo Samsung Sansui Sanyo Sceptre Scott Sharp Sherwood Sole Sony Sova Soyo Superscan Sylvania Symphonic Syntax Tatung 11436 11603, 11990 11250 10762 11581, 11618...
-
Page 45: Setup Codes For Tvs (Plasma)
Techview Teco Toshiba TruTech US Logic Vidikron Viewsonic Viore Vizio Westinghouse Wyse Setup Codes for TVs (Plasma) Akai Albatron Aomni BenQ Daewoo Dell Electrograph Fujitsu Funai Gateway H & B Haier Helios Hewlett Packard Hitachi Insignia Magnavox Marantz 12004 11040 11524, 10822, 10845, 11635, 11656, 12006 11723... -
Page 46: Setup Codes For Tv/Dvd Combos
Maxent Mitsubishi Monivision Motorola Moxell NetTV Norcent Norwood Micro Panasonic Philips Pioneer Polaroid Prima Proview Puneet RevolutionHD Runco Sampo Samsung Sole Sony Studio Experience Sylvania Tatung Toshiba US Logic Viewsonic Viore Vizio Yamaha Zenith Setup Codes for TV/DVD Combos Controlled by the TV Accurian Advent Akai... - Page 47 Apex Digital Audiovox Axion Broksonic Citizen Diamond Vision Dynex Emerson Funai Hitachi Initial Insignia Jensen Konka Magnavox Maxent Mintek Panasonic Philips Polaroid Prima Samsung Sansui Sova Sylvania Techview Toshiba Controlled by the DVD Advent Akai Apex Digital Audiovox Broksonic Citizen 11943, 11991 11937, 11951, 11952 11937...
-
Page 48: Setup Codes For Tv/Vcr Combos
Emerson Funai Hitachi Initial Insignia Jensen Magnavox Mintek Panasonic Philips Prima Samsung Sansui Sylvania Toshiba Setup Codes for TV/VCR Combos Controlled by the TV America Action Audiovox Broksonic Emerson Funai GoldStar Harley Davidson Hitachi Lloyd's Magnavox Memorex Mitsubishi Orion Penney RadioShack Samsung 20675, 21268... - Page 49 Sansui Sears Sony Sylvania Symphonic Thomas Toshiba Zenith Setup Codes for TV/VCR Combos Controlled by the VCR Broksonic Citizen Curtis Mathes Daewoo Emerson Funai GoldStar Harley Davidson Hitachi Lloyd's Magnasonic Magnavox Memorex Mitsubishi Optimus Orion Panasonic Penney Quasar RadioShack Samsung Sansui Sears Sony...
-
Page 50: Setup Codes For Vcrs
Toshiba Zenith Setup Codes for VCRs Accurian Adventura Aiwa Alienware American High Audiovox Broksonic Calix Canon Carver Citizen Craig Curtis Mathes CyberPower Daewoo Dell DirecTV Dynatech Electrohome Electrophonic Emerex Emerson Fuji Funai Garrard Gateway Go Video GoldStar Gradiente Harley Davidson Harman/Kardon Hewlett Packard 20845, 21145... - Page 51 Hitachi Howard Computers Hughes Network Systems 20739 Humax Hush iBUYPOWER Instant Replay Kenwood Kodak Linksys Lloyd's Magnasonic Magnavox Marantz Marta Matsushita Media Center PC Memorex Microsoft Mind Mitsubishi Motorola Multitech Nikko Niveus Media Northgate Olympus Optimus Orion Panasonic Penney 20000, 20089 21972 21972 20739...
- Page 52 Philco Philips Pilot Pioneer Polk Audio Presidian Proscan Quasar RadioShack Radix Randex Realistic ReplayTV Ricavision Samsung Sansui Scott Sears Sharp Sonic Blue Sony Stack 9 Sylvania Symphonic Systemax Tagar Systems Tashiko Teac Technics Teknika Thomas Tivo Toshiba Totevision Touch 20035 20739, 20035, 20081, 20618 20037 20067, 21337...
-
Page 53: Setup Codes For Video Accessories
Vector Video Concepts Videomagic Viewsonic Villain Voodoo Wards XR-1000 Zenith ZT Group Setup Codes for Video Accessories Alienware Amino AT&T Buffalo CyberPower D-Link Gateway Hewlett Packard Howard Computers Hush iBUYPOWER KoolConnect Linksys Media Center PC Microsoft Mind Motorola Niveus Media Northgate Ricavision Roku... - Page 54 Systemax Tagar Systems Toshiba Touch Viewsonic Voodoo Xbox ZT Group 01272 01272 01272 01272 01272 01272 02049 01272 www.urcsupport.com...
- Page 55 NOTES www.urcsupport.com...
- Page 56 M2056-C Revision 1.0...