Uniden ATLANTIS 250 Owner's Manual
Two-way vhf uniden marine radio
Hide thumbs
Also See for ATLANTIS 250:
- Owner's manual (28 pages) ,
- Manual d'utilisation (36 pages) ,
- Manual del usuario (36 pages)
Table of Contents
Advertisement
Advertisement
Table of Contents

Related Manuals for Uniden ATLANTIS 250


Summary of Contents for Uniden ATLANTIS 250
- Page 2 www.uniden.com...
-
Page 3: Table Of Contents
Controls and Indicators... 2 Warning! ... 4 Introduction ... 5 Features ... 5 Technical Support and Service ... 6 Maritime Radio Services Operation ... 6 Included in Your Package ... 7 Getting Started ... 8 Mounting the Cradle ... 8 Attaching the Antenna ... -
Page 4: Controls And Indicators
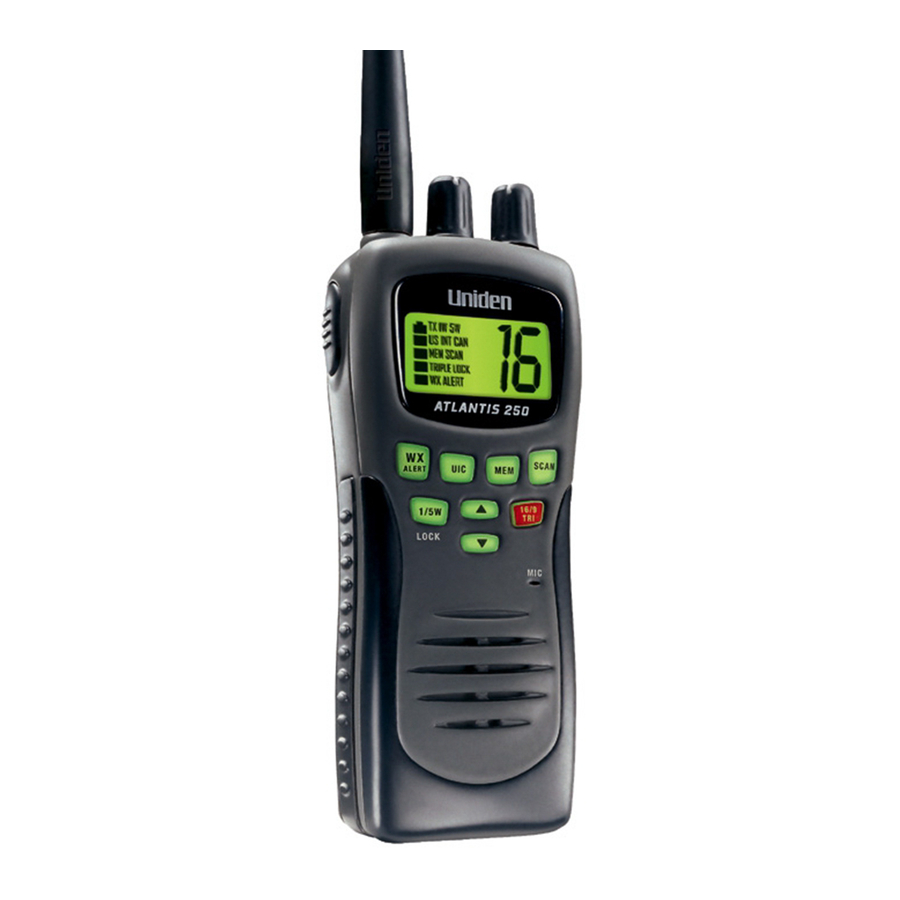
Controls and Indicators Antenna Belt Clip Adapter Jack Battery Battery Release Clip PTT (Push to Talk) Key USA/International/Canadian Button (UIC) WX Mode/Weather Alert Button (WX/ALERT) TX Power/Lock Button (1/5W/LOCK) Microphone Speaker MIC (Optional) Jack Volume/Power Knob (VOL) Squelch Knob (SQ) LCD Display Memory Button (MEM) Scan Button (SCAN) -
Page 5: Lcd Display
LCD Display Transmit Indicator TX Power Indicator USA/International/Canadian (US/INT/CAN) Indicator Channel Number Display Memory Indicator Scan Indicator G Battery Indicator Triple Watch Indicator Weather Mode Indicator Weather Alert Indicator Key Lock Indicator... -
Page 6: Warning
• The ATLANTIS 250 is waterproof only when both the antenna and the battery are properly attached. • Do not operate the transmitter of any radio equipment unless all the Radio Frequency (RF) connectors are secure and any open connectors are properly terminated. -
Page 7: Introduction
This handheld VHF marine radio will give you consistent, outstanding performance in virtually all conditions and situations. To ensure that you get the most from the ATLANTIS 250’s features, please read this operating guide carefully before using the unit. -
Page 8: Technical Support And Service
Be sure that a qualified technician services your radio equipment. Caution: Changes or modifications to this product not expressly approved by Uniden, or operation of this product in any way other than as detailed by this Operating Guide, can void your authority to operate this product. -
Page 9: Included In Your Package
Included in Your Package ATLANTIS 250 DC Adapter Beltclip Reference Guide/ Printed Material If any of these items are missing from the box, contact your Uniden Dealer or the Uniden Parts Department at (800)-554-3988. AC Adapter (AD-0003) Cradle Rechargeable Battery... -
Page 10: Getting Started
Mounting the Cradle Mount the Cradle to either a counter or wall. To counter: Attach the Cradle using the mounting screws and washers as follows. To wall: Apply the Cradle to the wall and insert the two mounting screws into the larger holes of the Cradle Push down the Cradle until it is firmly seated. -
Page 11: Using The Alkaline Battery Case
Using the Alkaline Battery Case When needed, you can use the battery case with Alkaline AA batteries (not included) instead of the rechargeable battery pack. To install the batteries: Remove the battery case cover by pulling the 2 halves apart applying your fingers to the projections. -
Page 12: Charging The Battery Pack
Charging the Battery Pack Your marine radio is powered by a specially designed Ni-MH battery pack. • Before operating the ATLANTIS 250, charge the Ni-MH battery pack for 16 hours without interruption with the Adapter. Place the ATLANTIS 250 in the Cradle. -
Page 13: Operation
• See “Controls and Indicators” (page 2) for button, knob, and key positions. • When you turn On your ATLANTIS 250 just after purchasing, it is automatically tuned to channel 16, the United States Coast Guard frequency for distress, safety, and calling. -
Page 14: Selecting A Channel
Selecting a Channel Turn On your ATLANTIS 250. To select a higher channel, press the L button. To select a lower channel, press the M button. • To change the channel continuously, press and hold the L or M button for more than 1 second. -
Page 15: Triple Watch
Triple Watch Triple Watch mode monitors channels 16 and 9 for a signal while you listen to the currently selected channel. The marine radio checks channel 16 and 9 for activity every 2 seconds. To select Triple Watch mode, press and hold the 16/9/TRI button for 2 seconds. -
Page 16: Monitoring Weather Channels
Monitoring Weather Channels The ATLANTIS 250 has 10 preprogrammed emergency/weather channel frequencies, represented by 0 through 9. To listen to the emergency/weather channels in your area, press the WX/ALERT button. WX appears on the display. To move up, press the L button. -
Page 17: Emergency/Weather Alert
Emergency/Weather Alert Emergency/Weather Alert allows your ATLANTIS 250 to function as a severe weather warning radio and will also alert you to any local or national emergencies. If the NOAA issues warning while this feature is turned On, the radio sounds an alert tone. You will then hear the emergency/weather broadcast. -
Page 18: Usa, International And Canadian Channels
USA, International and Canadian Channels The ATLANTIS 250 is initially set for USA marine channels when you turn On your radio. To listen to international marine channels, press the UIC button once. INT appears on the display. To listen to Canadian marine channels, press the UIC button again. -
Page 19: Deleting A Channel From Memory
Deleting a Channel from Memory Select the channel to delete from memory by pressing the L or M button. Press the MEM button. MEM disappears from the display. Scanning To begin scanning the programmed channels, press the SCAN button. SCAN and TRIPLE appear on the display. -
Page 20: Transmitting
Transmitting Transmission power can be set to either 5W or 1W. Press the 1/5W/LOCK button to make the change, then the 5W or the 1W indicator on the display changes accordingly. To transmit, press and hold the PTT (push-to-talk) key. TX appears on the display. -
Page 21: Battery Indicator
Battery Indicator When the unit is On, battery power is always indicated on the display. When the battery is fully charged, the battery indicator appears as follows: When the battery is nearly discharged, the battery indicator appears as follows: • When the battery indicator drops to the blinking 1-mark level on the display, the radio will receive but will not transmit. -
Page 22: Marine Channels - Usa
Marine Channels - USA Channel Frequency (MHz) Desig Transmit Receive — 163.275 — 162.550 — 162.400 — 162.475 — 162.425 — 162.450 — 162.500 — 162.525 — 161.650 — 161.775 156.050 156.050 Com’l, Port Ops, VTS 156.150 156.150 Com’l, Port Ops, VTS 156.250 156.250 156.300 156.300 156.350 156.350... - Page 23 Channel Frequency (MHz) Desig Transmit Receive 157.200 161.800 157.250 161.850 157.300 161.900 157.350 161.950 157.400 162.000 156.075 156.075 156.175 156.175 156.225 156.225 156.275 156.275 156.325 156.325 156.375 156.375 156.425 156.425 156.475 156.475 RX Only 156.525 156.575 156.575 156.625 156.625 156.675 156.675 156.725 156.725 156.775 156.775 156.825 156.825...
-
Page 24: Marine Channels - International
Marine Channels - International Channel Frequency (MHz) Desig Transmit Receive — 163.275 — 162.550 — 162.400 — 162.475 — 162.425 — 162.450 — 162.500 — 162.525 — 161.650 — 161.775 156.050 160.650 156.100 160.700 156.150 160.750 156.200 160.800 156.250 160.850 156.300 156.300 156.350 160.950 156.400 156.400... - Page 25 Channel Frequency (MHz) Desig Transmit Receive 157.200 161.800 157.250 161.850 157.300 161.900 157.350 161.950 157.400 162.000 156.025 160.625 156.075 160.675 156.125 160.725 156.175 160.775 156.225 160.825 156.275 160.875 156.325 160.925 156.375 156.375 156.425 156.425 156.475 156.475 RX Only 156.525 156.575 156.575 156.625 156.625 156.675 156.675 156.725 156.725...
-
Page 26: Marine Channels - Canada
Marine Channels - Canada Channel Frequency (MHz) Desig Transmit Receive — 163.275 — 162.550 — 162.400 — 162.475 — 162.425 — 162.450 — 162.500 — 162.525 — 161.650 — 161.775 156.050 160.650 156.100 160.700 156.150 160.750 156.200 156.200 156.250 156.250 156.300 156.300 156.350 156.350 156.400 156.400... - Page 27 Channel Frequency (MHz) Desig Transmit Receive 157.200 161.800 157.250 161.850 157.300 161.900 157.350 161.950 157.400 162.000 156.025 160.625 156.075 156.075 156.125 156.125 156.225 156.225 156.275 156.275 156.325 156.325 156.375 156.375 156.425 156.425 156.475 156.475 RX Only 156.525 156.575 156.575 156.625 156.625 156.675 156.675 156.725 156.725 156.775 156.775...
-
Page 28: Optional Parts And Replacement Accessories
Optional Parts and Replacement Accessories AC Adapter Mounting Screws Antenna Wrist Strap (AD-0003) (HH9408) Ni-MH Battery Cradle Reference Guide DC Adapter (BP 250) Beltclip Alkaline Battery Case Uniden Parts Department (800)-554-3988 We can also be reached on the web at www.uniden.com... -
Page 29: Specifications
General Channels Transmit and Receive Weather Freq. Control Freq. Tol. Transmit Receive Oper. Temp. Antenna Microphone Display Speaker Power Source Size (without antenna) Weight (w/battery & antenna) Transmitter Frequency Range Frequency Stability Power Output Spurious Emissions Current Drain Receiver Receiver Type Frequency Range Sensitivity Squelch Sensitivity... -
Page 30: Troubleshooting
Troubleshooting Not enough range Cause: Line of sight blocked ⇒ Increase antenna height. Will not transmit on 5 watt range but will transmit on the 1 watt range. Cause: Low voltage ⇒ Recharge or replace the batteries. Will not transmit while charging. Cause: Low voltage ⇒... -
Page 31: Fcc Rf Exposure Information
For more information about RF exposure, please visit the FCC website at www.fcc.gov. • When using an external speaker microphone, USE ONLY THE UNIDEN MODEL HHVTA07 (black) or HHVTAW07 (white). Use of any other accessory for this purpose may invalidate your authority to operate this device. -
Page 32: Three-Year Limited Warranty
Product excluding Ni-MH battery pack to be free from defects in materials and craftsmanship with only the limitations or exclusions set out below. Uniden warrants for 12 months, to the original retail owner, the Ni-MH battery pack to be free from defects in material and craftmanship with only the limitations or exclusions set out below. - Page 33 MEMO...
- Page 34 MEMO...
- Page 35 MEMO...
- Page 36 2003 UTZZ01899ZD (0)