Troy-Bilt BRONCO 12209 Owner's Manual
Troy-bilt rear-tine tillers owner's manual
Hide thumbs
Also See for BRONCO 12209:
- Owner's manual (37 pages) ,
- Owner's manual (36 pages) ,
- Owner's manual (32 pages)
Table of Contents
Advertisement
SAFETY FIRST!
Before operating this equipment, read this
Owner's Manual and the separate manual
supplied by the engine manufacturer.
Models
12227 – 3.75HP TUFFY
12209 – 5.5 HP BRONCO
12210 – 6.5 HP Super BRONCO
®
TM
TM
OWNER'S MANUAL
Rear-Tine Tillers
Safety
•
Assembly
•
Controls
•
Operation
•
Maintenance
•
Parts List
•
Model
12227
Model
12210
GARDEN WAY INCORPORATED
$ 4.50
Model
12209
Advertisement
Table of Contents

Related Manuals for Troy-Bilt BRONCO 12209


Summary of Contents for Troy-Bilt BRONCO 12209
-
Page 1: Parts List
SAFETY FIRST! Before operating this equipment, read this Owner's Manual and the separate manual supplied by the engine manufacturer. Models 12227 – 3.75HP TUFFY 12209 – 5.5 HP BRONCO 12210 – 6.5 HP Super BRONCO OWNER’S MANUAL Rear-Tine Tillers Safety •... -
Page 2: Table Of Contents
SECTION 2: ASSEMBLY ... Attach Handlebar ... Move Tiller Off Shipping Platform ... Install Forward Clutch Cable ... Install Reverse Clutch Cable (Models 12209/12210) .. Check Level of Transmission Gear Oil ... Add Motor Oil to Engine ... Check Hardware for Tightness... -
Page 3: Section 1: Safety
Fill fuel tank outdoors with extreme care. Never fill fuel tank indoors. Use a funnel or spout to prevent spillage. Reverse Clutch Control (Models 12209/12210) Depth Regulator Tine Hood Flap Standard-Rotating- Tines (SRT) Wheel Drive Pin (on each wheel) e. -
Page 4: Maintenance And Storage
25. Please remember: You can always stop the tines and wheels by releasing the Forward Clutch Bail or on Models 12209 and 12210 the Reverse Clutch control, (whichever control is engaged), or by moving the ignition switch and/or throttle control lever on the engine to “OFF”... -
Page 5: Safety Decals
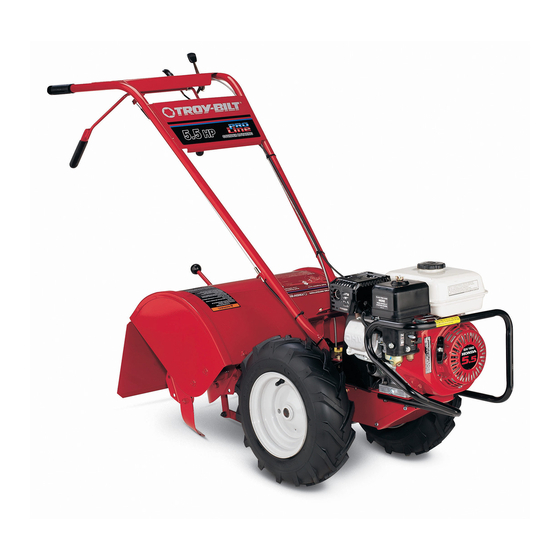
Figure 1-2: Location of safety and operating decals (5.5HP Model shown). REVERSE CHOKE CHOKE LEVER DIRECTION TILLER DIRECTION WARNING TO AVOID SERIOUS INJURY: Section 1: Safety Reverse Clutch Control Operating Instruction (Models 12209/12210) Warning Messages Hot Surfaces Warning (on belt cover) ROTATING TINES BAIL BAIL DISENGAGED ENGAGED... -
Page 6: Section 2: Assembly
(2) 7/16" open-end wrench* (2) 1/2" open-end wrench* (2) 9/16" open-end wrench* (1) Large adjustable wrench (Models 12209/12210 only) (1) Scissors (to trim plastic ties) (1) Ruler (for belt tension check) (1) Block of wood (to support tiller when removing wheels) -
Page 7: Install Forward Clutch Cable
Fig. 2-2: Attach handlebar (5.5HP Model shown). 2. Remove the hairpin cotter (L, Fig. 2-3) and wheel drive pin (M) from the wheel hub (O) and wheel shaft (N). 3. Slide the wheel fully inward on the wheel shaft (N, Fig. 2-3). Reinstall the wheel drive pin (M) through the wheel shaft only (not through the wheel hub). -
Page 8: Install Reverse Clutch Cable (Models 12209/12210)
Fig. 2-7: To check forward belt tension, take two measurements of the length of the coils in the spring – first with the bail open, then with the bail held against the handlebar. STEP 5: INSTALL REVERSE CLUTCH CABLE (MODELS 12209 AND 12210 ONLY) 1. Unwrap the reverse clutch cable (CC, Fig. -
Page 9: Check Level Of Transmission Gear Oil
STEP 6: CHECK LEVEL OF TRANSMISSION GEAR OIL The transmission was filled with gear oil at the factory. However, you should check the gear oil level at this time to make cer- tain it is correct. IMPORTANT: Do not operate the tiller if the gear oil level is low. -
Page 10: Section 3: Features & Controls
Figure 3-1: Tiller features and controls (5.5HP Model shown). See separate Engine Owner’s Manual to identify engine controls. Forward Clutch Bail (all models) or the Reverse Clutch Control (Models 12209 and 12210) is engaged. Use the FREEWHEEL mode only when the engine is not running. -
Page 11: Forward Clutch Bail
(stop) the wheels and tines (the engine will continue to run). Figure 3-4: All models have a Forward Clutch Bail (E). Only Models 12209/12210 have a Reverse Clutch Control (F). DEPTH REGULATOR LEVER This lever (G, Figure 3-5) controls the tilling depth of the tines. -
Page 12: Section 4: Operation
• Before starting engine, put Forward Clutch Bail (all models) and Reverse Clutch Control (Models 12209/12210 only) in neutral (disengaged) positions by releasing levers. • Never run engine indoors or in enclosed, poorly ventilated areas. -
Page 13: Operating The Tiller
Stopping the Engine and Tiller 1. To stop the wheels and tines, release the Forward Clutch Bail (all models) or the Reverse Clutch Control (Models 12209 and 12210) – whichever control is in use. 2. To stop the engine, put the ignition switch and/or the throttle control lever in the “OFF”... -
Page 14: Tilling Tips & Techniques
Section 4: Operation TILLING TIPS & TECHNIQUES Tilling Depths WARNING Before tilling, contact your tele- phone or utilities company and inquire if underground equipment or lines are used on your property. Do not till near buried electric cables, telephone lines, pipes or hoses •... - Page 15 TILLING TIPS & TECHNIQUES (cont.) Power Composting Power composting simply means tilling under and burying in the soil all manner of organic matter such as crop residues, leaves, grass clippings and cover crops. This material will decompose during the non-growing season and add important natural nutri- ents to the soil.
-
Page 16: Loading And Unloading The Tiller
Section 4: Operation TILLING TIPS & TECHNIQUES (cont.) Terrace Gardening (continued) • To create a terrace, start at the top of the slope and work down. Go back and forth across the first row as shown in Fig. 4-10. • Each succeeding lower terrace is started by walking below the terrace you’re preparing. -
Page 17: Section 5: Maintenance
Section WARNING Before inspecting, cleaning servicing the machine, shut off engine, wait for all moving parts to come to a complete stop, disconnect spark plug wire and move wire away from spark plug. Remove ignition key on electric start models. Failure to follow these instructions can result in serious personal injury or prop- erty damage. -
Page 18: Bolo Tines
Section 5: Maintenance WARNING Before inspecting, cleaning or servicing the machine, shut off engine, wait for all moving parts to come to a complete stop, disconnect spark plug wire and move wire away from spark plug. Failure to follow these instructions can result in serious personal injury or property damage. 4. -
Page 19: Checking And Adjusting Forward Drive Belt Tension
WARNING Before inspecting, cleaning or servicing the machine, shut off engine, wait for all moving parts to come to a complete stop, disconnect spark plug wire and move wire away from spark plug. Failure to follow these instructions can result in serious personal injury or property damage. Figure 5-3: Install tines so that cutting edge of tines enter soil first when tiller moves forward. -
Page 20: Forward Clutch Bail Adjustment
Service Department or your authorized dealer for service advice. CHECKING AND ADJUSTING REVERSE DRIVE BELT TENSION (Models 12209/12210 only) It is important to maintain correct tension on the reverse drive belt. A loose belt will cause the tines and wheels to slow down –... -
Page 21: Spark Plug Service
WARNING Before inspecting, cleaning or servicing the machine, shut off engine, wait for all moving parts to come to a complete stop, disconnect spark plug wire and move wire away from spark plug. Failure to follow these instructions can result in serious personal injury or property damage. 3. -
Page 22: Troubleshooting
Section 5: Maintenance WARNING Before inspecting, cleaning or servicing the machine, shut off engine, wait for all moving parts to come to a complete stop, disconnect spark plug wire and move wire away from spark plug. Failure to follow these instructions can result in serious personal injury or property damage. Before performing any troubleshooting procedures, refer to the appropriate safety, operating or maintenance instructions in this Manual or in the Engine Owner’s Manual. -
Page 23: Parts List
Models 12209, 12210 and 12227 REF. PART DESCRIPTION 9552 Hex Hd. Flange Screw, Self-Tapping, 1/4-20 x 1/2 ... 1917536 Decal, Hood ... 1904572 Tine Hood (Incl. tine flap and Ref. 3) (A) ... 1917594 Tine Hood (Incl. tine flap and Ref. - Page 24 Parts List Models 12209, 12210 and 12227 DRAWING NO. 2...
- Page 25 Models 12209, 12210 and 12227 REF. PART DESCRIPTION 55104 Upper Handlebar (Incl. Ref. 2) (A) ... 1916996 Upper Handlebar (Incl. Refs. 2 & 28) (B)(C) ... 1916928 Decal, Forward Clutch Bail ... 1100799 Hex Hd. Screw, 5/16-18 x 1-1/2 ...
- Page 26 Shim, 0.010" thick ... A/R 1166-5 Shim, 0.005" thick ... A/R 1086 Bronze Bushing ... (A) For Model 12227 (B) For Model 12209 (C) For Model 12210 Models 12209, 12210 and 12227 DRAWING NO. 4 REF. PART QTY. DESCRIPTION 55004 Wheel Shaft (A) ...
- Page 27 Models 12209, 12210 and 12227 REF. PART DESCRIPTION 9727 Plug, Transmission Oil Fill ... 1186328 Hex Hd. Flange Screw, 5/16-18 x 5/8, Grade 5 ... 1916641001 Front Cover, Transmission ... 50074 Rear Cover, Transmission... 50032 Gasket, Housing Cover... 9617 Oil Seal, Drive Shaft ...
- Page 28 Parts List 15, 47 Forward Clutch Cable DRAWING NO. 6 Reverse Clutch Cable Models 12209, 12210 and 12227...
- Page 29 Models 12209, 12210 and 12227 REF. PART DESCRIPTION Engine, Recoil Start... 1917326001 Bracket, Belt Cover... 1100242 Lock Washer, 5/16 (A) ... Lock Washer, 5/16 (B)(C) ... 1111696 Hex Hd. Screw, 5/16-24 x 1/2 (A) ... Hex Hd. Screw, 5/16-24 x 1/2 (B)(C) ..
- Page 30 Hold Tine With Blunt End Toward You Right Hand Tine Left Hand Tine NOTE: Identify Left and Right sides of tiller by standing in operator position and facing direction of forward travel. Models 12209, 12210 and 12227 DRAWING NO. 7 RIGHT SIDE...
- Page 31 Models 12209, 12210 and 12227 REF. PART DESCRIPTION 9711 Hex Hd. Screw, 3/8-16 x 1, Grade 5 ... 16 50049-01 Bolo Tine - Right Hand. Single tine used on left side of tiller. (Incl. two each Refs. 1 & 3) ...
-
Page 32: Customer Service Information
CUSTOMER SERVICE INFORMATION Owner Registration Card Please fill out and mail the enclosed owner registration card. The purpose of this card is to register each unit at the factory so that we can provide you with warranty benefits and informational bulletins. Warranty Service The warranty statement is included in the unit’s literature package.