Table of Contents
Advertisement
Available languages
Available languages
Quick Links
Advertisement
Chapters
Table of Contents

Related Manuals for Philips FR740/00


Summary of Contents for Philips FR740/00
- Page 1 FR740 Surround sound receiver FR760 MX740...
- Page 2 DICHIARAZIONE DI CONFORMITA’ Si dichiara che gli apparecchi FR 740, FR 760 e MX 740 Philips rispondono alle prescrizioni dell’art. 2 comma 1 del D. M. 28 Agosto 1995 n. 548. Fatto a Eindhoven, il 01/02/2000 (FR 740, MX 740)
- Page 3 English ...4 Français...24 Español ...44 Deutsch...64 Nederlands ...84 Italiano...104...
-
Page 4: Table Of Contents
Please observe the local regulations regarding the disposal of packing materials, exhausted batteries and old equipment. As an ENERGY STAR ® partner, Philips has determined that this product meets the ENERGY STAR ® guidelines for energy efficiency. Trademark acknowledgment “DOLBY”, “DOLBY DIGITAL”, “PRO LOGIC”... -
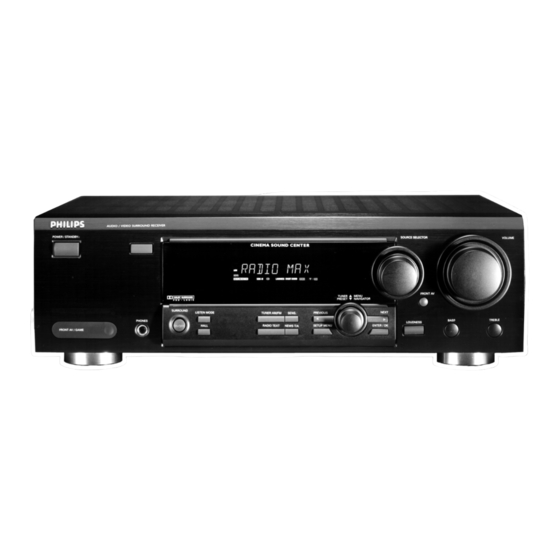
Page 5: Controls
CIN EM A ST AN DB PO WE R / 1 POWER / STANDBY...Switches the receiver on and off. 2 CINEMA LINK ...Switches the system control bus between the receiver and the TV on and off. 3 ...Sensor for the infrared remote control. -
Page 6: Remote Control
REMOTE CONTROL Remote control usage Open the battery compartment of the remote control and insert 2 alkaline batteries, type AA (R06, UM-3). Remove batteries if they are flat or if the remote control is not going to be used for a long time. Batteries contain chemical substances, so they should be disposed of properly. -
Page 7: Remote Control Buttons
Remote control buttons 2 ...Switches the receiver to standby. TUNER, CD, CDR/TAPE, TV, VCR, DVD/6CH...Switches the remote control to the commands of the different products. Selects the sources if pressed longer than 1 second. 1–0...Keys in numbers for tracks, stations or frequencies. -
Page 8: Connectors
Input of a TV when it is used as the center speaker (only possible when the CINEMA LINK system bus is connected). System control bus sockets of a Philips TV with CINEMA LINK. Supplies same voltage as mains. Up to 100 W total permitted load. -
Page 9: Connections
CAUTION RISK OF ELECTRIC SHOCK DO NOT OPEN RISQUE DE CHOC AVIS ELECTRIQUE Designed and developed by Philips in the European Community Manufactured under licence from Dolby Laboratories Licencing Corporation. "DOLBY", "PRO-LOGIC" and the Double-D Symbol are Trademarks of Dolby... -
Page 10: System Control Bus, Cinema Link
WOOFER VIDEO OUT VIDEO IN If the receiver and your Philips TV (or even better in addition a Philips VCR or DVD player) with Cinemalink are connected with the CINEMA LINK system bus control, some extra system benefits are offered: –... -
Page 11: Mains
– Right surround speaker to SURROUND R (grey and black) TV as the center speaker You may use your Philips TV with CINEMA LINK as the center speaker. For TVs with a scart connector an additional audio cinch-to-scart cable is needed. For TV’s with cinch connectors additional cinch cables are needed. -
Page 12: System Setup
SYSTEM SETUP CENTER LEFT SURROUND (REAR) RIGHT LEFT Positioning of the speakers General hints for positioning Avoid positioning the speakers in a corner or on the floor as this will boost the bass tones too much. Placing the speakers behind curtains, furniture, etc. will reduce the treble response. The listener should always be able to ”see”... -
Page 13: Display
Display The display of the receiver is divided into 3 sections, which are to be used for the following: Menu indication These signs show you if the menu is on or off and indicate in which direction you may move..Menu is on. -
Page 14: Menus
MENUS Receiver menu The receiver is equipped with a menu system. The menu is used for the setup of the receiver. The different menu options are related to each other in a logical way. Let’s assume you have no center speaker connected, and therefore switched CENTER LS to NO. -
Page 15: Tv Menu
TV menu If the receiver is connected to a Philips CINEMA LINK TV via the CINEMA LINK system control bus sockets (see “CONNECTIONS”), you may use the TV to set up the system. An option called RECEIVER will be added to the TV menu. -
Page 16: Source Selection
SOURCE SELECTION SOURCE SELECTOR When selecting a source by turning SOURCE SELECTOR, the audio inputs – and video inputs (FR 760 only) – with the corresponding name are activated. The incoming signal is reproduced by all audio and – if the source includes a video signal –... -
Page 17: Playback, Recording
Playing a source 1 Press POWER / STANDBY to switch on the receiver. 2 Turn SOURCE SELECTOR to select a source. The name of the source is displayed. • You can select the FRONT AV/GAME input by pressing FRONT AV (FR 760 only). 3 Start playback of the source as usual. -
Page 18: Surround Sound
SURROUND SOUND About surround sound Surround sound gives you a complete new listening sensation. You will have the feeling of being in the middle of the action, because sound is coming from everywhere around you. Look out for TV broadcasts, audio and video tapes and discs with the 3 or 1 marks which are encoded for multichannel surround sound. -
Page 19: Tuner
Tuning to radio stations You can search for radio stations by scanning the frequency band. You can also key in the frequency of a known radio station. If an FM station is being broadcast and received in stereo, = is shown. Searching for radio stations 1 Turn SOURCE SELECTOR to select the tuner. -
Page 20: Tuning To Stored Radio Stations
TUNER Tuning to stored radio stations 1 Turn SOURCE SELECTOR to TUNER to select the tuner. TUNER is displayed. 2 Turn TUNER PRESET X to select a preset radio station. , the preset number and station are displayed. PRESET Resorting stored radio stations After programming radio stations, you might want to change their sequence. -
Page 21: Rds R
RDS R Radio Data System is a service that allows FM stations to send additional information. If you are receiving an RDS station, R and the station name are displayed. Switching through different RDS information • Press RADIO TEXT on the receiver repeatedly to switch through the following information (if available): –... -
Page 22: Technical Data
TECHNICAL DATA Receiver Subject to modification without notice. General Power consumption (FR 740, MX 740) ...210 W Power consumption (FR 760) ...255 W Standby power consumption ...< 2 W Dimensions, w h d ...435 135 350 mm Weight (FR 740, MX 740) ...8.6 kg Weight (FR 760) ...9.4 kg Amplifier part (0.7 % THD, 6 , 1 kHz) Output power, stereo mode (FR 740, MX 740) (DIN)...2 60 W... -
Page 23: Warning
WARNING Under no circumstances should you try to repair anything by yourself, as this will invalidate the guarantee. Do not open the set as there is a risk of electric shock. PROBLEM POSSIBLE CAUSE No sound VOLUME is not correctly adjusted. Headphones are connected. -
Page 24: Généralités Produits Livrés Avec L'équipement
En tant que partenaire d´ENERGY STAR ® , Philips a déterminé que ce produit répond aux lignes directrices ® d´ENERGY STAR én matière de rendement énergétique. -
Page 25: Commandes
CIN EM A ST AN DB PO WE R / 1 POWER / STANDBY...Bouton de marche/arrêt de l‘équipement. 2 CINEMA LINK ...Mise en/hors service bus de commande système entre l‘équipement et le téléviseur. 3 ...Capteur pour télécommande infrarouges. 4 ...Affichage 5 SOURCE SELECTOR ...Sélectionne les différents connecteurs audio et vidéo. -
Page 26: Télécommande
TELECOMMANDE Utilisation de la télécommande Ouvrez le compartiment piles de la télécommande et insérez 2 piles alcaline, type AA (R06, UM-3). Retirez les piles si elles sont à plat ou si la télécommande ne sera pas utilisée pendant une période prolongée. Les piles contiennent des substances chimiques, donc elles devront être mises proprement au rebut. -
Page 27: Boutons De La Télécommande
Boutons de la télécommande 2 ...Pour mettre l‘équipement en mode de veille. TUNER, CD, CDR/TAPE, TV, VCR, DVD/6CH...Pour solliciter la télécommande au niveau des divers produits. Sélectionne les sources s’il est enfoncé plus d´1 seconde. 1–0...Boutons référencés pour pistes, stations ou fréquences. Les numéros sont composés de deux chiffres à... -
Page 28: Connecteurs
Entrée d‘un téléviseur utilisé comme enceinte central (uniquement possible lorsque le bus de système CINEMA LINK a été connecté). Douille de commande système d‘un téléviseur Philips avec CINEMA LINK. Alimente la même tension que le secteur. Charge totale utilisée jusqu‘à 100 W. -
Page 29: Connexions
CAUTION RISK OF ELECTRIC SHOCK DO NOT OPEN RISQUE DE CHOC AVIS ELECTRIQUE Designed and developed by Philips in the European Community Manufactured under licence from Dolby Laboratories Licencing Corporation. "DOLBY", "PRO-LOGIC" and the Double-D Symbol are Trademarks of Dolby... -
Page 30: Bus De Commande Système, Cinema Link
WOOFER VIDEO OUT VIDEO IN Si le récepteur et votre téléviseur Philips (et mieux encore si à cela s’ajoute un magnétoscope ou un lecteur DVD Philips) sont reliés, par un Cinemalink, à la commande du bus système CINEMA LINK, le système offre certains avantages supplémentaires :... -
Page 31: Secteur
– L‘enceinte surround gauche à SURROUND L (gris et noir) – L‘enceinte surround droite à SURROUND R (gris et noir) Téléviseur faisant fonction d‘enceinte centrale Vous pouvez utiliser votre téléviseur Philips avec CINEMA LINK comme enceinte centrale. Pour les téléviseurs équipés d‘un connecteur scart, un câble cinch-to-scart audio supplémentaire est requis. -
Page 32: Installation Du Système
INSTALLATION DU SYSTEME CENTER LEFT SURROUND (REAR) RIGHT LEFT Positionnement des enceintes Conseils de positionnement généraux Evitez de placer les enceintes dans un coin ou à même le sol, car cela amplifierait trop les basses. Le fait de placer les enceintes derrière les rideaux, des meubles, etc. -
Page 33: Affichage
Affichage L‘affichage du récepteur est divisé en 3 sections, qui seront utilisées pour ce qui suit : Indication de menu Ces signes vous montrent que le menu a été sollicité ou non et indiquent la direction dans laquelle vous pouvez vous déplacer. -
Page 34: Menus
MENUS Menu récepteur Le récepteur est équipé d‘un système de menu. Le menu sert à l‘installation du récepteur. Les diverses options de menu se rapportent l‘une à l‘autre d‘une façon logique. A supposer que vous n‘ayez pas d‘enceinte centrale et que CENTER LS (enceinte centrale) est réglée sur NO (non). -
Page 35: Menu Téléviseur
Menu téléviseur Si le récepteur est connecté à un téléviseur CINEMA LINK Philips par les douilles de système CINEMA LINK (voir « CONNEXIONS »), vous pouvez faire appel à votre téléviseur pour installer le système. Une option appelée RECEIVER sera ajoutée au menu du téléviseur. -
Page 36: Sélection De Source
SELECTION DE SOURCE SOURCE SELECTOR Lorsque vous sélectionnez une source en tournant au SOURCE SELECTOR, les entrées audio – et les entrées vidéo (uniquement pour FR 760) – de dénomination correspondante sont activées. Le signal d‘entrée est reproduit par toutes les sorties audio et –... -
Page 37: A Propos De La Lecture, Enregistrement
Lecture d‘une source 1 Appuyez sur POWER / STANDBY pour enclencher le récepteur. 2 Tournez à SOURCE SELECTOR pour sélectionner une source. Le nom de la source est affiché. • Vous pouvez sélectionner l‘entrée FRONT AV/GAME en appuyant sur FRONT AV (uniquement pour FR 760). 3 Démarrez la lecture de la source comme d‘habitude. -
Page 38: Son Surround
SON SURROUND A propos du son surround Le son surround vous donne une sensation d‘écoute toute nouvelle et complète. Vous aurez la sensation d‘être au centre de l‘action, car le son vient de tous les côtés autour de vous. Prêtez attention que des programmes de télévision, les bandes audio et vidéo ainsi que les disques avec 3 ou 1 soient codés pour le son surround multicanal. -
Page 39: Syntoniseur
Syntonisation des stations radio Vous pouvez rechercher les stations radio en balayant la fréquence. Il vous est également possible de choisir la fréquence d‘une station radio connue. Si une station FM est émise et reçue en stéréo, alors = est affichée. Recherche des stations radio 1 Tournez au SOURCE SELECTOR pour sélectionner le syntoniseur. -
Page 40: Syntonisation Des Stations Radio Mémorisées
SYNTONISEUR Syntonisation des stations radio mémorisées 1 Tournez SOURCE SELECTOR sur TUNER pour sélectionner le syntoniseur. TUNER est affiché. 2 Tournez à TUNER PRESET X pour sélectionner une station radio présélectionnée. , le numéro présélectionné et la station sont PRESET affichés. -
Page 41: Rds R
RDS R Radio Data System est un service qui permet aux stations FM d‘émettre des informations supplémentaires. Si vous recevez le signal d‘une station RDS, R et le nom de la station sont affichés. Passage en revue des différentes informations RDS •... -
Page 42: Caracteristiques Techniques
CARACTERISTIQUES TECHNIQUES Récepteur Sujet à modifications sans avis préalable. Généralités Consommation de puissance (FR 740, MX 740) ...210 W Consommation de puissance (FR 760)...255 W Consommation de puissance en veille...< 2 W Dimensions, l h p ...435 135 350 mm Poids (FR 740, MX 740)...8,6 kg Poids (FR 760)...9,4 kg Section amplificateur (0,7 % THD, 6 , 1 kHz) -
Page 43: Avertissement
AVERTISSEMENT Ne tentez jamais de réparer quoique ce soit vous- même, ceci annulerait votre garantie. N‘ouvrez pas l‘équipement au risque de chocs électriques. PROBLEME CAUSE POSSIBLE Pas de son Le VOLUME n‘est pas réglé correctement. Ecouteurs branchés. La source incorrecte a été sélectionnée. Aucun son n‘est audible Une des enceintes est mal branchée. -
Page 44: Información General Lista De Componentes
Observe las normas locales concernientes a la eliminación de los materiales de embalaje, pilas usadas y equipos desechables. Como socio de ENERGY STAR ® , Philips ha establecido que este producto cumple las directrices de ENERGY STAR ® sobre rendimiento energético. -
Page 45: Controles
CIN EM A ST AN DB PO WE R / 1 POWER / STANDBY...Enciende/apaga el receptor. 2 CINEMA LINK ...Activa/desactiva el sistema de control en bus entre el receptor y el televisor. 3 ...Detector para el mando a distancia de infrarrojos. 4 ...Pantalla 5 SOURCE SELECTOR ...Selecciona los diversos conectores de audio y vídeo. -
Page 46: Mando A Distancia
MANDO A DISTANCIA Utilización del mando a distancia Abra el compartimento de las pilas del mando a distancia e introduzca 2 pilas alcalinas, tipo AA (R06, UM-3). Si las pilas están desgastadas o no va a utilizar el mando a distancia durante un largo período, extráigalas del compartimento. -
Page 47: Botones Del Mando A Distancia
Botones del mando a distancia 2 ...Pone el receptor en el modo de espera. TUNER, CD, CDR/TAPE, TV, VCR, DVD/6CH...Cambia en el mando a distancia las órdenes para manejar cada uno de los aparatos. Selecciona los orígenes si se pulsa durante más de 1 segundo. 1–0...Para teclear los números de las pistas, emisoras o frecuencias. -
Page 48: Conectores
(es posible sólo cuando se tiene conectado un sistema en bus CINEMA LINK). Para salidas del Sistema de control en bus de un televisor Philips con CINEMA LINK. Aplica el mismo voltaje que el de la red de alimentación. Se permite una carga de hasta 100 W en total. -
Page 49: Conexiones De Audio
CAUTION RISK OF ELECTRIC SHOCK DO NOT OPEN RISQUE DE CHOC AVIS ELECTRIQUE Designed and developed by Philips in the European Community Manufactured under licence from Dolby Laboratories Licencing Corporation. "DOLBY", "PRO-LOGIC" and the Double-D Symbol are Trademarks of Dolby... -
Page 50: Sistema De Control En Bus, Cinema Link
WOOFER VIDEO OUT VIDEO IN Si el receptor y la TV Philips (o incluso mejor, añadiendo un reproductor de vídeo o de DVD Philips) con Cinemalink están conectados con el control de barra del sistema CINEMA LINK, se ofrecen beneficios extras para el sistema: –... -
Page 51: Alimentación
– El altavoz envolvente derecho a SURROUND R (gris y negro) El TV como altavoz central Puede utilizar su televisor Philips con CINEMA LINK como un altavoz central. Para un televisor con una conexión tipo «scart» (de alfileres) se necesita un cable adicional de audio «cinch-to-scart». -
Page 52: Configuración Del Sistema
CONFIGURACIÓN DEL SISTEMA CENTER LEFT SURROUND (REAR) RIGHT LEFT Emplazamiento de los altavoces Indicaciones generales sobre el emplazamiento Evite la colocación de los altavoces en una esquina o en el suelo, ya que esto reforzará demasiado los tonos graves. La respuesta de los agudos disminuirá... -
Page 53: Pantalla
Pantalla La pantalla del receptor está dividida en 3 secciones que se utilizan para lo siguiente: Indicación de menú Estas señales muestran si el menú está activado o desactivado y la dirección que puede seguir..el menú está activado M M E E N N U U 1...puede moverse hacia atrás al tema del menú... -
Page 54: Menú Del Receptor
MENÚS Menú del receptor El receptor está equipado con un sistema de menú. El menú se utiliza para la configuración del receptor. Las diferentes opciones del menú están interrelacionadas unas con otras siguiendo una lógica. Supongamos que no tiene un altavoz central conectado, y por consiguiente CENTER LS (altavoz central) está... -
Page 55: Menú Del Tv
Menú del TV Si el receptor está conectado a un televisor Philips CINEMA LINK a través de un sistema de control de clavijas en bus CINEMA LINK (Vea «CONEXIONES»), se puede utilizar el televisor para configurar el sistema. Se añadirá al menú del televisor una opción llamada RECEIVER. -
Page 56: Selección De Fuente
SELECCIÓN DE FUENTE SOURCE SELECTOR Cuando seleccione una fuente dando vueltas a SOURCE SELECTOR, se activan las entradas de audio – y las entradas de vídeo (sólo con FR 760) – correspondientes a ese nombre. Todas las salidas de audio y vídeo (si la fuente incluye una señal de vídeo) del receptor, reproducen la señal de entrada. -
Page 57: Reproducción, Grabación
Reproducción de una fuente 1 Pulse POWER / STANDBY para encender el receptor. 2 Gire SOURCE SELECTOR para seleccionar la fuente. El nombre de la fuente aparece en pantalla. • Para seleccionar la entrada FRONT AV/GAME pulse FRONT AV (sólo con FR 760). 3 Inicie la reproducción normal de la fuente. -
Page 58: Acerca Del Sonido Envolvente
EL SONIDO ENVOLVENTE Acerca del sonido envolvente El sonido envolvente le ofrece una calidad de sonido innovadora. Le dará la sensación de hallarse en medio de la acción, ya que el sonido se reproduce a su alrededor. Procure utilizar programas de TV, cintas de vídeo o audio y discos con los símbolos 3 o 1 que estén codificados para el sonido envolvente multicanal. -
Page 59: Para Sintonizar Las Emisoras De Radio
Para sintonizar las emisoras de radio Se pueden buscar las emisoras de radio efectuando un barrido por la banda de frecuencias. También se puede teclear la frecuencia de una emisora conocida. Si se emite una emisora FM y se recibe en estéreo, aparece =. Búsqueda de emisoras de radio 1 Gire SOURCE SELECTOR para seleccionar el sintonizador. -
Page 60: Para Sintonizar Con Emisoras Almacenadas
SINTONIZADOR Para sintonizar con emisoras almacenadas 1 Gire SOURCE SELECTOR y elija TUNER para seleccionar el sintonizador. Aparece en pantalla TUNER. 2 Gire TUNER PRESET X para seleccionar la emisora preseleccionada. Aparecen en pantalla , el número de preselección PRESET y la emisora. -
Page 61: Rds R
RDS R Radio Data System es un servicio que permite a las emisoras de FM enviar información adicional. Si está sintonizando una emisora RDS, aparecen en pantalla R y el nombre de la emisora. Para visualizar los diferentes datos RDS •... -
Page 62: Receptor
DATOS TÉCNICOS Receptor Sujeto a modificaciones sin previo aviso. General Consumo de energía (FR 740, MX 740)...210 W Consumo de energía (FR 760)...255 W Consumo de energía en espera...< 2 W Dimensiones, anch. alt. profun..435 135 350 mm Peso (FR 740, MX 740)...8,6 kg Peso (FR 760)...9,4 kg Amplificador (0,7 % THD, 6 , 1 kHz) Energía de salida, modo estéreo (FR 740, MX 740) (DIN)...2 60 W... -
Page 63: Advertencia
ADVERTENCIA No trate de reparar el aparato Vd. mismo bajo ningún pretexto, ya que podría invalidar la garantía. No abra el aparato o podría sufrir una descarga eléctrica. PROBLEMA CAUSA POSIBLE No hay sonido VOLUME no está bien ajustado. Los auriculares están conectados. Se ha elegido una fuente equivocada. -
Page 64: Allgemeine Informationen Lieferumfang
Bitte informieren Sie sich darüber, wie Sie Verpackungsmaterialien, leere Batterien und alte Geräte entsprechend den örtlichen Bestimmungen entsorgen können. Als ein ENERGY STAR ® -Partner, hat Philips festgelegt, daß dieses Produkt den ENERGY STAR ® Richtlinien für Energie-Effizienz entspricht. Warenzeichen Anerkennung „DOLBY“, „DOLBY DIGITAL“, „PRO LOGIC“... -
Page 65: Bedienelemente
CIN EM A ST AN DB PO WE R / 1 POWER / STANDBY...Schaltet den Receiver ein und aus. 2 CINEMA LINK ...Schaltet den System Kontrollbus zwischen Receiver und TV ein und aus. 3 ...Sensor für die Infrarot Fernbedienung. 4 ...Anzeige 5 SOURCE SELECTOR ...Wählt die verschiedenen Audio- und Videoanschlüsse. -
Page 66: Verwendung Der Fernbedienung
FERNBEDIENUNG Verwendung der Fernbedienung Öffnen Sie das Batteriefach der Fernbedienung und legen Sie 2 Alkaline Batterien der Type AA (R06, UM-3) ein. Entfernen Sie die Batterien, wenn Sie leer sind oder die Fernbedienung für längere Zeit nicht verwendet wird. Entsorgungshinweis Bitte werfen Sie nur entladene Batterien in die Sammelboxen beim Handel oder den Kommunen. -
Page 67: Tasten Der Fernbedienung
Tasten der Fernbedienung 2 ...Schaltet den Receiver auf Bereitschaft. TUNER, CD, CDR/TAPE, TV, VCR, DVD/6CH ...Schaltet die Fernbedienung auf die Bedienelemente der verschiedenen Produkte. Wählt die Ausgangsgeräte, sofern länger als 1 Sekunde gedrückt wird. 1–0...Nummerntasten für Titel, Sender oder Frequenzen. Zwei- oder mehrstellige Nummern müssen innerhalb von 2 Sekunden eingegeben werden. -
Page 68: Anschlüsse
Mitgelieferte Drahtantenne oder Außenantenne. TV Eingang, wenn er als Center Lautsprecher verwendet wird (nur dann möglich, wenn der CINEMA LINK Systembus angeschlossen ist). System Kontrollbusbuchse eines Philips TVs mit CINEMA LINK. Liefert gleiche Spannung wie das Netz. Bis zu 100 W gesamtzulässige Belastung. -
Page 69: Audioanschlüsse
CAUTION RISK OF ELECTRIC SHOCK DO NOT OPEN RISQUE DE CHOC AVIS ELECTRIQUE Designed and developed by Philips in the European Community Manufactured under licence from Dolby Laboratories Licencing Corporation. "DOLBY", "PRO-LOGIC" and the Double-D Symbol are Trademarks of Dolby... -
Page 70: System Kontrollbus, Cinema Link
SUB- WOOFER VIDEO OUT VIDEO IN Falls der Receiver und Ihr Philips TV Gerät (oder noch besser zusätzlich ein Philips VCR oder DVD-Spieler) mit Cinemalink an den CINEMA LINK System Kontrollbus angeschlossen sind, werden einige zusätzliche Leistungen angeboten: – Beim Starten eines Ausgangsgerätes schaltet das System automatisch auf diesen Eingang. -
Page 71: Netzbetrieb
– Rechter Surround Lautsprecher mit SURROUND R (grau und schwarz) TV als Center Lautsprecher Sie können Ihren Philips TV mit CINEMA LINK als Center Lautsprecher verwenden. Für TVs mit einem Scart Anschluß wird ein zusätzliches Audio Cinch-an-Scart Kabel benötigt. Für TVs mit Cinch Anschlüssen werden zusätzliche Cinch Kabel... -
Page 72: Aufbau Der Anlage
AUFBAU DER ANLAGE CENTER LEFT SURROUND (REAR) RIGHT LEFT Positionierung der Lautsprecher Generelle Hinweise zur Positionierung Vermeiden Sie, die Lautsprecher in einer Ecke oder am Boden aufzustellen, da dies die Bässe zu sehr verstärken würde. Die Plazierung der Lautsprecher hinter Vorhängen, Möbeln etc. verringert die Wiedergabe der Höhen. -
Page 73: Anzeige
Anzeige Die Anzeige des Receivers ist in 3 Bereiche geteilt, die folgende Verwendung haben: Menü Anzeige Diese Zeichen zeigen Ihnen, ob das Menü an oder aus ist und geben an, in welche Richtung Sie gehen können..Menü ist an. M M E E N N U U 1...Durch Verwendung von 1 PREV. -
Page 74: Receiver Menü
MENÜS Receiver Menü Der Receiver ist mit einem Menüsystem ausgestattet. Das Menü wird zum Einstellen des Receivers verwendet. Die verschiedenen Menüoptionen sind miteinander auf logische Weise verbunden. Angenommen Sie haben den Center Lautsprecher nicht angeschlossen und deshalb CENTER LS (Center Lautsprecher) auf NO (nein) geschaltet. Wenn Sie nun versuchen VOL CENTER (Center Lautstärke) zu benützen, wird eine Nachricht, daß... -
Page 75: Tv-Menü
TV Menü Wenn der Receiver über die CINEMA LINK System Kontrollbusanschlüsse (siehe „ANSCHLÜSSE”) an ein Philips CINEMA LINK TV angeschlossen ist, können Sie den TV zum Einstellen des Systems verwenden. Eine Option namens RECEIVER wird dem TV-Menü hinzugefügt. Wenn CINEMA LINK aktiv ist, werden Einstellungen am Receiver für einige Sekunden am TV-Bildschirm gezeigt. -
Page 76: Wahl Eines Ausgangsgerätes
WAHL EINES AUSGANGSGERÄTES SOURCE SELECTOR Beim Wählen eines Ausgangsgerätes durch Drehen von SOURCE SELECTOR werden die Audioeingänge – und Videoeingänge (nur FR 760) – mit den entsprechenden Namen aktiviert. Das eingehende Signal wird von allen Audio- und – wenn das Ausgangsgerät ein Videosignal beinhaltet – Videoausgängen des Receivers reproduziert. -
Page 77: Wiedergabe, Aufnahme
Spielen eines Ausgangsgerätes 1 Drücken Sie POWER / STANDBY, um den Receiver einzuschalten. 2 Drehen Sie SOURCE SELECTOR, um ein Ausgangsgerät zu wählen. Der Name des Ausgangsgerätes wird angezeigt. • Durch Drücken von FRONT AV können Sie den FRONT AV/GAME Eingang wählen (nur FR 760). 3 Starten Sie die Wiedergabe des Ausgangsgerätes wie gewohnt. -
Page 78: Surround Sound
SURROUND SOUND Einige Worte zu Surround Sound Surround Sound offenbart Ihnen ein komplett neues Hörerlebnis. Sie werden das Gefühl haben, sich inmitten des Geschehens zu befinden, da der Klang von allen Seiten kommt. Achten Sie auf TV-Sendungen, Audio- und Videokassetten und -discs mit den 3 oder 1 Zeichen, welche für Mehrkanal-Surround Sound kodiert sind. -
Page 79: Einstellen Der Radiosender
Einstellen von Radiosendern Sie können durch Abtasten des Frequenzbandes nach Radiosendern suchen. Sie können auch die Frequenz eines Ihnen bekannten Radiosenders eingeben. Wenn ein FM-Sender gesendet und in Stereo empfangen wird, erscheint =. Nach Radiosendern suchen 1 Drehen Sie SOURCE SELECTOR, um das Radio auszuwählen. TUNER wird angezeigt. -
Page 80: Einstellen Gespeicherter Radiosender
RADIO Einstellen gespeicherter Radiosender 1 Drehen Sie SOURCE SELECTOR auf TUNER, um das Radio auszuwählen. TUNER wird angezeigt. 2 Drehen Sie TUNER PRESET X, um einen gespeicherten Radiosender auszuwählen. , die Speicherplatznummer und der gespeicherte PRESET Sender werden angezeigt. Umsortieren gespeicherter Radiosender Nachdem Sie Radiosender programmiert haben, möchten Sie vielleicht deren Reihenfolge ändern. -
Page 81: Rds R
RDS R Radio Data System ist ein Service, das FM Sendern erlaubt, zusätzliche Informationen zu senden. Wenn Sie einen RDS-Sender empfangen, werden R und der Sendername angezeigt. Umschalten zwischen verschiedenen RDS Informationen • Drücken Sie wiederholt RADIO TEXT am Receiver, um zwischen folgenden Informationen (sofern vorhanden) umzuschalten: –... -
Page 82: Technische Daten
TECHNISCHE DATEN Receiver Änderungen vorbehalten. Allgemein Stromverbrauch (FR 740, MX 740)...210 W Stromverbrauch (FR 760)...255 W Stromverbrauch in Bereitschaft...< 2 W Abmessungen, b h t ...435 135 350 mm Gewicht (FR 740, MX 740)...8,6 kg Gewicht (FR 760)...9,4 kg Verstärkerteil (0,7 % THD, 6 , 1 kHz) Ausgangsleistung, Stereo Modus (FR 740, MX 740) (DIN)...2 60 W Ausgangsleistung, Surround Modus (FR 740, MX 740) Front ...2 60 W... -
Page 83: Warnung
WARNUNG Versuchen Sie unter keinen Umständen das Gerät selbst zu reparieren, da die Garantie dadurch ihre Gültigkeit verliert. Versuchen Sie nicht das Gerät zu öffnen, da Sie hiermit einen elektrischen Schlag riskieren. PROBLEM MÖGLICHE URSACHE Kein Ton VOLUME ist nicht richtig eingestellt. Kopfhörer sind angeschlossen. -
Page 84: Algemene Informatie Inhoud Van De Doos
Informeer waar u verpakkingsmateriaal, lege batterijen en oude apparatuur kunt inleveren. Als ENERGY STAR ® -partner heeft, Philips vastgesteld dat dit product voldoet aan de ENERGY STAR ® -richtlijnen voor efficiënt energiegebruik. Handelsmerk „DOLBY”, „DOLBY DIGITAL”, „PRO LOGIC”... -
Page 85: Bedieningsknoppen
CIN EM A ST AN DB PO WE R / 1 POWER / STANDBY...Om de receiver aan en uit te zetten. 2 CINEMA LINK ...Om de systeembus tussen de receiver en de tv in en uit te schakelen. 3 ...Sensor voor de infraroodafstandsbediening. -
Page 86: Gebruik Van De Afstandsbediening
AFSTANDSBEDIENING Gebruik van de afstandsbediening Open het batterijvak van de afstandsbediening en plaats er 2 alkalinebatterijen in, type AA (R06, UM-3). Verwijder de batterijen als ze leeg zijn of als u de afstandsbediening gedurende langere tijd niet zult gebruiken. ñ Batterijen niet weggooien, maar inleveren als KCA. -
Page 87: Toetsen Op De Afstandsbediening
Toetsen op de afstandsbediening 2 ...Om de receiver stand-by the schakelen. TUNER, CD, CDR/TAPE, TV, VCR, DVD/6CH...Om de afstandsbediening in te stellen voor het bedienen van de verschillende apparaten. Selecteert de bronnen indien langer dan 1 seconde ingedrukt. 1–0...Om cijfers in te toetsen voor cd-nummers, radiozenders of frequenties. -
Page 88: Aansluitbussen
De ingang van een tv wanneer deze gebruikt wordt als middenluidspreker (enkel mogelijk wanneer de systeembus CINEMA LINK aangesloten is). De systeembusaansluitingen van een Philips-tv met CINEMA LINK. Levert dezelfde spanning als het net. Maximaal aan te sluiten vermogen 100 W. -
Page 89: Audioaansluitingen
CAUTION RISK OF ELECTRIC SHOCK DO NOT OPEN RISQUE DE CHOC AVIS ELECTRIQUE Designed and developed by Philips in the European Community Manufactured under licence from Dolby Laboratories Licencing Corporation. "DOLBY", "PRO-LOGIC" and the Double-D Symbol are Trademarks of Dolby... -
Page 90: Systeembus, Cinema Link
SUB- WOOFER VIDEO OUT VIDEO IN Als de receiver en uw Philips TV (of nog beter met extra Philips VCR of DVD-speler) met CinemaLink worden aangesloten op het CINEMA LINK-systeembussturing, worden enige extra systeemmogelijkheden geboden: – Wanneer u een geluidsbron inschakelt dan schakelt het systeem automatisch naar die ingang. -
Page 91: Videoaansluitingen (Enkel Bij De Fr 760)
– De rechter-surround-luidspreker met SURROUND R (grijs en zwart) Uw tv als middenluidspreker U kunt uw Philips-tv met CINEMA LINK als middenluidspreker gebruiken. Voor tv’s met een scart-aansluiting heeft u een extra audioverloopkabel (van cinch naar scart) nodig. Voor tv’s met cinch-aansluitingen heeft u extra cinch-kabels nodig. -
Page 92: Installeren Van Het Systeem
INSTALLEREN VAN HET SYSTEEM CENTER LEFT SURROUND (REAR) RIGHT LEFT Opstellen van de luidsprekers Algemene tips voor het opstellen Plaats uw luidsprekers bij voorkeur niet in een hoek of op de grond, want dan worden de bassen te sterk. Als u de luidsprekers achter een gordijn, meubels enzovoort plaatst dan worden de hoge tonen verzwakt. -
Page 93: Display
Display Het display van de receiver bestaat uit 3 delen, die voor de volgende informatie gebruikt worden: Menu-indicaties Deze indicaties laten u zien of het menu al dan niet geopend is en geven aan in welke richting u kunt gaan..het menu is geopend M M E E N N U U 1...u kunt terugkeren naar het vorige onder-... -
Page 94: Receiver-Menu
MENU’S Receiver-menu De receiver is voorzien van een menusysteem. De verschillende menuopties zijn op een logische manier aan elkaar gerelateerd. Veronderstel dat u geen middenluidspreker aangesloten heeft en dus CENTER LS (middenluidspreker) op NO (no) gezet heeft. Probeert u vervolgens VOL CENTER (volume midden) te gebruiken dan loopt een boodschap in het display om u te laten weten dat dit niet mogelijk is (INSTALL CENTER SPEAKER - installeer middenluidspreker). -
Page 95: Tv-Menu
Tv-menu Als de receiver aangesloten is op een Philips CINEMA LINK-tv via de systeembusaansluitingen CINEMA LINK (zie „AANSLUITINGEN") dan kunt u het systeem via de tv installeren. Aan het menu wordt dan de keuzemogelijkheid RECEIVER toegevoegd. Als CINEMA LINK ingeschakeld is dan verschijnen de instellingen van de receiver gedurende een paar seconden op het tv-scherm. -
Page 96: Source Selector
BRONKEUZE SOURCE SELECTOR Wanneer u een bron kiest door SOURCE SELECTOR te draaien, worden de audio-ingangen – en (enkel bij de FR 760) de video- ingangen – met de bijbehorende naam geactiveerd. Het inkomend signaal wordt weergegeven door alle audio- en – indien de bron ook een videosignaal geeft –... -
Page 97: Afspelen, Opnemen
Afspelen van een bron 1 Druk op POWER / STANDBY om de receiver aan te zetten. 2 Draai SOURCE SELECTOR om een bron te kiezen. In het display verschijnt de naam van de bron. • U kunt de ingang FRONT AV/GAME kiezen door op FRONT AV te drukken (enkel bij de FR 760). -
Page 98: Surround Sound
SURROUND SOUND Over surround sound Surround sound biedt u een compleet nieuwe luisterervaring. U zult het gevoel hebben dat u zich ten midden van de actie bevindt want het geluid komt van overal om u heen. Let op tv-uitzendingen, audio- en videocassettes en cd’s met het logo 3 of 1 deze zijn gecodeerd voor een meerkanaals surround-weergave. -
Page 99: Afstemmen Op Een Radiozender
Afstemmen op een radiozender U kunt radiozenders zoeken door de frequentieband te scannen. Als u de frequentie van een zender kent, kunt u die ook rechtstreeks intoetsen. Als een FM-zender in stereo uitgezonden en ontvangen wordt dan verschijnt in het display =. Zoeken naar een radiozender 1 Draai SOURCE SELECTOR om de tuner te kiezen. -
Page 100: Afstemmen Op Een Geprogrammeerde Zender
TUNER Afstemmen op een geprogrammeerde zender 1 Draai SOURCE SELECTOR op TUNER om de tuner te kiezen. In het display verschijnt TUNER. 2 Draai TUNER PRESET X om een geprogrammeerde zender te kiezen. In het display verschijnen , het zendernummer en PRESET de zender. -
Page 101: Rds R
RDS R Radio Data System is een dienst van de zendstations waarbij FM-zenders extra informatie uitzenden. Als u en RDS-zender ontvangt dan verschijnen in het display R en de zendernaam. De verschillende soorten RDS-informatie • Druk herhaaldelijk op RADIO TEXT op de receiver om de volgende soorten informatie in het display te laten verschijnen (indien beschikbaar): –... -
Page 102: Receiver
TECHNISCHE GEGEVENS Receiver Wijzigingen voorbehouden zonder kennisgeving. Algemeen Stroomverbruik (FR 740, MX 740)...210 W Stroomverbruik (FR 760)...255 W Stroomverbruik in stand-by ...< 2 W Afmetingen, b h d ...435 135 350 mm Gewicht (FR 740, MX 740)...8,6 kg Gewicht (FR 760)...9,4 kg Versterkergedeelte (0,7 % THD, 6 , 1 kHz) Uitgangsvermogen, bij stereo (FR 740, MX 740) (DIN)...2 60 W Uitgangsvermogen, bij surround (FR 740, MX 740) -
Page 103: Waarschuwing
WAARSCHUWING Probeer in geen geval zelf iets te repareren want dan vervalt de garantie. Maak het apparaat niet open want dan loopt u het risico een elektrische schok te krijgen. PROBLEEM MOGELIJKE OORZAAK Geen geluid Het VOLUME staat te zacht. De hoofdtelefoon is aangesloten. -
Page 104: Informazioni Generali Materiale In Dotazione
Rispettare le norme locali sullo smaltimento dei materiali di imballaggio, batterie esaurite ed apparecchiature obsolete. ® Come partner ENERGY STAR Philips ha constatato che questo ® prodotto soddisfa le direttive ENERGY STAR materia di efficienza energetica. Riconoscimento dei marchi di fabbrica «DOLBY», «DOLBY DIGITAL», «PRO LOGIC»... -
Page 105: Comandi
CIN EM A ST AN DB PO WE R / 1 POWER / STANDBY...Accende e spegne il ricevitore. 2 CINEMA LINK ...Accende e spegne il bus di controllo del sistema tra il ricevitore e la TV. 3 ...Sensore per il telecomando a raggi infrarossi. -
Page 106: Telecomando
TELECOMANDO Uso del telecomando Aprire il comparto batterie del telecomando ed inserirvi 2 batterie alcaline di tipo AA (R06, UM-3). Estrarre le batterie esaurite o se si pensa di non utilizzare il telecomando per lungo tempo. Le batterie contengono sostanze chimiche, pertanto devono essere smaltite in modo corretto. -
Page 107: Pulsanti Del Telecomando
Pulsanti del telecomando 2 ...Mette il ricevitore in modo standby. TUNER, CD, CDR/TAPE, TV, VCR, DVD/6CH...Sposta il telecomando sui comandi dei diversi prodotti. Seleziona le sorgenti se premuto per più di 1 secondo. 1–0...Immette i numeri di brani, stazioni o frequenze. -
Page 108: Connettori
Entrata di una TV, se utilizzata come altoparlante centrale (possibile solo se è collegato il bus di sistema CINEMA LINK). Prese bus di controllo del sistema di una TV Philips con CINEMA LINK. Alimenta la stessa tensione di rete. Carico totale massimo consentito di 100 W. -
Page 109: Collegamenti
CAUTION RISK OF ELECTRIC SHOCK DO NOT OPEN RISQUE DE CHOC AVIS ELECTRIQUE Designed and developed by Philips in the European Community Manufactured under licence from Dolby Laboratories Licencing Corporation. "DOLBY", "PRO-LOGIC" and the Double-D Symbol are Trademarks of Dolby... -
Page 110: Bus Di Controllo Del Sistema, Cinema Link
WOOFER VIDEO OUT VIDEO IN Se il ricevitore e la vostra TV Philips (o meglio ancora in aggiunta un VCR Philips o un DVD player) con Cinemalink sono connessi al sistema di controllo CINEMA LINK vengono offerti alcuni vantaggi extra: –... -
Page 111: Rete
– Altoparlante surround destro a SURROUND R (grigio e nero) TV come altoparlante centrale La TV Philips può essere utilizzata con CINEMA LINK come altoparlante centrale. Per le TV dotate di presa scart, è necessario un cavo audio aggiuntivo cinch-to-scart. Per le TV dotate di prese cinch, sono necessari cavi cinch aggiuntivi. -
Page 112: Regolazione Del Sistema
REGOLAZIONE DEL SISTEMA CENTER LEFT SURROUND (REAR) RIGHT LEFT Posizionamento degli altoparlanti Informazioni di carattere generale sul posizionamento Evitare di posizionare gli altoparlanti in un angolo o sul pavimento, per non potenziare troppo i toni bassi. La collocazione degli altoparlanti dietro tende, mobili, ecc. ridurrà, invece, la risposta dei toni acuti. -
Page 113: Display
Display Il display del ricevitore si divide in 3 sezioni, da utilizzare come segue: Indicazioni del menu Questi indicatori segnalano se il menu è acceso o spento, nonché la direzione in cui ci si può spostare..il menu è acceso M M E E N N U U 1...per spostarsi indietro sull’elemento precedente del menu, mediante... -
Page 114: Menu
MENU Menu del ricevitore Il ricevitore è dotato di un sistema di menu, che viene utilizzato per impostare il ricevitore. Le diverse opzioni di menu sono correlate le une alle altre secondo un procedimento logico. Supponiamo che non vi sia alcun altoparlante centrale collegato e che, pertanto, CENTER LS (altoparlante centrale) sia impostato su NO (no). -
Page 115: Menu Della Tv
Menu della TV Se il ricevitore è collegato ad una TV Philips CINEMA LINK tramite le prese bus di controllo del sistema CINEMA LINK (vedere «COLLEGAMENTI»), si può utilizzare la TV per impostare il sistema. In questo caso, il menu della TV comprende un’opzione denominata RECEIVER. -
Page 116: Selezione Sorgente
SELEZIONE SORGENTE SOURCE SELECTOR Quando si seleziona una sorgente ruotando SOURCE SELECTOR , si attivano le entrate audio - e le entrate video (solo per FR 760) - con il nome corrispondente. Il segnale in entrata viene riprodotto da tutte le uscite audio e video - se la sorgente include un segnale video - del ricevitore. -
Page 117: Riproduzione, Registrazione
Riproduzione di una sorgente 1 Premere POWER / STANDBY per attivare il ricevitore. 2 Ruotare SOURCE SELECTOR per selezionare una sorgente. Il nome della sorgente viene visualizzato. • Si può selezionare l’entrata FRONT AV/GAME se si preme FRONT AV (solo per FR 760). 3 Avviare la lettura della sorgente secondo il procedimento abituale. -
Page 118: Suono Surround
SUONO SURROUND Informazioni sul suono surround Il suono surround genera all’ascolto una sensazione completamente nuova. Si ha, infatti, la sensazione di essere al centro dell’azione, perché il suono arriva da tutti i punti intorno a sé. Ricercate le trasmissioni TV, audio e video cassette e dischi contraddistinti dai simboli 3 o 1 che rappresentano il suono surround multicanale. -
Page 119: Sintonizzatore
Sintonizzazione sulle stazioni radio Si possono ricercare le stazioni radio eseguendo una scansione della gamma delle frequenze. È anche possibile immettere la frequenza di una stazione radio conosciuta. Se una stazione FM viene trasmessa e ricevuta in stereofonia, viene visualizzato =. Ricerca delle stazioni radio 1 Ruotare SOURCE SELECTOR per selezionare il sintonizzatore. -
Page 120: Sintonizzazione Sulle Stazioni Radio Memorizzate
SINTONIZZATORE Sintonizzazione sulle stazioni radio memorizzate 1 Ruotare SOURCE SELECTOR su TUNER per selezionare il sintonizzatore. TUNER viene visualizzato. 2 Ruotare TUNER PRESET X per selezionare una stazione radio preimpostata. , il numero preimpostato e la stazione vengono PRESET visualizzati. Riordinamento delle stazioni radio memorizzate Dopo aver programmato le stazioni radio, è... -
Page 121: Rds R
RDS R Radio Data System è un servizio che consente alle stazioni FM di inviare informazioni aggiuntive. Se si riceve una stazione RDS, vengono visualizzati R ed il nome della stazione. Spostamento attraverso le diverse informazioni RDS • Premere ripetutamente RADIO TEXT sul ricevitore, per spostarsi attraverso le seguenti informazioni (se disponibili): –... -
Page 122: Dati Tecnici
DATI TECNICI Ricevitore Soggetto a variazioni senza preavviso. Informazioni generali Consumo di potenza (FR 740, MX 740) ...210 W Consumo di potenza (FR 760) ...255 W Consumo di potenza in modo standby ...< 2 W Dimensioni, l a p ...435 135 350 mm Peso (FR 740, MX 740)...8,6 kg Peso (FR 760)...9,4 kg Amplificatore (0,7 % THD, 6 , 1 kHz) -
Page 123: Attenzione
ATTENZIONE Non cercare in nessun caso di riparare da soli un qualsiasi elemento dell’apparecchio, per non invalidare la garanzia. Non aprire l’apparecchio, per non correre il rischio di scosse elettriche. PROBLEMA POSSIBILE CAUSA Nessun suono Il VOLUME non è regolato correttamente. Sono collegate le cuffie. - Page 124 Meet Philips at the Internet http://www. philips.com FR740 FR760 3103 306 1698.1 MX740 VieUrs9949...