Table of Contents
Advertisement
Advertisement
Table of Contents

Related Manuals for Blaupunkt ALICANTE CD30


Summary of Contents for Blaupunkt ALICANTE CD30
- Page 1 Radio / CD Operating instructions...
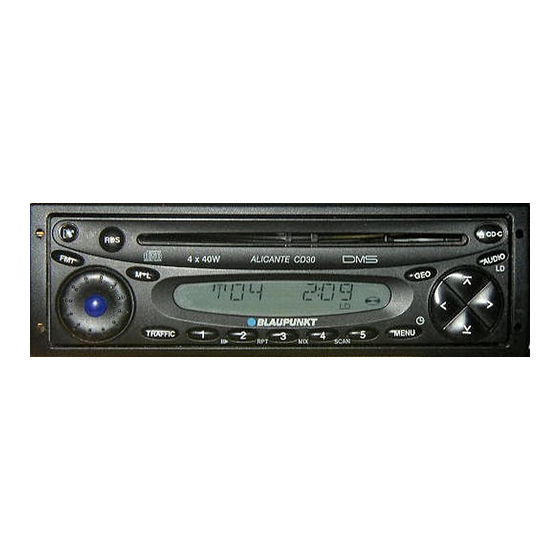
- Page 3 Button to release the control panel FM button – selects the FM memory FMT button – Travelstore (not on the Kiel CD30) Volume control ON button – switches the unit on/off RDS button – switches the RDS function on/off M•L button – selects the MW and LW frequency ranges TS button –...
-
Page 4: Table Of Contents
Important information ... 24 Road safety ... 24 Installation ... 24 Accessories ... 24 Guarantee ... 24 International telephone hotline ... 24 Theft protection ... 25 Removable control panel ... 25 Theft protection CODE ... 26 Switching on/off ... 27 Volume adjustment ... -
Page 5: Important Information
The optional RC 08 remote control al- lows you to safely access the most im- portant functions from your steering wheel. All Blaupunkt amplifiers can be used. You can connect the following Blaupunkt CD changers: CDC A 06, CDC A 08, CDC A 072 and IDC A 09. -
Page 6: Theft Protection
As a way of protecting your car radio against theft, the unit is equipped with a removable control panel (release panel). Without this control panel, the car radio is worthless to a thief. Protect you car radio against theft by taking the control panel with you every time you leave your vehicle. -
Page 7: Theft Protection Code
As a way of protecting your car radio against theft, the system features a four- digit code. You have to enter this number every time the unit is disconnected from your vehicle’s electrical power supply. As a factory default, the code entry re- quest function is deactivated. -
Page 8: Switching On/Off
There are various ways of switching the unit on/off. Switching on/off using the vehicle ignition. If the unit is correctly connected to the vehicle’s ignition, it will switch on/off si- multaneously with the ignition. You can also switch the unit on even if the ignition is off. -
Page 9: Mute Setting
When you have finished making your changes, press the MENU button <. This feature allows you to instantane- ously reduce the system volume (mute). Press button 4. You can set the unit’s mute level. Pressing the MENU < button. Keep pressing the until “MUTE LEVEL”... -
Page 10: Selecting The Frequency Range / Memory
are transmitting different pro- grammes. Note: REG has to be additionally activated/ deactivated in the unit’s menu. Press the MENU button <. Keep pressing the until “REG” followed by “ON” or “OFF” appears in the display. To switch REG on/off, press the button :. -
Page 11: Storing Stations
You can also tune into stations manu- ally. Press either the Note: You can only tune into stations manu- ally if the RDS function is first deacti- vated. If a radio station provides several pro- grammes, you have the option of brows- ing through its so-called “broadcasting network”. -
Page 12: Treble Reduction Feature During Interference (Hicut)
As soon as a station is received corre- sponding to the programme type you have selected, the radio unit automati- cally switches to that station from the currently tuned station or from CD mode / CD changer mode. Press the MENU button <. “MENU”... -
Page 13: Traffic Information Reception . 32 Switching Traffic Information Priority On/Off
Press the MENU button <. “MENU” appears in the display. Keep pressing the until “HICUT” appears in the display. button : to Press the switch HICUT on/off. “HICUT 0” means that treble will not be reduced; “HICUT 1” means that treble will be reduced. -
Page 14: Switching Off The Warning Sound
When you have finished making your changes, press the MENU button <. Press the MENU button <. “MENU” appears in the display. button : until “BEEP Press the ON” appears in the display. button :. Press the The display changes to “BEEP OFF”. Press the MENU button <. -
Page 15: Random Play (Mix)
Press button 4 (MIX) =. MIX lights up in the display. The next randomly selected track will then be played. Press button 4 (MIX) = again. MIX disappears from the display. You can briefly play all the tracks on a Press button 5 (SCAN) =. -
Page 16: Traffic Announcements In Cd Mode 35 Ejecting A Cd
If you want to receive traffic announcements whilst listening to a CD, press the TRAFFIC button >. Traffic announcement priority is active when TRAFFIC lights up in the display. To remove a CD from the unit: Press the CD•C button 8 until the CD is ejected. -
Page 17: Repeating Individual Tracks Or Whole Cds (Repeat)
Selected the required setting using button :. Press the MENU button <. If you wish to repeat the current track, briefly press button 3 (RPT) “RPT TRCK” appears briefly and RPT lights up in the display. If you wish to repeat the current CD, press button 3 (RPT) = again. -
Page 18: Displaying The Time
To briefly display the time, press the MENU button < until the time appears in the display. The time is set automatically using the RDS signal. However, if you cannot re- ceive any RDS stations or the RDS sta- tions that you listen to do not support this feature, you can also set the time manually. -
Page 19: Audio Settings
To set the bass, press the AUDIO button 9. “BASS” appears in the display. button : to Press the adjust the bass. To set the treble, press the AUDIO button 9. “BASS” appears in the display. Press the AUDIO button 9 again. “TREBLE”... -
Page 20: External Audio Sources
CD players, MiniDisc players or MP3 players. If you want to connect an external au- dio source, you will need a Blaupunkt adapter cable to do so (Blaupunkt no.: 7 607 897 093). Furthermore, the AUX input must be activated in the menu. - Page 21 01-6 10 39-0 015 762 241 026 130 04 41 800-266 25 28 006 535 054 47 042 175 873 212 Blaupunkt-Werke GmbH Bosch Gruppe K7/VKD 8 622 402 136 Fax: 0 51 21 49 40 02 0 25 25 54 48...