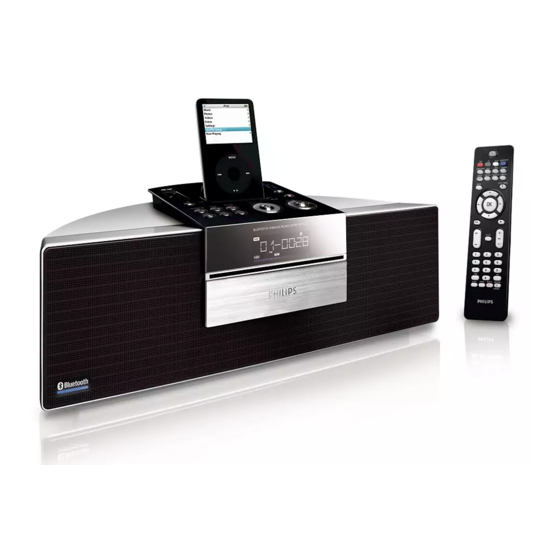
Philips BTM630/12 User Manual
Bluetooth wireless micro system
Hide thumbs
Also See for BTM630/12:
- Quick start manual (4 pages) ,
- Specification sheet (2 pages) ,
- Service manual (33 pages)
Table of Contents
Troubleshooting

Related Manuals for Philips BTM630/12


Summary of Contents for Philips BTM630/12
- Page 1 Bluetooth Wireless Micro System Register your product and get support at www.philips.com/welcome User manual Manuel d'utilisation Manual de usuario Benutzerhandbuch Gebruikershandleiding Manuale dell'utente Användarhandbok Brugervejledning BTM630...
- Page 2 Italia DICHIARAZIONE DI CONFORMITA’ Si dichiara che l’apparecchio BTM630 Philips risponde alle prescrizioni dell’art. 2 comma 1 del D.M. 28 Agosto 1995 n. 548. Fatto a Eindhoven Philips Consumer Electronics 5616 JB Eindhoven, The Netherlands Norge Typeskilt finnes på apparatens underside.
- Page 3 Advarsel: Usynlig laserstråling ved åbning når sikkerhedsafbrydere er ude af funktion. Undgå utsættelse for stråling. Bemærk: Netafbryderen er sekundært indkoblet og ofbryder ikke strømmen fra nettet. Den indbyggede netdel er derfor tilsluttet til lysnettet så længe netstikket sidder i stikkontakten. Klass 1 laseraparat Varning! Om apparaten används på...
- Page 4 Philips Consumer Electronics...
- Page 5 Index English ------------------------------------------------ 6 Français -------------------------------------------- 33 Español --------------------------------------------- 60 Deutsch --------------------------------------------- 87 Nederlands -------------------------------------- 114 Italiano -------------------------------------------- 141 Svenska ------------------------------------------- 168 Dansk --------------------------------------------- 195...
-
Page 6: Table Of Contents
Contents General Information Environmental Information ... 7 Supplied accessories ... 7 Safety Information ... 7~8 Hearing Safety ... 8 Preparations Rear connections ... 9 Power ... 9 Antennas Connection ... 9~10 Optional connection ... 10 Inserting batteries into the Remote Control .. -
Page 7: General Information
Congratulations on your purchase and welcome to Philips! To fully benefit from the support that Philips offers, register your product at www.philips.com/ welcome. This product complies with the radio interference requirements of the European Community. Environmental Information All unnecessary packaging has been omitted. We... -
Page 8: Hearing Safety
General Information ● The mechanical parts of the set contain self- lubricating bearings and must not be oiled or lubricated. ● When the system is switched to Standby mode, it is still consuming some power. To disconnect the system from the power supply completely, remove the AC power plug from the wall socket. -
Page 9: Preparations
Rear connections The type plate is located at the bottom of the system. For users in the U.K.: please follow the instructions on page 2. Power ● Before connecting the AC power adaptor to the wall outlet, ensure that all other connections have been made. -
Page 10: Optional Connection
Preparations FM Antenna ● For better FM stereo reception, connect an outdoor FM antenna to the FM AERIAL (FM ANTENNA) terminal. Optional connection The optional equipment and connecting cords are not supplied. Refer to the operating instructions of the connected equipment for details. Connecting a USB mass storage device or SD/MMC memory card By connecting a USB mass storage device or SD/... -
Page 11: Controls
¡ Controls on the system iPod dock – is used to dock your iPod player for playback or recharging through this system. SD • MMC – is the slot used to insert an SD/MMC memory card. – is the jack used to connect an auxiliary device. TIMER –... - Page 12 Controls for CD/MP3-CD/WMA/USB/CARD fast searches back and forward within a track/disc (press and hold)..skips to the beginning of a current/previous/subsequent track. ÉÅ – starts or interrupts playback. PROG – (for CD/MP3/USB/CARD) programs tracks. – (for TUNER) programs radio stations. –...
-
Page 13: Controls On The Remote Control
Controls on the remote control – switches the system on or to Eco Power standby/normal standby with clock display. – copies music to an external portable USB storage device or SD/MMC card. PROG/CLOCK – (for CD/MP3/USB/CARD) programs tracks. – (for TUNER) programs radio stations. –... - Page 14 Controls VOL +/- – adjusts the volume level. – stops disc playback or erases a disc program. 3 / 4 – (for MP3-CD/USB/CARD) skips to the beginning of a current/previous/subsequent album. ¡ SHUFFLE – plays disc/USB/CARD tracks randomly. ™ EJECT/OPEN 0 –...
-
Page 15: Basic Functions
Switching the system on ● Press STANDBY-ON B (or B on the remote). ➜ The system will switch to the last selected source. ● Press SOURCE on the top of the system or CD, iPod, BLUETOOTH, USB/CARD, AUX or TUNER on the remote control. ➜... -
Page 16: Cd/Mp3-Cd/Wma Operation
CD/MP3-CD/WMA Operation Loading a disc This CD player plays Audio Discs including CD Recordables, CD-Rewritables, MP3 CD and WMA disc. ● CD-ROM, CD-I, CDV, VCD, DVD or computer CDs, however, are not possible. Press SOURCE on the top of the system to select CD or press CD on the remote. -
Page 17: Playing An Mp3/Wma Disc
To find a passage within a track Press and hold on the system (or on the remote control). When you recognize the passage you want, release on the system (or the remote control). ➜ Normal playback continues. To stop playback ●... -
Page 18: Different Play Modes: Shuffle And Repeat
CD/MP3-CD/WMA Operation Different play modes: SHUFFLE and REPEAT You can select and change the various play modes before or during playback. The REPEAT modes can also be combined with PROGRAM. To select your play mode, press MODE on the system (SHUFFLE or REPEAT on the remote control) before or during playback until the display shows the desired function. -
Page 19: Radio Reception
Tuning to radio stations Press SOURCE repeatedly (or TUNER on the remote control) to select the tuner source (FM or MW). Hold on the system (or the remote control) and then release the button. ➜ The system will start searching for a radio station with sufficient signal strength. -
Page 20: Tuning To Preset Radio Stations
Radio Reception Tuning to preset radio stations ● Press ALBUM • PRESET +/- on the system (or 3 / 4 on the remote control) until the desired preset station is displayed. Radio Data System is a service that allows FM stations to show additional information. If you are receiving a RDS station, station name are displayed. -
Page 21: External Sources
Using a non-USB device Use the supplied Aux-in cable to connect the AUX jack (3.5mm, located on the top panel) to an AUDIO OUT or headphone jack on an external device (such as TV, Laser Disc player, DVD player or CD recorder). Press SOURCE on the system repeatedly (or AUX on the remote control) to select external equipment. -
Page 22: Memory Card
External Sources How to transfer music files from PC to a USB mass storage device/SD/MMC memory card By dragging and dropping music files, you can easily transfer your favorite music from PC to a USB mass storage device/SD/MMC memory card. For a flash player, you can also use its music management software for the music transfer. - Page 23 Prepare the source to record from. You can select one of the following sources for recording each time: DISC - load a disc. Then, select a track where ripping will start. (See "CD/MP3-CD/WMA Operations".) BT (BLUETOOTH) - Connect a Bluetooth- enabled device supporting the A2DP profile to the system.
-
Page 24: Ipod Dock
iPod Dock Compatible iPod players ● Most Apple iPod models with 30-pin dock connectors as follows: 20GB, 40GB, 20/30GB Photo, 40/60GB Photo, 30GB Video, 60GB Video, 80GB Video, Mini, Nano and Nano 2nd generation. Selecting the correct dock adaptor ● 8 iPod dock adaptors of different type, as indicated at the back of the adaptor, are included to fit the following iPod:... -
Page 25: Bluetooth Operation
➜ “PAIRING” starts flashing on the display panel. Set the Bluetooth-enabled device to search for other available Bluetooth devices until it recognizes “PHILIPS BTM630”. (Refer to the user manual of the device to be connected for detailed operations.) on the... -
Page 26: Operating A Connected Bluetooth-Enabled Device Through The System
Bluetooth Operation Select “PHILIPS BTM630” to start pairing. Enter “0000” when prompted for a keyword. Wait for completion of the pairing until you hear a double beep from the system and the bluetooth icon turns on. ➜ If the connected device (mobile phone) supports the HFP and/or HSP profiles, the display panel of the system will show “PHONE... -
Page 27: Receiving A Call Through The System
5) Place the unit in line with your mouth. If you will be using this unit while sitting down, place the unit at tabletop level, in line with the level of your mouth. Placing the unit on a high cabinet or on the floor may reduce the pick-up of the microphone. -
Page 28: Clock/Timer
Clock/Timer Clock setting The clock can be set in either 12-hour or 24-hour mode (12HR or 24HR for example). In standby mode, press PROG on the system (or PROG/CLOCK on the remote control). ➜ SET CLOCK is displayed briefly. Then, 12HR or 24HR is displayed. -
Page 29: Sleep Timer Setting
Sleep timer setting The sleep timer enables the system to switch off by itself after a set period of time. Press SLEEP on the remote control repeatedly to select a preset time. ➜ The selections are as follows (time in minutes): OFF ™... -
Page 30: Specifications
Cleaning the disc lens ● After prolonged use, dirt or dust may accumulate at the disc lens. To ensure good playback quality, clean the disc lens with Philips CD Lens Cleaner or any commercially available cleaner. Follow the instructions supplied with cleaner. -
Page 31: Troubleshooting
Do not open the system as there is a risk of electric shock. If a fault occurs, first check the points listed below before taking the system for repair. If you are unable to remedy a problem by following these hints, consult your dealer or Philips for help. -
Page 32: Troubleshooting
Troubleshooting Problem “DEVICE NOT SUPPORTED” scrolls on the display. Sound input to the microphone cannot be heard clearly. The audio quality is poor after connection with a Bluetooth-enabled device. A device cannot pair or connect with the system. The paired mobile phone connects and disconnects constantly. - Page 33 Meet Philips at the Internet http://www.philips.com BTM630 CLASS 1 LASER PRODUCT Printed in China PDCC-JS/JW-0739...
- Page 34 Notes for iPod connection 1. The docking entertainment system is compatible with all the existing Apple iPod models with 30-pin connector. 2. Four adaptors are included to fit different iPod models including iPod touch (8GB, 16GB), iPod classic (80GB, 160GB), iPod nano 3rd generation (4GB, 8GB), iPod the 5th generation (30GB, 60GB, 80GB), iPod nano 2nd generation (2GB, 4GB, 8GB) and iPod nano 1st generation (1GB, 2GB, 4GB ).