Table of Contents
Advertisement
Quick Links
Advertisement
Table of Contents

Related Manuals for Topcom Twintalker 9100


Summary of Contents for Topcom Twintalker 9100
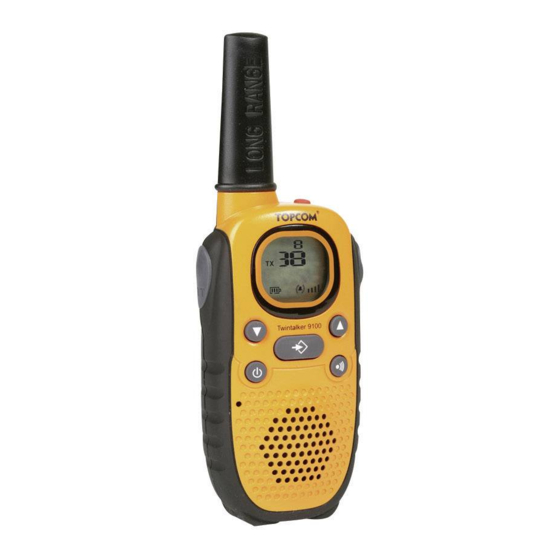
- Page 1 TWINTALKER 9100 LONG RANGE User manual v 1.0...
- Page 2 This product is in compliance with the essential requirements and other relevant provisions of the R&TTE directive 1999/5/EC. The Declaration of conformity can be found on: http://www.topcom.net/support/cedeclarations.php The features described in this manual are published with reservation to modifications.
-
Page 3: Intended Purpose
Introduction Thank you for purchasing the Topcom Twintalker. It’s a low powered radio communication device that has no running costs other than the minimal cost of re-charging the batteries. The TwinTalker operates on Private Mobile Radio frequencies and can be used in any country where the service is authorised as indicated on the packing box and in this manual. - Page 4 Topcom Twintalker 9100 Personal safety • Do not place your device in the area over an air bag or in the air bag deployment area. Air bags inflate with great force. If a communicator is placed in the bag deployment area and the air bag inflates, the communicator may be propelled with great force and cause serious injury to the occupants of the vehicle.
-
Page 5: Cleaning And Maintenance
(s) will be supressed. Therefore you should only transmit a signal (press Topcom Twintalker 9100 km in open field). Since these devices use free frequency -button and speak into the microphone. -
Page 6: Getting Started
Topcom Twintalker 9100 Getting started Removing/Installing the Belt Clip To remove the clip from the unit, push the belt clip (B) towards the antenna, while pulling the clip tab (A). When re-installing the belt clip, a click indicates the belt clip is locked into position. -
Page 7: Lcd Display Information
– Press To Talk or release to listen – Confirm a setting in the menu LCD Display 11 LCD Display information Topcom Twintalker 9100 a. CTCSS code b. Time c. Channel number TX icon - Displayed when transmitting a signal... -
Page 8: Battery Charge Level/Low Battery Indication
When the BATTERY CHARGE LEVEL is low, the BATTERY icon will flash to indicate that the batteries need to be replaced or recharged. 13 Using the Twintalker 9100 13.1 Clock functions When the battery is installed and the unit is OFF, the time is displayed. - Page 9 NOTE: Any PMR set on the same channel can receive and listen to the conversation, also when the other use a CTCSS code. Topcom Twintalker 9100 . The unit will “beep” and the LCD Screen will display the again. The unit will “beep” and only the time is to TRANSMIT.
- Page 10 Topcom Twintalker 9100 13.7 CTCSS (Continuous Tone Coded Squelch System) The 2 digit CTCSS code corresponds to a specific tone frequency the radio emits. Two users, with the same channel and CTCSS set can hear one another.They will not be able to hear anyone else on the channel unless the other radios have the same exact CTCSS code enabled.
- Page 11 Sending a call Tone Press briefly. The call tone will be transmitted for 3 seconds on the set channel. 13.12 Vibrator function When receiving a call tone, the Twintalker 9100 can also vibrate. To set the Roger Beep. • Press 5 times. ‘...
- Page 12 Topcom Twintalker 9100 13.13 Roger Beep On/Off After the - button is released, the unit will send out a roger beep to confirm that you have stopped talking. To set the Roger Beep. • Press • Press • Press 13.14 Key-Tone On/Off When a button is pressed, the unit will beep briefly.
-
Page 13: Technical Specifications
13.17 Headset connection The Twintalker 9100 can be used with an optional external microphone and speaker. The connector is located under the protective rubber cover on the right side of the unit. To attach the external speaker/microphone headsets or earpiece, lift the rubber flap on the top of the unit to expose the connector. -
Page 14: Warranty Period
15 Warranty 15.1 Warranty period Topcom units have a 24 - month warranty period. The warranty period starts on the day the new unit is purchased. Consumables or defects causing a negligible effect on operation or value of the equipment are not covered. - Page 15 SERVICE RETURN CARD - RÜCKSENDEKARTE - CARTE DE RETOUR SERVICE - RETOURFICHE RETURN WITH YOUR DEFECT PRODUCT Name/Vorname/Prénom/Naam: Surname/Familienname/Nom/Familienaam: Street/Straße/Rue/Straat: Nr./N°: Location/Ort./Lieu/Plaats: Country/Land/Pays/Land: Tel./Tél.: E-mail: Model name/Modellbezeichnung/Nom du modèle/Modelnaam: Serial Nr/Seriennummer/N° série/Serienummer: Purchase date/Kaufdatum/Date d’achat/Aankoopdatum: (DD/MM/YYYY) - (TT/MM/JJJJ) Fault description/Beschreibung des Defekts/Description de la panne/Beschrijving defect: (Original Proof of Purchase has to be attached to this return card to be valid for warranty) Model name/Modellbezeichnung/Nom du modèle/Modelnaam: Serial Nr/Seriennummer/N°...
- Page 16 TWINTALKER 9100 LONG RANGE visit our website www.topcom.net MC600072...