Swann DVR4-1000 SW242-DU2 Operating Instructions Manual
4 channel digital video recorder
Hide thumbs
Also See for DVR4-1000 SW242-DU2:
- Operating instructions manual (12 pages) ,
- User manual (26 pages)

Related Manuals for Swann DVR4-1000 SW242-DU2

Summary of Contents for Swann DVR4-1000 SW242-DU2
-
Page 1: Channel Digital Video Recorder
plug&playsecurity Advanced security made easy DVR4-1000™ 4 Channel Digital Video Recorder Operating Instructions SW242-DU2 / SW244-DUX / SW244-DUM www.swannsecurity.com... -
Page 2: Before You Begin
Before You Begin FCC Verifi cation: NOTE: This equipment has been tested and found to comply with the limits for Class B digital device, pursuant to part 15 of the FCC Rules. These limits are de- signed to provide reasonable protection against harmful interference in a residen- tial installation. -
Page 3: Table Of Contents
Contents Before You Begin Contents Package Contents DVR Layout Front Panel Rear Panel Remote Control Layout Connections & Installation Connecting Cameras and Power Adapter Connecting the DVR to a TV Monitor Turning the DVR On/Off and Auto Recovery Image Display Single Camera View Multi Camera View Installing or Changing a Hard Drive... -
Page 4: Package Contents
Package Contents DVR4-1000™ Unit Remote Control Operating Instructions Easy Setup Guide Power Adapter with Cable Software CD BNC to RCA Video Cable Operating Instructions Security Stickers If you are missing any of the components above, contact Swann Communications for assistance. -
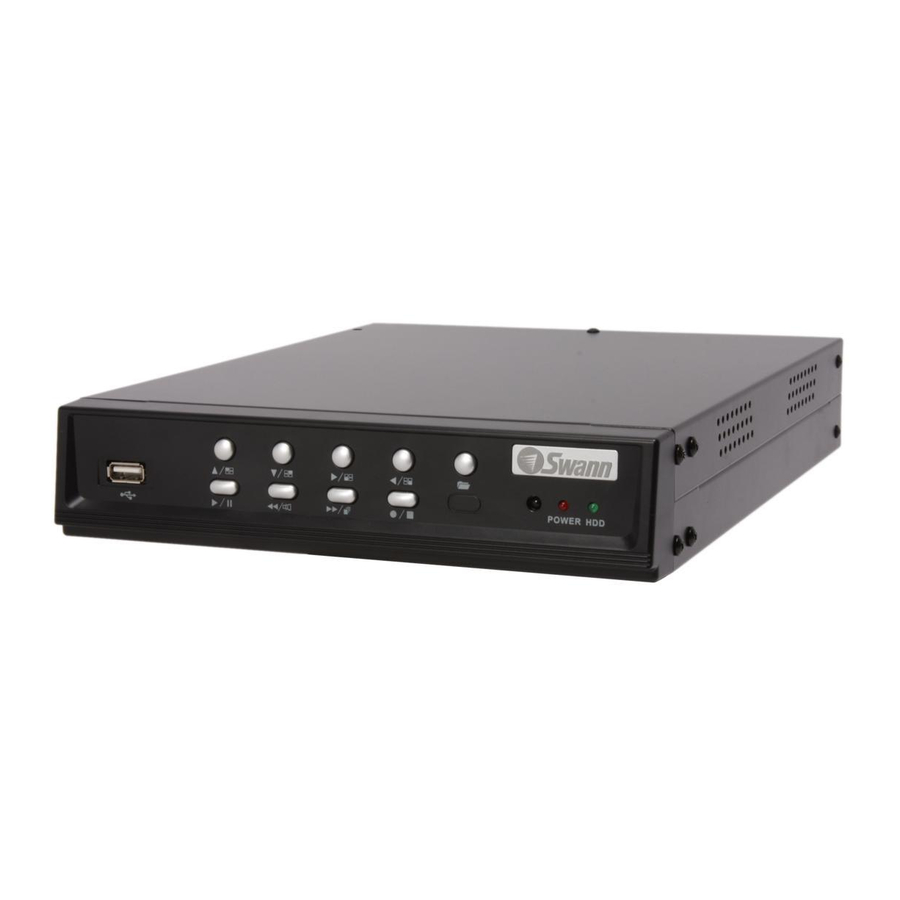
Page 5: Dvr Layout
DVR Layout Front Panel 1. USB Connection Download backup footage to Flash Drive (not included) 2. Up Arrow Move cursor up in menus or Camera 1 fullscreen view 3. Down Arrow Move cursor down in menus or Camera 2 fullscreen view 4. -
Page 6: Remote Control Layout
Remote Control Layout Using the Remote Control for the First Time The remote control contains a battery that must be activated before use. Find and remove the clear plastic tab at the bottom of the remote. The remote will now be ready for use. 1-4. -
Page 7: Connecting Cameras And Power Adapter
Connecting Cameras and Power Adapter Cameras and accessories optional 1. Connect the Power and BNC ends of the Security Camera to an Extension Cable. 2. Connect the BNC end of the Extension Cable to the back of the DVR. 3. Connect the power end of the Extension Cable to the Power Splitters. 4. -
Page 8: Connecting The Dvr To A Tv Monitor
To turn on your DVR connect the Power Adapter to the DC 12V input on the back of the unit. To turn the DVR off unplug the DVR from the wall outlet or power point. If the DVR will not be in use for extended periods of time Swann recommends unplugging the unit. Auto-Recovery Feature The DVR4-1000™... -
Page 9: Image Display
Image Display Single Camera View Multi Camera View Multi Camera View with 4 Cameras 1. Current Camera Channel 2. Motion Detection Icon 3. Recording Icon 4. Main Display 5. Current Date & Time 6. Mute Audio MUTE 7. No Camera Signal Icon Multi Camera View with No Cameras... -
Page 10: Installing Or Changing A Hard Drive
Installing or Changing a Hard Drive IMPORTANT NOTE: The following instructions are for installing or changing the hard drive. If your DVR4-1000™ already has a hard drive pre-installed disregard these steps. Installing / Changing a Hard Drive in the DVR4-1000™ 1. -
Page 11: Starting The Dvr With A New Hard Drive
Starting the DVR With a New Hard Drive When starting the DVR4-1000™ for the fi rst time or starting the DVR after changing to a new hard drive, the DVR will confi gure the hard drive for use. Fol- low the on screen prompts to confi gure the hard drive. 1. -
Page 12: Menu Operation
Menu Operation Accessing and Navigating the Menu System The main Setup Menu can be accessed by pressing the Menu Button To navigate the menus press the directional arrow keys To select the highlighted option press To return to the previous menu press Note: The menu cannot be accessed while in playback or backup mode. -
Page 13: Record Menu
Record Menu Record Speed: Set the recording frame rate per camera. Note: higher frame rates provide smoother recordings but use more hard drive space. Record Quality: Set the image quality of the recordings from Normal, High or Highest. Note: higher image quality settings use more hard drive space. Event Rec Duration: When Motion Detection is active, Event Rec Duration is the length of time in seconds the DVR will record after motion stops, from 5, 10, 15, 20, 25 or 30 seconds. -
Page 14: Motion Detection Menu
Motion Detection Menu Channel: Select which camera attributes to change from camera 1-4. Sensitivity: Set the amount of movement necessary before motion detection triggers recording. Set from 1 (most sensitive) to 4 (least sensitive), default Off. Note: this feature must be set from 1-4 to enable motion recording. Alarm Duration: Set the length of time the alarm will sound when motion is detected. -
Page 15: Screen Menu
Screen Menu Border: Applies a border between the cameras in multi camera view. Video Adjustment: Adjust the display to fi t on your TV monitor. Auto Switching: When active, in live view mode, the DVR will automatically switch between camera channels in full screen mode. Set the delay from 1-10 seconds between changes or Off. -
Page 16: System Menu
USB Flash Drive. Do not remove the Flash Drive while the fi rmware is updating as it may damage the DVR. Only use updates authorized by Swann. When complete, remove the Flash Drive and restart the DVR. -
Page 17: Time Search
Time Search Start time: This is the date and time of the oldest recording on the DVR. Stop time: This is the date and time of the fi nal recording on the DVR. Enter a time between the Start and End time and press the Play button to view a recording. -
Page 18: Backup Footage
Backup Footage The DVR4-1000™ has a backup feature via the USB port on the front of the DVR. The DVR accepts fl ash drives or thumbdrives up to 2GB in size. Follow the steps below to backup footage: 1. Insert a USB fl ash drive / thumbdrive (not included) to the USB port. 2. -
Page 19: Viewing Backup Footage On A Pc
Viewing Backup Footage on a PC Using the VVFPlayer software View backed up footage from the DVR4-1000™ with the included VVFPlayer software located on the CD. 1. Copy the VVFPlayer software from the CD to your computer. 2. Double click to open the VVFPlayer software. 3. -
Page 20: Extract Footage From A Larger Video Clip
Viewing Backup Footage on a PC (cont) Extract footage from a larger video clip When dealing with larger backup fi les it may be necessary to extract smaller clips. The following describes how to extract footage and export to a new .VVF fi le. 1. -
Page 21: Troubleshooting Guide
Solution: Analog wireless cameras suffer from interference. The DVR interprets the change of image as motion and records. Swann recommends the use of wired cameras or digital wireless cameras such as the ADW-300 for DVR recording. -
Page 22: Technical Specifi Cations
Technical Specifications Video/Audio Video Format: Operating System: Video Input: Audio Input: Video Output: Audio Output: Display and Recording Display Frame: Global Recording Frame Rate: Video Operation Duplex : Display Resolution: Recording Resolution: Compression Format: Size per frame: General HDD Interface: Backup Method: Search Mode: Full Screen:... -
Page 23: Warranty Information
Swann. The end user is responsible for all freight charges incurred to send the product to Swann’s repair centres. -
Page 24: Technical Support Details
Melbourne, Australia compared to your local time. Telephone Helpdesk (M 9am-5pm AUS ET) (Tu-F 1am-5pm AUS ET) (Sa 1am-9am AUS ET) NEW ZEALAND toll free INTERNATIONAL +61 3 8412 4610 © Swann Communications 2008 1300 138 324 0800 479 266 SR242-DU2-10005-040309...