Table of Contents
Advertisement
Quick Links
Mini Hi-Fi
Component
System
Operating Instructions
Owner's Record
The model and serial numbers are located on the rear panel. Record the serial
number in the space provided below. Refer to them whenever you call upon your
Sony dealer regarding this product.
Model No. _______________
MHC-GRX9900 / GRX70 / GRX70J
MHC-GRX50 / R770
MHC-RXD9 / RXD80
MHC-RXD7
©1999 by Sony Corporation
3-865-605-14(1)
Serial No. _______________
1
Advertisement
Table of Contents

Related Manuals for Sony MHC-GRX50


Summary of Contents for Sony MHC-GRX50
- Page 1 The model and serial numbers are located on the rear panel. Record the serial number in the space provided below. Refer to them whenever you call upon your Sony dealer regarding this product. Model No. _______________ MHC-GRX9900 / GRX70 / GRX70J...
- Page 2 WARNING To prevent fire or shock hazard, do not expose the unit to rain or moisture. To avoid electrical shock, do not open the cabinet. Refer servicing to qualified personnel only. Do not install the appliance in a confined space, such as a bookcase or built-in cabinet.
-
Page 3: Table Of Contents
Table of Contents Getting Started Step 1: Hooking up the system ... 5 Step 2: Setting the time ... 7 Step 3: Presetting radio stations ... 8 Saving the power in standby mode ... 10 Basic Operations Playing a CD ... 11 Recording a CD ... -
Page 4: Using This Manual
RXD9 is different from that of the MHC-GRX70, but the locations of the buttons are the same. Any differences in operation are clearly indicated in the text, for example, “MHC-GRX70 only” or “Europearn model only”. MHC-GRX70/GRX70J/GRX50/R770/ RXD80/RXD7 * This part of the MHC-GRX50/R770/RXD7 is different from other models as below: MHC-GRX50/R770/RXD7 EDIT DIRECTION TUNER MEMORY... -
Page 5: Getting Started Step 1: Hooking Up The System
Getting Started Step 1: Hooking up the system Do the following procedure 1 to 4 to hook up your system using the supplied cords and accessories. FM antenna Front speaker (Right) Connect the speakers. Connect the speaker cords of front speakers to the SPEAKER jacks as below. - Page 6 Step 1: Hooking up the system (continued) Connect the FM/AM antennas. Set up the AM loop antenna, then connect it. Jack type A Extend the FM lead antenna horizontally. AM loop antenna Jack type B Extend the FM lead antenna horizontally. AM loop antenna For models with a voltage selector, set VOLTAGE SELECTOR to...
-
Page 7: Step 2: Setting The Time
To attach the front speaker pads Attach the supplied front speaker pads to the bottom of the speakers to stabilize the speakers and prevent them from slipping. Inserting two size AA (R6) batteries into the remote With normal use, the batteries should last for about six months. -
Page 8: Step 3: Presetting Radio Stations
Step 2: Setting the time (coninued) Press ENTER/NEXT. The minute indication flashes. Turn the jog dial to set the minute. Press ENTER/NEXT. The clock starts working. If you’ve made a mistake, start over from step 1. To change the time The previous explanation shows you how to set the time while the power is off. -
Page 9: The Display
Press TUNER/BAND repeatedly until the band you want appears in the display. The bands you can receive vary depending on the model you purchased. Be sure to check which bands you can receive. Every time you press this button, the band changes as follows: 2 band model: FM ˜... -
Page 10: Saving The Power In Standby Mode
Saving the power in standby mode (For MHC-RXD9/RXD80/RXD7/R770) You can lower the power consumption to a minimum (Power Saving Mode) and save energy in the standby mode. POWER SAVE /DEMO (Power) DISPLAY / Press POWER SAVE/DEMO when the power is off. The system switches to the Power Saving Mode and the clock display disappears. -
Page 11: Basic Operations
Basic Operations Playing a CD — Normal play You can play up to three CDs in a row. EX-CHANGE (Power) PLAY VOLUME MODE ◊ √ Press § and place up to two CDs on the disc tray. If a disc is not placed properly it will not be recognized. - Page 12 Playing a CD (continued) Do this Stop play Press p. Press CD (P (P on the Pause remote). Press again to resume play. Select a track During play or pause, turn the jog dial clockwise (to go forward) or counterclockwise (to go back) and release it when you reach the desired track.
-
Page 13: Recording A Cd
Recording a CD — CD Synchro Recording The CD SYNC button lets you record from a CD to a tape easily. You can use TYPE I (normal) or TYPE II (CrO ) tapes. The recording level is adjusted automatically. DISC SKIP/ EX-CHANGE (Power) DOLBY NR... -
Page 14: Listening To The Radio
Listening to the radio –– Preset Tuning Preset radio stations in the tuner's memory first (see “Step 3: Presetting radio stations”). (Power) STEREO/MONO ◊ √ Press TUNER/BAND repeatedly until the band you want appears in the display. The bands you can receive vary depending on the model you purchased. -
Page 15: Recording From The Radio
To listen to non-preset radio stations Use manual or automatic tuning in step 2. For manual tuning, press + or – repeatedly. For automatic tuning, press and hold + or –. Tips • Pressing TUNER/BAND when the power is off automatically turns the power on and tunes to the last received station (One Touch Play). -
Page 16: Playing A Tape
Recording from the radio (continued) Press § and insert a recordable tape into deck B. With the side you want to record facing forward Press REC PAUSE/START. Deck B stands by for recording. Press DIRECTION repeatedly to select A to record on one side. Select ß... - Page 17 Press § and insert a recorded tape in deck A or B. With the side you want to play facing forward Press DIRECTION repeatedly to select A to play one side. Select ß* to play both sides. To play both decks in succession, select RELAY (relay play).** Press TAPE A (or TAPE B) ( (DECK A (or DECK B) ( on the...
-
Page 18: Recording From A Tape
Recording from a tape — High-speed Dubbing You can use TYPE I (normal) or TYPE II (CrO ) tapes. The recording level is automatically adjusted. (Power) DOLBY NR Press § and insert a recorded tape in deck A and a recordable tape in deck B. -
Page 19: The Cd Player Using The Cd Display
The CD Player Using the CD display You can check the remaining time of the current track or that of the CD. When a CD TEXT disc is loaded, you can check the information stored on the disc, such as the disc titles or artist names. When the unit detects CD TEXT discs, the “CD TEXT”... -
Page 20: Playing The Cd Tracks Repeatedly
Playing the CD tracks repeatedly –– Repeat Play This function lets you repeat a single CD or all CDs in normal play, Shuffle Play and Program Play. (Power) PLAY MODE REPEAT Press REPEAT during playback until “REPEAT” appears in the display. -
Page 21: Playing The Cd Tracks In Random Order
Playing the CD tracks in random order –– Shuffle Play You can play all the tracks on one CD or all CDs in random order. (Power) DISC 1~3 Jog dial Press FUNCTION repeatedly until “CD” appears in the display, then place a CD. -
Page 22: Programming The Cd Tracks
Programming the CD tracks –– Program Play You can make a program of up to 32 tracks from all the CDs in the order you want them to be played. (Power) ◊ √ CD ( CHECK CLEAR VOL +/– Press FUNCTION repeatedly until “CD”... -
Page 23: Playing Cds Without Interruption
To cancel Program Play Press PLAY MODE repeatedly until “PROGRAM” or “SHUFFLE” disappears from the display. Press Check the CHECK on the remote program repeatedly. After the last track, “CHECK END” appears. Clear a track from CLEAR on the remote in the end stop mode. -
Page 24: The Tape Deck Recording On A Tape Manually
The Tape Deck Recording on a tape manually You can record from CD, tape, or radio as you like. For example, you can record just the songs you want or record from the middle of the tape. The recording level is adjusted automatically. -
Page 25: Recording A Cd By Specifying Track Order
Recording a CD by specifying track order — Program Edit You can record tracks from all the CDs in the order you want. When programming, make sure the playing times for each side do not exceed the length of one side of the tape. (Power) EDIT DOLBY NR... - Page 26 Recording a CD by specifying track order (continued) Repeat steps 5 and 6 for tracks from the same disc or steps 4 to 6 for tracks from another disc to program the remaining tracks to be recorded on side B. Press CD SYNC.
-
Page 27: Dj Effects Looping Part Of A Cd
DJ Effects Looping part of a CD — Loop With the loop function, you can repeat part of a CD during playback. This lets you create original recordings. (Power) Jog dial LOOP Press and hold LOOP during playback at the point you want to start the Loop function, and release to resume normal play. -
Page 28: Sound Adjustment Adjusting The Sound
Sound Adjustment Adjusting the sound You can reinforce the bass, create a more powerful sound, and listen with headphones. (Power) GROOVE FILE SELECT To reinforce bass (DBFB) Press DBFB*. Every time you press the button, the display changes as follows: n DBFB NORMAL ( µ... -
Page 29: Selecting The Audio Emphasis
Selecting the effect from the music menu MHC-GRX9900/GRX70/GRX70J/RXD9/ RXD80 (Power) EFFECT ◊ √ MHC-GRX50/RXD7/R770 (Power) SYNC EQ Press FILE SELECT. The last effect chosen appears in the display. Use the jog dial to select the preset you desire. The preset name appears in the display. -
Page 30: Selecting The Audio Emphasis
RACING BATTLE ADVENTURE P FILE 1~5 Personal file* * The personal file function lets you store your own effects (see “Making a personal audio emphasis file” on page 33). For MHC-GRX50/RXD7/R770 Effect ROCK Standard music sources JAZZ DANCE SOUL ACTION... -
Page 31: Changing The Spectrum Analyzer Display
Changing the spectrum analyzer display You can enjoy changing the display while listening to the music. (Power) SPECTRUM ANALYZER / Press SPECTRUM ANALYZER. Every time you press the button, the display changes as follows: IMAGE PATTERN NORMAL PATTERN Selecting surround effects You can enjoy surround effects. -
Page 32: Adjusting The Graphic Equalizer
Adjusting the graphic equalizer (MHC-GRX9900/GRX70/GRX70J/RXD9/ RXD80 only) You can adjust the sound by raising or lowering the levels of specific frequency ranges. Before operation, first select the audio emphasis you want for your basic sound. (Power) Select the audio emphasis you want for your basic sound (see “Selecting the audio emphasis”... -
Page 33: Making A Personal Audio Emphasis File
Making a personal audio emphasis file — Personal file (MHC-GRX9900/GRX70/GRX70J/RXD9/ RXD80 only) You can create a personal file of audio patterns (surround effect and graphic equalizer) and store them in the memory of the unit. Later, call up an audio pattern to play a favorite tape, CD, or radio program. -
Page 34: Other Features
Other Features Using the Radio Data System (RDS) (For European model only) What is the Radio Data System? Radio Data System (RDS) is a broadcasting service that allows radio stations to send additional information along with the regular program signal. This tuner offers convenient RDS features like station name display and location of stations by program type. - Page 35 Press PTY while listening to the radio. Turn jog dial to select the program type you want. See the “List of program types” section below. Press ENTER/NEXT. The unit starts searching the preset RDS stations (“SEARCH” and the selected program type are shown alternately in the display).
-
Page 36: Singing Along: Karaoke
Using the Radio Data System (RDS) (continued) JAZZ Jazz programs. COUNTRY Country music programs. NATION Programs featuring the popular music of the country or region. OLDIES Programs featuring oldies music. FOLK Folk Music Programs. DOCUMENTARY Investigative features. ALARM TEST Test signal for emergency broadcasts. ALARM-ALARM Emergency broadcasts. -
Page 37: Mixing And Recording Sounds
Start playing the music and adjust the volume. Adjust the microphone volume by turning MIC LEVEL. When you are done Turn MIC LEVEL to 0 and disconnect the microphone from MIX MIC, then press KARAOKE PON/MPX repeatedly so that “h” disappears. Note With some songs, vocals may not be cancelled when you select “KARAOKE PON”. -
Page 38: Falling Asleep To Music
Singing along: Karaoke (continued) To stop recording Press p. Tips • If acoustic feedback (howling) occurs, move the microphone away from the speakers or change the direction of the microphone. • If you want to record your voice through the microphone only, you can do so by selecting the CD function and not playing a CD. -
Page 39: Waking Up To Music
Waking up to music — Wake-up Timer You can wake up to music at a preset time every day. Make sure you have set the clock (see “Step 2: Setting the time”). TIMER SELECT 3 4,5,6, Prepare the music source you want to play. -
Page 40: Timer-Recording Radio Programs
Waking up to music (continued) To check the setting Press TIMER SELECT and turn the jog dial to select the respective mode (DAILY 1 or DAILY 2), then press ENTER/NEXT. To change the setting, start over from step 1. To cancel the timer operation Press TIMER SELECT and turn the jog dial to select “TIMER OFF”, then press ENTER/ NEXT. -
Page 41: Optional Av Components Connecting Audio Components
Set the time to start recording. Turn the jog dial to set the hour, then press ENTER/NEXT. The minute indication starts flashing. Turn the jog dial to set the minute, then press ENTER/NEXT. The hour indication flashes again. Set the time to stop recording following the above procedure. - Page 42 “MD” appears. To the audio output of the MD deck When you connect a Sony MD deck, you can use the MD (, P, and p buttons on this unit’s remote to perform play, pause, and stop operations.
-
Page 43: Connecting A Vcr
Connecting a VCR Make sure to match the color of the plugs and the connectors. To listen to the sound of the connected VCR, press FUNCTION repeatedly until “VIDEO” appears. Refer to the instructions of each component. To the audio output of the VCR Connecting the surround speakers (MHC-GRX70/GRX70J only) -
Page 44: Connecting Outdoor Antennas
Connecting outdoor antennas Connect the outdoor antenna to improve the reception. Refer to the instructions of each component. FM antenna Connect the optional FM outdoor antenna. You can also use the TV antenna instead. Jack type A 75-ohm coaxial cable (not supplied) Jack type B IEC standard socket... -
Page 45: Additional Information Precautions
• When you move the system, take out any discs. If you have any questions or problems concerning your stereo system, please consult your nearest Sony dealer. Notes on CDs • Before playing, clean the CD with a cleaning cloth. -
Page 46: Troubleshooting
First, check that the power cord is connected firmly and the speakers are connected correctly and firmly. Should any problem persist, consult your nearest Sony dealer. General The display starts flashing as soon as you plug in the power cord even though you haven’t turned on the power... - Page 47 There is severe hum or noise. • A TV or VCR is placed too close to the stereo system. Move the stereo system away from the TV or VCR. “0:00” (or “12:00”) flashes in the display. • A power interruption occurred. Set the clock and timer settings again.
-
Page 48: Tape Deck
Troubleshooting (continued) Tape Deck The tape does not record. •No tape in the cassette holder. •The tab has been removed from the cassette (see “To save a tape permanently” on page 45). •The tape has reeled to the end. The tape does not record nor play or there is a decrease in sound level. -
Page 49: Specifications
Continuous RMS power output (reference) 170 + 170 watts (6 ohms at 1 kHz, 10% THD) MHC-GRX50: The following measured at AC 120, 220, 240 V 50/60 Hz DIN power output (rated) 110 + 110 watts (8 ohms at 1 kHz, DIN) - Page 50 Tape player section Recording system 4-track 2-channel stereo Frequency response 40 – 13,000 Hz (±3 dB), (DOLBY NR OFF) using Sony TYPE I cassette 40 – 14,000 Hz (±3 dB), using Sony TYPE II cassette Wow and flutter ±0.15% W.Peak (IEC) 0.1% W.RMS (NAB)
- Page 51 AM tuner section Tuning range 2 Band type: North American models: 530 – 1,710 kHz (with the interval set at 10 kHz) 531 – 1,710 kHz (with the interval set at 9 kHz) European models: 531 – 1,602 kHz (with the interval set at 9 kHz) Other models: 531 –...
- Page 52 Specifications (continued) SS-RXD7 for MHC-RXD7 (Canadian model) Speaker system Speaker units Woofer: Tweeter: Super Tweeter: Nominal impedance Dimensions (w/h/d) Mass SS-GRX50/GRX50G for MHC-GRX50 Speaker system Speaker units Woofer: Tweeter: Super Tweeter: Nominal impedance Dimensions (w/h/d) Mass General Power requirements North American models: 120 V AC, 60 Hz...
-
Page 54: Parts Identification
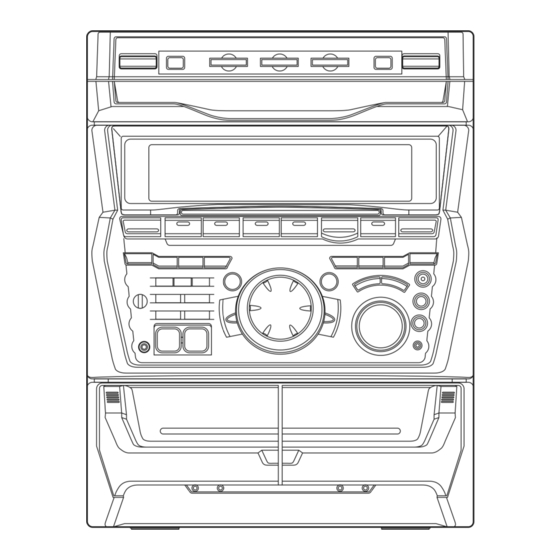
Parts identification MHC-GRX70/GRX70J/GRX50/R770/RXD80/RXD7 (power) button 2 POWER SAVE/DEMO button 3 DISC 1~3 buttons 4 DISC SKIP/EXCHANGE button 5 CD § button 6 Disc tray 7 Display 8 CD/tape operating buttons: CD (P (play/pause) TAPE A ( (play) TAPE A 9 (play) TAPE B ( (play) TAPE B 9 (play) p (stop) - Page 55 !§ @ª For MHC-GRX9900/GRX70/GRX70J/ RXD9/RXD80 EFFECT button FILE SELECT button GEQ CONTROL button P FILE MEMORY button For MHC-GRX50/R770/RXD7 EDIT, DIRECTION, TUNER MEMORY button PLAY MODE, DOLBY NR(, PTY*) button REPEAT, STEREO/MONO button FILE SELECT button #º FUNCTION button * For European models only.
-
Page 56: Index
H, I, J Hooking up optional components 41-44 the antennas 6, 44 the power 6 the system 5 Sony Corporation Printed in Hungary Karaoke 36 L, M Loop 27 Normal Play 11 One Touch Play 12, 15, 17 P, Q...