Table of Contents
Advertisement
Mini Hi-Fi
Component
System
Operating Instructions
Owner's Record
The model and serial numbers are located on the rear panel. Record the serial
number in the space provided below. Refer to them whenever you call upon your
Sony dealer regarding this product.
Model No. _______________
DHC-MD333
©1998 by Sony Corporation
3-864-468-12(1)
Serial No. _______________
Advertisement
Table of Contents

Related Manuals for Sony DHC-MD333 Primary


Summary of Contents for Sony DHC-MD333 Primary
-
Page 1: Operating Instructions
Owner’s Record The model and serial numbers are located on the rear panel. Record the serial number in the space provided below. Refer to them whenever you call upon your Sony dealer regarding this product. Model No. _______________ DHC-MD333 ©1998 by Sony Corporation 3-864-468-12(1) Serial No. - Page 2 WARNING To prevent fire or shock hazard, do not expose the unit to rain or moisture. To avoid electrical shock, do not open the cabinet. Refer servicing to qualified personnel only. Do not install the appliance in a confined space, such as a bookcase or built-in cabinet.
-
Page 3: Table Of Contents
Table of Contents Getting Started Step 1: Hooking up the system ... 4 Step 2: Setting the time ... 6 Step 3: Presetting radio stations ... 7 Connecting optional A/V components and outdoor aerials ... 9 Basic Operations Playing a CD ... 11 Recording a CD on an MD ... -
Page 4: Getting Started
Getting Started Step 1: Hooking up the system Perform the following procedures 1 to 4 to hook up your system using the supplied cords and accessories. To complete the setup, do steps 2 and 3 also. Right speaker DHC-MD333 rear panel Connect the speakers. - Page 5 Other models AM loop aerial Set VOLTAGE SELECTOR to the position of your local power line voltage (except for North American European, Argentine models). 110-120V 220-240V VOLTAGE SELECTOR Connect the mains lead to a wall outlet. If the plug of the mains lead does not fit your wall outlet, detach the supplied adaptor from the plug (except for North American, European and Argentine...
-
Page 6: Step 2: Setting The Time
Step 2: Setting the time You must set the time before you can use the timer functions. The clock is on a 24-hour system for the European model, and a 12-hour system for other models. The European model is used for illustration purpose. -
Page 7: Step 3: Presetting Radio Stations
Step 3: Presetting radio stations You can preset the following number of stations: – North American model : 20 for FM and 10 for AM – European model: 20 for FM, 10 for MW, and 10 for LW – Other models: 20 for FM, 10 for MW, and 10 for SW To tune in the desired preset the station... - Page 8 Step 3: Presetting radio stations (continued) Press ENTER/YES on the remote. The preset number flashes. Proceed steps 6 and 7 while the preset number is flashing. If the unit is not operated for more than 16 seconds, the preset number disappears and the unit returns to the status of step 3.
-
Page 9: Connecting Optional A/V Components And Outdoor Aerials
Connecting optional A/V components and outdoor aerials To enhance your system, you can connect optional components. Refer to the instructions of each component. Connecting audio components Connect the plugs from the optional component to jacks of the same colour on the rear panel of this unit. -
Page 10: Connecting Outdoor Aerials
Connecting optional A/V components and outdoor aerials (continued) Connecting outdoor aerials Connect an outdoor aerial to improve reception. FM aerial Connect an optional FM outdoor aerial or you can use a TV aerial instead. European model IEC standard socket connector (not supplied) Other models 75-ohm coaxial cable... -
Page 11: Basic Operations
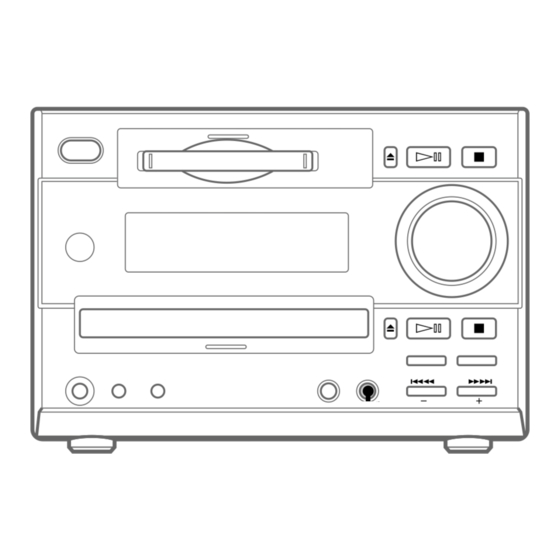
Basic Operations Playing a CD To turn on the system, press VOLUME CD p CD indicator Press CD 6 and place a CD on the disc tray. With the label side To close the disc tray, press the CD 6 button again. -
Page 12: Recording A Cd On An Md
Playing a CD (continued) Tips • You can start playing from the desired track in step 2. 1 Press MD/CD =0 or )+ repeatedly until you find the desired track. 2 Press CD ·∏. •Pressing CD ·∏ (or CD · on the remote) when the power is off automatically turns the power on and starts CD play if there is a CD on the disc tray (One Touch Play). -
Page 13: Disc Tray
Press CD 6 and place a CD on the disc tray. The disc tray opens. With the label side Press CD 6 to close the disc tray. Press CD-MD SYNC. The MD deck stands by for recording and the CD pauses at the beginning. LEVEL SYNC TRACK SYNC... -
Page 14: Playing An Md
Playing an MD To turn on the system, press You can play an MD just like a CD. MD indicator VOLUME MD 6 MD p MD/CD = 0/)+ MD · Stop play Pause MD P MD p Select a track MD =/ + Find a point in a track... -
Page 15: Listening To The Radio
Before inserting an MD When the power is on, make sure the MD indicator is off. If the MD indicator is lit red, another MD is already inserted. Press MD 6 and remove the MD. Tips • You can start playing from the desired track. 1 Press MD/CD =0 (or MD = on the remote) or MD/CD )+ (or MD + on the remote) repeatedly until the desired track... - Page 16 Listening to the radio (continued) Press TUNER/BAND (or BAND on the remote) repeatedly until the band you want appears. Each time you press the button, the band changes as follows: North American model: FMn AM European model: FMn MW n LW Other models: FM n MW n SW 8 .
-
Page 17: Recording From The Radio
Recording from the radio You can record a radio programme on an MD. If you use an MD with tracks already recorded on it, the MD deck automatically locates the end of the recorded section of the MD and starts the new recording from there. To record after erasing all tracks on an MD, see page 39. -
Page 18: The Cd Player
Recording from the radio (continued) While “TOC” is lit or is flashing To ensure complete recording, do not move the deck or disconnect the mains lead. The deck updates the Table of Contents (TOC) while “TOC” is flashing. Notes • The MD recording is complete only after all the recording information is entered to TOC at which point TOC stops flashing and goes out. -
Page 19: Playing The Cd Tracks In Random Order
Playing the CD tracks in random order –– Shuffle Play You can play all the tracks on a CD in random order. CD + Press FUNCTION repeatedly until “CD” appears, then place a CD on the disc tray. Press PLAY MODE repeatedly until “SHUFFLE”... - Page 20 Programming the CD tracks (continued) Press CD + or = until the desired track appears in the display. Selected track number Press ENTER/YES. The track is programmed. “Step” appears, followed by the total number of programmed steps. The number of the last programmed track appears, followed by the total playing time of the programme.
-
Page 21: Using The Cd Display
Using the CD display You can check the remaining time of the current track or that of the CD. DISPLAY Press DISPLAY repeatedly during play. Each time you press the button, the display changes as follows: n Elapsed time of the current track. The remaining time of the current track. -
Page 22: Labelling A Cd
Looping part of a CD track (continued) Press FUNCTION repeatedly until “CD” appears and place a CD on the disc tray. Press LOOP repeatedly during pause or stop mode to select “NORMAL 1 – 5” or “RHYTHM 1 – 5.” Each time you press the button, the display changes as follows: NORMAL 1... - Page 23 Press EDIT and press +/– repeatedly until “Name in ?” appears. LEVEL SYNC DISC Press ENTER/YES. The cursor flashes. LEVEL SYNC DISC Cursor Press CHARACTER repeatedly until the type of character you want appears. Each time you press the button, the display changes as follows: A (Upper case) n a (Lower case) n 0 (Numbers) n ! (Symbols)*...
-
Page 24: The Md Deck
The MD Deck – Playback Playing the MD tracks repeatedly — Repeat Play You can repeat a single track or all the tracks on a disc. Press REPEAT during play until “REPEAT” or “REPEAT 1” appears. REPEAT: For all the tracks on the current REPEAT 1* : For a single track only. -
Page 25: Programming The Md Tracks
Programming the MD tracks –– Programme Play You can make a programme of up to 25 tracks in the order you want them to be played. Press FUNCTION repeatedly until “MD” appears, then insert an MD. Press PLAY MODE repeatedly until “PGM”... -
Page 26: Using The Md Display
Programming the MD tracks (continued) Additional tasks Do this Cancel Press MD p to stop the Programme Programme Play, then press Play PLAY MODE repeatedly until “PGM” and “SHUFFLE” disappear. Add a track to Do steps 3 and 4. the programme (in stop mode) Erase the Press MD p, the Programme... - Page 27 Checking the remaining time of a disc Press DISPLAY in stop mode. Each time you press the button, the display changes as follows: The total playing time and the track numbers on the MD. The remaining recordable time on the (Only for a recordable MD) Disc title on the MD** ** “No Name”...
-
Page 28: Recording
The MD Deck – Recording Before you start recording MDs (Mini Disc) let you digitally record and play music with high quality sound comparable with the sound of CDs. Another feature of MDs is track marking. The track marking feature lets you quickly locate a specific point or easily edit the recorded tracks. -
Page 29: Recording The Favorite Cd Tracks On An Md
Recording the favorite CD tracks on an MD You can select your favorite CD tracks with the Programme Play feature, then record the programme on an MD using the CD Synchro Recording feature. indicator MD 6 Selecting the tracks Press FUNCTION repeatedly until “CD”... -
Page 30: Recording On An Md Manually
Recording the favorite CD tracks on an MD (continued) Press MD ·∏. Recording starts from the last recorded portion of the MD. The CD player stops and the MD deck pauses automatically when the recording is completed. If there is no remaining recording time on the MD, the MD deck stops. -
Page 31: Starting Recording With 6 Seconds Of Prestored Audio Data
Start playing the source you want to record. When recording from this system’s CD player, the track numbers are automatically marked. Press r REC while recording to mark the track numbers at the desired point (see “Marking track numbers” on page 33). To stop recording Press MD p. -
Page 32: Starting Recording With 6 Seconds Of Prestored Audio Data
Starting recording with 6 seconds of prestored audio data (continued) Insert a recordable MD. Press FUNCTION repeatedly to select the source (e.g., TUNER) you want to record. Press r REC. The deck stands by for recording. Start playing the source you want to record. -
Page 33: Marking Track Numbers
Marking track numbers The track numbers can be marked as follows: • Mark the track numbers automatically. When you record from this system’s CD (digital recording) or during level-synchro recording, the track numbers are automatically marked. • At any point while recording. You can mark the track numbers while recording any sources. -
Page 34: Making A Space Between Tracks 3 Seconds Long
Marking track numbers (continued) Marking track numbers at a specific point while recording –– Track mark You can mark track numbers at any time while recording, regardless of the type of sound source. Press r REC while recording at the point you want to add a track mark. - Page 35 Press r REC during recording pause. Press EDIT then press +/– repeatedly until “S. Space ?” appears. Press ENTER/YES. “S. Space ON ?” appears. Press ENTER/YES again. Press MD ·∏. Recording starts. To stop recording MD p Press MD p. To turn off the Smart Space and Auto Cut functions 1 Press EDIT during recording pause.
-
Page 36: Editing
The MD deck – Editing Before you start editing You can edit the recorded tracks on an MD. By using the editing functions, you can create a new sequence to the recorded MD. Editing functions • Name – Labelling MDs Use this function to label discs and tracks. -
Page 37: Labelling An Md
Labelling an MD –– Name Function If you a labelled CD on a new MD, the title is automatically recorded on the MD (Disc Memo Copy function). You can also create titles (names) for your recorded MDs and tracks. You can use up to 1,700 characters for a disc. -
Page 38: Erasing Recordings
Labelling an MD (continued) Note • You can label a track title while playing, but you must complete labelling before the track ends. • If the MD is record protected, “MD Protected” appears in the display and the MD cannot be recorded on. - Page 39 Press MD + or = repeatedly until the track number you want to erase appears. LEVEL SYNC TRACK The track number you want to erase. Press EDIT then press +/– repeatedly until “Erase ?” appears. TOC EDIT LEVEL SYNC TRACK E r a s e ? Press ENTER/YES.
-
Page 40: Moving Recorded Tracks
Erasing recordings (continued) To erase a portion of a track By using the Divide (see page 41), Erase, and Combine (see page 42) functions, you can erase specific portions of a track. Eg.: Erasing a portion of track A. Track number Original tracks... -
Page 41: Dividing Recorded Tracks
Press +/– repeatedly until the track number you want to move the track to (new track number) appears. TOC EDIT LEVEL SYNC TRACK o k ? The original The number you want track number. Press ENTER/YES. “Complete” appears for a few seconds and the selected track moves to appointed position. -
Page 42: Combining Recorded Tracks
Dividing recorded tracks (continued) Press ENTER/YES. “Rehearsal” and “Position ok ?”appear alternately and the portion to be divided is played repeatedly. To shift the division point : While monitoring the sound, press +/– to find the division point.The point moves in increments of 1/86 second (1 frame). -
Page 43: Undoing The Last Edit
Press MD + or = repeatedly until the first track number to be combined appears. For example, to combine tracks 4 and 1, select track 4. Press EDIT then press +/– repeatedly until “Combine ?” appears. Press ENTER/YES. TOC EDIT LEVEL SYNC TRACK 4 5 4... -
Page 44: Sound Adjustment
Undoing the last edit (continued) Press ENTER/YES. One of the following messages appears, depending on the last edit. Editing done: Message: Labelling a track or “Name Undo ?” an MD Erasing a single “Erase Undo ?” track Erasing all tracks on an MD Moving a tracks “Move Undo ?”... -
Page 45: Selecting The Preset Equalizer Menu
Selecting the Preset Equalizer menu The Preset Equalizer enables you to select the sound characteristic among 5 sound effects according to the music you are listening to. Press MUSIC MENU repeatedly. Each time you press the button, the display changes as follows: n ROCK n POP n JAZZ FLAT N DANCE N CLASSIC N To cancel the Preset Equalizer... - Page 46 Labelling the preset station (continued) Press ENTER/YES. The cursor starts flashing. Cursor Press CHARACTER repeatedly until the type of character you want appears. Each time you press the button, the display changes as follow: A (Upper case) n a (Lower case) n 0 (Numbers) n ! (Symbols)* (Space)** n A…...
-
Page 47: Using The Radio Data System (Rds)
Using the Radio Data System (RDS) (European model only) What is the Radio Data System? Radio Data System (RDS) is a broadcasting service that allows radio stations to send additional information along with the regular programme signal. Note RDS may not work properly if the station you are tuned to is not transmitting the RDS signal properly or if the signal is weak. -
Page 48: Waking Up To Music
Waking up to music — Wakeup Timer You can wake up to music at a preset time. Make sure you have set the clock (see page 6). 4,6,7,8 CURSOR ? / / 5,6,7,9 Prepare the music source you want to play. •... -
Page 49: Timer Recording Radio Programmes
To change the setting Start over from Step 1 through Step 5, then press CURSOR ? or / until the time you want to change flashes. To check the setting / To use the timer Press CLOCK/TIMER SELECT repeatedly until “DAILY TIMER” appears. The start time, followed by the stop time, and the sound source appears, then the original display appears. - Page 50 Timer recording radio programmes (continued) Set the time to start recording. Press +/– to set the hour, then press ENTER/YES. The minute indication flashes. Press +/– to set the minute, then press ENTER/YES. The hour indication flashes again. Set the time to stop recording following the procedure in step 5.
-
Page 51: Additional Information Precautions
• When you move the system, take out any discs. If you have any questions or problems concerning your system, please consult your nearest Sony dealer. On the speaker system This speaker system is not magnetically shielded and the picture on TV sets may becomes magnetically distorted. -
Page 52: System Limitations Of Mds
System limitations of MDs The recording system in your MD deck has the limitations described below. Note, however, that these limitations are due to the inherent nature of the MD recording system itself, not to mechanical causes. “Disc Full” lights up before the MD has reached the maximum recording time (60 or 74 minutes) When 255 tracks have been recorded on the MD,... -
Page 53: Self-Diagnosis Display
To solve the problem refer to the following list. If any problem persists, consult your nearest Sony dealer. M D P r o t e c t e d C11/MD Protected The MD is protected against erasure. - Page 54 Troubleshooting (continued) CD Player The CD tray does not close. •The CD is not placed properly. The CD will not eject. • The CD has tape, seals, or paste on it. The CD will not play. •Press CD 6 to check the CD placed. When you listening to the radio and the disc tray is open, the CD indicator is lit red, then the CD is not placed.
- Page 55 A stereo FM programme is not received in stereo. •Press STEREO/MONO so “STEREO” appears. Periodic noise during MD reording. • Adjust the aerial. If other problems not described above occur, reset the system as follows: 1 Unplug the mains lead. 2 Hold down , then plug the mains lead into the wall outlet again.
-
Page 56: Specifications
Troubleshooting (continued) TUNER Name Full The system has stored the maximum number of characters to be input. Name Full There is no more space to store track or disc titles. OVER You have reached the end of the CD while pressing the MD/CD )+ button during pause. - Page 57 CD player section System Compact disc and digital audio system Laser Semiconductor laser ( =780 nm) Emission duration: continuous Laser output Max. 44.6 µW* *This output is the value measured at a distance of 200 mm from the objective lens surface on the Optical Pick-up Block with a 7 mm aperture.
-
Page 58: Index
Index Adjusting the sound 44 the volume 11 Aerials 4, 10 After editing 36 recording 28 AMS 12, 15 Analogue recording 28 Automatic Source Selection 12, 15, 16 Auto cut 34 Batteries 5 Before editing 36 recording 28 CD player 11, 18 CD-MD Synchro Recording 12, 29 Clock setting 6... - Page 60 Sony Corporation Printed in Japan...