Advertisement
Private mobile radio
USER GUIDE
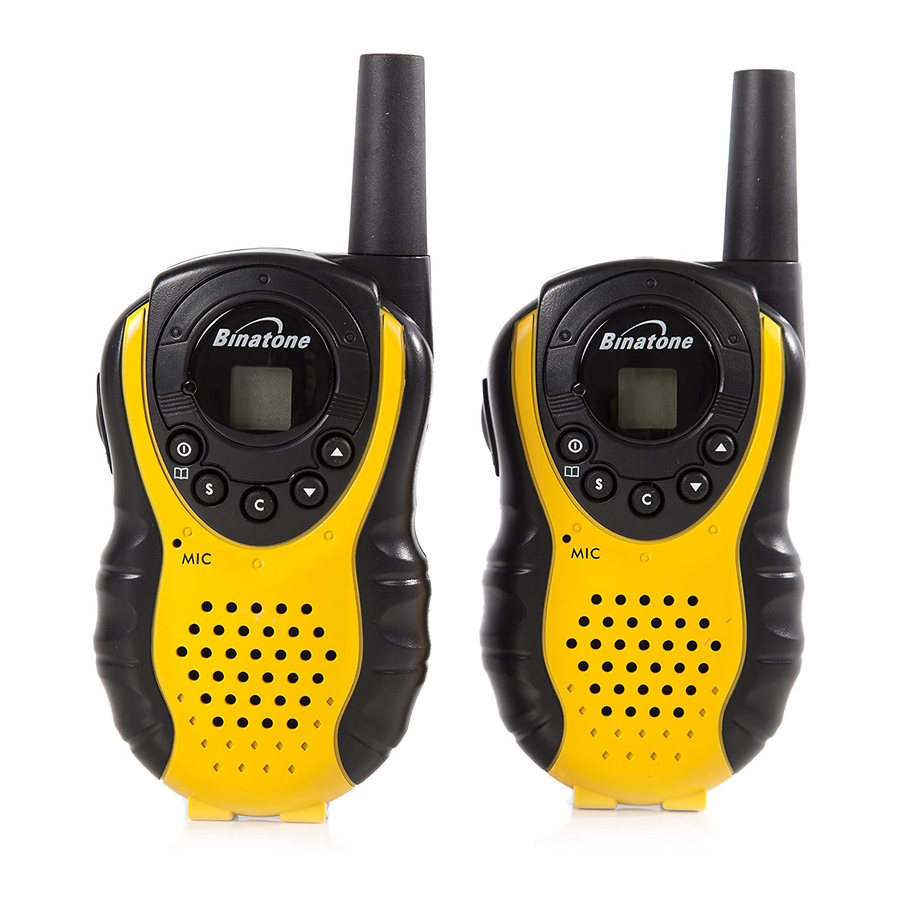
RED LED Indicator
lighting
Antenna
MENU/
(Power)
Button
LCD Screen
-(Menu) Press to program
-Displays the
the PMR settings.
current channel
(Power) Press and
selection and other
hold to turn the
radio symbols.
PMR unit ON
or OFF.
(UP)/
(DOWN)
TALK (PUSH to
buttons - Press to
TALK) button
change channels,
- Press and hold
volume, and to
to transmit.
select settings
during programming.
Mic (Microphone)
SCAN button
- Press and hold to
CALL button
scan for an active
- Press to send a
channel .
ringing tone to other
PMR units.
Speaker
1. LCD Screen
Channel Number. Changes
from 1 to 8 as selected by the
user.
Displays the Speaker volume
level.
Displayed when transmitting a signal.
Displayed when receiving a signal.
Displayed when the Power Low is activated.
2. Installation
2.1 Removing the Belt Clip
Belt clip
a. Pull the Belt Clip Latch
latch
away from the PMR.
b. While pulling the Belt
Clip Latch, push up
the Belt Clip as
shown in Figure 1.
2.2 Installing the Belt
Clip
a. Slide the Belt Clip into
the slot as shown in
Figure 2.
b. A "click" indicates the
Belt Clip is locked into
Figure 1
position.
Figure 2
2.3 Installing the Batteries
c
c
b
a
Figure 3
Figure 4
Caution: Observe the proper battery polarity orientation when
installing batteries. Incorrect positioning can damage both the
batteries and the unit.
a. Release the Battery Compartment Cover Latch located on the rear
side of the PMR then remove the Battery Compartment Cover from
the Battery Compartment. See Figure 3.
b. Install 3 x 1.5V AAA/LR03 regular Alkaline or Ni-MH
rechargeable batteries by following the orientation as
shown in Figure 3.
c. Replace the Battery Compartment Cover.
d. Lock the Battery Compartment Cover Latch into position.
Notes:
Use only same type and make of batteries on the PMR units.
The PMR units have a built-in Power Saver (PS) for maximum
battery life, but when not in use, turn the unit OFF to
conserve battery power.
Remove the batteries if the units will not be used for a long
period of time.
3. Operation
3.1 Turning the Unit ON/OFF
To T urn ON;
a. Press and hold the
(Power) button. A special "beep"
sound will be heard and the LCD Screen will display the
current channel.
To switch OFF;
b. Press and hold the
(Power) button. A special "beep"
sound will be heard and the LCD Screen will turn blank.
3.2 Adjusting the Speaker volume
There are 8 volume levels. To adjust the speaker volume,
press the
(UP) button to increase, or press the
(DOWN) button to decrease. The LCD Screen will show
the digital speaker volume level during adjustment.
3.3 Receiving a Call
The unit is continuously in Receive mode when the
unit is turned ON and not transmitting. When a signal is
received on the current channel, the receive signal icon
"RX" will be displayed on the LCD Screen.
3.4 Transmitting (sending)
Press and hold the TALK (Push to Talk) button to transmit
a.
your voice. The transmit signal icon "TX" will display on
the LCD Screen and the RED LED indicator will light.
b.
Hold the unit in a vertical position with the Mic
(Microphone) 5 cm away from the mouth. While holding
the TALK button, speak into the mic (microphone) in a
normal tone of voice.
c.
Release the TALK button when you have finished
d
transmitting.
Important:
In order for other people to receive your transmission, they must
also be on the same channel that you are currently using. Refer
to the "Changing Channel" section for more information.
When the TALK and/or CALL buttons are continuously pressed,
your PMR cannot receive any transmissions.
3.5 Calling (Paging) Tone
You can use the CALL button to send a tone to other users on
the same channel. To activate this feature;
With the PMR in normal mode, press and release the CALL
button. The unit will transmit a 2-second page tone to the
other unit/s set with the same channel within transmitting
range.
Binatone Help Line - 0845 345 9677
3.6 Channel Scan
Channel scan performs a search for active signals in a
continuous loop from channels 1 to 8. This allows you to find
other radios without having to manually change to each channel.
To activate this feature;
a.
Press and hold down the
SCAN
button. The channel
number on the LCD creen changes rapidly until an active
s
signal is detected.
b.
When an active signal (one of the 8 channels) is detected,
the channel scan pauses on the active channel until the
active signal stops.
c.
If you press the
TALK
button while the scan is paused on
an active channel the unit will communicate through the
active signal channel,
and the channel scan will be
deactivated.
(OR press the
(UP) button to continue the
channel scanning.)
d.
If no action is taken before the detected signal stops then
the scan will continue.
e
.
Press and hold the SCAN button to stop the channel
scanning operation. The unit will return to the channel
set before the scan was started.
3.7 The Menu Functions
3.7.1 Changing Channels
The PMR has 8 available channels. To change channel;
a. Press the
(Menu) button once, the Channel icon
8
"
" will start blinking on the LCD Screen.
b. While the Channel icon is blinking, press the
(UP) or
(DOWN) button to select the desired channel. The
channel changes from 1 to 8, or from 8 to 1.
c. Press the TALK button again to confirm your
selected channel.
Note:
Refer to the "Channel Table" section of this Owner's Manual for
detailed frequency listing.
3.7.2 TX Power High/Low setting
This feature permits the selection of the transmitting power
level to high or low. At Power High, the PMR will transmit
at maximum power and at a longer transmission range.
a. Press the
(Menu) button twice.
b. Press the
(UP) or
(DOWN) button to select
High or Low. The LCD Screen will display "L" when the
low power is selected. At low power mode, the PMR
will transmit at reduced transmitting range but could
extend the battery life.
c. Press the TALK button again to confirm your
selected power level.
3.7.3 Monitor
You can use the Monitor feature to check for weak signals
on the current channel.
a. Press the
(Menu) button 3 times. The PMR will
enter the Monitor mode and hear everything on the
current channel.
b. Press the
(Menu) button again to turn off the
Monitor operation and return to standby mode.
Advertisement

Related Manuals for Binatone LATITUDE 100


Summary of Contents for Binatone LATITUDE 100
- Page 1 The unit will transmit a 2-second page tone to the other unit/s set with the same channel within transmitting range. Binatone Help Line - 0845 345 9677 3.6 Channel Scan Channel scan performs a search for active signals in a continuous loop from channels 1 to 8.
-
Page 2: Auxiliary Features
Binatone Help Line - 0845 345 9677 Binatone Help Line - 0845 345 9677 9. Guarantee and service The Binatone Latitude 100 is fully guaranteed for 12 months from the date Frequency (MHz) Channel Frequency (MHz) of purchase sh own on your sales receipt.