Table of Contents
Advertisement
4-156-541-14(1)
Linear PCM Recorder
Getting Started
Basic Operations
Other Recording Operations
Other Playback Operations
Editing Tracks
About the Menu Function
Utilizing Your Computer
Additional Information
Troubleshooting
Operating Instructions
Index
PCM-M10
© 2009 Sony Corporation
Printed in China
Advertisement
Table of Contents

Related Manuals for Sony LINEAR PCM RECORDER PCM-M10


Summary of Contents for Sony LINEAR PCM RECORDER PCM-M10
- Page 1 4-156-541-14(1) Linear PCM Recorder Getting Started Basic Operations Other Recording Operations Other Playback Operations Editing Tracks About the Menu Function Utilizing Your Computer Additional Information Troubleshooting Operating Instructions Index PCM-M10 © 2009 Sony Corporation Printed in China...
-
Page 2: Declaration Of Conformity
The model number is located at the rear panel and the serial number is located inside the battery compartment. Record the serial number in the space provided below. Refer to these numbers whenever you call upon your Sony dealer regarding this product. Model No.PCM-M10 Serial No. -
Page 3: Notice For Users
• The recorded music is limited to private use only. Use of the music beyond this limit requires permission of the copyright holders. • Sony is not responsible for incomplete recording/ downloading or damaged data due to problems of the PCM recorder or computer. -
Page 4: Table Of Contents
Table of Contents Techniques for Better Recording ...7 Getting Started Step 1: Checking the Contents of the Package ...10 Index to parts and controls ...11 Step 2: Inserting the Batteries ...13 When to replace batteries ...14 To operate with the AC power adaptor ...15 Step 3: Turning the PCM recorder On ...16 Turning the power on ...16... - Page 5 Other Playback Operations Changing the Playback Method ...49 Changing the display during playback ...49 Listening the playback sounds with the headphones or external speakers ...50 Quickly locating the point you wish to start playback – Easy Search ...51 Selecting the playback mode ...51 Playing back repeatedly ...52 Changing the Playback Sounds ...54 Adjusting the playback speed –...
- Page 6 Additional Information Precautions ...92 Specifications ...95 System requirements ...95 Battery life ... 100 Troubleshooting Troubleshooting ...102 Error Messages ... 108 System Limitations ... 112 Display Window ... 113 Index ...116 Trademarks ... 119 What you record is for personal enjoyment and use only. Copyright laws prohibit other forms of use without the permission of the copyright holders.
-
Page 7: Techniques For Better Recording
Techniques for Better Recording The PCM-M10 linear PCM recorder allows you to enjoy high-quality recording in a variety of situations. This section introduces easy recording setups for 6 typical music scenes. For recording a solo acoustic guitar performance Tips for setup •... - Page 8 For recording a jazz trio performance Tips for setup • Use a tripod or other device to set the PCM recorder as close to the lead instrument as possible. • While monitoring recording, move the PCM recorder to the position where volume levels from instruments are well-balanced.
- Page 9 For recording an electronic piano performance via a line connection Tips for setup • Connect the line output jack of an electronic piano to the LINE IN jack of the PCM recorder with a cable (not supplied). • Adjust the recording level to the optimum with the REC LEVEL dial.
-
Page 10: Getting Started
Getting Started Step 1: Checking the Contents of the Package Linear PCM recorder (1) Remove the film on the display window before you use the PCM recorder. Remote commander (1) AC power adaptor (3V) (1) USB connecting cable (1) LR6 (size AA) alkaline batteries (2) Hand strap (1) CD-ROM (1) (Sound Forge Audio Studio LE) -
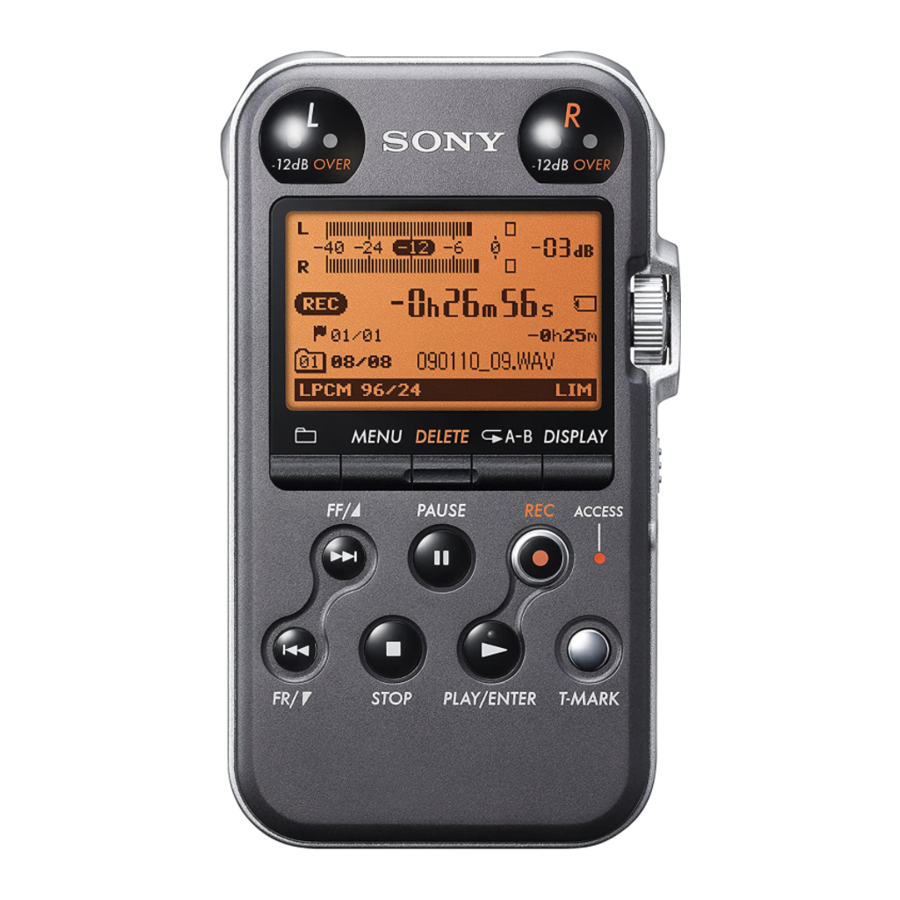
Page 11: Index To Parts And Controls
Index to parts and controls Front A Peak level L/R (-12 dB/OVER) indicators B Display window C DELETE button D MENU button (folder) button (fast-forward/up) button > (fast-rewind/down) button STOP button PAUSE button/indicator PLAY/ENTER button/indicator* REC (record) button/indicator (repeat) A-B button M DISPLAY button N REC LEVEL (recording level) dial O POWER/HOLD switch... - Page 12 W REC LEVEL (recording level) MANUAL/AUTO switch X Hole for attaching the tripod (not supplied) Y Battery compartment Z Speaker (on the basement) wj Built-in microphones (stereo) wk DPC (SPEED CTRL) (speed control) ON/OFF switch wl i/LINE OUT (headphone/line output) jack USB connector ea M2™/microSD memory card slot...
-
Page 13: Step 2: Inserting The Batteries
Step 2: Inserting the Batteries Slide and lift the battery compartment lid in the direction of the arrow. Insert the two supplied LR6 (size AA) alkaline batteries into the battery compartment, and then close the lid. Be sure to insert the batteries with the 3 and # ends in the right position. -
Page 14: When To Replace Batteries
batteries, select “NiMH Battery” in the “Battery Setting” submenu of the “Detail Menu.” With this setting, the battery remain indicator for the rechargeable batteries will be displayed more precisely. See “Making Settings for the Menu” on page 71. Tips • Even if fully-charged rechargeable batteries are inserted, the battery indicator may not show the full status. -
Page 15: To Operate With The Ac Power Adaptor
To operate with the AC power adaptor Insert the supplied AC power adaptor securely into the DC IN 3V jack until it stops to the end. to the DC IN 3V jack to a wall outlet AC power adaptor (supplied) -
Page 16: Step 3: Turning The Pcm Recorder On
Step 3: Turning the PCM recorder On Turning the power on Slide the POWER/HOLD switch in the direction of “POWER” for more than 1 second. The PCM recorder is turned on, and an animation of “Accessing...” is displayed. Turning the power off Slide the POWER/HOLD switch in the direction of “POWER”... -
Page 17: Step 4: Setting The Clock
Step 4: Setting the Clock > FF/ v , . FR/ V MENU N PLAY/ ENTER x STOP Recorded audio files (tracks) are named using the date and time of the clock. By setting the clock before recording, the recording’s date and time will be correctly saved. - Page 18 Press MENU to enter the menu mode. The menu mode window will be displayed. Press > select “Detail Menu,” and then press PLAY/ENTER. Press > select “Clock,” and then press PLAY/ENTER. Press > the date, and then press ENTER. Press year, and then press Perform the same operations to set month, day, hour, and minute in...
-
Page 19: Step 5: Setting The Language To Be Used In The Display Window
Step 5: Setting the Language to Be Used in the Display Window > FF/ v , . FR/ V MENU N PLAY/ ENTER x STOP You can select the language to be used for tracks, menus, folder names, file names, etc. - Page 20 Press > the language that you want to use, and then press PLAY/ENTER. You can select the following languages. English, Español (Spanish), Français (French). Press STOP to return to the stop mode display. to select...
-
Page 21: Preventing Accidental Operation - Hold
Preventing Accidental Operation – HOLD Locking the buttons of the PCM recorder Slide the POWER/HOLD switch in the direction of “HOLD.” “HOLD” will appear for approximately 3 seconds and all the functions of the buttons of the PCM recorder are locked. Unlocking the buttons of the PCM recorder Slide the POWER/HOLD switch towards... -
Page 22: Basic Operations
Basic Operations Recording P Note Before making a recording, turn on the power of the PCM recorder. Selecting a folder Press to display the folder selection window in the stop mode. Press > which you want to record tracks ( When you purchase the PCM recorder, there are 10 folders already available. - Page 23 Starting recording (automatic recording) Set the REC LEVEL switch to “AUTO,” and press REC in the stop mode to enter the recording standby mode. REC indicator lights in red and the indicator flashes in orange (Recording Standby mode). When you select “AUTO,” the recording level will be adjusted automatically.
-
Page 24: To Stop Recording
To stop recording Press STOP. The ACCESS indicator flashes in orange and the PCM recorder stops at the beginning of the current recording. Note while accessing The PCM recorder is recording data and saving it in memory when the ACCESS indicator flashes in orange. - Page 25 • When a memory card is being inserted, you can continue recording a track by changing the folder to save the track from the internal memory to the memory card automatically after the internal memory is full (Cross-Memory Recording)(page 39). •...
-
Page 26: Listening
Listening P Note Before the playback starts, turn on the power of the PCM recorder. Before you start playback Connect headphones (not supplied) to the i/LINE OUT (headphone/line output) jack for better playback sound. P Note Make sure that “Audio Out” in the menu is set to “Headphones.”... - Page 27 Press PLAY/ENTER. Press > want to play. Press PLAY/ENTER. Playback will start soon, and the indicator will light in green. (When “LED” is set to “OFF” in the menu (page 79), the indicator does not light.) Press VOLUME +/– to adjust the volume. to select the track you PLAY/ENTER N PLAY/...
-
Page 28: To Stop Playback
To stop playback Press STOP. The PCM recorder stops at the current position. To resume playback from that point, press Other operations stop at the current position (Playback Pause function) go back to the beginning of the current track go back to previous tracks Press . FR/ V repeatedly. skip to the next track skip to the succeeding tracks... - Page 29 Quickly locating the point you want to start playback (Easy Search) By setting “Easy Search” to “ON” in the menu, you can go back approximately 3 seconds by pressing . FR/ V , or advance approximately 10 seconds during playback by pressing > FF/ v (page 51).
-
Page 30: Deleting
Deleting P Notes • Once a track has been deleted, you cannot retrieve it. • Before deleting the track, turn on the power. Selecting a track and deleting it Select the track you want to delete when the PCM recorder is in the stop or playback mode. Press DELETE. - Page 31 To cancel deleting midway Select “Cancel” in step 3 of “Selecting a track and deleting it,” and then press PLAY/ENTER. Deleting another track Proceed with the steps 1 through 4 in “Selecting a track and deleting it.” Deleting a part of a track Use the Divide function in the menu to divide a track into two first, one you want to delete and the other you do not want to delete.
-
Page 32: Other Recording Operations
Other Recording Operations Changing the Recording Method Recording using the remote commander to REMOTE jack You can use the supplied wired remote commander to perform recorder operations remotely. Insert the remote commander plug securely into the REMOTE jack. Press the appropriate buttons on the remote commander to perform operations such as recording, pausing and stopping recording, and adding track marks. -
Page 33: Manual Recording
Manual recording Built-in microphones REC LEVEL z REC N PLAY/ENTER x STOP > FF/ v , . FR/ V When you set the REC LEVEL switch to “MANUAL,” you can adjust the recording level manually, according to the sound source. If necessary, you can also utilize the “LIMITER”... -
Page 34: Recording A Few Seconds In Advance - The Pre-Recording Function
If the peak level OVER indicator lights in red when the recording level exceeds –1 dB, or “ ” appears on the display window, distortion may occur. Reduce the recording level. Adjust the OVER indication maximum level of the sound to about –12 dB. - Page 35 Sounds for 5 seconds are buffered in the memory z REC Press Press PLAY/ENTER. enter the recording standby mode. Press MENU to enter the menu mode. The menu mode window will be displayed. Press > “Detail Menu,” and then press PLAY/ENTER.
-
Page 36: Recording On A Memory Card
To start recording, press PLAY/ENTER. The standby for recording mode is released, and recording continues from the sound buffered in step 7. To stop recording, press P Notes • If you start recording with the pre-recording function using the built-in microphones, a click noise may be recorded when you press z REC. -
Page 37: Inserting A Memory Card
Memory cards that you can use with the PCM recorder are as follows: • Memory Stick Micro™ (M2™) media: Up to16 GB is supported. For compatible M2™, please refer to the Sony web site (page 95). • microSD card: A microSD (FAT16) card smaller than 2 GB and a microSDHC (FAT32) card from 4 GB to 16 GB are supported. - Page 38 To remove a memory card Be sure that the ACCESS indicator is off, and then push the memory card into the slot. When it pops out, remove it from the memory card slot. On folder and track file structure Ten folders are created in a memory card in addition to those in the built-in memory.
-
Page 39: Recording Across Memory Media - Cross-Memory Recording
To start recording Select the folder and press recording standby mode. Then press PAUSE or PLAY/ENTER to start recording. For automatic recording, see “Recording” on page 22. For manual recording, see “Manual recording” on page 33. Recording across memory media – Cross-Memory Recording >... - Page 40 Press > “ON,” and then press ENTER. Press STOP to exit the menu mode. To cancel Cross-Memory Recording Select “OFF” in step 4. When the current memory media becomes full during recording The following message appears on the display window. Recording continues as a new track in a recordable folder of the smallest folder number available for the other memory media.
-
Page 41: Changing The Recording Settings
Changing the Recording Settings Selecting the recording mode > FF/ v , . FR/ V MENU N PLAY/ ENTER x STOP You can select the recording mode in the menu when the PCM recorder is in the stop mode. About the recording modes The PCM recorder is compatible with 2 types of recording modes: LPCM (Linear PCM) and MP3. -
Page 42: Setting The Microphone Sensitivity
Press > the desired recording mode, and then press PLAY/ENTER. LPCM 22.05kHz/16bit LPCM 44.10kHz/16bit LPCM 44.10kHz/24bit LPCM 48.00kHz/16bit LPCM 48.00kHz/24bit LPCM 96.00kHz/16bit LPCM 96.00kHz/24bit MP3 44.10kHz/64kbps MP3 44.10kHz/128kbps MP3 44.10kHz/320kbps * default setting ** for a long-time recording Press STOP to exit the menu mode. P Note You cannot set the recording mode while recording. -
Page 43: Cutting Out Low Frequency - The Lcf Function
You can set the sensitivity of the built-in microphones and an external microphone connected to the m (microphone) jack of the PCM recorder. Switch the MIC SENS(ATT) switch according to the recording conditions or to suit your purposes, when the PCM recorder is either stopped or is recording. -
Page 44: Preventing Sound Distortion- The Limiter Function
Press > “LCF(Low Cut Filter),” and then press PLAY/ENTER. Press > “ON,” and then press ENTER. The LCF function is set to “OFF” when you purchase the PCM recorder. Press STOP to exit the menu mode. To cancel the LCF function Set “LCF(Low Cut Filter)”... - Page 45 Press > “Detail Menu,” and then press PLAY/ENTER. Press > “LIMITER,” and then press ENTER. Press > “ON,” and then press PLAY/ ENTER. The LIMITER function is set to “OFF” when you purchase the PCM recorder. Press STOP to exit the menu mode. To cancel the LIMITER function to select Set “LIMITER”...
-
Page 46: Recording Via Other Devices
Recording via Other Devices Recording with an external microphone m (microphone) jack > FF/ v , . FR/ V REC LEVEL z REC N PLAY/ENTER X PAUSE x STOP You can record from an external microphone. When an external microphone is connected, the built-in microphones and the input from the LINE IN jack become disabled. -
Page 47: Recording From Other Equipment
When “MANUAL” has been selected in step 4, adjust the recording level with the REC LEVEL dial. To stop recording, press Recommended microphones (not supplied) We recommend you use the Sony ECM-MS957 electret condenser microphone. Recording from other equipment Tape recorder or CD player PAUSE or STOP. - Page 48 REC LEVEL dial. To stop recording, press Recommended audio connecting cable (not supplied) We recommend you use Sony RK-G129 audio connecting cable (not supplied). P Note When both m (microphone) jack and LINE IN jack are connected with an external...
-
Page 49: Other Playback Operations
Other Playback Operations Changing the Playback Method Changing the display during playback You can change the display during playback between the file information display and the level meter display. • File information display Title name Artist name File name Current folder icon A track recorded using the PCM recorder is displayed as follows. -
Page 50: Listening The Playback Sounds With The Headphones Or External Speakers
PCM recorder. Adjust the volume with the VOLUME +/– buttons. Or use a Sony audio connecting cable (not supplied) to connect the microphone or line input jack of an external active or passive speaker (not supplied) with the i/ LINE OUT (headphone/line output) jack of the PCM recorder. -
Page 51: Quickly Locating The Point You Wish To Start Playback - Easy Search
• When “Audio Out” in the menu is set to “LINE OUT,” do not connect headphones; the playback sound from the headphones will be very loud. Quickly locating the point you wish to start playback – Easy Search When “Easy Search” is set to “ON” in the menu, you can quickly locate the point at which you wish to start playback by pressing... -
Page 52: Playing Back Repeatedly
Press MENU to enter the menu mode when the PCM recorder is in the stop or playback mode. The menu mode window will be displayed. Press > “Play Mode,” and then press ENTER. Press > “1,” “ ,” “ALL,” “ “... - Page 53 Playing back a track repeatedly During playback, press and hold ENTER until “ 1” appears. The selected track will be played back repeatedly. To resume normal playback, press PLAY/ENTER again. Playing back a specified section repeatedly – A-B Repeat During playback, press to specify the starting point A.
-
Page 54: Changing The Playback Sounds
Changing the Playback Sounds Adjusting the playback speed – the DPC function When you slide the DPC (SPEED CTRL) (Digital Pitch Speed Control) switch to “ON,” you can adjust the playback speed between +100% and –75% of normal speed in the menu. The track is played back in natural tones thanks to the digital processing function. -
Page 55: Adjusting The Playback Tones - Key Control
Press PLAY/ENTER to execute the playback speed. Press STOP to exit the menu mode. Press PLAY/ENTER to start playback. Tracks are played back at the selected playback speed. To resume normal playback Slide the DPC (SPEED CTRL) switch to “OFF.” Adjusting the playback tones –... -
Page 56: Reinforcing The Bass Sound - Effect
Press > the playback tone. Press to adjust the sounds by > a halftone higher (#1 to #6), or to adjust it by a halftone lower (21 to 26), each in 6 steps. Press PLAY/ENTER to set the playback tone. Press STOP to exit the menu mode. - Page 57 Press MENU to enter the menu mode when the PCM recorder is in the stop or playback mode. The menu mode window will be displayed. Press > “Effect,” and then press ENTER. Press > effect you want for the playback, and then press PLAY/ENTER.
-
Page 58: Playback Via Other Devices
Playback via Other Devices Recording with other equipment Tape recorder, etc. i/LINE OUT jack Audio connecting cable x STOP N PLAY/ENTER You can record the sound of the PCM recorder with other equipment. Before you start recording, we recommend you to make a trial recording first. Connect the /LINE OUT (headphone/ line output) jack of the PCM recorder to... - Page 59 STOP on the PCM recorder and the connected equipment at the same time to stop recording. Recommended audio connecting cable (not supplied) You can use Sony audio connecting cables RK-G129 (not supplied). to select P Notes PLAY/ • To listen playback with the headphones, set “Audio Out”...
-
Page 60: Editing Tracks
Editing Tracks Adding a Mark to a Track Using a track mark Adding a track mark You can add a track mark at a point at which you would like to divide a track later or locate during playback. You can add a maximum of 98 track marks to each track. - Page 61 Locating a track mark and starting playback at the track mark In the stop mode, press > . When the (track mark) icon flashes once, press PLAY/ENTER Dividing a track at all the track mark positions Select “Divide All T-MARK(Track Marks)”...
-
Page 62: Adding A "Take" Or "Keep" To A File Name
Stop position The track mark just before the stop position will be deleted. Press STOP to exit the menu mode. Deleting all the track marks in the selected track at one time Select a track from which you would like to delete the track marks, and then select “Delete All T-MARK(Track Marks)”... - Page 63 Press MENU to enter the menu mode. The menu mode window will be displayed. Press > “Add “TAKE”,” and then press PLAY/ENTER. Press > “Add “TAKE”,” or “Add “KEEP”,” and then press PLAY/ENTER. A confirmation message is displayed. Press > “Execute,”...
-
Page 64: Protecting A Track
Protecting a track To prevent a track from being accidentally deleted or edited, you can protect an important track. A protected track is marked with the (protect) indicator and is regarded as a read-only file you cannot delete or edit. Display the track which you would like to protect. -
Page 65: Arranging Tracks
Arranging Tracks Copying a track to the other memory > FF/ v , . MENU N PLAY/ENTER x STOP Memory card slot You can copy tracks between the built-in memory and a memory card, which is useful in saving a backup. Before starting the operation, insert a memory card to be used for copying into the memory card slot. -
Page 66: Dividing A Track Into Two
Memory Select Folder” is displayed and the folder selection window is displayed. Press > the folder that you want to copy the track into, and then press “Copying...” is displayed and the track is copied to the end in the destination folder. - Page 67 You can divide a track until the total number of tracks in the folder reaches 99. Dividing a track at the current position Stop the track at the position where you want to divide a track. Press MENU to enter the menu mode. The menu mode window will be displayed.
- Page 68 Press > “Execute,” and then press ENTER. “Dividing...” appears, and the divided tracks will be suffixed with a sequential number (“_1” for the original track, and “_2” for the new track).” track 1 track 2 A track is divided. track 1 track 2_1 track 2_2 A suffix made up of a sequential number is...
-
Page 69: Deleting All Tracks In A Folder
Press > “Execute,” and then press ENTER. “Dividing...” appears, and the track is divided at all the track mark positions. The tracks divided from a single track will be suffixed with a sequential number (_1 and so on). Track1 A track is divided. Track1_1 Track1_2 Track1_3 A suffix made up of a sequential number is... - Page 70 Select the folder containing the tracks you want to delete when the PCM recorder is in the stop mode. Press MENU to enter the menu mode. The menu mode window will be displayed. Press > “Delete,” and then press ENTER. The Delete menu is displayed.
-
Page 71: About The Menu Function
About the Menu Function Making Settings for the Menu > FF/ v , . FR/ V MENU N PLAY/ ENTER x STOP Press MENU to enter the menu mode. The menu mode window will be displayed. Press > the menu item for which you want to make setting, and then press ENTER. -
Page 72: Menu Settings
Menu settings Menu items Divide Divide Current Position Divide All T-MARK(Track Marks) Delete Delete All Delete T-MARK(Track Mark) Delete All T-MARK(Track Marks) File Copy Add “TAKE” Protect Memory REC Mode LCF(Low Cut Filter) DPC(Speed Control) Settings Execute, Cancel Execute, Cancel Execute, Cancel Execute, Cancel Execute, Cancel... - Page 73 Menu items Settings Effect Bass1, Bass2, OFF Key Control 21 to 26, #1 to #6 Easy Search ON, OFF Play Mode Detail Menu Format Execute, Cancel Clock _ _ y _ _ m _ _ d _ _ : _ _ ON, OFF Backlight 10 SEC, 60 SEC, Always-ON, OFF...
- Page 74 Menu items Settings (*: Initial setting) Divide Divide a track into two. Divide Current A track will be divided into two at the current position. Position Divide All T- A track will be divided at all the track mark positions. MARK(Track Marks) Delete...
- Page 75 Menu items Settings (*: Initial setting) Protect Protect the selected track to prevent the track from being deleted or divided. Execute: Protect the selected track. If you specify a track which has already been protected, cancel the protection. Cancel*: Protection or cancel protection is not executed. Memory Select the memory in which you want to save a track, or which contains the track you want to play, edit, or copy.
- Page 76 Menu items Settings (*: Initial setting) REC Mode Set the sampling frequency and quantifying bit number for recording: LPCM 22.05kHz/16bit LPCM 44.10kHz/16bit* LPCM 44.10kHz/24bit LPCM 48.00kHz/16bit LPCM 48.00kHz/24bit LPCM 96.00kHz/16bit LPCM 96.00kHz/24bit MP3 44.10kHz/64kbps MP3 44.10kHz/128kbps MP3 44.10kHz/320kbps • Sampling frequency is a value that represents how many times an analog signal is converted into a digital signal (A/D conversion) per second.
- Page 77 Menu items Settings (*: Initial setting) DPC(Speed Control) Set the DPC(Speed Control) function. You can adjust the playback speed between +100% and –75% of normal speed in the menu.You can set the speed by 5% for – from –75% to 0%, 10% for + between 0% and 100%. (–30%*) Effect Set the effect you want for the playback in the menu.
- Page 78 Menu items Settings (*: Initial setting) Play Mode Set the playback mode. ALL: Detail Menu Format Format the memory currently selected in “Memory” setting in the menu, deleting all the data in the memory and resetting the folder structure to its default status. Execute: Cancel*: P Notes...
- Page 79 Menu items Settings (*: Initial setting) Clock Set the clock by setting year, month, day, hour, and minute in sequence. (09y01m01d 12:00 AM*) The clock is displayed in 12-hour system. 12:00AM = midnight, 12:00PM = noon Turn the operation of ACCESS indicator, peak level indicators, z REC button, N PLAY/ENTER button, and X PAUSE button on or off during operation.
- Page 80 Menu items Settings (*: Initial setting) Backlight Turn the backlight in the display window on or off. 10 SEC*: 60 SEC: Always-ON: OFF: P Note When you select “Always-ON,” the batteries will be consumed quickly. When you use the PCM recorder with batteries, we recommend you select other options than “Always-ON.”...
- Page 81 Menu items Settings (*: Initial setting) LIMITER Set the input level automatically to prevent the sound distortion that may occur when a too loud sound is input in Manual recording. The LIMITER function is activated. OFF*: The LIMITER function is cancelled. P Note This feature is effective only when REC LEVEL switch is set to “MANUAL.”...
- Page 82 Menu items Settings (*: Initial setting) Audio Out Set the output of the i/LINE OUT (headphone/line output) jack. Headphones*: You can use the jack as a headphone jack. Select LINE OUT: You can use the jack as a line output jack. Select this P Notes •...
-
Page 83: Utilizing Your Computer
Utilizing Your Computer Using the PCM recorder with Your Computer When the PCM recorder is connected to your computer, it is recognized by the computer, and you can transfer data between them. Copying tracks from the PCM recorder to your computer to save them (page 87) You can copy the tracks recorded on the PCM recorder to save them. -
Page 84: Connecting The Pcm Recorder To Your Computer
Connecting the PCM recorder to your computer Computer To USB port USB connecting cable (supplied) To exchange tracks (files) between the PCM recorder and your computer, connect the PCM recorder to your computer. Connect the USB connector of the PCM recorder with the USB port of your running computer with the supplied USB connecting cable inserted into the connectors securely until each plug stops... -
Page 85: Structure Of Folders And Files
Structure of folders and files Built-In Memory and M2™ “PCM RECORDER” or “MEMORY CARD” Folder for tracks recorded using the PCM recorder Folder copied from your Lesson computer MUSIC J-POP microSD card “MEMORY CARD” Lesson MUSIC Folder for tracks recorded using the PCM recorder Folder copied from your computer... - Page 86 If you connect the PCM recorder to your computer, you can see the structure of folders and files of the built-in memory, memory card (M2™ or microSD card) on the computer screen. The folders and files are displayed on the computer screen as shown on the previous page.
-
Page 87: Copying Tracks From The Pcm Recorder To Your Computer
Copying Tracks from the PCM recorder to Your Computer You can save tracks or folders by copying them from the PCM recorder to your computer. When you wish to create a CD, you can use “Sound Forge Audio Studio LE,” the supplied software application, to create a CD. -
Page 88: Copying Files From Your Computer To The Pcm Recorder And Playing Them Back
Copying Files from Your Computer to the PCM recorder and Playing Them Back You can copy music or the other audio files (LPCM/MP3/WMA/AAC-LC*) from your computer to the PCM recorder by dragging and dropping them, and you can play them back using the PCM recorder. - Page 89 Press PLAY/ENTER to start playback. Press STOP to stop playback. The maximum playback time (tracks*), when playing music files using the PCM recorder, is as follows. 48 kbps 128 kbps 178hr. 67 hr. 55 min. (2,683 tracks) (1,005 tracks) * In the case where tracks of 4 minutes each are copied to the PCM recorder.
-
Page 90: Using The Pcm Recorder As A Usb Memory - Data Storage Function
Using the PCM Recorder as a USB Memory – Data Storage Function When the PCM recorder is connected to your computer using a USB connecting cable, image data or text data on the computer, as well as tracks or files recorded using the PCM recorder can be temporarily stored in the PCM recorder. -
Page 91: Disconnecting The Pcm Recorder From Your Computer
Disconnecting the PCM Recorder from Your Computer Follow the procedures below; otherwise, data may be damaged. Make sure that the PCM recorder is in the stop mode. Perform the following operation on your computer. On the Windows screen, left-click the icon at the bottom of the desktop of the computer. -
Page 92: Additional Information
Additional Information Precautions On noise • Noise may be heard when the unit is placed near an AC power source, a fluorescent lamp or a mobile phone during recording or playback. • Operation and touch noises may be recorded when you press the button on the PCM recorder, touch the case, or hold the PCM recorder during recording. - Page 93 Do not use alcohol, benzine or thinner. If you have any questions or problems concerning your unit, please consult your nearest Sony dealer. Backup recommendations To avoid potential risk of data loss caused by accidental operation or malfunction of...
- Page 94 PCM recorder, and may have problems when used with the PCM recorder. For compatible M2™, please refer to the Sony web site (page 95). • “MagicGate™” is copyright protection technology that uses encryption technology. The PCM recorder does not support data recording/playback that requires MagicGate™...
-
Page 95: Specifications
• For the latest version information and compatibility with your operating system, please access the support home page for the PCM recorder: U.S.A.: http://www.sony.com/recordersupport Canada: http://www.sony.ca/ElectronicsSupport/ http://fr.sony.ca/ElectronicsSupport/ • The following systems are not supported: – Operating systems other than the ones indicated on the left –... - Page 96 When you are using Windows 2000 Professional Install the driver using “SonyRecorder_Driver.exe” in the PCM recorder. PCM recorder section Capacity (User available capacity) Built-In Memory: 4 GB (approx. 3.60 GB = 3,865,470,566 Byte) A part of the memory capacity is used as a management area.
- Page 97 Signal-to-noise ratio (S/N) (Input from the LINE IN jack and output from LINE OUT jack when recording/playing back LPCM) 87 dB (1 kHz IHF-A) (for 24 bit) General Speaker 21/ 32 Approx. 16 mm ( inches) dia. Input/Output • Microphone jack (minijack, stereo), input for plug in power –...
- Page 98 Optional accessories Memory Stick Micro™ (M2™) MS-A1GD, MS-A2GD, MS-A4GD, MS-A8GU2, MS- A16GU2 Stereo headphones MDR-7502, MDR- 7509HD Electret condenser microphone ECM-MS957 Audio connecting cable RK-G129 Rechargeable battery NH-AA-B2K Battery charger BCG-34HS2K Carrying case speaker CKS-M10 Wind screen AD-PCM2 Tripod VCT-PCM1 Your dealer may not handle some of the above listed optional accessories.
- Page 99 Maximum recording time The maximum recording time of all the folders is as follows (rounded figures by 5 minutes). Recording modes Built-in memory LPCM 96.00kHz/24bit 1 hr. 50 min. LPCM 96.00kHz/16bit 2 hr. 45 min. LPCM 48.00kHz/24bit 3 hr. 40 min. LPCM 48.00kHz/16bit 5 hr.
-
Page 100: Battery Life
For details on the battery life, see the next table. The maximum recording time varies if you record tracks in mixed recording mode. Battery life When using Sony LR6 (SG) (size AA) alkaline batteries Recording modes LPCM 96.00kHz/24bit LPCM 96.00kHz/16bit... - Page 101 MP3 44.10kHz/64kbps 38 hr. The battery life is measured in testing using methods proprietary to Sony. The battery life may shorten depending on how you operate the PCM recorder. When playing back music through the internal speaker with the volume level set to 16.
-
Page 102: Troubleshooting
Troubleshooting Before taking the PCM recorder for repair, check the following sections. Should any problem persist after you have made these checks, consult your nearest Sony dealer. Please note that recorded tracks may be deleted during service or repair work. - Page 103 Symptom Remedy The ACCESS indicator, peak • “LED” is set to “OFF”. Display the menu and set “LED” to “ON” level indicators, z REC button, N PLAY/ENTER button, or X PAUSE button indicators do not light. “Memory Full” is displayed •...
- Page 104 Symptom A howling noise is heard during recording. You cannot divide a track. When recording from other equipment, the input level is too strong or not strong enough. Playback speed is too fast or too slow. “--:--” is displayed. “--y--m--d” or “ --:--” is displayed on the recording date display.
- Page 105 Symptom Remedy The battery life is short. • The battery life on page 100 is based on playback with the volume There is no battery power • Even if you do not use the PCM recorder, the batteries are remaining after you have left the batteries inserted for long time without using the PCM recorder.
- Page 106 Symptom The “Accessing...” display does not disappear. It takes a long time to copy a track. The PCM recorder does not operate with the USB AC adaptor. The copied tracks are not displayed. It takes a long time for the PCM recorder to start.
- Page 107 Symptom Remedy The PCM recorder does not • You may have formatted the memory of the PCM recorder using a operate. The PCM recorder is not • Disconnect the PCM recorder from your computer and reconnect recognized by your computer. •...
-
Page 108: Error Messages
Error Messages Error message Low Battery Level Change Battery Power Problem Memory Full Track Full T-MARK(Track Marks) are Full Cannot Divide - Exceeding Maximum Number of Tracks in Folder Cause/Remedy • You cannot format the memory or delete all the files in a folder because of insufficient battery power. - Page 109 Error message Cause/Remedy File Damaged • You cannot play or edit tracks, because the data of the selected file Format Error • The PCM recorder has been formatted using a computer. You Process Error • The PCM recorder failed in memory access. Remove and then re- •...
- Page 110 Error message Memory Card Locked Read Only Memory Card Memory Card Access Denied Memory Card Not Supported • A memory card that the PCM recorder does not support is Unknown Memory Card Stop and Reinsert Memory Card Unknown Data Invalid Operation Cause/Remedy •...
- Page 111 Error message Cause/Remedy New Track • The file size of the track being recorded has reached the maximum Only Effective During • When the MANUAL Recording Mode Level Too High • When the Set MIC SENS to LOW Or Adjust MIC Position Continue Recording in •...
-
Page 112: System Limitations
System Limitations There are some system limitations of the PCM recorder. Troubles as mentioned below are not malfunctions of the Symptom You cannot record tracks up to the maximum recording time. You cannot display or play back music files in order of copying. -
Page 113: Display Window
Display Window Display when stop or recording In manual recording Display when playback (without level meter display) Level meter display when playback A Operation mode indicator Displays the following, depending on the current operation mode : stop : playback : recording : recording standby/recording pause (The indicator flashes.) : playback pause (The indicator... - Page 114 date (year, month, day), and recording time (hour, minute) C Level meter display in Auto (AGC) recording mode In manual recording, the level meter whose colors are reverse is displayed. D Auto (AGC) recording indication In the manual recording mode, a peak level value is displayed.
- Page 115 K File information The file name of the track is displayed. L Limiter indicator : Appears when the LIMITER is set for a track. M LCF(Low Cut Filter) indicator : Appears when the LCF(Low Cut Filter) is set for a track. N Remaining recording time indication Displays the remaining recording time of the memory currently being used in...
-
Page 116: Index
Index A-B Repeat ...53 AC power adaptor ...15, 93 Adding a track mark ...60 Adding TAKE or KEEP to a file name ..62 Adjusting the playback sound tones ...55 Adjusting the volume ...25, 27, 50 Auto (automatic) recording ...22 Battery life ... 100 Battery remain indication ...14 Built-in microphones ...23 Compatible memory cards ...37... - Page 117 KEEP ...62 Key Control ...55 LCF(Low Cut Filter) ...43 Level meter display ...49 LIMITER ...44 Locking the buttons ...21 LPCM ...41 Maintenance ...93 Manual recording ...33 Memory card ...37, 93 Memory setting ...38 Menu Add “TAKE” ...72, 74 Audio Out ...73, 82 Backlight ...73, 80 Battery Setting ...73, 80 Clock ...73, 79...
- Page 118 Playback modes ...51, 78 Plug In Power ...46 POWER ...16 POWER/HOLD switch ...16, 21 Precautions ...92 Pre-Recording ...34 Protect ...64 Recharging batteries ... 13, 101 Recording ...22, 33 Recording from other equipment ...47 Recording mode ...41, 76 Recording time ...99 Recording with an external microphone .46 Recording with other equipment ...58 Reinforcing the bass sound ...56...
-
Page 119: Trademarks
• MPEG Layer-3 audio coding technology and patents licensed from Fraunhofer IIS and Thomson. • Sound Forge is a trademark or registered trademark of Sony Creative Software, Inc. in the United States and other countries. All other trademarks and registered trademarks are trademarks or registered trademarks of their respective holders.