Table of Contents
Advertisement
Additional information on this product and answers
to frequently asked questions can be found at our
Customer Support Website.
http://www.sony.net/
Printed on 70% or more recycled paper
using VOC (Volatile Organic Compound)
-free vegetable oil based ink.
Printed in China
Digital Video Camera Recorder
Operating Guide
DCR-DVD108/DVD308/
DVD608/DVD708
© 2007 Sony Corporation
2-319-496-11(1)
Enjoying with your
12
camcorder
Getting Started
21
Recording/Playback 31
Editing
48
Utilizing recording media
57
Customizing your
62
camcorder
80
Using a Computer
85
Troubleshooting
Additional
98
Information
Quick
111
Reference
Spanish Quick Guide/
122
Guía rápida en español
Advertisement
Table of Contents

Related Manuals for Sony DVD608


Summary of Contents for Sony DVD608
- Page 1 Printed on 70% or more recycled paper using VOC (Volatile Organic Compound) -free vegetable oil based ink. Printed in China Digital Video Camera Recorder Operating Guide DCR-DVD108/DVD308/ DVD608/DVD708 © 2007 Sony Corporation 2-319-496-11(1) Enjoying with your camcorder Getting Started Recording/Playback 31 Editing Utilizing recording media...
- Page 2 WARNING To reduce fire or shock hazard, do not expose the unit to rain or moisture. This symbol is intended to alert the user to the presence of uninsulated “dangerous voltage” within the product’s enclosure that may be of sufficient magnitude to constitute a risk of electric shock to persons.
-
Page 3: Important Safeguards
IMPORTANT SAFEGUARDS For your protection, please read these safety instructions completely before operating the appliance, and keep this manual for future reference. Carefully observe all warnings, precautions and instructions on the appliance, or the one described in the operating instructions and adhere to them. -
Page 4: Replacement Parts
IMPORTANT SAFEGUARDS (Continued) Lightning For added protection for this set during a lightning storm, or when it is left unattended and unused for long periods of time, unplug it from the wall outlet and disconnect the antenna or cable system. This will prevent damage to the set due to lightning and power-line surges. -
Page 5: Read This Before Operating Your Camcorder
Owner’s Record The model and serial numbers are located on the bottom. Record the serial number in the space provided below. Refer to these numbers whenever you call upon your Sony dealer regarding this product. Model No. DCR- Serial No. -
Page 6: Notes On Use
– 8cm DVD+R DL Use the discs with marks listed below. See page 14 for details. For reliability durability of recording / playback, we recommend that you use Sony discs or discs with an VIDEO CAMERA) mark for your camcorder. - Page 7 Be sure to insert the “Memory Stick Duo” into the Memory Stick Duo Adaptor. Memory Stick Duo Adaptor Using the camcorder • Do not hold the camcorder by the following parts. Viewfinder LCD screen Battery • The camcorder is not dustproofed, dripproofed or waterproofed.
- Page 8 About the Carl Zeiss lens Your camcorder is equipped with a Carl Zeiss lens, which was developed jointly by Carl Zeiss, in Germany, and Sony Corporation, and produces superior images. It adopts the MTF measurement system for video cameras and offers a quality typical of a Carl Zeiss lens.
-
Page 9: Table Of Contents
Subject examples and solutions Enjoying with your camcorder What you can do with your camcorder ... 12 Choosing a disc ... 14 Using your camcorder ... 16 “ HOME” and “ OPTION” - Taking advantage of two types of menus ... 18... - Page 10 Using a Macintosh computer ... 84 Troubleshooting Troubleshooting ... 85 Warning indicators and messages ... 94 Additional Information Using your camcorder abroad ... 98 Maintenance and precautions .. 100 Specifications ... 108 Quick Reference Identifying parts and controls ... 111 Indicators displayed during recording/playback ...
-
Page 11: Subject Examples And Solutions
Subject examples and solutions Shooting Flowers in close-up B PORTRAIT ... 77 B FOCUS... 75 B TELE MACRO ... 75 Focusing on the dog on the left side of the screen B FOCUS... 75 B SPOT FOCUS... 75 Getting a good shot of a ski slope or beach B BACK LIGHT ... -
Page 12: Enjoying With Your Camcorder
Enjoying with your camcorder What you can do with your camcorder Your camcorder records image data on 8cm DVD*. It is more convenient than video tape and far more versatile. Taking beautiful shots easily No rewinding to start recording (p.31, 34) - Page 13 Using the supplied software to edit and copy (p.80) Picture Motion Browser, the software supplied with your camcorder allows you to edit movies or still images stored in your computer to create your original DVD. Copying discs could not be easier enabling you to share your precious moments with family and friends.
-
Page 14: Choosing A Disc
• If you use a double-sided disc, you can record on both sides of the disc (p.100). Your camcorder uses the VBR (Variable Bit Rate) format to automatically adjust image quality to suit the recording scene. This technology causes fluctuations in the recording time of a disc. Movies containing quickly moving and complex images are recordedat a higher bit rate, and this reduces the overall recording time. - Page 15 Formatting deletes all recordings and returns the recording medium to its original empty state (p.59). Even when using a new disc, format it with your camcorder (p.28). Finalizing is required to play the disc in a DVD drive on a computer. A DVD+RW that is not finalized may cause the computer to malfunction.
-
Page 16: Using Your Camcorder
• You can select the disc from [DISC SELECT GUIDE] (p.58). 2Recording, playback, editing (See pages 34, 39, and 48.) What you can do with your camcorder depends on the type of disc (p.15). 3Viewing on your camcorder (See pages 32 and 39) You can also connect it to a TV for viewing (p.42). -
Page 17: Viewing On Another Dvd Device
4Viewing on another DVD device (See pages 44, 57.) To view a disc recorded on your camcorder on other DVD devices, you need to finalize it first. DVD device / DVD recorder Notes • The less the recording volume of the disc is, the more it takes time to finalize the disc. -
Page 18: Home" And " - Taking Advantage Of Two Types Of Menus
Displays a description of the item (p. 19) Category category Page Items FINALIZE* DISC SELECT GUIDE Page UNFINALIZE DISC INFO To customize your camcorder (p. 62). Page * You can also set these items during Easy Handycam operation available in the page (HELP) (MANAGE DISC/MEMORY) Page FORMAT*... - Page 19 Using the HOME MENU Turn the POWER switch to turn on your camcorder. (HOME) A (or B). Press (HOME) B (HOME) A Touch the category you want to use. Example: (OTHERS) category Touch the item you want to use. Example: [EDIT] Continue operation by following the guidance on the screen.
- Page 20 “ HOME” and “ 3 Touch the item you want to know the content. MOVIE Records a movie. Activate? When you touch an item, its explanation appears on the screen. To apply the option, touch [YES], otherwise, touch [NO]. To deactivate the HELP Touch (HELP) again in step 2.
-
Page 21: Getting Started
Getting Started Step 1: Checking supplied items Make sure that you have the following items supplied with your camcorder. The number in the parentheses indicates the number of that item supplied. AC Adaptor (1) (p. 22) Power cord (1) (p. 22) A/V connecting cable (1) (p. -
Page 22: Step 2: Charging The Battery Pack
DC IN jack on your camcorder. Notes • Disconnect the AC Adaptor from the DC IN jack holding both the camcorder and the DC plug. To remove the battery pack Turn the POWER switch to OFF(CHG). Slide the BATT (battery) release lever and remove the battery pack. - Page 23 Battery pack NP-FH40 (supplied) NP-FH50 NP-FH70 NP-FH100 Recording time Approximate time (min.) available when you use a fully charged battery pack. DCR-DVD108/DVD608 Battery pack NP-FH40 (supplied) NP-FH50 NP-FH70 NP-FH100 Charging time Continuous Typical recording...
-
Page 24: Playing Time
• The power will not be supplied from the battery as long as the AC Adaptor is connected to the DC IN jack of your camcorder, even when the power cord is disconnected from the wall outlet. • When attaching an optional video light, it is recommended that you use an NP-FH70/NP- FH100 battery pack (DCR-DVD308/DVD708). -
Page 25: Step 3: Turning The Power On, And Setting The Date And Time
Adaptor or battery terminal with any metallic objects. This may cause a malfunction. • Even if your camcorder is turned off, AC power (house current) is still supplied to it while connected to the wall outlet via the AC Adaptor. -
Page 26: Changing The Language Setting
(p. 107). • It takes a few seconds for your camcorder to be ready to shoot after the power is turned on. You cannot operate your camcorder during this time. -
Page 27: Step 4: Preparing For Recording
LCD panel. z Tips • If you open the LCD panel 90 degrees to the camcorder, then rotate it 180 degrees to the lens side, you can close the LCD panel with the LCD screen facing out. This is convenient during playback operations. -
Page 28: Step 5: Inserting A Disc Or A "Memory Stick Duo
Close the disc cover. [DISC ACCESS] appears on the LCD screen. It may take some time for the camcorder to recognize the disc. x DVD-RW/DVD+RW A screen appears to ask whether you will use [DISC SELECT GUIDE]. - Page 29 • Be careful not to obstruct the operation with your hand or other objects, etc., when opening or closing the disc cover. Move the belt to the bottom of the camcorder, then open or close the disc cover. • If you catch the belt when closing the disc cover, it may cause your camcorder to malfunction.
- Page 30 • When the access lamp is lit or flashing, your camcorder is reading/writing data. Do not shake or knock your camcorder, turn the power off, eject the “Memory Stick Duo,” or remove the battery pack. Otherwise, image data may be damaged.
-
Page 31: Recording/Playback
Handycam) Easy Handycam operation makes nearly all settings automatic so that you can perform recording or playing back operation without detailed settings. It also makes screen font size larger for easy viewing. * DCR-DVD108/DVD608 ** DCR-DVD308/DVD708 Movies Turn the POWER... - Page 32 Recording and playing back with ease (Easy Handycam) (Continued) Viewing recorded movies/still images Turn the POWER switch A to turn on your camcorder. Press (VIEW IMAGES) F (or G). The VISUAL INDEX screen appears on the LCD screen. (It may take some time to display the VISUAL INDEX screen.)
- Page 33 Still images: Touch , then touch the still image you want to view. Return (to the VISUAL INDEX screen) Go to the VISUAL INDEX screen * [DATA CODE] is fixed to [DATE/TIME] (p. 67). z Tips • The screen returns to the VISUAL INDEX screen when the movies from the one you selected through the one at the end of the list are all played back.
-
Page 34: Recording
• If the access lamps (page 28, 29) is on after recording is finished, it means data is still being written onto the disc or “Memory Stick Duo.” Do not apply shock or vibration to your camcorder, and do not disconnect the battery or AC Adaptor. Open the Lens cover... - Page 35 Movies Movies are recorded on the disc. For recordable time, see page 14. Turn the POWER switch until (Movie) lamp turns on. Press START/STOP B (or C). [STBY] To stop recording, press START/STOP again. To switch to the movie recording mode using the (HOME) button Touch...
-
Page 36: Zooming
LCD frame. Wider range of view: (Wide angle) Close view: (Telephoto) * DCR-DVD108/DVD608 ** DCR-DVD308/DVD708 Move the power zoom lever slightly for a slower zoom. Move it further for a faster zoom. -
Page 37: Recording In Dark Places (Nightshot Plus)
BACK LIGHT again. Recording in mirror mode Open the LCD panel 90 degrees to the camcorder (1), then rotate it 180 degrees to the lens side (2). z Tips • A mirror-image of the subject appears on the LCD screen, but the image will be normal when recorded. - Page 38 [1.0M] (4:3) at the maximum. z Tips • See page 66 for the number of recordable still images. • With the DCR-DVD108/DVD608, you can change the aspect ratio of movies in the HOME MENU. For details, see page 64. 0.7M] (16:9) or...
-
Page 39: Playback
(HOME) (VIEW IMAGES) C DCR-DVD308/ DVD708 Turn the POWER switch A to turn on your camcorder. Press VIEW IMAGES) B (or C). The VISUAL INDEX screen appears on the LCD screen. (It may take some time to display the VISUAL INDEX screen.) -
Page 40: Still Images
Start playing back Movies Touch tab and the movie to be played back. The VISUAL INDEX screen reappears when playback from the selected movie until the last movie is completed. Return (to the VISUAL INDEX screen) Beginning of the scene/ previous scene Stop (go to the VISUAL INDEX screen) -
Page 41: Using Pb Zoom
1.1 to 5 times the original size. Magnification can be adjusted with the power zoom lever or the zoom buttons on the LCD frame. * DCR-DVD108/DVD608 ** DCR-DVD308/DVD708 1 Play back the still images you want to magnify. 2 Magnify the still image with T (Telephoto). -
Page 42: Playing The Picture On A Tv
Playing the picture on a TV Connect your camcorder to the input jack of TV or VCR using A/V connecting cable 1 or A/V connecting cable with S VIDEO 2. Connect your camcorder to the wall outlet using the supplied AC Adaptor for this operation (p.22). Refer also to the instruction manuals supplied with the devices to be connected. - Page 43 picture’s aspect ratio switches between 16:9 (wide) and 4:3, the image may jitter. • When you play back a picture recorded in 16:9 (wide) aspect ratio on a 4:3 TV not compatible with the 16:9 (wide) signal, set [TV TYPE] to [4:3].
-
Page 44: Making The Disc Compatible With Playback On Other Devices Or Dvd Drives (Finalizing)
other devices or DVD drives (Finalizing) Finalizing makes the recorded disc compatible for playback with other devices and DVD drives of computers. Before finalizing, you can select the style of the DVD menu which displays the image list (p. 47). Whether finalizing is required depends on the type of disc. - Page 45 To add recordings to a finalized disc (p.60) Recordings cannot be added. When the DVD menu has been created, a confirmation screen prompts you to confirm that you wish to add a recording. b Notes • Even when you are using a DVD-RW or DVD+RW, you cannot record additional movies onto the disc after finalizing the disc during Easy Handycam operation.
-
Page 46: Playback On Other Devices Or Dvd Drives (Finalizing)
AC Adaptor during finalizing. When you need to disconnect the AC Adaptor, make sure that the power of your camcorder is set to off and disconnect the AC Adaptor after Finalizing restarts when you connect the AC Adaptor and turn on your camcorder again. - Page 47 To select a DVD menu style (OPTION) t 1 In step 4, touch [DVD MENU]. 2 Select the desired style from 4 types of pattern with [T]/[t]. Select [NO MENU] if you do not create a DVD menu. 3 Touch b Notes •...
-
Page 48: Editing
PRINT You can print still images on a connected PictBridge printer (p. 55). COMPUTER You can connect your camcorder to a computer (p. 80). Deleting images You can delete the images recorded on a disc or a “Memory Stick Duo” using your camcorder. - Page 49 • To delete all images recorded in the disc and restore the original capacity of the disc, format the disc (page 59). z Tips • The images recorded by this camcorder and stored onto a disc are called "original." Deleting the still images in the “Memory Stick Duo”...
-
Page 50: Dividing The Image
Deleting images (Continued) – write-protection is set to the still images by the other device. z Tips • To delete all images recorded on the “Memory Stick Duo,” format the “Memory Stick Duo” (p. 60). Dividing the image b Notes •... -
Page 51: Creating The Playlist
• A slight difference may occur from the point where you touch and the actual dividing point, as your camcorder selects the dividing point based on about half-second increments. Creating the Playlist A Playlist is a list showing thumbnails of the movies that you have selected. -
Page 52: Playing The Playlist
[YES] t b Notes • Do not remove the battery pack or the AC Adaptor from your camcorder while editing the Playlist. It may damage the disc. z Tips • You can add a maximum of 999 movies to the Playlist. - Page 53 • A slight difference may occur from the point where you touch and the actual dividing point, as your camcorder selects the dividing point based on about half-second increments. z Tips • The original movies are not changed even if you...
-
Page 54: Dubbing To Vcr Or Dvd/Hdd Recorders
Dubbing to VCR or DVD/HDD recorders You can dub images played back on your camcorder to other recording devices, such as VCRs or DVD/HDD recorders. Connect the device in either of the following ways. Connect your camcorder to the wall outlet using the supplied AC Adaptor for this operation (p. -
Page 55: Printing Recorded Images (Pictbridge Compliant Printer)
You can print out still images using a PictBridge compliant printer, without connecting the camcorder to a computer. Connect your camcorder to the AC Adaptor to obtain power from the wall outlet (p. 22). Insert the “Memory Stick Duo” containing still images into your camcorder and turn on the printer. - Page 56 (VIEW IMAGES) – To disconnect the USB cable from the printer. – To remove the “Memory Stick Duo” from your camcorder • If the printer stops working, disconnect the USB cable, turn the printer off and on again, and restart the operation from the beginning.
-
Page 57: Utilizing Recording Media
You can enable discs to be played on other devices by finalizing them (p. 44). DISC SELECT GUIDE Your camcorder advises you of the right disc for your purpose (p. 58). FORMAT You can format and use the disc again (p. -
Page 58: Finding The Right Disc (Disc Select Guide)
Playing a disc on other devices (Continued) • Movies stored on a disc cannot be copied directly onto a computer to be played back or edited. z Tips • For details on operations and procedures, see the “First Step Guide” on the supplied CD-ROM (p. -
Page 59: Deleting All Scenes On The Disc (Formatting)
[Completed.] is displayed. b Notes • Use the AC Adaptor as the power source to prevent your camcorder from running out of power during formatting. • Do not apply shock or vibration to your camcorder, and do not disconnect the AC Adaptor during formatting. -
Page 60: Recording Additional Scenes After Finalizing
Connect the AC Adaptor to the DC IN jack on your camcorder, then connect the power cord to the wall outlet. Turn on your camcorder. Insert the finalized disc into your camcorder. - Page 61 When [Completed.] appears, touch b Notes • Use the AC Adaptor as power source to prevent your camcorder from running out of power during the operation. • Do not apply shock or vibration to your camcorder, and do not disconnect the AC Adaptor during the operation.
-
Page 62: Customizing Your Camcorder
Customizing your camcorder What you can do with the category of the HOME MENU You can change the recording functions and the operating settings for your convenience. Using the HOME MENU Turn on your camcorder, then press (HOME). (HOME) (HOME) (SETTINGS) category Touch (SETTINGS). -
Page 63: List Of The (Settings) Category Items
AREA SET DST SET/SUMMERTIME LANGUAGE SET GENERAL SET (p. 72) Items DEMO MODE Page CALIBRATION A.SHUT OFF REMOTE CTRL DCR-DVD108/DVD608 DCR-DVD308/DVD708 Also available during Easy Handycam operation. Only [SOUND SETTINGS] is available during Easy Handycam operation. Page Page Page Page... -
Page 64: Movie Settings
Records images to the full screen on a 16:9 (wide) TV screen. b Notes • When you connect your camcorder to a TV compatible with the ID-1/ID-2 system and play back the disc, set [TV TYPE] to [16:9]. The TV switches to full mode automatically. - Page 65 The right side of the bar shows the digital zooming factor. The zooming zone appears when you select the zooming level. For DCR-DVD108/DVD608 B OFF Up to 40 × zoom is performed optically. 80× Up to 40 × zoom is performed optically, and after that up to 80 ×...
-
Page 66: (Items For Recording Movies)
[ (p. 37). • You can only select the image size for still images. z Tips • The image size of DCR-DVD108/DVD608 is set to [VGA (0.3M)]( Number of still images recordable on a “Memory Stick Duo” (approx.) 1.0M... -
Page 67: (Items For Recording Still Images)
FLASH LEVEL (DCR- DVD308/DVD708) You can set this function when you use an external flash (optional) that is compatible with your camcorder. HIGH( Makes the flash level higher. B NORMAL( ) LOW( Makes the flash level lower. REDEYE REDUC (Redeye reduction) - Page 68 – during displaying still images recorded by another device using a flash. • The data code is displayed on the TV screen if you connect your camcorder to a TV. • The indicator toggles through the following sequences as you press DATA CODE on the...
-
Page 69: Sound/Disp Set
B NORMAL Standard brightness. BRIGHT Brightens the LCD screen. b Notes • When you connect your camcorder to outside power sources, [BRIGHT] is automatically selected for the setting. • When you select [BRIGHT], battery life is slightly reduced during recording. -
Page 70: (Items To Adjust Beep And The Screen) Output Settings
(Default setting for DCR-DVD308/ DVD708) Select to view your images on a 16:9 (wide) TV. Wide (16:9) 4:3 images images (Default setting for DCR-DVD108/ DVD608) Select to view your images on a 4:3 standard TV. Wide (16:9) 4:3 images images... -
Page 71: (Items For When Connecting Other Devices) Clock/ Lang
Set to [ON] to move the time forward 1 hour. LANGUAGE SET You can select the language to be used on the LCD screen. z Tips • Your camcorder offers [ENG[SIMP] ] (simplified English) for when you cannot find your native tongue among the options. -
Page 72: (Items To Set Clock And Language) General Set
5 minutes. NEVER The camcorder is not automatically turned off. b Notes • When you connect your camcorder to a wall outlet, [A.SHUT OFF] is automatically set to [NEVER]. REMOTE CTRL (Remote control) (DCR-DVD308/ DVD708) -
Page 73: Activating Functions Using The Option Menu
Various functions are displayed in the context of the operation. Using the OPTION MENU While using your camcorder, touch (OPTION) on the screen. (OPTION) Touch the desired item. -
Page 74: Recording Items On The Option Menu
Activating functions using the Recording items on the OPTION MENU See page 73 for setting operation. Items FOCUS SPOT FOCUS TELE MACRO EXPOSURE SPOT METER SCENE SELECTION WHITE BAL. COLOR SLOW SHTR S. NIGHTSHOT PLS FADER D.EFFECT PICT.EFFECT REC MODE MICREF LEVEL IMAGE SIZE QUALITY... -
Page 75: Functions Set In The Option Menu
), the zoom (p. 36) moves to the top of the T (telephoto) side automatically and allows recording subjects at a close distance as follows; DCR-DVD108/DVD608 down to about 43 cm (17 in.) DCR-DVD308/DVD708 down to about 38 cm (15 in.) - Page 76 Functions set in the OPTION MENU (Continued) To cancel, touch [OFF], or zoom to wide- angle (W side). b Notes • When recording a distant subject, focusing may be difficult and can take some time. • Adjust the focus manually ([FOCUS], p. 75) when it is hard to focus automatically.
- Page 77 Select to take the vivid blue of the ocean or a lake. SNOW Select to take bright pictures of a white landscape. * Your camcorder is set to focus only on distant subjects. ** Your camcorder is set not to focus on nearby subjects. b Notes •...
-
Page 78: Color Slow Shutter
• If you change the battery pack with [AUTO] selected, or take your camcorder outdoors after inside use (or vice versa), select [AUTO] and aim your camcorder at a nearby white object for about 10 seconds for better color balance adjustment. - Page 79 FLASH MODE (DCR- DVD308/DVD708) appears. You can set this function when you use an external flash (optional) that is compatible with your camcorder. Attach the external flash to the Active Interface Shoe (p. 112). B ON ( ) Flashes every time.
-
Page 80: Using A Computer
Editing images imported to a computer x Creating an original DVD You can create an original DVD from image data imported from your camcorder. x Copying a disc t Video Disc Copier You can copy all the images on a disc taken with your camcorder. -
Page 81: Installing The "First Step Guide" And Software
• When using a “Memory Stick PRO Duo” and your computer is not compatible with it, connect your camcorder with the USB cable instead of using the Memory Stick slot on the computer. Installing the “First Step Guide”... - Page 82 Read [License Agreement], select [I accept the terms of the license agreement] when you agree, then click [Next]. Connect your camcorder to your computer via a USB cable, then click [Next] on the connection confirmation screen. b Notes • Even if a screen prompting you to restart your computer appears, you do not need to restart it at this time.
-
Page 83: Viewing "First Step Guide
Tips • You can also start this program by selecting [Start] t [Programs] ([All Programs] for Windows XP) t [Sony Picture Utility] t [First Step Guide] t folder with model name of your camcorder t HTML version of “First Step Guide.”... -
Page 84: Using A Macintosh Computer
• The supplied software “Picture Motion Browser” does not operate on Mac OS. • Refer to “First Step Guide” for the details on connecting your camcorder to the computer and copying the still images. System requirements To copy still images from a “Memory Stick Duo”... -
Page 85: Troubleshooting
(p. 22). The camcorder does not operate even when the power is set to on. • It takes a few seconds for your camcorder to be ready to shoot after the power is turned on. This is not a malfunction. - Page 86 Your camcorder gets warm. • This is because the power has been turned on for a long time. This is not a malfunction. Turn off your camcorder and leave it for a while in a cool place. The supplied Remote Commander does not function (DCR-DVD308/ DVD708).
- Page 87 • Attach the battery pack to the camcorder correctly (p. 22). If the problem persists, disconnect the AC Adaptor from the wall outlet and contact your Sony dealer. The battery pack may be damaged. The remaining battery time indicator does not indicate the correct time.
- Page 88 • The playback screen is displayed. Set your camcorder to recording standby (p. 35). • Your camcorder is recording the scene you have just shot on the disc. • The disc has run out of space. Use a new disc or format the disc (DVD-RW/DVD+RW only, p.
- Page 89 START/ STOP and the point that the recorded movie starts/stops. • On your camcorder, there may be a slight time difference between the point where you press START/STOP and the actual point that recording movie starts/stops. This is not a malfunction.
- Page 90 You cannot adjust [LCD BL LEVEL]. • You cannot adjust [LCD BL LEVEL] when: – The LCD panel is closed on your camcorder with the LCD screen facing out. – The power is supplied from the AC Adaptor. You cannot use [WIDE SELECT] (DCR-DVD108/DVD608).
- Page 91 Playback does not move to the previous scene when you press • If playback crosses 2 titles made automatically by your camcorder when . is pressed, playback may not move to the previous scene. Select the desired scene from the menu screen. Refer to the instruction manual of the playback device for further information.
- Page 92 Make sure that the A/V connecting cable is connected to the proper jack, i.e. to the input jack of another device for dubbing a image from your camcorder (p. 54). Connecting to a computer When using the movies on a disc, a computer does not recognize your camcorder.
- Page 93 [D.EFFECT] [S. NIGHTSHOT PLS], [COLOR SLOW SHTR], [FADER] [OLD MOVIE] [SCENE SELECTION], [PICT.EFFECT] [PICT.EFFECT] [OLD MOVIE] [TELE MACRO] [SCENE SELECTION] [AUTO SLW [S. NIGHTSHOT PLS], SHUTTR] [SCENE SELECTION], [COLOR SLOW SHTR], [D.EFFECT] [WIDE [OLD MOVIE] SELECT]** * DCR-DVD308/DVD708 ** DCR-DVD108/DVD608...
-
Page 94: Warning Indicators And Messages
Some symptoms you can fix by yourself. If the problem persists even after you have tried a couple of times, contact your Sony dealer or local authorized Sony service facility. C:(or E:) ss:ss (Self-diagnosis display) C:04:ss •... - Page 95 Fast flashing • The temperature of your camcorder is extremely high. Turn off your camcorder and leave it for a while in a cool place. (Warning indicator pertaining to “Memory Stick Duo”) •...
-
Page 96: Pictbridge Compliant Printer
• The disc recorded in the different format code from your camcorder. Formatting the disc may enable you to use the disc on your camcorder (DVD- RW/DVD+RW only) (p.59). x “Memory Stick Duo” Reinsert the Memory Stick. • Reinsert the “Memory Stick Duo” a few times. - Page 97 Please wait. • This is displayed if the disc removal process takes time. Turn on the camcorder and leave it for about 10 minutes, preventing vibration.
-
Page 98: Additional Information
Additional Information Using your camcorder abroad Power supply You can use your camcorder in any countries/regions using the AC Adaptor supplied with your camcorder within the AC 100 V to 240 V, 50/60 Hz range. Use a commercially available AC plug adaptor [a], if necessary, depending on the design of the wall outlet [b]. -
Page 99: World Time Difference
Setting to the local time You can easily set the clock to the local time by setting a time difference when using your (SETTINGS) t [CLOCK/ camcorder abroad. Set SET]/[SUMMERTIME] on the HOME MENU (p. 71). World time difference Time-zone... -
Page 100: Maintenance And Precautions
Otherwise you may not be able to record or play normally in some situations using that disc. • When you set the disc in your camcorder, press firmly until it clicks. When the message [C:13:ss] appears on the LCD screen, open the disc cover and set the disc again. - Page 101 Note that data that uses “MagicGate” technology cannot be recorded or played on your camcorder. • Still image format: Your camcorder compresses and records image data in the JPEG (Joint Photographic Experts Group) format. The file extension is “.JPG.”...
- Page 102 “Design rule for Camera File system” universal standard established by the JEITA (Japan Electronics and Information Technology Industries Association). • On your camcorder, you cannot play back still images recorded on other devices (DCR- TRV900 or DSC-D700/D770) that do not conform to the universal standard. (These...
- Page 103 • After charging is complete, disconnect the cable from the DC IN jack on your camcorder or remove the battery pack. To use the battery pack effectively •...
- Page 104 Sometimes this malfunction cannot be repaired. • If any solid object or liquid gets inside the casing, unplug your camcorder and have it checked by a Sony dealer before operating it (SETTINGS) any further. • Avoid rough handling, disassembling,...
- Page 105 LCD screen • Do not exert excessive pressure on the LCD screen, as it may cause damage. • If your camcorder is used in a cold place, a residual image may appear on the LCD screen. This is not a malfunction.
- Page 106 Maintenance and precautions (Continued) On handling the casing • If the casing is soiled, clean the camcorder body with a soft cloth lightly moistened with water, and then wipe the casing with a dry soft cloth. • Avoid the following to avoid damage to the finish: –...
- Page 107 • Do not touch the lens of the eyecup block. • If you turn the viewfinder lens adjustment lever after removing the eyecup block from your camcorder, the lever and lens may come out the eyecup block. If this happens, replace them as follows: 1 Attach the lever to the eyecup block in the position illustrated.
-
Page 108: Specifications
Specifications System Video compression format MPEG2/JPEG (Still images) Audio compression format DCR-DVD108/DVD608 Dolby Digital 2ch Dolby Digital Stereo Creator DCR-DVD308/DVD708 Dolby Digital 2/5.1ch Dolby Digital 5.1 Creator Video signal NTSC color, EIA standards Usable discs 8 cm DVD-RW/DVD+RW/DVD-R/ DVD+R DL... - Page 109 2.2 kΩ (kilohms) USB jack mini-B REMOTE jack (DCR-DVD308/DVD708) Stereo mini-minijack (Ø 2.5 mm) LCD screen Picture DCR-DVD108/DVD608 6.2 cm (2.5 type) DCR-DVD308/DVD708 6.9 cm (2.7 type, aspect ratio 16:9) Total number of pixels 123 200 (560 × 220) General Power requirements 6.8 V/7.2 V (battery pack)
- Page 110 • “Memory Stick,” “ Duo,” “ PRO Duo,” “ “MagicGate,” “ “MagicGate Memory Stick” and “MagicGate Memory Stick Duo” are trademarks of Sony Corporation. • “InfoLITHIUM” is a trademark of Sony Corporation. • DVD-RW, DVD+RW, DVD-R, and DVD+R DL logo are trademarks.
-
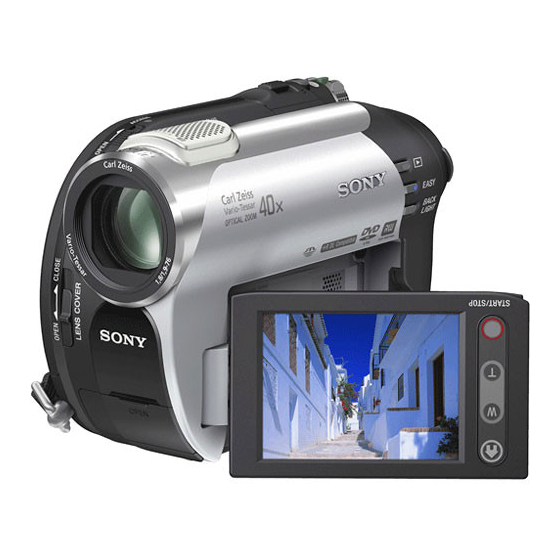
Page 111: Quick Reference
Quick Reference Identifying parts and controls The numbers in ( ) are reference pages. A Power zoom lever (36, 41) B PHOTO button (31, 35) C POWER switch (25) D Viewfinder lens adjustment lever (27) E Eyecup (106) F Viewfinder (27) (Movie)/ (Still) mode lamps (25) - Page 112 The accessory can be turned on or off as you operate the POWER switch on your camcorder. Refer to the operating instructions supplied with your accessory for details. The Active Interface Shoe has a safety device for fixing the installed accessory securely.
- Page 113 J Access lamp (“Memory Stick Duo”) (29) (USB) jack (55) L RESET button Initializes all the settings, including the setting of the date and time. M DISP/BATT INFO button (23) N WIDE SELECT button** (37) * DCR-DVD108/DVD608 ** DCR-DVD308/DVD708 Continued ,...
- Page 114 Remote Commander may shorten, or the Remote Commander may not function properly. In this case, replace the battery with a Sony CR2025 lithium battery. Use of another battery may present a risk of fire or explosion.
-
Page 115: Indicators Displayed During Recording/Playback
Indicators displayed during recording/playback Recording movies A Recording mode (HQ/SP/LP) (64) B HOME button (19, 62) C Remaining battery (approx.) (23) D Recording status ([STBY] (standby) or [REC] (recording)) E Counter (hour/minute/second) F Disc type (14) G Recording format (14) Appears for DVD-RW only. - Page 116 Indicators displayed during recording/playback (Continued) Viewing movies A Recording mode (HQ/SP/LP) (64) B Return button C Remaining battery (approx.) (23) D Playback mode E Counter (hour/minute/second) F Disc type (14) G Previous/Next button (32, 40) H Scene number I OPTION button (20, 73) J Video operation buttons (32, 40) K 5.1ch surround recording (36) Viewing still images...
- Page 117 Indicators when you made changes Following indicators appear during recording/playback to indicate the settings of your camcorder. Upper left Bottom Upper left Indicator Meaning 5.1ch surround recording/ playback (36) Self-timer recording (79) MICREF LEVEL low (79) Flash (67, 79) [WIDE SELECT] (64)
-
Page 118: Glossary
One of the recording formats you can select when using a DVD-RW. VR mode enables editing (deleting or sequence rearrangement) with your camcorder Finalizing the disc lets you play it back on a VR mode compatible DVD device. x VISUAL INDEX... -
Page 119: Index
Index Numeric 16:9 ...37, 70 16:9 WIDE...64 4:3 ...37, 64, 70 5.1 ch surround recording ...36 8cm DVD...12 AC Adaptor...22 Active Interface Shoe ...112 Additional recording...60 AREA SET ...71 Aspect ratio...37, 42, 64 AUTO SLW SHUTTR (Auto slow shutter) ...65, 93 A.SHUT OFF (Auto shut off) ...72 A/V connecting cable ...42, 54... - Page 120 Index (Continued) LANDSCAPE ...77 LANGUAGE SET...71 LCD backlight ...27 LCD BL LEVEL (LCD back light level)...69, 90 LCD BRIGHT ...69 LCD COLOR ...69 Lens cover ...27 LP ...64 Macintosh ...84 Maintenance ...100 MANAGE DISC/MEMORY category ...57 “Memory Stick Duo”...29, 101 Memory Stick Duo adaptor ...102 MICREF LEVEL ...79...
- Page 121 VCR or DVD/HDD recorder ...54 VF B.LIGHT (Viewfinder brightness) ...69 VIDEO mode ...14, 118 VIEW IMAGES SET ...67 Viewfinder ...27 Viewing ...32 VISUAL INDEX ...32, 39, 118 VOLUME ...40, 69 Volume label...58 VR mode...14, 118 Warning indicators...94 Warning messages ...95 WHITE BAL.
-
Page 122: Spanish Quick Guide/Guía
Spanish Quick Guide/Guía rápida en español Paso 1: Comprobación de los componentes suministrados Asegúrese de disponer de los siguientes componentes suministrados con su videocámara. El número entre paréntesis indica el número de componentes suministrados de cada artículo. Adaptador de alimentación de ca (1) Cable de alimentación (1) Cable de conexión de A/V (1) Cable USB (1) - Page 123 Paso 2: Carga de la batería Cubierta de la toma Pila Clavija de cc Adaptador de alimentación de ca Puede cargar la batería “InfoLITHIUM” (serie H) luego de instalarla en la videocámara. b Notas • Únicamente es posible utilizar la batería “InfoLITHIUM”...
- Page 124 Paso 2: Carga de la batería (continuación) b Notas • Desconecte el adaptador de alimentación de ca de la toma entrada de cc mientras sujeta la videocámara y la clavija de cc Para extraer la batería Deslice el interruptor POWER hacia la posición OFF(CHG).
- Page 125 DCR-DVD108/DVD608 Tiempo de Batería grabación continua NP-FH40 (suministrada) NP-FH50 NP-FH70 NP-FH100 DCR-DVD308/DVD708 Tiempo de Batería grabación continua NP-FH40 (suministrada) NP-FH50 NP-FH70 NP-FH100 * El tiempo de grabación normal indica el tiempo de grabación al repetir las operaciones de inicio/ parada, conexión/desconexión de la alimentación y utilización del zoom.
- Page 126 Paso 2: Carga de la batería (continuación) • El indicador CHG (carga) parpadeará durante la carga o la Información sobre la batería no se mostrará correctamente en las siguientes situaciones: – La batería no está conectada correctamente. – La batería está dañada. –...
-
Page 127: Cambio Del Ajuste De Idioma
Seleccione la zona geográfica que desee mediante v/V y, a continuación, toque [SIGUIENTE]. Ajuste [HORA VERANO] y, a continuación, toque [SIGUIENTE]. Ajuste [A] (año) mediante v/V. AJUS.RELOJ SIGUIENTE Seleccione [M] mediante b/B y, a continuación, ajuste el mes mediante v/V. Ajuste [D] (día), las hora y los minuto del mismo modo y, a continuación, toque [SIGUIENTE]. - Page 128 Paso 4: Preparación para grabación Apertura de la tapa del objetivo Deslice el interruptor LENS COVER hasta la posición OPEN. Cuando haya finalizado la grabación, ajuste el interruptor LENS COVER en la posición CLOSE para cerrar la tapa del objetivo. Panel LCD Abra el panel LCD 90 grados respecto a la videocámara (1) y, a continuación, gírelo...
- Page 129 Visor Podrá contemplar las imágenes a través del visor para evitar que la batería se desgaste, o siempre que la calidad de la imagen de la pantalla LCD sea muy baja. Visor Palanca de ajuste del objetivo del visor Muévala hasta que vea claramente la imagen.
- Page 130 Paso 5: Inserción de un disco o un “Memory Stick Duo” (continuación) Coloque el disco con la cara de grabación hacia la videocámara y, a continuación, presione el centro del disco hasta que encaje en su sitio. Coloque la cara impresa del disco hacia afuera cuando utilice discos de una sola cara.
- Page 131 b Notas • Al abrir o cerrar la cubierta del disco, tenga cuidado de no obstaculizar la operación con la mano u otros objetos. Coloque la correa en la parte inferior de la videocámara y, a continuación, abra o cierre la cubierta del disco. •...
- Page 132 Paso 5: Inserción de un disco o un “Memory Stick Duo” (continuación) Para expulsar un “Memory Stick Duo” Empuje ligeramente el “Memory Stick Duo” hacia el interior de la ranura una vez y, a continuación, deslícelo fuera de ésta. b Notas •...
- Page 133 Grabación DCR-DVD108/DVD608 (HOME) D START/STOP DCR-DVD308/DVD708 (HOME) D START/STOP START/STOP B Ajuste de la correa de sujeción Ajuste la correa de sujeción como muestra la ilustración y sujete la videocámara correctamente. Interruptor POWER A (HOME) E PHOTO F b Notas •...
- Page 134 Grabación (continuación) Películas Las películas se graban en el disco. Gire el interruptor POWER hasta que se encienda el indicador (película). Presione START/STOP B (o C). [ESPERA] Para detener la grabación, presione START/STOP nuevamente. Para cambiar al modo de grabación de películas mediante el botón (HOME) Toque...
- Page 135 Reproducción DCR-DVD108/DVD608 (HOME) (VISUALIZAR IMÁGENES) C DCR-DVD308/ DVD708 Gire el interruptor POWER Presione VISUALIZAR IMÁGENES) La pantalla VISUAL INDEX aparece en la pantalla LCD. (Es posible que el sistema tarde un tiempo en mostrar la pantalla VISUAL INDEX). Vuelve a la pantalla de grabación...
- Page 136 Reproducción (continuación) Inicie la reproducción. Películas Toque la lengüeta La pantalla VISUAL INDEX volverá a aparecer cuando se haya completado la reproducción de la secuencia entre la película seleccionada y la última película. Volver (a la pantalla VISUAL INDEX) Principio de la escena/ escena anterior Detener (ir a la pantalla VISUAL INDEX)