Table of Contents
Advertisement
Quick Links
Advertisement
Table of Contents

Related Manuals for Sirius Satellite Radio Xact XTR7CK


Summary of Contents for Sirius Satellite Radio Xact XTR7CK
- Page 1 XTR7CK Satellite Radio Receiver User Guide...
-
Page 2: Table Of Contents
Auto Select ... 24 Signal Indicator ... 25 Confirm Tone Options ... 25 Channel Block ... 26 Time-Based Features ... 27 Factory Default ... 29 Troubleshooting ... 30 Specifications ... 31 Optional Accessories ... 32 Warranty ... 34 XTR7CK User Guide... -
Page 3: Box Contents
If anything is missing or damaged, or if your XACT Sirius XTR Receiver fails to operate, notify your dealer immediately. It is recommended that you retain the original carton and packing materials in case you need to ship your Receiver in the future. XTR7CK User Guide Remote Control Vehicle Power Adapter... -
Page 4: Safety Precautions
Be sure the unit is connected to a 12V DC power supply with a negative ground connection. • Do not open the unit. • Do not install the unit where it will be exposed to high levels of humidity, moisture, or dust. XTR7CK User Guide... -
Page 5: Fcc Warning
The user could lose the authority to operate this equipment if an unauthorized change or modification is made. XTR7CK User Guide Note This equipment has been tested and found to comply with Part 15 of the FCC Rules. These rules are designed to provide reasonable protection against harmful interference. -
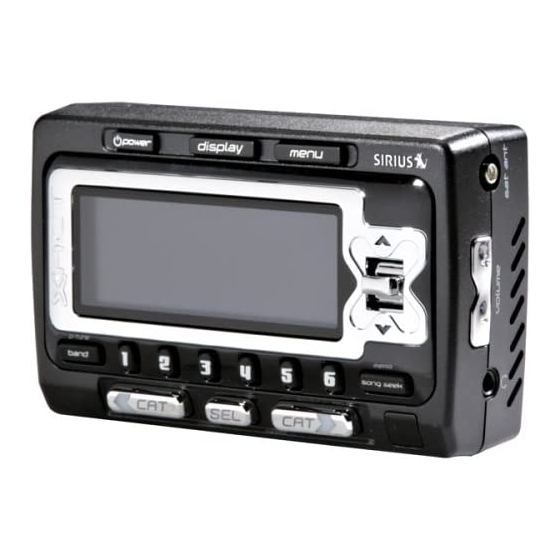
Page 6: Receiver Controls And Features
6. Select (SEL) Button: Selects an option on the screen. 7. Preset Number Buttons (0-6): Sets and selects preset channels. 8. Memory (MEMO) Button (S-Seek Function): Saves and recalls artist names and song titles. You can store up to 20 artist/song title combinations. XTR7CK User Guide... - Page 7 12V DC power supply. 12.FM OUT: FM Output for use with wired FM switch box accessory (sold separately). 13.ANTENNA: Input jack for SIRIUS antenna. 14.VOL: Volume control for audio out jack. 15.AUDIO OUT: Audio line output or headphone jack. XTR7CK User Guide...
-
Page 8: Remote Control
12. Previous Button: Tunes to the last tuned channel. 13. VOL+/ VOL- Buttons: Adjust the volume up & down. Installing Batteries in the Remote 1. Remove the battery cover. 2. Install CR2025 battery. (+ side is up) 3. Replace the battery cover. XTR7CK User Guide... -
Page 9: Activating Your Sirius Subscription
Once updated and the SIRIUS channels are received, the display will change to “Call 1-888-539-SIRIUS to Subscribe” and will place you in SIRIUS Satellite Radio’s Preview Channel. Channel 184 is the SIRIUS preview channel. You will not be able to tune to any other channels until you activate your SIRIUS subscription. -
Page 10: Vehicle Installation
• Find a location that provides good visibility of and access to the XTR7 Receiver’s front panel. • It is strongly recommended that you mount the XTR7 Receiver using Audio/ the provided Suction Cup Mount, Headphone adhered to the windshield. XTR7CK User Guide... - Page 11 Receiver. Don’t plug the adapter into the cigarette lighter until the installation is completed. XTR7CK User Guide Connecting to your Car Stereo 1. If your vehicle stereo has an AUX input, plug a 3.5mm audio cable into the Audio Out connector on the XTR7.
- Page 12 • Best reception is achieved with the antenna mounted on the roof or the trunk for convertibles. • If the vehicle has a roof rack or skid ribs, it may be necessary to mount the antenna off-center. button to turn the XTR7 XTR7CK User Guide...
- Page 13 2. Route the cable from the antenna to the vehicle’s interior by tucking it underneath the rubber molding around rear window, as shown. XTR7CK User Guide 3. Route the cable from the lowest point of the rear window into the trunk. Take advantage of any existing cable channels or wiring conduits.
-
Page 14: Basic Operation
Pressing and holding the DISPLAY button for 3 seconds will enter Channel List mode, described in the next section. Clock 12:00 Band/Preset Bank Number Auto Sizing/ Scrolling Song Title XTR7CK User Guide... -
Page 15: Search Modes (Category, Channel, Artist, Song)
Artist Name and Song Title to preview what is playing on other channels before selecting. To exit this mode without changing to a new channel, press and hold the DISPLAY button for 1 second. XTR7CK User Guide CATEGORY 001 CH Name 002 CH Name... -
Page 16: Direct Tuning
2. Press the desired preset button to recall the preset. The channel will change and the display will revert to the Default screen for the new channel. to indicate that the channel has been memorized. it, it will be replaced by the new channel. XTR7CK User Guide... -
Page 17: Searching For A Channel Preset (P.tune Mode)
Default Display To exit Preset Tune Mode and return to Channel Tuning Mode, press and hold the BAND button. XTR7CK User Guide Preset Tune List Mode In the Preset Tuning Mode you can view your list of presets showing Channel Name, Artist Name, or Song Title just like in the Channel List Mode: 1. -
Page 18: Memory (Memo) And Songseek (S-Seek) Functions18
Receiver’s memory. A memory “Stored” pop-up screen, followed by “X Used/Y Empty” will each appear for 1 second (below). CH NAME 12:00 Stored CH NAME 12:00 X Used/Y Empty XTR7CK User Guide... - Page 19 2. If the MEMO button is pressed and all of the memory spaces are full, S-Seek Full will flash on the display for 1 second, followed by a pop-up screen presenting the Replace-Cancel options. XTR7CK User Guide This prompt allows you to make the following Replace/Cancel choices: •...
- Page 20 2. Use the Channel Switch to highlight the “Delete” option. 3. Press SEL and a Delete confirmation screen will appear. 4. To permanently delete the program from your list, select “Yes” using the Channel Switch and press SEL to confirm. Delete XTR7CK User Guide...
- Page 21 If one or more matches are found, a pop-up screen momentarily appears for 2-seconds and displays XTR7CK User Guide “S-Seek Alert”. An audible beep tone will be heard indicating that a match has been found. The display then reverts to the S-Seek Alert screen which displays the current matches.
-
Page 22: Menu Display Options
It is recommended that you write this number in the space provided on the last page of this user guide. No adjustments are allowed in this mode. To exit this option, press the SEL or Menu Button. Sirius ID ESN 000123456789 XTR7CK User Guide... -
Page 23: Display Settings
Switch adjusts in 0.2 MHz increments and the Category Buttons adjust in 2 MHz increments. Frequency 94.1 MHz XTR7CK User Guide Display Settings It is possible to adjust the Brightness and Contrast of the Receiver’s display. While in the “Menu Options” list, use the Channel Switch to highlight the display setting you wish to adjust. -
Page 24: Auto Select
Auto Select option, perform the following: 1. From the Menu, use the Channel Switch to highlight “Auto Select”. Press SEL. 2. Use the Channel Switch to Select “ON” or “OFF”. Press SEL to set the option. To exit, push the MENU button. XTR7CK User Guide... -
Page 25: Signal Indicator
Home Docking Kit or Portable Boom Box manual. To exit this function, press SEL or MENU. Signal Indicator XTR7CK User Guide Confirm Tone Options The XACT Sirius XTR Receiver will sound an Audio “Tone” alert when the unit powers ON and OFF as well as when the S-Seek Alert is activated. -
Page 26: Channel Block
003 CH Name Options”. Press SEL. and press SEL. four digit code using the 1-6 number buttons. You will then be prompted to confirm the new code by entering it again. Enter Code # _ _ _ _ XTR7CK User Guide... -
Page 27: Time-Based Features
Clock: The clock data is provided via the SIRIUS Satellite data stream, and will update based on the received signal. XTR7CK User Guide • Time Zone: Since the clock adjusts automatically, it is important to specify your proper time zone. - Page 28 15 Minutes 30 Minutes 45 Minutes 60 Minutes Use the Channel Switch to select the desired Sleep Time. When the desired time is highlighted, press SEL. The Receiver will now turn off after the selected time has elapsed. XTR7CK User Guide...
-
Page 29: Factory Default
“No” to leave them as-is and return to the Menu Options List Mode. Restore Settings XTR7CK User Guide If “Yes” is chosen, the unit reverts to the original factory settings for the following parameters: • All Presets revert to empty •... -
Page 30: Troubleshooting
Check satellite connection to receiver Contact system installer or vendor Switch to another FM frequency Check vehicle antenna cable Change location to eliminate nearby obstacles (bridge, etc.) 1. Check cables at Receiver and radio 2. Select another FM modulator frequency. XTR7CK User Guide... -
Page 31: Specifications
... (4” W x 2-3/8” H x 1-1/8” D) Receiver Weight ... 5oz. Remote Control Dimensions ... 49mm(W) x 104mm(H) x 23mm(D) ... (1-7/8””W x 4-1/8”H x 7/8”D) Remote Control Battery Requirements ... CR2025 Note: Features and Specifications subject to change without notice. XTR7CK User Guide... -
Page 32: Optional Accessories
Includes the Following: • Compact tabletop/desktop docking cradle • Audio cable for connection to any stereo bookshelf system • Adjustable indoor/outdoor antenna with 20’ of cable • AC Adapter XTR7CK User Guide... - Page 33 • Auxiliary Line Level Output • 3.5mm Stereo Mini Jack • Dual 4” Full Range Speakers, 5 w per Channel • Adjustable indoor/outdoor antenna with 20’ of cable • AC Adapter • Extended Outdoor Play with 8 ‘D’ Batteries (not included) XTR7CK User Guide...
-
Page 34: Warranty
XACT Communication with the equipment, and/or loss of parts. This warranty is voided in the event any unauthorized person opens, alters, or repairs the product. All XACT Communication equipment being returned for repair must be suitably packaged. XTR7CK User Guide... - Page 35 Product should you have to return it. For your reference: Model Number______________________________ SID\ESN Number______________________________ S/N Number_______________________________ Date of Purchase__________________________ Name of Dealer_____________________________ XACT Communication Customer Service Telephone Number: 1-866-466-XACT (9228) OUTSIDE THE U.S.A. AND CANADA CALL: 1-212-481-7950 Visit Us on the Web: www.getxact.com XTR7CK User Guide...
- Page 36 Call Toll Free 1-866-466-XACT (9228) or Visit our Website www.getxact.com © 2005 SIRIUS Satellite Radio Inc. “SIRIUS” and the SIRIUS dog logo are XTR7CK-OM (Rev. 1, March 2005) registered trademarks of SIRIUS Satellite Radio Inc.