Behringer V-AMP2 User Manual
Behringer v-amp virtual guitar amp user's manual
Hide thumbs
Also See for V-AMP2:
- User manual (27 pages) ,
- Technical specifications (4 pages) ,
- User manual (20 pages)
Table of Contents
Advertisement
Advertisement
Table of Contents

Related Manuals for Behringer V-AMP2


Summary of Contents for Behringer V-AMP2
- Page 1 User’s Manual Version 1.1 January 2002...
-
Page 2: V-Amp
SAFETY INSTRUCTIONS CAUTION: To reduce the risk of electric shock, do not remove the cover (or back). No user serviceable parts inside; refer servicing to qualified personnel. WARNING: To reduce the risk of fire or electric shock, do not expose this appliance to rain or moisture. This symbol, wherever it appears, alerts you to the presence of uninsulated dangerous voltage inside... - Page 3 FOREWORD Dear Customer, Welcome to the community of BEHRINGER users and thank you for the trust you have shown us in buying the V-AMP 2. It gives me particular pleasure to write this to you because, after months of hard work, our engineers have achieved a highly ambitious goal: to improve on what is already an excellent virtual guitar amp whose highly developed sound and remarkable array of functions offers you maximum flexibility and performance.
- Page 4 V-AMP Virtual guitar amplifier with tube simulation and digital multi-effects processor Authentic virtual guitar preamp with 32 amp and 15 speaker simulation models Dedicated selectors for amp models, speaker cabinets and digital effects Transparent user interface with direct display of all essential settings 32 simulations of popular guitar amps, ranging from clean to crunch to tube distortion sounds 15 speaker simulations directly selectable and freely combinable with any amp model 24-bit high-resolution stereo multi-effects processor with first-class algorithms like chorus, flanging,...
-
Page 5: Table Of Contents
TABLE OF CONTENTS 1. INTRODUCTION ...6 1.1 The new functions of the V-AMP 2 ... 6 1.2 Before you begin ... 7 1.2.1 Serial number ... 7 1.3 Control elements ... 7 1.3.1 User interface ... 7 1.3.2 Connections on the V-AMP 2 side panel ... 9 2. -
Page 6: Introduction
BEHRINGER is a company with its roots in professional recording studio technology. For many years now we have been successful in developing products for studio and live use. These include microphones and 19"... -
Page 7: Before You Begin
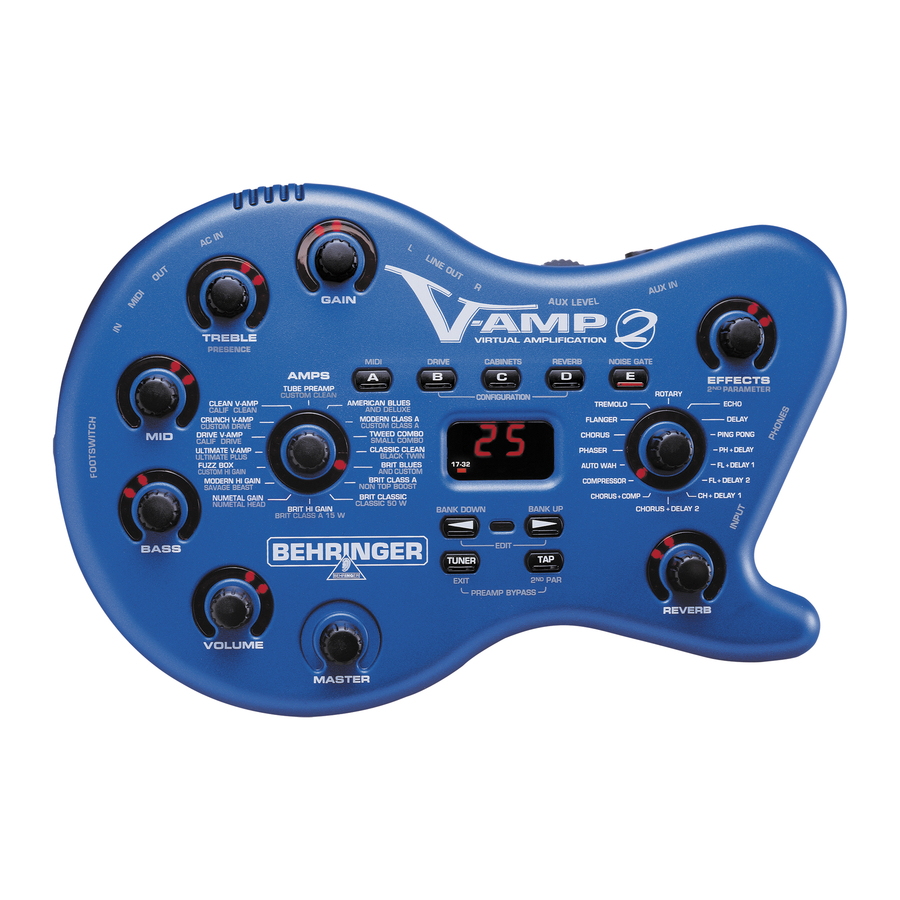
The V-AMP 2’s serial number is located on the rear side. In order to qualify for extended warranty entitlement, please return the completed warranty card to us within 14 days of purchase, or simply register on-line (www.behringer.com). 1.3 Control elements 1.3.1 User interface... - Page 8 The MASTER control determines the overall volume of the V-AMP 2. Apart from the AUX LEVEL control All the other controls are encoder-type rotary controls. The VOLUME control is for the volume of the selected preset. The BASS control in the EQ section is for raising or lowering the low-frequency range. The MID control is for raising or lowering the mid-range frequencies.
-
Page 9: Connections On The V-Amp 2 Side Panel
You can also switch the tuner off again using the same button. The V-AMP 2 has MIDI inputs and outputs to which you can connect a MIDI foot pedal, e.g. the BEHRINGER MIDI FOOT CONTROLLER FCB1010 or a PC. V-AMP 2 ) in that mode, the arrow keys can be used for setting parameters. -
Page 10: Examples Of Use/Configurations
Connect the enclosed power supply unit via the AC IN socket. The balanced LINE OUT 1/4" sockets provide the audio signal from the V-AMP 2 in stereo, for example, for recording purposes. You can connect the LINE OUT outputs with balanced or unbalanced jack plugs. The left line output of the V-AMP 2 can be used to route the audio signal to a guitar amp with a mono input. -
Page 11: Selecting Configuration Modes
In modes L1, L2 and L3, the additional 3-band EQ is set with the BASS, MID and TREBLE controls. As this EQ works globally, it has no effect on the settings of these three controls from the preset programming. If you plug in your headphones, the V-AMP 2 automatically selects S1 mode. 2.1 Selecting CONFIGURATION modes Your V-AMP 2 left the factory set in Studio 1 (S1) mode. -
Page 12: Recording
When you’re playing on stage it’s extremely important that you are able to hear your guitar properly. It’s an advantage to use a guitar amp with a line input, like the BEHRINGER BLUE DEVIL GX112. Apart from that, the amp used should provide enough power to reproduce the V-AMP 2’s sound potential to the full. -
Page 13: Live Set-Up With P.a. System And Your Own Monitor Amp On Stage
For this application please select mode L1 or L2 under CONFIGURATION, depending on whether you want to have the external amp with or without cabinet simulation! Thus, you can also optimize the sound on the amp with TREBLE, MID and BASS of the global 3-band EQ. 2.5 Live set-up with P.A. -
Page 14: Editing Presets
In this case, by pressing button A, B, C or E you can immediately call up another preset of the same bank. The two arrow keys (BANK UP und BANK DOWN) enable you to switch banks. The display on the V-AMP 2 always shows which bank has been selected. -
Page 15: Restoring All Factory-Programmed Presets
preset the temporary edited version is discarded. However, after editing you can also hold down the two arrow keys until “Pr” appears in the display, which brings back the factory preset that was originally stored there. However you then have to save it again by holding down the corresponding preset button for approx. two seconds. - Page 16 V-AMP 2 amazingly distorted sound even at low volume. The Tweed Champ had a volume control, but no EQ control. If you want to get the most authentic sound out of this amp, keep the sound control on the V-AMP 2 in the mid- range.
-
Page 17: Speaker Descriptions
Fender, Vox, Marshall, Mesa Boogie, Gibson, Soldano, Matchless, Dumble, Budda, Tweed, Engl, Roland and the names of musicians and groups are registered trademarks belonging to the respective owners and are in no way associated with BEHRINGER. 4.2 Speaker descriptions The sound of any guitar combo depends largely on the type and combination of speakers used. In the past 50 years there has been widespread experimentation to find out what type of speaker is best suited to any one specific guitar sound and in what way the sound is modified when a certain speaker is combined with others. -
Page 18: Effects Processor
The MIDI function also allows you to use an additional wah-wah effect which can be controlled best using a MIDI Foot Controller with an expression pedal, such as our BEHRINGER FCB1010. See tab. 8.1 for an overview of all MIDI data transmitted and received by the V-AMP 2. -
Page 19: Effect Descriptions
Reverb and delay algorithms REVERB: Reverb is still the most important effect for mixing or live performance. That’s why we at BEHRINGER make a point of giving you as many as nine different reverb programs so that you can use the most suitable reverb program for any situation. -
Page 20: Special Effects
Special effects COMPRESSOR: A compressor limits the dynamic range of the audio material, thus producing audible and creative sound effects. Pronounced use of the compressor (using the EFFECTS control) allows you to compress the overall dynamic range of the material. AUTO-WAH: The legendary wah-wah effect owes its fame mainly to Jimi Hendrix. -
Page 21: Tuner
V-AMP 2 6. TUNER Press the TUNER button to activate the built-in tuner. 6.1 Tuning your guitar The chromatic tuner automatically recognizes the frequencies of all the standard guitar notes. For the A-string this means a frequency of 220 Hz. When you plug your guitar into the V-AMP 2 and play an open string, the tuner will recognize and display the note. -
Page 22: Installation
7. INSTALLATION 7.1 Audio connections The input of your BEHRINGER V-AMP 2 is a mono 1/4" jack. The Line Out, Aux In and headphones outputs are stereo 1/4" jacks. The Line Out outputs work with both balanced and unbalanced connections. -
Page 23: Midi Connections
V-AMP 2 7.2 MIDI connections The MIDI standard (Musical Instruments Digital Interface) was developed in the early 80s to enable different makes of electronic instruments to communicate with each other. Over the years the range of MIDI applications has constantly expanded, and today it is standard practice to network entire recording studios using the MIDI standard. -
Page 24: Appendix
8. APPENDIX 8.1 MIDI implementation Function Midi Channel Mode Note Number Velocity After Touch Pitch Bender Control Change N (request only) N (request only) Y (skipped on request) Y (skipped on request) N (request only) N (request only) N (request only) N (request only) N (request only) N (request only) -
Page 25: Default Cabinets/Amp Models
8.2 Default cabinets/amp models 1st level name default cabinet simulation AMERICAN BLUES 2 4 x 10" VINTAGE BASS MODERN CLASS A 9 2 x 12" US CLASS A TWEED COMBO 1 1 x 8" VINTAGE TWEED 8 2 x 12" TWIN COMBO CLASSIC CLEAN BRIT. -
Page 26: Specifications
Dimensions (H x W x D) Weight BEHRINGER constantly strives to maintain the highest quality standards. Modifications may be made, if necessary, without prior notice. The specifications and appearance of the equipment may therefore differ from those listed or illustrated. -
Page 27: Warranty
All the registered trademarks, names of musicians and groups are the property of their respective owners BEHRINGER, V-AMP and BLUE DEVIL are registered trademarks. BEHRINGER Instrument Amplification is a Division of BEHRINGER. ALL RIGHTS RESERVED. © 2002 BEHRINGER Spezielle Studiotechnik GmbH.