Table of Contents
Advertisement
Advertisement
Table of Contents

Related Manuals for Kenmore 385. 17526


Summary of Contents for Kenmore 385. 17526
- Page 1 OWNER'S MANUAL MODEL 385. 17526...
- Page 2 Specific instructions are given on threading, tension adjustments, obtain the best sewing results and avoid unnecessary Advice on the operation and care of your machine is always available at your nearest Sears Retail Store. Please remember, if you have questions about your machine or need parts and service, the model number and serial number when you inquire.
- Page 3 SAFETY INSTRUCTIONS Your sewing machine is designed and constructed Read all instruction before using this sewing machine. DANGER- o reduce the risk ot electric shock: An appliance should never be left unattended unplug this appliance from the electric outlet immediately betore cleaning.
-
Page 4: Table Of Contents
SECTION KNOW THE MACHINE A Portable Case or Cabinet is Avaiatble ... Locate and Identify the Parts ... identify the Accessories PREPARE THE MACHINE FOR SEWING SECTION Set Up the Machine ... Plug in the Machine and Switch on the Power ... Foot Control Use ... -
Page 5: Section Know The Machine
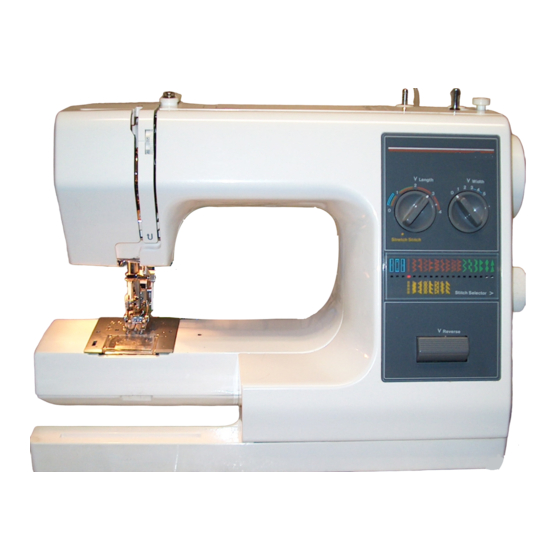
A Portable Case or Cabinet is Available A full fine ot sewing cabinets is available at your nearest Sears retail store or through general catalog. Another option buy a Carrying Case ... then your Kenmore goes anywhere, stored anywhere. Locate and Identify the Parts... - Page 6 SECTION KNOW THE MACHINE Locate and Identify the Parts (Continued) Arm Cover Plate Hand Wheel Push-Pull Clutch Stitch Selector Stretch Stitch Adiuster Light and Power Switch Plug Connector Carrying Handle Presser Thumb Presser Presser Foot Lever Free Arm Drop Feed Lever Foot Control Nomenclature Plate...
-
Page 7: Identify The Accessories
identify the Accessories Buttonhole Large screw driver Small screw driver Straight Zipper ioot stitch toot Buttonhole Attachment Buttonhole Buttonhole guid_ p_ate ._// opener Needle set Additional spool pin Spool pm tell Sliding buttonhole loot toot Base plate __ SECTION KNOW THE MACHINE Lint brush Small spoof holder Larde spool holder... -
Page 8: Set Up The Machine
SECTION PREPARE THE MAHCINE Set Up the Machine o Plug in the Machine and Switch on the Power Power suppiy pIug Power sw_tch Plug connecter Machine plug NOTE: Before inserting the plug into your machine, be sure the power switch is OFF_ Check your outlet to be sure it is a 110 to t 20 Volt AC outlet. -
Page 9: Set The Pressure Dial
• Set the Pressure Dia! The pressure control dial is located inside the race cover plate. Set the dial aligning the setting mark on the dial with the groove as follows. 3 ... most sewing 2 ... applique and Cut-Out work 1 ... -
Page 10: Adiust The Presser Foot Lever
SECTION PREPARE THE MACHINE Set Up the Machine (Continued) • Adjust the Presser Foot Lever The Presser Foot Lever raises and lowers your presser loot. You can raise it about I/4- higher than the normal up position for easy removal of the presser foot or to help you place heavy fabrics under the presser loot. -
Page 11: Accessories Storage Box
Fit the tab into the slot, as shown. 2. With your thumb and index finger, gently snap in. PREPARE THE MACHINE FOR SEWING Your sewing machine can do tree arm sewing. This feature makes sewing easy for: * Bar tacking to reiniorce pockets, and waistlines on ready-made... - Page 12 SECTION PREPARE THE MACHINE FOR SEWING Set Up the Machine (Continued) '_'Sewing buttons on sleeves, waistbands, _- Darning socks or mending knees, elbows, '* Stitching sleeves, waistbands, pants legs, etc. or areas ol wear in children's clothes. or any circular garment area.
-
Page 13: Know What The Presser Feet Will Do
KnowWhat the Presser Feet Will Do = Check The Presser Foot The Presser leer are an important feature this machine. what each does in order to use them effectively. Your presser foot is held in place by a Foot Holder. Each presser foot merely snaps on the toot is holder, which is seldom removed. - Page 14 SECTION PREPARE THE MACHINE Know What the Presser Feet Will Do (Continued) g Change the Presser Foot (Continued) To Snap On Groove _n_ To Snap On the Presser Foot: Place presser loot horizontal pin on the loot lies just under the groove of the toot holder. 2.
- Page 15 = Presser Foot Types (Continued) Sliding Buttonhole Foot Sliding buttonhole toot Use this for buttonholes of built-in system. is marked measure your buttonholes accurately. Uses: Buttonhole making (see page 54_) SECTION Zigzag Foot E; Zigzag toot This toot can be set sew on each side ot your zipper.
-
Page 16: Presser Foot Types
SECTION PREPARE THE MACHINE = Presser Foot Types (Continued) Buttonhole Foot Buttonhole toot Use this loot when making buttonholes with buttonhole attachment system. Uses: Buttonhole making (see page 57) FOR SEWING Choose the Needle and Thread Your choice of needle and thread depends on the labric your sewing. In the needle case, you wilt find the tollowing color-coded Blue (11) ... -
Page 17: Fabric, Needle, Thread And Stitch Length Chart
o Fabric, Needle, Thread and Stitch Length Chart NEEDLE FABRIC SIZE AND COLOR Lightwe{ght: Batiste, Dimity, Chiffon, 11-ORANGE Silks, Fine Lace, Organza, Crepe, Taffeta, Voile, Organdy Mediurnweight, Cotton, Cotton Blend, Percale, Gingham, 14-RED Shantung, Pique, Seersucker Satin, Knit, Suitings, Linen, Wool Crepe, Leather Medium Heavyweight: 14-RED... -
Page 18: Prepare The Bobbin
SECTION PREPARE THE MACHINE Prepare the Bobbin • To Remove the Bobbin from the Machine (_ Remove cover plate by (_ Take out the bobbin, sliding hook cover plate release button the right. FOR SEWING o Horizontal Spool Pin Ordinary Spool .-.,, Small Spool Tilt up spool pin. -
Page 19: Bobbin Wind
Bobbin Wind Horizontal Spool Pin Additional Spool Pin ® ®@ (_)0 ,,,,A SECTION (_ Pull the clutch knob away trom the machine to disengage clutch. (_ Draw the thread from the spool, (_ Guide the thread around the bobbin winder thread guide. (_ Insert the thread through the hole in the bobbin, threading (_) Put the bobbin on the bobbin winding spindle, and push it to the right. - Page 20 SECTION PREPARE THE MACHINE Prepare the Bobbin (Continued) e Insert the Bobbin into the Bobbin Holder Put the bobbin into the bobbin 2. Pult holder so that the thread reeds toward counter-clockwise (left). slot @. FOR SEWING 3. Then pull about inches of thread...
-
Page 21: Thread The Needle
Prepare the Top Thread o Thread the Needle The numbered steps above follow the numbers on the illustrations. Dotted lines show places where the thread loops and then is pulled tight. SECTION PREPARE Raise take-up lever to its highest position by turning hand wheel toward you, Raise presser toot lever, Place the spool on the spool pin as shown, with thread coming lrom the back of the spool. -
Page 22: Prepare The Top Thread
SECTION PREPARE THE MACHINE Prepare the Top Thread (continued) • Pick Up the Bobbin Thread 2. Bring bobbin thread up by pulling 1. Raise presser toot fever, Hold needle thread loosely in left hand top thread, and rotate hand wheel toward you one complete turn. -
Page 23: Adjust The Top Thread Tension
o Adjust the Top Thread Tension Top side o! labnc Loosen_ Tighfen For Straight Stitch The ideal straight stitch will have threads locked between the two layers ot tabric, as shown above, magnified to show detail. If you look at the stitch, trent and back, you will notice that there are no gaps, that each stitch is smooth and even. - Page 24 SECTION PREPARE THE MACHINE For Zigzag Stitch in the correct zigzag stitch, the bobbin threads wilt not show on the top side ol fabric and the top threads will show slightly on the bottom side. See below lor the correct appearance. To match this appearance, Top tension Top tension...
-
Page 25: Stitch Selector
Stitch Selector The stitch selector controt determines the stitch you select. Simply turn this control untii the desired stitch is indicated indicator on the stitch indicator panef. The bottom selected when the stitch iength control is set at the stretch stitch position. NOTE: To avoid needle or tabric damage, be sure your needle is up and out ot fabric when selecting a stitch,... -
Page 26: Stitch Width Control
SECTION PREPARE THE MACHINE Stitch Width Control Stitch Length Control The stitch width control regulates the width The stitch ot the stitch you select. length of stich, and also has a stretch stitch setting. The higher the number, the wider the stitch. The higher The ""_ "' is the maximum... -
Page 27: Reverse Stitch Control
Now that you are familiar with the controls on your machine and with the accessories you are ready to start to sew with your new Kenmore sewing machine. Below are some good habits to tolfow each time you sit down to sew: Inspect the needle. - Page 28 SECTION LEARN THE STITCHES Practical Stitch Chart Stitch Foot and Other Attach. Stitch Selection Straight Zigzag STRAIGHT Zipper toot STRAIGHT Straight Zigzag STRETCH ZIGZAG Satin Zigzag RICK-RACK Zigzag STRETCH BLIND HEM Zigzag STITCH Thread Stitch Stitch Needle j ... Tension width Length Check...
- Page 29 Stitch Foot and Other Attach. Stitch Selection OVERCAST Zigzag STRETCH THREE-STEP Zigzag ZIGZAG <, ,€ SMOCKING Zigzag STRETCH SHELL Satin STITCH SERGING Zigzag I" Thread Stitch Stitch Needle =Tension Length width Check 2 - 6 Yellow 3 - 5 Chad Stretch Stitch on p°...
-
Page 30: Section Learn The Stitches
SECTION LEARN THE STITCHES Practical Stitch Chart (Continued) Stitch Foot and Other Attach. Stitch Selection Zigzag STITCHING ELASTIC Zigzag STRETCH J> > FAGOTING Zigzag STRETCH Zigzag PATCHING > <> TWO-POINT SHELL Zigzag STITCHING Stitch Stitch Thread Needle width Tension Length Check Zone Chart... - Page 31 Stitch Stitch Foot and Other Attach. Selection HERRING BONE Zigzag STRETCH TWO*POINT Zigzag BOX STITCH OVEREDGE Zigzag STITCH DECORATIVE Satin GEOMETRICS STRETCH Zigzag STITCH DECORATIVE Thread Stitch Stitch Needle Tension Length width Check Yellow Cha_ Stretch on p. 15 Stitch Position Check Cha_...
- Page 32 SECTION LEARN THE STITCHES Practical Stitch Chart (Continued) Stitch Foot and Other Attach. Stitch 'Selection BUTTONHOLE Sliding buttonhole attachment Buttonhole TWiN NEEDLE STITCHES Satin SATIN STITCH Satin Thread Stitch Stitch Needle Tension width Length Blue Check Blue Zone Chart Zone onp.
-
Page 33: Straight Stitches
Straight Stitches o Straight Stitch Set the Machine Stitch w_dth control 0 Top thread tension control 2 to 6 Slitch tength controt red Betore sewing with the straight stitch Zone loot, always set the stitch width control to 0 to avoid breaking the needle, 1. -
Page 34: Topstitching
SECTION LEARN THE STITCHES Straight Stitches (Continued) • Topstitching Set the Machine Stitch w_dth contro__ Top thread tension Stitch length control 2 to 6 control Here's How ZORO 1. Lower the presser loot. 2, Keep the edge of the tabric next to the right edge of the presser toot. -
Page 35: Sew In A Zipper
o Sew in a Zipper Fabric Preparation: Put the top sides o! the fabric together to the ot the zipper opening. Use the reverse to [ock the stitches. zipper opening with stitch length at -4 "" and top thread tension at "3 "*, Top thread tension... - Page 36 SECTION LEARN THE STITCHES Straight Stitches (Continued) of fabric lO. Close the zipper and turn the fabric 8. Open the zipper. top side up, Lower the presser foot and stitch the rest of the seam. Top s_de o! Iabnc Top s_de of labr_c 11.
-
Page 37: Dropping The Feed Dogs
o Dropping the Feed Dogs The drop teed lever is located underneath the free arm bed on the back side of the machine. C) To raise the teed dogs, push the (_ For dropping lever in the direction ol the push the lever in the direction arrow as illustrated. -
Page 38: Zigzag Stitches
SECTION LEARN THE STITCHES Zigzag Stitches • Basic Zigzag Set the Machine Stitch w_dth control 1 lo 5 TOp thread lens_on Stitch Iength control 3 to 8 control red zone Here's How There are many ways to sew a zigzag stitch. -
Page 39: Satin Stitch
o Satin Stitch Set the Machine Slitch widlh Top thread tenston control 3 to 8 Stitch length conlrel 0.5 to i Stretch Stitch F: Satin slttch 1ool Pressure dial: I or 2 The Stitch and Its Uses The Satin stitch is a versatile and often used decorative stitch, but it can also be used to overcast edge... -
Page 40: Applique
SECTION .LEARN THE STITCHES Zigzag Stitches (Continued) • Applique Set the Machine Stitch w+dth control 2 to 5 2 ! 34 Top thread tenston conlrof 2 to 6 Stitch lenglh conb'ol 0+5 to i Baste joiner) applique pieces on the tabric. Stitch surethe edge ol the applique. -
Page 41: Embroidery
Available stores. on to the fabric with embroidery you one thread to draw bobbin through to the sudace ot the outline, guiding labric raise the foot is an o ptional item at many sears LEARN THE STITCHES SECTION... -
Page 42: Sew A Button
SECTION LEARN THE STITCHES Zigzag Stitches (Continued) • Sew a Button Set the Machine Stitch width control Must be adjusted 2i3-4 Top thread tens=on control 2 to 6 Stitch leng_,h conlrol Any number (not necessary to adjust) Drop the feed dogs (see page 3_.). 1. -
Page 43: Overcasting Stitch
• Overcasting Stitch Set the Machine Stitch w+dth control 3 to 5 Top thread tenmon Control 3 to 8 Stitch length control zonE, Helptul Hints Start overcasting the raw corner ot your seam, start right at the edge, the labric will bunch up and the stitches will become Slre_ch Stitch tangled. -
Page 44: Blind Hemming
SECTION LEARN THE STITCHES Zigzag Stitches (Continued) o Blind Hemming Set the Machine Lightweighl Stitch w=dlh conlro! 2 to 3 Top thread tension con#ol 2 to 6 Stitch length con|roI red zone 1. Finish the raw edge ol your hem any way you desire (see overcasting 2. -
Page 45: Lace Work
o Lace Work Set the Machine Stitch w_dth control 2 to 3 Top thread tension cont[oI 2 to 6 Stitch [ength contro} 1 Stretch Stitch Lace adds a |ancifut, feminine touch to blouses and lingerie. Table linens and pillows trimmed with lace. Turn raw edge of fabric 5/8""... -
Page 46: Three-Step Zigzag
SECTION LEARN THE STITCHES Zigzag Stitches (Continued) o Three-Step Zigzag Set the Machine Stitch w_dth control Top thread lens_on control 2 to 6 Stitch length control 0.5 to i Seam Finishing (Overcasting) Place the tabric under the presser foot so that the edge wilt be slightly inside the right hand side of the presser loot, Guide Stretch... -
Page 47: Shell Stitching
o Shell Stitching "N Set the Machine Stitch width cont[ol 3 to 5 Top thread tens+on cont_-ol 4 to 9 Stitch length control Heres zone For best effect: Stretch Stitch Salm slitcl_ tool 2. If you sew rows of shell stitches, The Stitch and Its Uses space the rows 1/2- apart. -
Page 48: Fagoting Stitcih
SECTION LEARN THE STITCHES Zigzag Stitches (Continued) • Fagoting Stitch Set the Machine Stitch widlh control 5 Top thread tension control 3 1o 8 Stitch length conlrof 0.5 Io 2 Here's How 1, Fold under each |abric edge 5!8- and press. 2. -
Page 49: Two-Point Box Stitch
o Two-point Box Stitch Set the Machtne Stitch width controt 3 to 5 Top thread tens=on conlrol 3 to 8 Stitch length control zone This stitch is useful to join elastic tabric. Stretch Stitch Zigzag toot SECTION = Overedging Stitch Set the Machine Stitch w_dlh Top lhread... -
Page 50: Decorate With Geometric Patterns
SECTION LEARN THE STITCHES Zigzag Stitches (Continued) o Decorate with Geometric Patterns Set the Machine Top thread tension control 3 to 8 The Stitches and Their Uses These stitches are purely decorative, You can sew one row or several or vary the stitch width and length tor specia] effects. -
Page 51: Stretch Stitches
Stretch Stitches = Straight Stretch Set the Machine Stitch width control 0 Top thread tension controt 2 to 6 Stitch length control yellow stretch stiLch position A: Zigzag toot Stretch Stitch stretch H: Stralgl_t toot actually sewn, but is stitched in a forward The Stitch and Its Uses back This stitch is the stretch variation... -
Page 52: Overcast Stretch Stitching
SECTION LEARN THE STITCHES Stretch St itches (Continued) • Overcast Stretch Stitching Set the Machine Stitch width Top lhread lenslon control 2 to 6 Stilch length control yellow stretch sltlch position Here's How Place the raw edge of the labrJc to the LEFT of the needle as shown. -
Page 53: Serging Or Pine Leaf Stretch Stitching
• Serging or Pine Leaf Stretch Stitching Set the Machine Stitch w+dlh • Top thread tenmon control 3 to 6 Stitch length control yellow stretch stitch position Herds Place the tabric under the presser toot so that the stitches are made over the edge. -
Page 54: Stretch Patching
SECTION LEARN THE STITCHES Stretch Stitches (Continued) =, Stretch Patching Set the Machine Stitch width control 5 Top thread tension cont[ol 2 to 6 Stitch length control yeI!ow stretch stilch position The Stitch and Its Uses For patching worn out elbow or knees. For patchwork Stretch Stitch... -
Page 55: Decorative Stretch Patterns
= Decorative Stretch Patterns Set the Machine Top thread tension Stitch width contro! controt 2 to 6 3to5 StitCh length control ye}low stretch stitcll pos}tion Slrelch Stitch The Stitch and Its Uses Decorative stretch patterns can be used for adding creative touch to the items you sew lor your home and tamily. -
Page 56: Buttonholes Making
THE STITCHES Buttonhole Making ,D Learning to Sew Buttonholes With you Kenmore sewing machine you have two methods ol making buttonholes. You may use the built-in system or you may use the snap-in automatic buttonhole attachment system. Choose the buttonhole style 1. -
Page 57: Built-In System
e Built-in System Set the Machine Stitch w+dth !t I 0oo,+.3,o conlro! Stilch length Blue zone F:== 1. a. Carefully length on your garment. b. Change to the sliding buttonhole toot. TOp Ihread tension control 2 lo 6 c. Insert the garment under Strelch Stilch with... - Page 58 SECTION LEARN THE STITCHES Buttonhole Making (continued) 5. a. Set the stitch selector at 1=_ 4. a. Set the stitch selector at _ b. Sew 4 to 6 stitches. b. Sew marking of the buttonhole. c. Stop sewing at the right stitch. c.
-
Page 59: Using Buttonhole Attachment
o Using Buttonhole Attachment Buttonhole Attachment System For more varied and accurate buttonholes, you will enioy buttonhole attachment and templates. Know the parts and carefully read how to set up your machine properly. You wilt need these item tot the buttonhole attachment system. - Page 60 SECTION LEARN THE STITCHES Buttonhole Making (continued) Set the Machine Stitch width control 2 Top thread tension control 2 to 6 Stitch _ength conlro_ 3 to 4 Slretoh Stitch Buttonhole _oot Helptui Hihts Best results obtained using #60 ~#80 light weight threads bobbin thread.
- Page 61 _-_Butlonhole Guide block -/ _Geat -'-'---Base a. When you have selected the template with size and style buttonhole you need, slide the template into the guide plate. b. Pull catch toward you while sliding the template size you have chosen ts at the setting mark. c.
- Page 62 SECTION LEARN THE STITCHES Buttonhole Making (continued) Marked Mark your buttonhole position caretully on the garment, Placing your garment behind the machine, insert it the between plate and the buttonhole foot as shown. c. Align marked buttonhole with center marking on buttonhole d, Line up your labric edge with the measurement just in tront of the buttonhole loot as shown.
-
Page 63: Twin Needle Stitching
Twin Needle Stitching Set the Machine for any of these stitch Top thread tension control 3 to 7 t-------:,H', Stitch length control stretch yellow stitch position or green zone _---J_ A: Zigzag toot ..I_3 F: Satin stilch toot Stretch Stitch Twin needle !it _', Turn off the power switch (see page 6_). -
Page 64: Performance Problems Chart
SECTION PERFORMANCE PROBLEMS What to Do When PROBLEM Incorrect size needle. improper threading. Loose upper thread tension. Pulling fabric. Irregular Stitches Loose presser foot. Unevenly wound bobbin. Nicks or burrs at hole ot needle plate. Pulling tabric. Incorrect size needle. Breaking Needle Incorrect setting of needle. - Page 65 PROBLEM incorrect size needle, Bent or blunt needle. Skipping Stitches incorrect setting of needle. Tight upper thread tension. Starting to stitch too fast. Improper threading. Tight upper thread tension. Breaking Upper Thread Incorrect size needle. Sharp eye in needle. Nicks or burrs at hole of needle plate+ Improper bobbin case threading.
-
Page 66: Care For The Machine
SECTION CARE FOR THE MACHINE Cleaning the Machine Replacing the Light Bulb To insure that your machine operates at its best, you need to keep the essential parts clean at all times, The bobbin area can collect dust and lint, Your machine can become knock loudly if a thread is caught. -
Page 67: Clean The Hook Race And Feed Dogs
SECTION CARE FOR THE MACHINE :IWf in case machine is not used tor an extended time, oil it before sewing. Use good quality sewing machine oil. No other oiling is required Above points are only area require oiling on this machine. -
Page 68: Parts List
PARTS LIST... - Page 69 All parts listed herein may be ordered lrom any Sears Roebuck and Co. store or service center. WHEN ORDERING REPAIR PARTS, ALWAYS INFORMATION: 1. PART NUMBER 2. PART DESCRIPTION 3. MODEL NUMBER 4. NAME OF ITEM If the parts you need are not stocked locally, your order will be electronically transmitted to a Sears Repair Parts Distribution Center for expedited handling.
- Page 70 Do not modify the plug in any way." "Foot Controller Model YC-482P or YC-530 for use with Sewing Machine Models 385.!778x x x, 385.1684x x x, 385.1584x x x, 385.1664 x x x, 385.1754x x ×, 385.17526x x x, 385.1764x x x, 385.1884x x x, 385.17928x x x, 385.17924x x x, 385.t8836x x x,...
- Page 71 FULL 25-YEAR WARRANTY ON SEWING MACHINE HEAD For 25 years from the date of purchase, Sears wilt, free of charge, repair detects in material or workmanship which appear in the mechanical components of the sewing machine head. FULL TWO YEAR...
- Page 72 _,m_ m _-)_ >__i__ -._ z..__i _ _i m_ &.-'S €>';* > G3-.<-_ -.<i o_o_ _'_ _ >i> SETTING UP YOUR MACHINE 1o You'll find lh e spool cover. Tilt the spoo[ pin. spool thread thread coming back spool as shown. _i _ 2.
- Page 73 i::::_ Make sure t here isno stack or t. insert bobbin into :il;i snags in the thread Use the rotates counter c ockwse, type of thread andsze neede 2 Pul thread through slat (A) and recommended in your instruc- thread through notch (B) and t on book about 4 incheslong.
- Page 74 19150, 19501, 19502, 19601 15641, 16641, 16642 Llamar al centro de sears al telefono 1-800-366-7278 para ordenar boy, Cuando vallas a ordenar indicar #20 codigo 385 huego numero de ta parte, ACCESORIOS DE MAQUINA DE COSER NUMERO DESCRIPClON LA PARTE...
- Page 75 18841, 19150, 19501, 19502, 19601 16641, 16641, 16642 CALL SEARS TELEPARTS CENTER AT 1-800-366-7278 TO ORDER TODAY ! WHEN ORDERING, PLEASE INDICATE DIVISION 20-SOURCE 385 THEN PART NO, (SEWING MACHINE SOURCE 385) PART DESCRIPTION PART NO. 200012104 Hemmer Foot 214872011...
- Page 76 MACHINE Now that you have purchased your Kenmore Sewing Machine, should a need ever exist for repair parts or service, sJmpty contact your nearest Sears Service Center. Be sure to provide all pertinent you call or visit. The model number will be shown on the nomenclature page 4 for location.