Table of Contents
Advertisement
OWNER'S MANUAL
®
BATTERy ChARgER/MAINTAINER
2 Amp, 12 volt
4 Amp, 6 volt
Fully Automatic with
Float-Mode Monitoring
Model No.
200.71219
CAUTION:
Read and follow all Safety
Rules and Operating Instructions
Before Every Use of this Product.
SAvE ThESE INSTRUCTIONS.
Sears, Roebuck and Co., hoffman Estates, IL 60179 U.S.A.
0099000589/1205
Advertisement
Table of Contents

Related Manuals for DieHard 200.71219


Summary of Contents for DieHard 200.71219
- Page 1 4 Amp, 6 volt Fully Automatic with Float-Mode Monitoring Model No. 200.71219 CAUTION: Read and follow all Safety Rules and Operating Instructions Before Every Use of this Product. SAvE ThESE INSTRUCTIONS. Sears, Roebuck and Co., hoffman Estates, IL 60179 U.S.A. 0099000589/1205...
-
Page 2: Table Of Contents
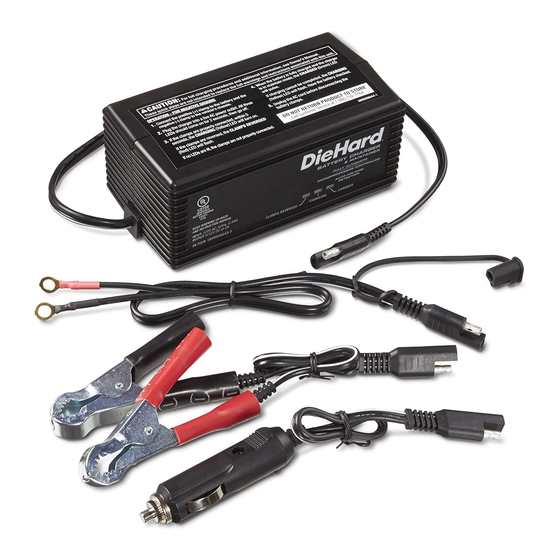
WARRANTy... 2 IMPORTANT SAFETy INSTRUCTIONS ... 3 PERSONAL SAFETy PRECAUTIONS ..4 BEFORE USINg yOUR BATTERy ChARgER ... 5 Plugging.It.In... 5 Using.An.Extension.Cord... 5 50.Amp.Battery.Clamps... 5. Permanent.Ring.Connectors... 5 12V.Accessory.Plug... 5 USINg yOUR BATTERy ChARgER... 6 PREPARINg yOUR BATTERy TO BE ChARgED ... 6 OPERATINg INSTRUCTIONS . -
Page 3: Important Safety Instructions
IMPORTANT SAFETy INSTRUCTIONS WARNINg – RISK OF EXPLOSIvE gASES WORKING.IN.VICINITY.OF.A.LEAD-ACID.BATTERY.IS.DANGEROUS..BAT- TERIES.GENERATE.EXPLOSIVE.GASES.DURING.NORMAL.BATTERY.OP- ERATION..FOR.THIS.REASON,.IT.IS.OF.UTMOST.IMPORTANCE.THAT.EACH. TIME.BEFORE.USING.YOUR.CHARGER,.YOU.READ.THIS.MANUAL.AND. FOLLOW.THE.INSTRUCTIONS.EXACTLY. To.reduce.risk.of.battery.explosion,.follow.these.instructions.and.those.published.by. battery.manufacturer.and.manufacturer.of.any.equipment.you.intend.to.use.in.vicinity. of.battery..Review.cautionary.markings.on.these.products.and.on.engine. SAvE ThESE INSTRUCTIONS This.manual.contains.important.safety. and.operating.instructions.for.battery. charger.Model.71219. •. Read.all.instructions.and.cautions. printed.on.the.battery.charger,.battery,. and.vehicle.or.equipment.using.bat- tery.. •. Use.charger.only.on.lead-acid.type. rechargeable.batteries,.such.as.those. used.in.motorcycles,.lawn.tractors,. ATVs,.RVs,.boats,.snowmobiles.an- tique.and.classic.cars..This.charger.is. not.intended.to.supply.power.to.a.low. voltage.electrical.system.other.than.in. a.starter-motor.application. •. Never.use.charger.for.charging.dry. cell.batteries.that.are.commonly.used. with.home.appliances.like.radios,.ste- reos,.remote.controls,.etc..These.bat- teries.may.burst.and.cause.personal. -
Page 4: Personal Safety Precautions
a.hard.blow,.been.dropped,.or.otherwise. damaged. Take it to a qualified profes- sional.for.inspection.and.repair. Be sure.to.position.the.charger.power. cord.to.prevent.it.from.being.stepped.on,. tripped.over,.or.damaged. Never.pull.out.the.plug.by.the.cord.when. unplugging.the.charger..Pulling.on.the. cord.may.cause.damage.to.the.cord.or. the.plug. PERSONAL SAFETy PRECAUTIONS •. Wear complete eye and clothing protection.when.working.with.lead- acid.batteries. •. Make sure.that.someone.is.within. range.of.your.voice.to.come.to.your. aid.if.needed.while.you.work.with.or. are.near.a.lead-acid.battery. •. have plenty of fresh water and soap.nearby.for.use.in.case.battery. -
Page 5: Before Using Your Battery Charger
BEFORE USINg yOUR BATTERy ChARgER It.is.important.to.understand.the.charger’s.requirements..This.section.explains.the. charger’s.electrical.requirements.and.how.to.prepare.a.battery.for.charging. PLUggINg IT IN Your.charger.requires.a.120V.AC.electri- cal.outlet.installed.according.to.all.local. codes.and.ordinances. USINg AN EXTENSION CORD The.use.of.an.extension.cord.is.not. recommended..If.you.must.use.an.ex- tension.cord,.please.make.sure.that.you. follow.these.guidelines:. •. Make.sure.that.pins.on.plug.of.exten- sion.cord.are.the.same.number,.size,. and.shape.as.those.of.plug.on.charger.. •. Check.that.the.extension.cord.is. properly.wired.and.in.good.electrical. condition. •. Make.sure.that.the.wire.size.is.large. enough.for.its.length.and.for.the.AC. ampere rating, as specified in the chart.below. MINIMUM RECOMMENDED EXTENSION CORD... -
Page 6: Using Your Battery Charger
Be careful not to overfill. If you have a. sealed. battery. with. non-removable. vent.caps,.no.action.is.necessary. •. Take. time. to. read. all. of. the. battery. manufacturer’s specific precautions, such.as.removing.or.not.removing.vent. caps.while.charging,.and.recommended. rates.of.charge. USINg yOUR BATTERy ChARgER Maintain.Mode:.When.the.Charged. (green) LED is lit, the charger has started.Maintain.Mode..This.mode.of. operation.is.also.known.as.Float-Mode. Monitoring..In.this.mode,.the.charger. keeps.the.battery.fully.charged.by.deliv- ering.a.small.current,.when.necessary.. -
Page 7: Operating Instructions
IMPORTANT: Follow.all.safety.instructions.and.precautions.when.charging.your.bat- tery..Wear.complete.eye.protection.and.clothing.protection..Charge.your.battery.in.a. well-ventilated.area. ChARgINg BATTERy IN ThE vEhICLE: 1.. Avoid.personal.injury.by.keeping. clear.of.fan.blades,.belts,.pulleys. and.other.engine.parts. 2.. Avoid.damaging.the.charger.by. keeping.the.power.cord.and.output. cords.away.from.the.hood,.door.or. moving.engine.parts. 3.. Note.the.polarity.of.the.battery.posts. by checking the identification marks on the battery: POSITIVE (POS, P or +) and NEGATIVE (NEG, N or -). The.positive.post.is.usually.larger. than.the.negative.post.. -
Page 8: Charging.battery.removed.from.the.vehicle
3. Connect the red (POSITIVE) output clamp.to.the.POSITIVE.battery.post.. Rock.and.twist.the.clamp.back.and. forth.to.be.sure.a.solid.electrical.con- nection.is.made. 4.. Position.yourself.as.far.away.from. the.battery.as.possible,.and.then. connect the black (NEGATIVE) output.clamp.to.the.free.end.of.the. cable. BATTERy ChARgER 5.. Select.the.desired.charge.rate.and. battery.type:.2A,.12V.or.4A,.6V. 6.. Plug.the.power.cord.into.an.AC.110V. POWER CORD electrical.wall.outlet.. 7.. Press.the.appropriate.control.buttons. to.select.the.desired.charge.rate. gROUNDED POWER and.battery.type..The.CHARGING. OUTLET (yellow) LED should light and the charging.process.should.start..If.the. -
Page 9: Battery Percent And Charge Time
BATTERy PERCENT AND ChARgE TIME This.charger.adjusts.the.charging.time.in.order.to.charge.the.battery.completely,.ef- ficiently and safely. This.battery.charger.has.a.rated.output.of.2.and.4.ampere..This.output.will.vary.with. the.age.and.condition.of.the.battery.being.charged..If.battery.has.only.been.slightly. discharged,.it.can.be.charged.in.less.than.a.few.hours..The.same.battery.will.take. longer.to.charge.if.it.is.very.weak. 2 Amp, 12 volt Battery Ampere.Hour.Battery.Capacity 4 Amp, 6 volt Battery Ampere.Hour.Battery.Capacity A.minimal.amount.of.care.can.keep.your.battery.charger.working.properly.for.years. 1. Clean the clamps each time you are finished charging. Avoid skin contact with bat- tery.acid...See.“Personal.Safety.Precautions”,.page.4. -
Page 10: Troubleshooting
NOTES... - Page 11 NOTES...