Table of Contents
Advertisement
Quick Links
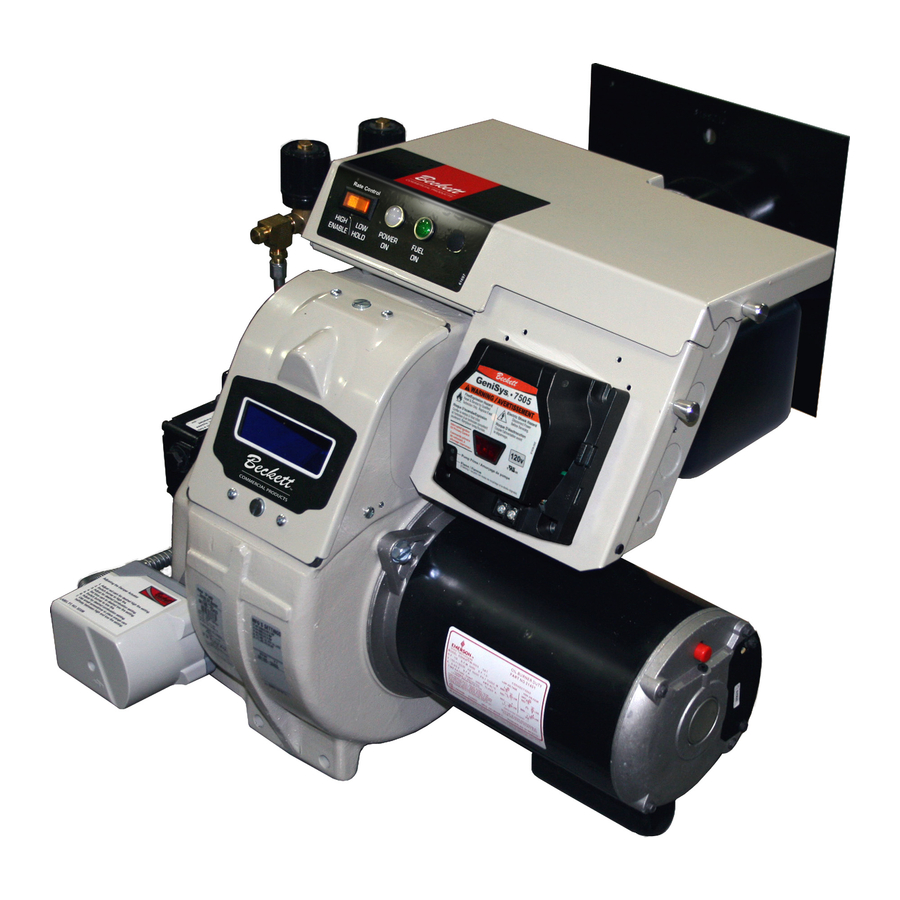
1400
MODEL
MODEL
MODEL
MODEL
MODEL
CF
Instruction Manual
ON/OFF Operation
Firing rate: 4.0 – 10.0 GPH
Motor voltage: 120 / 60 Hz std.
Thank you for purchasing a
Beckett burner. With proper care and
regular maintenance, it will provide
years of trouble-free service. Please
take a few minutes to read the section
entitled "To the owner" inside this
manual. Then, keep the manual in a
safe place where it can be easily
located if needed by your professional
service technician.
Oil
Burner
Advertisement
Table of Contents

Related Manuals for Beckett CF 1400


Summary of Contents for Beckett CF 1400
- Page 1 Firing rate: 4.0 – 10.0 GPH Motor voltage: 120 / 60 Hz std. Thank you for purchasing a Beckett burner. With proper care and regular maintenance, it will provide years of trouble-free service. Please take a few minutes to read the section entitled “To the owner”...
-
Page 2: Please
High altitude installations — Accepted industry practice requires no derate of burner capacity up to 2,000 feet above sea level. For altitudes higher than 2,000 feet, derate burner capacity 4% for each 1000 feet above sea level. Denotes presence of a hazard which, if ignored, could result in severe personal injury, death or substantial property damage. -
Page 3: Table Of Contents
Warranty Beckett warrants its equipment to those who have purchased it for resale, including your dealer. If you have any problems with your equipment or its installation, you should contact your dealer for assistance. Refer to warranty sheet in literature packet included with burner for details. -
Page 4: Pre-Installation Checklist
Clearances • With the burner installed in the appliance, there must be adequate space in front of and on the sides of the burner to allow access and operation. Verify that the clearance di- mensions comply with all local codes and with the appli- ance manufacturer's recommendations. -
Page 5: Verify Firing Rate
Verify that the cham- ber dimensions are at least as large as the minimum values given in . -
Page 6: Mount The Burner
• Remove the rear access door from the back of the burner for improved access to the interior. • Attach the air tube to the burner with the bolts and acorn nuts provided. The acorn nuts must go on the outside of the burner, with the bolts inserted from the inside. -
Page 7: Set Dimension Z
Figure 5 - Nozzle line assembly in burner Measure dimension front (flat) face of head to end of air tube, as shown. Measure dimension Z from the flat surface between (not on) the raised fins. 1424 Figure 7 - Burner installed in appliance front Legend "... -
Page 8: Connect Fuel Line(S)
• Size the oil supply and return lines using the guidelines given in the fuel unit literature included in the literature envelope. Oil line flow rate will equal the burner rate for one-pipe systems. For two-pipe systems, refer to 300 psig... -
Page 9: Burner Fuel Flow
• Install two high-quality shut-off valves in accessible loca- tions on the oil supply line. Locate one valve close to the tank. Locate the other valve close to the burner, upstream of the fuel filter. Burner fuel flow •... -
Page 10: Wire The Burner
Instruction Manual – Model CF1400 Oil Burner Wire the burner Install the burner and all wiring in accordance with the National Electrical Code and all applicable local codes or requirements. Wire the burner in compliance with all instructions provided by the appliance manufacturer. Verify operation of all controls Do not by-pass any safety control. -
Page 11: Sequence Of Operation - Typical
( ) and the ignition transformer The oil pump is operated by the burner motor, so oil pres- sure is delivered to the oil valve inlet. 3. Power is applied to the oil valve circuit. If optional timer, ), is installed, oil flow will be delayed for the timer duration, thus providing a prepurge period. -
Page 12: Adjusting Plate Assembly
• The indicator plate assembly (item to head position settings. • Slide the secondary adjusting plate (item of the burner until the number on the indicator plate corre- sponds to the initial head setting given in desired firing rate. •... -
Page 13: Set Appliance Limit Controls
Damper label - position indicator for air adjusting plate k Damper indicator - permanently attached to damper m Air adjusting plate - sets air position Form 6104 BCF14N-R0299 Instruction Manual – Model CF1400 Oil Burner Table 5 – Initial air adjusting plate settings (damper position) Approximate head settings 7 –... -
Page 14: Start The Burner
4. Close the line switch to the burner. The burner motor should start immediately. 5. If the burner motor does not start, reset the motor overload switch (if so equipped) and press the reset switch of the burner primary control. -
Page 15: Maintenance And Service
Operation and adjustment of the burner requires technical knowledge and the use of combustion test instruments. Do not tamper with the burner or controls. Failure to comply could result in failure of the burner or system, resulting in severe personal injury, death or substantial property damage. -
Page 16: Replacement Parts
10" Kit #51312 Kit #51629 U.S.A.: P . O. Box 1289 Elyria, Ohio 44036 800-645-2876 440-327-1060 FAX 440-327-1064 Canada: R. W. Beckett Canada, Ltd. 430 Laird Road Guelph, Ontario, N1G 3X7 800-665-6972 FAX 519-763-5656 Part number Item Part name Timer...