Table of Contents
Advertisement
Quick Links
Advertisement
Table of Contents

Related Manuals for Samsung ITP-5107SIP


Summary of Contents for Samsung ITP-5107SIP
- Page 1 ITP-5107S IP Keyset User Guide...
- Page 2 ITP-5107S User Guide For OfficeServ 100, OfficeServ 500, ™ ™ OfficeServ 7000 Series ™ 05/2006...
- Page 3 Samsung Telecommunications America reserves the right without prior notice to revise information in this guide for any reason. Samsung Telecommunications America also reserves the right without prior notice to make changes in design or components of equipment as engineering and manufacturing may warrant.
-
Page 4: Table Of Contents
TABLE OF CONTENTS ABOUT THIS BOOK ...1 THINGS YOU SHOULD KNOW ...2–6 ASSEMBLING YOUR KEYSET ...7 ITP-5107S SETUP ...8–13 OUTSIDE CALLS Making an Outside Call ...14 Answering an Outside Call...14 Universal Answer ...14 Recall/Flash ...15 Busy Line Queuing with Callback ...15 Canceling Callback ...15 INTERCOM CALLS Calling Other Stations ...16... - Page 5 DIALING FEATURES Speed Dialing ...27 Programming Personal Speed Dial Numbers ...27–28 One Touch Speed Dialing...28 Last Number Redial ...28 Manual Retry with Redial ...29 Save Number with Redial...29 Chain Dialing...29 Automatic Redial/Retry...29 Pulse to Tone Changeover ...30 Memo Redialing...30 PAGING AND MESSAGING Making an Internal Page...31 Making an External Page ...31 All Page ...31...
- Page 6 CUSTOMIZING YOUR KEYSET AME Password ...41 Auto Camp-On ...41 Select Ring Tone ...41 Change Your Passcode ...41 Set Answer Mode (Intercom) ...42 Set Answer Mode (CO) ...42 Automatic Hold ...42 Headset Operation ...42 Hot Keypad ...43 Key Confirmation Tone ...43 Rejoining a Page ...43 Ring Preference ...43 Auto Answer CO Calls ...44...
- Page 7 SVMi E-Series ...58 Accessing your Mailbox ...59 SVMi E-Series Subscriber Services Menu Diagram ...60–61 Getting Started ...62 Listen to your Messages ...62 Subscriber Services Menu ...62 Listening to Old or New Messages ...63 Group New or Old Messages ...64 Record and Send a Message...64 Access Manager ...65 Personal Greetings ...67 Mailbox Administration ...69...
-
Page 8: About This Book
ABOUT THIS BOOK Samsung’s new OfficeServ Technology keyset model, ITP-5107S, is part of the OfficeServ 100, OfficeServ 500, and OfficeServ 7000 Series. The ITP-5107S IP keyset represents a new concept of Internet phone, in that it uses an IP address to Send/Receive voice and data. For voice communications, the ITP- 5107S uses the data network line already in place in most offices and increasing number of homes. -
Page 9: Things You Should Know
Lines from the telephone company are “C.O. lines.” Calls on these lines are referred to as “outside calls.”Your system can have individual C.O. line keys or lines may be assigned to groups. -
Page 10: Full Duplex Speakerphone
Some simple rules to remember: • Any steady LED indicates the line or feature is in use. • A fast flashing green LED indicates a new call ringing in. • A slow flashing green or red LED indicates a call is on hold. •... -
Page 11: Conference Button
CONFERENCE BUTTON The CONFERENCE button allows the user to set up a call with up to 5 parties (sta- tion or trunk). TRANSFER BUTTON Transfer is used to send any call to another extension in one of two ways. You can do a screened transfer by informing the other extension who is calling or you can do a blind transfer without notification. -
Page 12: System Tones
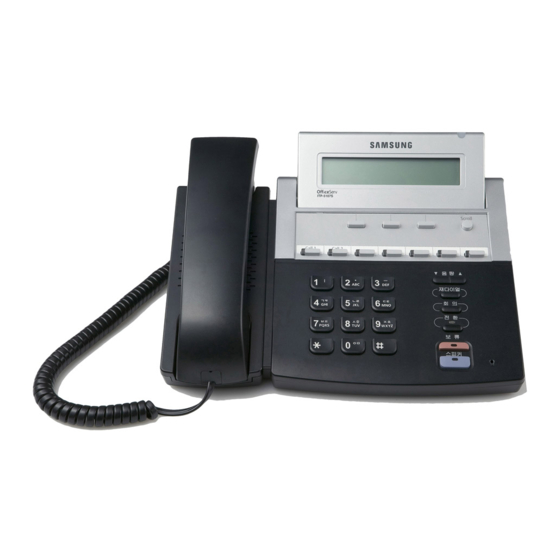
SYSTEM TONES The system provides several tones to assist you. Some of these tones are already familiar to you. Intercom Dial Tone—A steady tone that indicates you can begin dialing. DIAL TONE Ringback Tone—Indicates the station you dialed is ringing. RINGBACK TONE—1000 ms ON/3000 ms OFF Busy Tone—Indicates the station you dialed is busy. - Page 13 ITP-5107S Programmable Buttons (7) Dial Button Soft Button LCD Panel Status Indicator Redial Button Conference Button Transfer Button Hold Button Microphone Speaker Button Scroll Button Keyset Support Volume Button...
-
Page 14: Assembling Your Keyset
ASSEMBLING YOUR KEYSET • Place the keyset face down on a flat surface. • Insert notched ends of the support bracket into the channels located in the upper section of the bottom panel. Push towards the top of the keyset to lock •... -
Page 15: Itp-5107S Setup
ITP-5107S SETUP INITIALIZING THE ITP-5107S Initially the ITP-5107S IP keyset will need to be setup to operate within the users network.The Setup Menu is also used to make changes to the keyset, in the event that the system information should change. The option chosen via scroll key will be highlighted. -
Page 16: Navigating The Menus
6.FACTORY RESET 7.REBOOT NAVIGATING THE MENUS Once the IP setup menu is displayed, you can move to each menu by using the buttons as described below: • The [0]~[9] dial buttons are used to directly choose a menu, or sub-menu options. -
Page 17: Menu Structure
MENU STRUCTURE The IP SETUP MENU is configured as follows: 1. SYSTEM EASY WIZARD This option will guide you through setting up all required parameters for con- necting the ITP keyset to your system. 2. SYSTEM INFORMATION Version Info: Provides boot rom, software, DSP, and hardware version information. -
Page 18: Setting Ip Manually
SETTING THE NETWORK PARAMETERS Utilize the following programming steps to program the ITP-5107S keyset to operate within the users network. YOU CAN SELECT THE SYSTEM EASY WIZARD TO PROGRAM ALL REQUIRED NETWORK PARAMETERS IF YOU WANT TO SET UP THESE PARAMETERS INDIVIDUALLY FOLLOW THE INSTRUCTIONS BELOW. Network Parameter Setup Get into the SETUP MODE as shown on page 8. - Page 19 • Select the [3. NETMASK SET UP] menu and press SPEAKER, the LCD will display the following message and the user can enter a new Netmask IP address. Use the HOLD button to backspace. Check if there is any currently saved subnet mask address of the phone on the LCD.
-
Page 20: Completion Of Settings
System Server Setup From the Main Setup Menu, the fifth item [5. SYSTEM SERVER SET UP] sets or modifies settings related to registering the phone to the MCP. You can obtain this information from your system administrator. The screen below is displayed. 1.SERVER IP ADDRESS You can set/modify the IP address of the MCP at the [1. -
Page 21: Outside Calls
SPEAKER, receive intercom dial tone and dial a line access code. • Dial the telephone number. • Finish the call by replacing the handset. NOTE: You will receive No More Calls tone when you attempt to make a call and there is no button available for that line. -
Page 22: Recall/Flash
SENDING A FLASH While on an outside call, press the FLASH button to send a flash to the telephone company. This is required for some custom calling features or CENTREX use. NOTE: Flash is not available on an ISDN circuit. -
Page 23: Intercom Calls
INTERCOM CALLS CALLING OTHER STATIONS • Dial the extension number or group number. • Wait for the party to answer. If you hear a brief tone burst instead of ringback tone, the station you called is set for Voice Announce or Auto Answer. Begin speaking immediately after the tone. -
Page 24: Busy Station Callback
BUSY STATION CALLBACK When you call another station and receive a busy signal: • Press the CBK button, if programmed, or dial 44. • When the busy station becomes free, your keyset will ring. • Lift the handset to call the now idle station. NOTES: A callback will be canceled if not answered within 30 seconds. -
Page 25: Calling Your System Operator
CALLING YOUR SYSTEM OPERATOR • Dial 0 to call your system operator or group of operators. • If you want to call a specific operator, dial that person’s extension number. NOTE: If the Hot Keypad feature has been turned off, you must first lift the hand- set or press the SPEAKER button before you begin dialing. -
Page 26: Call Processing
CALL PROCESSING SYSTEM HOLD • When you are connected to any call, press HOLD. The call will flash green at your keyset. If this call appears on a line button at other keysets, it will flash red at those keysets. •... -
Page 27: Consultation Hold
• If you do not answer this recall within a pre-programmed period of time, it will go to the system operator. CONSULTATION HOLD When you are talking on an outside line and it is necessary to consult with anoth- er extension: •... -
Page 28: Transfer With Camp-On
first station to hang up, simply press another DSS button. OR Press the CALL button or C.O. line button to return to the outside party and begin the transfer process again. When you are transferring a call to a keyset set for Voice Announce or Auto Answer, the transferred call will always ring. -
Page 29: Conference Calls
Finish the first call and hang up; the waiting call will ring. • Lift the handset. NOTE: Intercom calls will not go on Automatic Hold. CONFERENCE CALLS You may conference up to five parties (you and four others) in any combination of outside lines and internal stations in any order. -
Page 30: Forwarding Calls
You may forward your calls to another station, group of stations or an external telephone number. Program a destination for the type of forwarding you want as detailed below. If you have FWD ALL, FWD BUSY and FWD NO ANSWER buttons, press one to turn that forward feature on. -
Page 31: Forward Follow Me
FORWARD BUSY/NO ANSWER If you have both a Forward on Busy destination and a Forward No Answer desti- nation programmed, you may set both of these at the same time: • Dial 604. • Receive confirmation tone and hang up. NOTE: If the Hot Keypad feature has been turned off, you must first lift the handset or press the SPEAKER button before you begin dialing. -
Page 32: Call Pickup
• Dial 0 to cancel current condition OR Dial 1-5 to select the forward type OR Press UP or DOWN to select the forward type. Press the right soft key to move the cursor. • Dial the destination number (e.g., 202) OR Press UP or DOWN to select the destination Press the right soft key to move the cursor •... -
Page 33: Privacy Release
PRIVACY RELEASE This feature will allow another station to join in our conversation by releasing pri- vacy on the C.O. from your phone. To Release Privacy: While you are talking on a C.O. line and you wish to have other internal parties (or up to three) join the conversation. -
Page 34: Dialing Features
Dial a speed dial number (00–49). • Dial a line or line group access code. • Dial the telephone number to be stored (24 digits maximum). It can include #, ,, FLASH and PAUSE. • Press TRANSFER to store the number. -
Page 35: One Touch Speed Dialing
SPEAKER button before you begin dialing. LAST NUMBER REDIAL To redial the last telephone number you dialed, press the REDIAL button or dial 19. NOTES: If the Hot Keypad feature has been turned off, you must first lift the handset or press the SPEAKER button before you begin dialing. -
Page 36: Manual Retry With Redial
If the Hot Keypad feature has been turned off, you must first lift the handset or press the SPEAKER button before you begin dialing. The saved telephone number is stored in memory until you save another number. Redial does not apply to intercom calls. -
Page 37: Pulse To Tone Changeover
• While you are talking on an outside call, press SAVE. • Dial the telephone number as it is dictated to you on the keypad. • Press SAVE to store the number. To dial the number, press the SNR button. It will select the same line and dial the stored number. -
Page 38: Paging And Messaging
PAGING AND MESSAGING MAKING AN INTERNAL PAGE To make an announcement through the keyset speakers in the idle condition: • Lift the handset. • Press the PAGE button or dial 55. • Dial the desired zone number 0, 1, 2, 3 or 4. •... -
Page 39: Meet Me Page
MEET ME PAGE • Lift the handset. • Press the Meet Me Page (MMPG) button or dial 54. • Dial the desired zone number. • After the attention tone, instruct the paged person to dial 56. • Press WAIT or TRANSFER. •... -
Page 40: Messages-Set And Cancel
To retrieve an automatically parked call: • Dial 10 plus the number that was announced. If you have a PAGPK button, press it and dial the number that was announced. If you have a PARK button, press it and dial the announced orbit number. •... -
Page 41: Programmed Messages
NOTES: Display keyset users can view message indications and return them in any order. See Viewing Message Indications under Display Features. If the Hot Keypad feature has been turned off, you must first lift the handset or press the SPEAKER button before you begin dialing. If a message has been left at your keyset by a keyset in Auto Answer, you must manually cancel the message after it has been returned. -
Page 42: Convenience Features
CONVENIENCE FEATURES DO NOT DISTURB Use this feature when you want to block calls to your keyset. • While on-hook, press the DND button or dial 401. The DND button lights steady red to remind you of this mode. • To cancel DND, press the DND button again or dial 400. -
Page 43: Established Call Pickup
ESTABLISHED CALL PICKUP To pick up an established call in progress at a single line extension connected to a computer modem on your PC. • Press the EP button for that station on your keyset and the call is automati- cally moved to your keyset. -
Page 44: Door Phone Calls
ANSWERING THE DOOR PHONE When you are programmed to receive calls from a door phone: • You will receive three short rings repeated. • Lift the handset. You are connected to the door phone. • If an electric door lock release is installed, dial 13 to unlock the door. CALLING THE DOOR PHONE/ ROOM MONITOR You may call the door phone and listen to what may be happening outside or in... -
Page 45: Group Listening
GROUP LISTENING When you are engaged on a call and you are using the handset, you may want other people to hear the distant party’s voice over the speaker: • Press the LISTEN button to turn on the speaker.The microphone is not in use, so the distant party does not hear other parties present in your office. -
Page 46: Manual Signalling
MANUAL SIGNALLING Use this feature when you want to send a brief 500ms ring burst to another sta- tion, regardless of the status of your phone (on-hook, off-hook, handsfree, DND, or ringing). To send a signal to another station: • Press the Manual Signalling (MS) button. -
Page 47: Ohva Block
OHVA BLOCK Your keyset can be programmed with an OHVA Block (BLOCK) button. Pressing this button will prevent anyone from making an OHVA to you until you press the button again and cancel the blocking. OHVA REJECT Your keyset can be programmed with an OHVA Reject (REJECT) button. Pressing this button while receiving an OHVA call will disconnect the voice announcing party and return you to your original call. -
Page 48: Customizing Your Keyset
CUSTOMIZING YOUR KEYSET AME PASSWORD This feature allows people using the AME feature to enable password protection. This will prevent unauthorized people from listening to your messages being left. The passcode is the same as your station passcode. This feature only applies if there is an SVMi card installed in the system and your keyset has a programmed AME button. -
Page 49: Set Answer Mode (Intercom)
SET ANSWER MODE (INTERCOM) You can receive internal calls in one of three modes (see Answering Intercom Calls under Intercom Calls for descriptions): • While on-hook, press TRANSFER and then dial 103. • Dial 0 for Ringing, 1 for Auto Answer or 2 for Voice Announce. •... -
Page 50: Hot Keypad
HOT KEYPAD On your phone system your keyset’s keypad can be made “live” or “hot” so that it is not necessary to lift the handset or press the SPEAKER button before you begin dialing. Calls can be made and features activated by simply dialing the C.O. line number, trunk group access code, intercom number or feature access code. -
Page 51: Auto Answer Co Calls
connected to the CO call. In order for this option to work the station must also be programmed for auto answer (see SET ANSWER MODE). • While on hook, press TRANSFER and then dial 110. • Dial 151 to turn Auto Answer CO on or 150 to turn it off. •... -
Page 52: Display Features
DISPLAY FEATURES INTERACTIVE DISPLAY KEYS The three keys below the display are substitutes for dedicated feature keys and ac- cess codes. Pressing one of these buttons has the same effect as pressing a pro- grammable button. These buttons are called soft keys as their functions are not fixed.They change to present you with the best options for that call condition.The use of soft keys allows the programmable buttons to be used for more DSS and speed dial buttons. -
Page 53: Call Log
Press either the IN or OUT key. • View the first IN/OUT telephone number. At this point you may select one of the three options related to this number or use the UP/DOWN keys to scroll through your list of calls. -
Page 54: Call Progress Displays
The system can be set to automatically time outside calls. A few seconds after you dial a telephone number, the timer appears in the display. It appears immediately for incoming calls. The call timer continues for the duration of the call. Call dura- tion times are displayed in minutes and seconds. -
Page 55: Viewing Message Indications
VIEWING MESSAGE INDICATIONS You can view all of your message indications before you return them: • With the handset on-hook, press the MESSAGE button with the red flashing light. • The first station that left a message indication will be displayed. •... -
Page 56: Personal Speed Dial Names
DIAL 7 DIAL 8 DIAL 9 DIAL , NOTES: When the character you want appears on the same dial pad key as the previ- ous character, press UP to move the cursor one space to the right. Other symbols are available for DIAL #. To cancel an individual alarm and reminder message: •... -
Page 57: Managing Key Assignments
LCR WITH CLEAR When you are making an outside call using LCR and dial an incorrect digit, you can press the CLEAR soft key to reenter the telephone number. You do not need to redial 9 to reaccess LCR. BACKSPACE WITH LCR If you misdial while using LCR, you can delete digits shown in the display by press- ing the BSPC soft key as many times as necessary. -
Page 58: Text Messaging
TEXT MESSAGING This feature allows two digital keyset users to respond to each other with prepro- grammed text messages. After receiving an Off Hook Voice Announcement or Station Camp-On, you may respond with a text message while continuing to talk and listen to your outside party.The other station can view this message and take the appropriate action or respond back with another text message. - Page 59 Press TRANSFER Transfer: RETURN Dial 205 205:busy OHVA CAMP ON OHVA to 205 Wait for reply ASK THEM TO HOLD TMSG EXIT 702: 01:45 CONF PAGE OHVA from 201 TMSG GIVE THE CALL TMSG:01 Dial 03 or press ASK THEM TO HOLD TMSG:03 Wait for reply 701:...
-
Page 60: Caller Id
There are two types of Caller ID; the first delivers the calling party’s tele- phone number only and the second (sometimes referred to as “Deluxe” Caller ID) delivers both the calling party’s telephone number and name as listed in the tele- phone directory. -
Page 61: Ani
BRI and PRI type circuits. On BRI circuits the system only supports number deliv- ery and, like ANI, a name can be attached to the telephone number of frequent callers via the Caller ID translation table. On 5ESS and NI2 PRI circuits both name and number support is provided on the OfficeServ 100, OfficeServ 500, and OfficeServ 7000 Series systems. -
Page 62: Viewing The Next Caller Id Call
The system displays the speed dial bin in which the number was stored. NOTE: Your telephone system must have LCR correctly programmed to redial the saved number. If LCR is not being used on your system, you will not be allowed to... - Page 63 INQUIRE CALLER ID PARK/HOLD INFO If you are informed that an incoming call is on hold or has been parked for you, you may view the Caller ID information before you retrieve the call.This may influ- ence how you choose to handle the call. From an idle keyset: •...
- Page 64 NOTES: Each keyset defaults with ten review bins. Please see your system administra- tor to determine the number of bins assigned to your keyset. Your system must have LCR correctly programmed to allow you to DIAL num- bers from the review list or to STORE entries from the review list.
-
Page 65: Svmi E-Series
SVMi E-Series This section describes how to setup and use the various features available to a Subscriber. A Subscriber is a person that has been authorized access to the vari- ous features and services available in the SVMi E-Series. Please review this section carefully before you use your Authorized Features and Services, known as Subscriber Services. -
Page 66: Accessing Your Mailbox
ACCESSING YOUR MAILBOX [Also known as Subscriber Services Menu] Inside Callers [Subscriber logging in from their Desk] • Dial the SVMi E-Series access number or press the key assigned to ring SVMi E-Series [VMMSG]. • Enter your personal password when prompted (the default password is 0000). -
Page 67: Svmi E-Series Subscriber Services Menu Diagram
SVMi E-Series Subscriber Services Menu SVMi-8 Subscriber NOTE: All options shown MAY NOT be authorized. If an option is not available please speak to your system administrator. -
Page 69: Getting Started
GETTING STARTED Using your new SVMi E-Series Subscriber Services is as simple as following a few simple spoken instructions. First time users should read this section as a tutorial. You should start with the following steps: • Access your Subscriber Services Menu - You already know how to do this. From the Subscriber Services Menu: •... -
Page 70: Listening To Old Or New Messages
This will allow you to leave a message in the mailbox of the sender (if the sender has a mailbox on this system). Return the call directly to the telephone number that left the message. This will work for internal and external callers, but Caller ID service is need- ed to use this feature on an outside call. -
Page 71: Group New Or Old Messages
Change playback speed of the recording. There are two levels of speed during playback. Dialing this code will toggle between the two speeds. Play options. Pressing this key will play all the menu options available to you from this point. Hear the time and date, and sender's information of the message you just heard. -
Page 72: Access Manager
b) Record your message at the tone. After recording the message, you will hear the Send Menu with the following functions: Review Continue Recording Discard and Re-Record Set Message Attributes (Delivery Options) Schedule Future Delivery Save and Send then Send a Copy to Someone Else Save and Send the Recording Setting Message Attributes If after recording a message you select [4] you can set up any combination of the... - Page 73 The stored phone numbers are entered in 'Personal Services' [#][2] (if allowed by the Administrator). The stored tele- phone number list can contain up to 9 preprogrammed telephone numbers. The Find Me feature only use the first five.
-
Page 74: Personal Greetings
Busy, and Do Not Disturb (or Forwarded All). This will allow different greetings to play depending on the type of call forward that you have set, or the condition of your telephone. The Call Coverage conditions that you can assign specific greetings to are select-... - Page 75 1.” Busy Greeting Played to a caller when you are already talking to someone on your extension or the telephone at your Designated Location. This option is available only if the Administrator has assigned you the 'Busy Greeting' feature.
-
Page 76: Mailbox Administration
To hear your message at the remote location when the SVMi E-Series calls you, after you pick up the telephone and answer you will be instructed that there is a message and to enter your password. Simply enter your password... - Page 77 Setting Up Message Alert: ■ From the Subscriber Services Menu press [6] for Mailbox Administration. ■ Press [1] for Message Alert. ■ There are 4 options available to you: Press [1] to toggle message alert on and off. Press [2] to set the schedule when you would like to be notified. Press [3] to be notified on urgent messages only.
-
Page 78: Message Broadcast
This useful feature will allow you to cancel any messages that have NOT yet been picked up by the recipient. Auto Play New Messages If this option is enabled, after you enter your password correctly any new messages will immediately begin to play.To enable (or if already enabled tog- gle and disable) this feature: ■... -
Page 79: Personal Services
PERSONAL SERVICES The Personal Administration Menu is used to set your password and record your name. Many of these features must be allowed by the System Administrator. Workload Management Allows you to access to all reminders, both Active and Pending. If authorized you can group your reminders as Commitments, Follow-Ups or Tasks for bet- ter organization. -
Page 80: Personal Administration Settings
■ The current Directory Name will be played as a string of digits that are equal to your name spelled out on your telephone keypad. Follow the instructions to enter a new name.You will be prompted to enter your last name and then your first name. -
Page 81: Keyset User Features
Note: Remember if you know what digits to press, you can enter them at any time you do not have to wait to be prompted. This feature can be toggled on/off at anytime. Also if it is off you will be prompted within each subscriber menu to press zero for more options. -
Page 82: Call Record
AME Password If your keyset has AME PASSWORD (MMC 110) set to YES, you must enter your station password to listen to messages being left. This will prevent unauthorized people from listening to messages being left for you. If the password option is turned on, while a message is being left, press the flash- ing AME indicator and enter your station password (not your SVMi E-Series pass- word). -
Page 83: Shortcuts
SHORTCUTS Calling Calling a station that is busy or does not answer you can press [#] to immediately send the call to the called parties mailbox. Call Divert to Voicemail While receiving an incoming (ringing) call, dial [,] to immediately send the caller to your personal voicemail box. -
Page 84: Personal Speed Dial Numbers
_________________________ _________________________ _________________________ _________________________ _________________________ _________________________ _________________________ _________________________ _________________________ _________________________ _________________________ _________________________ _________________________ _________________________ _________________________ _________________________ _________________________ _________________________ _________________________ TELEPHONE NUMBER _________________________ _________________________ _________________________ _________________________ _________________________ _________________________ _________________________ _________________________ _________________________ _________________________ _________________________ _________________________ _________________________ _________________________ _________________________ _________________________ _________________________ _________________________ _________________________... - Page 85 _________________________ _________________________ _________________________ _________________________ _________________________ _________________________ _________________________ _________________________ _________________________ _________________________ _________________________ _________________________ _________________________ _________________________ _________________________ _________________________ _________________________ _________________________ _________________________ TELEPHONE NUMBER _________________________ _________________________ _________________________ _________________________ _________________________ _________________________ _________________________ _________________________ _________________________ _________________________ _________________________ _________________________ _________________________ _________________________ _________________________ _________________________ _________________________ _________________________ _________________________...
- Page 86 System Feature Codes Line Groups Local/LCR 800 ____________________________ 801 ____________________________ 802 ____________________________ Station Groups 501 _____________________________ 502 _____________________________ 503 _____________________________ 504 _____________________________ Paging Zones - Dial 55 plus All Internal Zones _____________________________ _____________________________ _____________________________ _____________________________ _____________________________ _____________________________ _____________________________ _____________________________ All External Zones All External Zones and Internal Zone 0 Programmed Messages - Dial 48 plus 00 Cancel Message...