Table of Contents

Related Manuals for Samsung Digimax 130


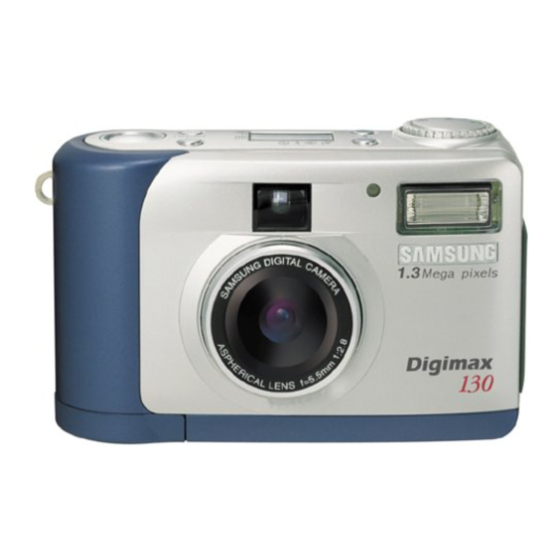
Summary of Contents for Samsung Digimax 130
- Page 1 Thank you for buying a Samsung Camera. This manual will guide you through using the Digimax 130, Including taking pictures, downloading images and using MGI PhotoSuite software. Please read this manual before using your new camera. ENGLISH...
-
Page 2: Special Features
Change the location and direction of any aerial. Increase distance between camera and affected device. Use a different socket away from the affected device. Please contact a Samsung agent or a radio/TV engineer. This device complies with part 15 of the FCC Rules. - Page 3 MANUFACTURE’S CONTENTS MANUFACTURE’S CONTENTS Please check that you have the correct contents before using this product. Digital camera Application S/W, Driver CD-ROM Video cable Accessories (Optional) AC Adapter 4 AA Alkaline Batteries User manual Product warranty USB cable CompactFlash card...
- Page 4 THIS DIGITAL CAMERA CAN BE USED FOR Recording images onto CD Printing images Viewing images on TV Editing images on a PC...
-
Page 5: This Digital Camera Can Be Used For
THIS DIGITAL CAMERA CAN BE USED FOR Creation of a digital photo album You can even create your own unique gift-wrap paper by using your digital images. Inserting images directly into any electronic document Taking a self-portrait and using the image... -
Page 6: Table Of Contents
CONTENTS Ready Getting to know your camera Safety note Identification and features Viewfinder LCD panel indicator LCD menu Ready Connecting to Power Using the batteries Using the AC power adapter Inserting CF CARD Removing CF CARD Instructions on how to use CF CARD Selecting the date and time Attaching the strap Basic... -
Page 7: Getting To Know Your Camera
GETTING TO KNOW YOUR CAMERA Prior to using this camera, please read the user manual thoroughly. Keep the manual in a safe place. About the image mark This manual contains instructions on using this camera that will help you to use this camera safely and correctly. -
Page 8: Safety Note
Do not attempt to modify this camera in any way. This may result in fire, injury, electric shock or severe damage to you or your camera. Internal inspection, maintenance and repairs should be carried out by your dealer or Samsung Camera Service Center. Do not use the flash in close proximity to the people or animals. - Page 9 It is best to clean your camera prior to seasonal periods of high humidity. Consult your dealer or Samsung Camera Service Center for information on the cost of cleaning your camera. Do not move the camera while it is switched on, if you are using the AC Power Adapter.
-
Page 10: Identification Of Features
IDENTIFICATION OF FEATURES Product Exterior (Front) Strap eyelet Lens Focus dial Product Exterior (Rear) LED 1 LED 2 LCD monitor Viewfinder Viewfinder Self-timer lamp Flash Menu select button( ) /Self-timer button( Menu select button( ) Enter button LCD button... - Page 11 IDENTIFICATION OF FEATURES Product Exterior (Top/Side/Bottom) Flash button Mode dial Quality button LCD panel Menu button Power button USB connection terminal Video connection terminal (Video output terminal) DC input connection point (DC 6V IN) CompactFlash card (CF CARD) slot cover Battery chamber cover Tripod socket Shutter button...
-
Page 12: Viewfinder
IDENTIFICATION OF FEATURES Viewfinder Reference Vertical and Horizontal shots are taken in the same way. Avoid obstructing the lens or the flash when you take a picture. A picture can be spoiled when a finger, hair or camera strap is in front of the lens or the flash. -
Page 13: Lcd Panel Indicator
IDENTIFICATION OF FEATURES LCD panel indicator Flash mode indicator : Auto flash : Red-eye reduction : Fill-in flash : Flash off Self-timer mode indicator Battery status indicator : The batteries are fully charged : The batteries are partially charged : There are no batteries capacity Preparing new batteries : The camera will be forced to switch off immediately The batteries need replacing... -
Page 14: Lcd Menu
IDENTIFICATION OF FEATURES LCD Menu The function menu will be displayed on LCD monitor. RECORD MENU LCD BRIGHTNESS : change LCD BRIGHTNESS LCD BRIGHTNESS QUICKVIEW QUICKVIEW: view the captured image straight away. WHITE BALANCE EV COMPENSATION WHITE BALANCE : change WHITE BALANCE EV COMPENSATION : change EV COMPENSATION PLAY MENU LCD BRIGHTNESS : change LCD BRIGHTNESS... -
Page 15: Ready
READY Connecting to Power There are two ways in which to provide the camera with power. One is using batteries (AA Alkaline), alternatively use an AC Adapter (DC 6V / 2.5A). Using the batteries Open the battery chamber cover by pushing in the direction of the arrow. -
Page 16: Using The Ac Power Adapter
READY Using the AC power adapter If you have access to a main supply, using an AC Adapter allows the camera to be used for long periods of time. If you connect the camera to a computer, it is advisable to use an AC adapter rather than the camera’s battery, as this will enable extended use. -
Page 17: Inserting Cf Card
READY Inserting CF CARD If your camera doesn’t have enough space for image storage, insert a CF CARD. Pull the card cover in the direction of the arrow to open. Insert the card towards the arrow. The front side of the CF CARD(red arrow printed) and front side of camera should face the same direction when card is inserted. -
Page 18: Instructions On How To Use Cf Card
READY Reference When using an 8MB internal memory, the specification/shooting capacity will be as follows. This is based on the conditioning standard of our company. Image resolution (1280 960 pixels) (640 480 pixels) The number of normal shots can vary according to the picture content. Instructions on how to use CF CARD Using a new CF CARD for the first time Before using the CF CARD, it must be initialized. - Page 19 If the power is switched off while initializing, reading or removing the CF CARD. It is advisable to copy important data onto other media as back-up e.g. floppy disks, hard disks etc. Samsung cannot be held responsible for lost data. Note Important information whilst using the CF CARD When a CF CARD is inserted, the camera only operates using the CF CARD.
-
Page 20: Selecting The Date And Time
READY Selecting the date and time You can record the date and time with the image data in the memory card when you take a picture. Please select the date and time when you use the camera for the first time or when the batteries have been removed from the camera for over 60 seconds. -
Page 21: Attaching The Strap
READY Reference The date is indicated as below 01 / 01 / 2001 00 : 00 AM (PM) month year The selection range for date/time setup covers from 2001 – 2099. (It is automatically programmed to allow for a leap year/ month) It is originally set as [01/01/2001 00:00 AM]. -
Page 22: Camera Working Mode
CAMERA WORKING MODE Now let's take a picture If the internal memory is full, insert a CF CARD. Turn the power on. The beep is activated whenever the power is turned on. Should the color of the condition indicator lamp(LED1) next to the viewfinder be red, it means that the camera is booting up. -
Page 23: Memory Full
CAMERA WORKING MODE Now let's take a picture Use the viewfinder or LCD monitor to frame your shot. Turn the LCD button on to use the LCD monitor. When taking pictures, squeeze the Shutter button gently to prevent camera shake. If you press the Shutter button down fully, the picture will be taken and the data that makes up the picture, will be stored in the internal memory or CF CARD. -
Page 24: Identifications And Functions
CAMERA WORKING MODE Identifications and Functions Power button (POWER) Press the Power button to turn the camera ON/OFF. If the camera is turned on and no buttons are pressed, or if there is no host communication with it for 90 seconds, the LCD panel and LCD monitor will automatically be turned off to conserve battery power. - Page 25 CAMERA WORKING MODE Identifications and Functions Menu select button ( / ) Use the Menu select button when you wish to select the menu for each mode. Self-timer button ( The Self-timer button is active only in RECORD mode. When the Self-timer button is pressed, the 10-second Self-timer is enabled. The image will be captured 10 seconds after you have pressed the Shutter button.
-
Page 26: Digital Zoom
CAMERA WORKING MODE Digital zoom You can take a extended picture (2x ZOOM) on RECORD mode by pressing LCD button and Enter button successively. Extended (2x ZOOM) image stores as 640 x 480 pixels. But, you must set the image resolution to 1280 x 960 pixels to take a extended (2x ZOOM) picture. There is a 2x and 4x Digital zoom available in PLAY mode. - Page 27 CAMERA WORKING MODE 1 image screen play mode Turn the power on. The most recent image captured will be shown when the Mode dial is set to PLAY mode. Use the Menu select button ( / ) to browse the captured images.
-
Page 28: Instruction Of Camera Mode
Instruction of camera mode You can select the appropriate mode by using the Mode dial located at the top of the camera. This digital camera has 5 working modes, which are listed below. RECORD mode ( This mode is used for taking pictures. -
Page 29: Set Up Mode
CAMERA WORKING MODE SET UP mode ( DATE/TIME, LANGUAGE, SOUND, FORMAT MEDIA, VIDEO MODE and RESET TO DEFAULT settings can be changed. DELETE mode ( In this mode you can delete images in the internal memory or CF CARD. In DELETE mode, the recorded images can be deleted all at once, or singularly. PC mode ( In this mode, images stored on the internal memory or CF CARD can only be transferred via USB cable. -
Page 30: Setting Up The Function
SETTING UP THE FUNCTION Setting up the function by using the LCD panel Select the Flash mode The flash mode can only be set under RECORD mode. There are 4 modes available: Auto flash, Red-eye reduction, Fill-in flash and Flash off. The default setting is Auto flash. -
Page 31: Select The Quality And The Resolution Mode
SETTING UP THE FUNCTION Setting up the function by using the LCD panel Select the quality and the resolution mode Image quality and resolution can only be set under RECORD mode. This camera provides 6 different image resolution & quality combination settings. The default setting is [1280X960 pixels] resolution( To change the setting, press the Quality button a number of times until the desired one is selected. -
Page 32: Select The Self-Timer Mode
SETTING UP THE FUNCTION Setting up the function by using the LCD panel Selecting the Self-timer mode This function is used when the photographer would also like to be in the picture. The Self-timer mode can only be set under RECORD mode. Press the Self-timer button( - The Self-timer lamp(red) is turned on. -
Page 33: Setting Up The Function
SETTING UP THE FUNCTION Setting up the function by using the LCD monitor RECORD Mode Press the Menu button in RECORD mode, the Record menu will be displayed. LCD BRIGHTNESS Changes the brightness setting of the LCD monitor. Turn the power on. Set the camera to RECORD mode ( By pressing the Menu button, the RECORD menu will be displayed on the LCD monitor. - Page 34 SETTING UP THE FUNCTION Setting up the function by using the LCD monitor QUICKVIEW If QUICKVIEW is selected, you can view the most recently captured image immediately on the LCD monitor. Turn the power on. Set the camera to RECORD mode ( By pressing the Menu button, the RECORD menu will be displayed on the LCD monitor.
- Page 35 SETTING UP THE FUNCTION Setting up the function by using the LCD monitor WHITE BALANCE The color of the image may alter according to lighting conditions during shooting. By using this function, you will be able to obtain more naturally colored images. Turn the power on.
- Page 36 SETTING UP THE FUNCTION Setting up the function by using the LCD monitor EV COMPENSATION This camera will automatically control the exposure value and you can select exposure compensation. If you increase(+) the exposure, you will obtain a brighter image. If you decrease(-) the exposure, you will obtain a darker image.
-
Page 37: Play Mode
SETTING UP THE FUNCTION Setting up the function by using the LCD monitor PLAY mode Press the Menu button in PLAY mode, the PLAY menu will be displayed. LCD BRIGHTNESS Refer to page 33. SLIDE SHOW This displays the recorded images in sequence, with a user-defined delay time in between 2 and 10. - Page 38 SETTING UP THE FUNCTION Setting up the function by using the LCD monitor Press the Enter button again to make the change. The SLIDE SHOW will start. If you want to stop the SLIDE SHOW, press one of the following buttons : LCD button, Menu button, Enter button and Menu select button and camera turns to PLAY mode.
- Page 39 SETTING UP THE FUNCTION Setting up the function by using the LCD monitor COPY TO CF CARD Copy the recorded images on the internal memory to CF CARD. Turn the power on. Set the camera to PLAY mode. By pressing the Menu button, the PLAY menu is displayed on the LCD monitor.
- Page 40 SETTING UP THE FUNCTION Setting up the function by using the LCD monitor DPOF(Digital Print Order Format) If you are using a printer that supports DPOF, you will be able to print the captured image from CF CARD. A NO CARD message will display on the LCD monitor if a CF CARD is not inserted.
-
Page 41: Setup Mode
SETTING UP THE FUNCTION Setting up the function by using the LCD monitor SETUP mode You can set up the items (DATE/TIME, LANGUAGE, SOUND, FORMAT MEDIA, VIDEO MODE, RESET TO DEFAULT). DATE / TIME The date and time can be selected. This will allow you to put the date and time on your data. - Page 42 SETTING UP THE FUNCTION Setting up the function by using the LCD monitor LANGUAGE There are 7 languages available for your selection. Turn the power on. Set the camera to SETUP mode and the SETUP menu will be displayed on the LCD monitor. Use the Menu select button to select a LANGUAGE setting.
- Page 43 SETTING UP THE FUNCTION Setting up the function by using the LCD monitor SOUND You can select whether or not the beep sound is activated. Turn the Power on. Set the camera to SETUP mode and SETUP menu will be displayed on the LCD monitor.
- Page 44 SETTING UP THE FUNCTION Setting up the function by using the LCD monitor FORMAT MEDIA Formats the CF CARD or internal memory. Turn the power on. Set the camera to SETUP mode and the SETUP menu will be displayed on the LCD monitor. Use the Menu select button ( / ) to select FORMAT MEDIA.
- Page 45 SETTING UP THE FUNCTION Setting up the function by using the LCD monitor VIDEO MODE You can set up the Video output signal from the camera in NTSC or PAL, depending on the type of device (monitor or TV, etc.) to which it is being connected. Select the correct video output for the device that is to be connected.
- Page 46 SETTING UP THE FUNCTION Setting up the function by using the LCD monitor RESET TO DEFAULT returns all the camera settings to the factory default settings. Turn the power on. Set the camera to SETUP mode and SETUP menu will be displayed on the LCD monitor. Use the Menu select button ( / ) to select RESET TO DEFAULT.
-
Page 47: Delete Mode
SETTING UP THE FUNCTION Setting up the function by using the LCD monitor DELETE mode In DELETE mode, users can delete all the recorded images at once or one after another. Note To delete the images recorded in the camera (internal memory), do not insert any CF CARD as the camera will not be able to read the internal data with a CF CARD inserted. - Page 48 SETTING UP THE FUNCTION Setting up the function by using the LCD monitor DELETE ALL Turn the power on. Set the camera to DELETE mode and DELETE menu will be displayed on the LCD monitor. Use the Menu select button ( / ) to select DELETE ALL?.
-
Page 49: Pc Mode
SETTING UP THE FUNCTION Setting up the function by using the LCD monitor PC mode In this mode, images can be transferred to a PC via USB cable. There are no menus associated with this mode. When you connect the camera to the PC, you should ensure that the camera is in PC mode. PC MODE Note Before connecting the camera to the PC, you will need to do the following in this order. -
Page 50: Before Contacting A Service Center
BEFORE CONTACTING A SERVICE CENTER Before contacting a service center, please check the following Symptoms The batteries need replacing The power is not turned on The AC Power Adapter is not connected The batteries need replacing The power is The camera has automatically turned turned off itself off during use... -
Page 51: Specifications
SPECIFICATIONS Image Sensor 1/3.2 CCD with 1.3 Mega pixels f=5.5mm (35mm film equivalent : 42.5mm) Lens F2.8 / F8.0 Digital Zoom RECORD mode : 2X, PLAY mode : 2X, 4X Viewfinder Real image optical viewfinder 1.6 color TFT LCD LCD Monitor Focusing Pan focusing Normal : 0.8m ~ infinity... -
Page 52: Software Manual
SOFTWARE MANUAL Please read the user manual carefully before using the camera Software Notes The attached softwares are image editing softwares for Windows. Under no circumstances should all or part of both the software and the user manual be reproduced . Copyright for both software is licensed only for use with a camera. -
Page 53: System Requirements
SOFTWARE MANUAL System Requirements (2001 August) For Windows Computer : A personal computer with a processor more advanced than MMX Pentium 133 MHz. Operating System : Windows 98/98SE/2000/ME Memory : Minimum 32MB RAM Others : USB port, CD-ROM Drive 80MB of available hard-disk space 16 bit color display adapter and compatible monitor a desktop area of 800 by 600 pixels (24 bit color display adapter, True color display recommended) -
Page 54: How To Set Up The Software
HOW TO SET UP THE SOFTWARE How to set up the software When you put the Driver CD-ROM provided with this camera into the CD-ROM drive, the following frame is automatically run. Camera Driver : This is the driver for connecting the PC to the Camera. For windows : refer to page 55. -
Page 55: Setting Up Camera Driver
Click the Camera Driver icon in the auto run frame(54 page). A WELCOME window will then be displayed. Click [Next >] to prepare the Camera Driver installation. Start Installation of Digimax 130 window will be displayed. Click [Next>] to start installation. An Installation Complete window will be displayed. - Page 56 HOW TO SET UP THE SOFTWARE Note Ensure that the Camera Driver has been installed before connecting the camera to the PC via the USB cable. Restart computer after Camera Driver installation. Should the computer not find the Camera Driver after installation or when you connect the camera to PC before Camera Driver installation, please re-install the Camera Driver using the following steps.
-
Page 57: De Software Installeren
DE SOFTWARE INSTALLEREN MGI PhotoSuite III SE installeren Click the MGI PhotoSuite lll SE icon on autorun frame. Select language. Chinese(PRC), Chinese(Taiwan), English, French(Standard), German, Italian, Spanish. A Welcome window will be displayed. Click [Next >] to move to the next step. The Software License Agreement window will be displayed. -
Page 58: Setting Up The Mgi Photosuite Iii Se
HOW TO SET UP THE SOFTWARE Setting up the MGI PhotoSuite lll SE Start Copying Files window will display. Click [Next > ] to start installation. The MGI Registration window will be displayed before completing installation. Send : send your name and e-mail address to MGI. Register now : move to the on-line registration window. -
Page 59: Setting Up The Mgi Photovista
HOW TO SET UP THE SOFTWARE Setting up the MGI PhotoVista Click the MGI PhotoVista icon on the autorun window. Select language. English, Deutsch, japanese, french are available. A Welcome window will be displayed. Click [Next >] to move to the next step. The Software License Agreement window will be displayed. - Page 60 HOW TO SET UP THE SOFTWARE Setting up the MGI PhotoVista Select the Program Folder where MGI PhotoVista will be installed. The Start Copying Files window will display. Click [Next > ] to start installation. The Online Registration window will display. Click [Continue..] to continue.
-
Page 61: How To Use Editing Software
HOW TO USE EDITING SOFTWARE MGI PhotoSuite lll SE This software is only compatible with Windows. To open MGI PhotoSuite lll SE, click the [start MGI PhotoSuite lll SE] and MGI PhotoSuite lll SE will then open. programs MGI PhotoSuite lll SE... - Page 62 HOW TO USE EDITING SOFTWARE MGI PhotoSuite lll SE An introduction to the Welcome screen Get images. Prepare A number of photo editing activities can be performed within this module. Compose Use your photos in a variety of fun, creative and interesting ways.
- Page 63 HOW TO USE EDITING SOFTWARE MGI PhotoSuite lll SE Introduciton to navigation bar Back return to the previous step. Home Return to Welcome screen. Help Display help window. Get images. Prepare A number of photo editing activities can be performed within this module. Compose Use your photos in a variety of fun and interesting ways.
- Page 64 HOW TO USE EDITING SOFTWARE MGI PhotoSuite lll SE : Get images To obtain images from the computer To acquire images,Click the large [Get] button on the Welcome screen, or the [Get] button on the Navigation bar. Click [Computer] from the list of options displayed on the activity panel.
- Page 65 HOW TO USE EDITING SOFTWARE MGI PhotoSuite lll SE When you obtain images from the digital camera. Note When you connect a PC to the Camera, use the following sequence : 1. Turn the Mode dial to PC mode. 2. Turn the power on.
- Page 66 The Welcome screen will change to the next work step, with the selected image displayed. Reference When you use the Digimax 130, only [Computer] and [Album] from the list of options displayed are available. You will be able to obtain images from the digital camera.
- Page 67 HOW TO USE EDITING SOFTWARE MGI PhotoSuite lll SE Acquiring images from an Album. To acquire images, click the the large [Get] button on the Welcome screen, or the [Get] button on the Navigation bar. Click [Album] from the list of options displayed on the activity panel.
- Page 68 HOW TO USE EDITING SOFTWARE MGI PhotoSuite lll SE PREPARE When the image is loaded, the step changes to Prepare automatically. Menu of [PREPARE] step Rotate & Crop You can rotate, flip or crop images along with a host of others. Touchup Remove Red eye, Remove Scratches etc..
- Page 69 HOW TO USE EDITING SOFTWARE MGI PhotoSuite lll SE COMPOSE Add Text , Compound Images etc.. are available in this step. Menu of [COMPOSE] steps Collage : A collage consists of several photos or sections of photos arranged together on a common background.
- Page 70 HOW TO USE EDITING SOFTWARE MGI PhotoSuite lll SE ORGANIZE Organize your photos and other media files into albums. Menu of [ORGANIZE] step Choose a photo album to view or edit Select Album : To create an Album, click [Organize] in the welcome screen or navigation bar.
- Page 71 HOW TO USE EDITING SOFTWARE MGI PhotoSuite lll SE Creating an Album To create an Album, click the large Organize button on the Welcome screen, or the Organize button on the Navigation bar. Click [Album..] in Choose a photo album to view or edit.
- Page 72 HOW TO USE EDITING SOFTWARE MGI PhotoSuite lll SE SHARE Saving images Saving or sharing images. Menu of [SHARE] step Save To save the active file according to its current name and path. Save As To assign a new name or path to the file. Send E-mail e-mailing images.
- Page 73 HOW TO USE EDITING SOFTWARE MGI PhotoSuite lll SE PRINT Printing images You can print images. Menu of [PRINT] step Print Printing images. Print Multiples Print multiple copies of a photo or project, or one copy of each of the photos included in an album, according to a predefined template.
-
Page 74: Mgi Photovista
HOW TO USE EDITING SOFTWARE MGI PhotoVista MGI Photovista is an easy-to-use program that lets you create spectacular 360° panoramic images in a snap. This software is only compatible with Windows. To open MGI Photovista, click [start button programs MGI Photovista MGI Photovista] and it will open. -
Page 75: Rotate Images
HOW TO USE EDITING SOFTWARE MGI PhotoVista Introduction Open the Image Source Load the first image source of the panorama Rotate Images Rotates all selected images counterclockwise Flip Image Horizontally Flips the selected image horizontally Flip Image Vertically Flips the selected image vertically Select Lens Select lens for effect Stitch Panorama... - Page 76 HOW TO USE EDITING SOFTWARE MGI PhotoVista Opening an image source and creating panoramic effects. Click [open image source] in the menu bar to select the first image of the sequence. A dialogue box will then be displayed. BUTTON Add image to source file Add all images to source file Add All Remove...
- Page 77 HOW TO USE EDITING SOFTWARE MGI PhotoVista The file names are Displayed in the Select Lens window. Click [Select Lens] to select a lens. When you click [Stitch Panorama], the Stitch Options window will be displayed. When checking Full 360° panorama. 360°...
- Page 78 HOW TO USE EDITING SOFTWARE MGI PhotoVista Saving images Click [File] in Stitched_Result menu to save a panoramic image. To save a panoramic image as a JPG or BMP file format, click [Save As..]. Click [Publish Panorama] to send the image to a designated server for sharing purposes.
- Page 79 HOW TO USE EDITING SOFTWARE MGI PhotoVista Click [Upload Pictures] and images are sent to www.GatherRound.com Click [Print Panorama] to print it. Reference For more information, please refer to the Help file in [Help Quick Start Tutorial].
-
Page 80: Setting Up Camera Driver For Mac
SETTING UP CAMERA DRIVER FOR MAC Setting up Camera Driver for Mac Insert CD-ROM. Click SAMSUNG USB Driver installer that is in Digimax 130 folder. and Camera Driver installation for Mac will start. Select Install Location and click [Install]. Click [Cancel] and the installation will be canceled. - Page 81 SETTING UP CAMERA DRIVER FOR MAC Note Please make sure of restarting computer after installation. Don’t take off the USB cable or turn off the power during the image download or opening the image file. It may make the system shutdown. It is impossible to transfer image from Mac to camera and delete image that is in Removable Disk.
- Page 82 MEMO...
- Page 83 MEMO...
- Page 84 RANCHO DOMINGUEZ, CA 90220 TEL : (1) 310-537-7000 FAX : (1) 310-537-1566 SAMSUNG U.K. LIMITED. PHOTO PRODUCTS DIV. SAMSUNG HOUSE, 3 RIVERBANK WAY, GREAT WEST ROAD, BRENTFORD, MIDDLESEX,TW8 9RE, U.K. TEL : (44) 20-8232-3348 FAX : (44) 20-8569-8385 SAMSUNG DEUTSCHLAND GmbH...