
Related Manuals for Samsung SGH-T456


Summary of Contents for Samsung SGH-T456
- Page 1 QUAD BAND Series SGH-T456 Portable Digital Mobile Phone User Manual Please read this manual before operating your phone, and keep it for future reference.
-
Page 2: Intellectual Property
Samsung Electronics Co., Ltd. and its related entities. The Bluetooth® word mark and logos are owned by the Bluetooth SIG, Inc. and any use of such marks by Samsung Electronics Canada, Inc. is under license. Other trademarks and trade names are those of their respective... -
Page 3: Table Of Contents
Using This Manual ... 1 Instructional Icons ... 1 Important Safety Precautions ... 2 Getting Started ... 4 SIM Card ... 4 Activating Your Phone ... 4 Switching the Phone On and Off ... 8 Your Phone ... 9 Features of Your Phone ... 9 Phone Layout ... - Page 4 Entering Text ...32 Using the Qwerty Keyboard ... 32 Using the Keypad ... 33 Using T9 Mode ... 34 Using Alphabet Mode ... 35 Using Number Mode ... 36 Using Symbol Mode ... 36 Transferring Files ...37 Transferring Files via USB Cable ... 37 Transferring Files via Bluetooth ...
- Page 5 Using the Internet Browser ... 62 Bookmarks ... 64 Messages ... 67 Rogers IM ... 67 MobileMail ... 69 Create New Message ... 69 Message Folders ... 74 Templates ... 75 Voice Mail ... 77 Delete All ... 78 Messages Settings ... 78 Memory Status ...
- Page 6 Settings ...111 Sound ... 111 Display Settings ... 112 Set Time & Date ... 113 Phone ... 114 Calls ... 116 Connectivity ... 119 Applications Settings ... 125 Reset ... 132 Memory Status ... 133 Solving Problems ...134 Health and Safety Information ...137 Exposure to Radio Frequency (RF) Signals ...
-
Page 7: Using This Manual
Using This Manual This user manual has been specially designed to guide you through the functions and features of your phone. To get started quickly, refer to Your Phone, Getting Started and Call Functions. Instructional Icons Before you start, familiarize yourself with the following visual aids: ... -
Page 8: Important Safety Precautions
Important Safety Precautions Please read these guidelines before using your wireless phone. Failure to comply with them may be dangerous or illegal. Road Safety at All Times Do not use a hand-held phone while driving; park the vehicle first. Switching Off When Refueling Do not use the phone at a refueling point (service station) or near fuels or chemicals. -
Page 9: Sensible Use
Water Resistance Your phone is not water-resistant. Keep it dry. Accessories and Batteries Use only Samsung-approved accessories and batteries. Use of any unauthorized accessories could damage your phone and may be dangerous. Qualified Service Only qualified service personnel may repair your phone. -
Page 10: Getting Started
Getting Started SIM Card When you subscribe to a cellular network, you receive a plug-in SIM (Subscriber Identity Module) card loaded with your subscription details, such as your PIN, and optional services you have selected. Activating Your Phone Activating your phone requires several steps: inserting the SIM card, charging the battery, and turning the phone on. -
Page 11: Installing The Sim Card
2. Lift the battery out of the phone (bottom edge first). Installing the SIM Card Important! The plug-in SIM card and its contacts can be easily damaged by scratches or bending. Use caution when inserting or removing the card and keep all SIM cards out of reach of children. -
Page 12: Installing The Battery
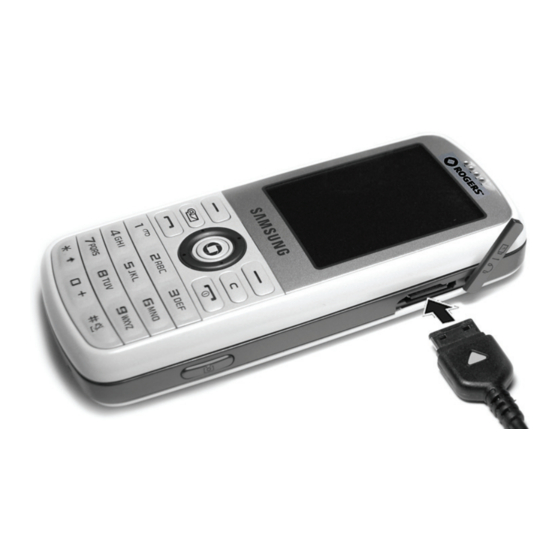
3. Slide the cover back on the phone until it locks into position. Charging the Battery Your phone is powered by a rechargeable Li-ion (lithium ion) battery. Use the travel adapter to charge the battery, and use only Samsung approved batteries and chargers. Getting Started... - Page 13 Note: Fully charge the battery before using your phone for the first time. A discharged battery recharges fully in approximately four hours. You can use the phone while the battery is charging, but this causes the phone to charge more slowly. Note: For connection to an electrical supply not located in North America, you must use an adapter of the proper configuration for the power outlet.
-
Page 14: Switching The Phone On And Off
Note: The phone is also charged when connected to the USB port of a PC using the USB cable. Low Battery Indication When only a few minutes of talk time remain, a warning tone sounds, the “Low Battery” message appears on the display and the empty battery icon flashes. -
Page 15: Your Phone
Your Phone Features of Your Phone Your phone is lightweight, easy-to-use and offers many valuable features. The following list outlines a few of the features included in your phone. Bluetooth wireless technology Camera and camcorder Instant messaging capability ... -
Page 16: Phone Layout
Phone Layout Closed View of Your Phone The following illustration shows the external elements of your phone 1. Volume keys/Menu Navigation: Allow you to adjust the ringer volume in standby mode, mute the ringer when receiving a call and adjust the voice volume during a call. - Page 17 3. Left soft key: Performs the function indicated by text on the display directly above the key. 4. MobileMail key: Provides direct access to the MobileMail email application (see “MobileMail” on page 69). 5. Send key: Press to answer a call. Enter a number and press to make a call.
- Page 18 14. Right soft key: Performs the function indicated by text on the display directly above the key. 15. Navigation keys: In Menu mode, the navigation keys work as directional keys to scroll through menus and lists. In Idle mode, they work as shortcuts, allowing you to access other menus directly.
-
Page 19: Open View Of Your Phone
Open View of Your Phone This phone provides the added convenience of a slideout QWERTY keyboard. To access the keyboard, rotate the phone 90 degrees to the left and slide the top section of the phone up to open, as shown. When you slide the phone open, the display rotates from vertical viewing mode to horizontal viewing mode.: 1. -
Page 20: Back View Of Your Phone
Back View of Your Phone The following illustration shows the back side of your phone. 1. Camera lens: Allows you to take pictures and videos. 2. Mirror: Helps aim the camera when taking a self-portrait. Your Phone... -
Page 21: Display
Display Display Layout The internal display has three main areas: Area Icons Text and graphics area Soft key function indicators Description Displays various icons that indicate phone status. Displays messages, menus, instructions and any information that you enter, such as the number you are dialing. - Page 22 Icons Shows the received signal strength. The more bars, the stronger the signal. Appears when a call is in progress. Appears when there is no network coverage available. Appears when the phone is accessing services on a GPRS (2.5G) network. Appears when the phone is accessing services on an Edge network.
-
Page 23: Memory Card
Appears when Bluetooth wireless technology is active. Appears when Ring Tune Volume is set to Silent Mode. Appears when Ring Tune Volume is set to Vibration Mode or Call Alert Type is set to Vibration. Appears when Call Alert Type is set to Vibration then Melody. Appears when Call Alert Type is set to Melody &... -
Page 24: Inserting A Microsd Card
Inserting a microSD Card Note: Ensure your battery is fully charged before using a microSD card. Your data may become damaged or unusable if the battery runs out while reading or writing to the microSD card. To insert a microSD card into your phone: 1. -
Page 25: Removing A Microsd Card
Note: If this is the first time that the microSD card is inserted into your phone, the phone automatically creates a series of folders on it for file storage (Graphics, Ring Tunes, Other Files, Sounds, Videos). Removing a microSD Card Warning! Do not remove a microSD card while files are being accessed or transferred. - Page 26 2. From the Idle screen, select [ Tunes, Graphics, Videos) 3. Press <Options> and select Memory Card Info. 4. Press <Format>. 5. You are prompted to confirm the loss of any data on the memory card. Press <Yes> if you agree. The card is formatted. Your Phone Media ...
-
Page 27: Call Functions
Call Functions Making a Call From the Idle screen, enter the phone number (with area code, if necessary), then press [ Note: When you activate the Auto Redial option, the phone automatically redials up to ten times when the call is not answered or someone is already on the phone. For carriers that automatically divert unanswered calls to voice mail, the Auto redial feature will not provide useful service. -
Page 28: Answering A Call
Ending a Call When you want to end your call, press [ Redialing a Recent Number All incoming, outgoing and missed calls are listed in the Call History menu. If the number or caller is listed in your Contact List, the name associated with the number also displays. -
Page 29: Missed Calls
If the Any Key option in the Call Answer menu is activated, you can press any key to answer a call except [ “General” on page 116 for more information). 2. End the call by pressing [ Note: You can answer a call while using the Contact list or menu features. After ending the call, the phone returns to the function screen you were using. -
Page 30: Vibration Mode
1. Open the Missed Calls list (see above). 2. If you want to delete one call, highlight the number you wish to delete and press <Options>. If you want to delete all calls, press <Options>. 3. Select <Delete>. 4. To delete one call, select Selected. To delete all calls, select All. Press <Yes>... -
Page 31: Options During A Call
Options During a Call Your phone provides a number of features that you can use during a call. In Call Options During a call, press <Options> to access the following: Hold: Places the call on hold. New Call: Places the current call on hold and allows you to enter and dial another number. -
Page 32: Switching The Microphone Off (Mute)
To make a call while you have a call in progress: 1. While on a call, press <Options> and select New Call. 2. Enter the new number and press [ call. To switch between the two calls, changing the one on hold to active and placing the other on hold, press <Options>... -
Page 33: Making A Multi-Party Call
(Dual Tone Multi-Frequency) tones produced by the numeric keys during a call. This allows you to use the keypad without hearing annoying key tones. Note: To communicate with answering machines or computerized telephone systems, the Send Keys option must be selected. Making a Multi-party Call Multi-party calling is a network service that allows up to six people to take part simultaneously in a multi-party or “conference”... -
Page 34: Sending A Sequence Of Dtmf Tones
4. To return to the multi-party call, press <Options> and select Join. 5. All the call participants can now hear each other. To drop a participant: 1. Press <Options> and select Remove. 2. Highlight the participant you wish to drop and press [ The call to the selected participant is ended. -
Page 35: Call Waiting
For further information on using the Contact list feature, see “Contacts” on page 102. Call Waiting Call Waiting lets you answer an incoming call while you have a call in progress, if your network supports this service and you have set the Call Waiting-Voice Call option to Activate. -
Page 36: Access Codes
Access Codes There are several access codes used by your phone and its SIM card. These codes help protect the phone against unauthorized use. When requested to enter any of the codes, enter the code and press <OK>. Except for the PUK and PUK2 codes, access codes can be changed using the Security menu (see the Security section in “Phone”... -
Page 37: Pin2
To re-enable your PIN: 1. Enter the PUK and press <OK>. 2. Enter a new PIN of your choice and press <OK>. 3. When the Confirm New PIN message displays, enter the same code again and press <OK>. If you enter an incorrect PUK ten times in succession, the SIM card becomes invalid. -
Page 38: Entering Text
Entering Text This section explains the various text input modes for entering characters into your phone using the QWERTY keyboard and the phone keypad. It also describes how to use the T9 predictive text entry system to reduce the number of key strokes required for entering text using the keypad. Using the Qwerty Keyboard This phone offers the convenience of a slideout QWERTY keyboard. -
Page 39: Using The Keypad
3. Shift/Sym key: Toggles the text input mode between upper and lower case. Hold Alt and press this key to open the Symbols page and access symbols and other character sets. 4. Alt key: Allows you to enter characters displayed at the top of the QWERTY keys, for example: $, @, #, ! 5. -
Page 40: Using T9 Mode
To access the Symbol You can also access any of the input modes by pressing <Options> and selecting Input Mode. Highlight the desired input method and case, then press <Select> or [ Using T9 Mode T9 is a predictive text input mode based on a built-in dictionary that allows you to key in characters using single keystrokes. -
Page 41: Using Alphabet Mode
You can move the cursor using the left and right navigation keys. To delete letters, press [ the display. 2. Press <Add>. The word is added to the T9 dictionary and becomes the first word for the associated key presses. Using Alphabet Mode Use the 0 to 9 keys to enter your text. -
Page 42: Using Number Mode
p q r s 7 t u v 8 w x y z 9 + = < > € £ $ % & ¥ ¤ 0 To shift the case, press [ To enter a space, press [ ... -
Page 43: Transferring Files
Studio software (included with your phone) requires a PC with available USB port, installation of PC Studio on the PC, and a USB cable. Note: For more information on Samsung PC Studio software, consult the online help provided with the program. - Page 44 “SGH-T456 has been connected” then the SGH-T456 icon appears. 3. In the PC Studio program, click on the SGH-T456 icon. The Phone Explorer window appears. 4. Using Phone Explorer, navigate to the phone folder you want to access.
-
Page 45: Transferring Files Via Bluetooth
File transfer between your phone and a PC using Bluetooth requires a PC with Bluetooth wireless capability and installation of Samsung’s PC Studio software (included with your phone). Note: For more information on Samsung PC Studio, consult the online help provided with the PC Studio 3 software. To transfer files using Bluetooth: 1. -
Page 46: Transferring Files Via Microsd Card
Transferring Files via microSD Card You can directly transfer music and other files between your PC and a microSD memory card. 1. Remove the microSD card from your phone (see “Removing a microSD Card” on page 19) and insert it into your PC’s microSD card reader or, if you are using an SD card reader, first insert the microSD card into a microSD adapter (see “Using a microSD Adapter”... - Page 47 2. Open Windows Media Player on the PC and click the Sync tab. The list of devices at the right side of the screen will include your phone (SGH-T456). 3. Drag and drop the files you want to transfer to your phone to the Sync List at the right side of the screen.
-
Page 48: Menus
Menus This section explains the menu navigation for your phone. It also includes an outline of all the available menus associated with your phone. Some menu options are controlled by the SIM provided by your service provider. Menu Navigation The navigation keys on your phone allow you to scroll through menus quickly and easily. -
Page 49: List Of Menu Functions
List of Menu Functions The menu structure is as follows: 1. Rogers Mall 2. Media Music Ring Tunes Graphics Videos Voice Notes Other Files Memory Card * Memory Status 3. Games & Apps Get New Games Get New Applications 4. Call History All Calls Missed Calls Calls Made... -
Page 50: Rogers Mall
Rogers Mall This menu selection (Menu 1) opens the Internet Browser, accesses Rogers mobile Internet and automatically opens a Rogers Web page where you can shop for music, ring tunes, games, images and video files; access messaging functions; and view news and information. For information on using your phone’s Internet browser, see “Using the Internet Browser”... -
Page 51: Media
Media The Media menu (Menu 2) enables you to manage your media files (music, ring tunes, graphics, videos, voice notes and other files). You can also check memory status (amount used and available). Media files are organized in a series of named folders. You can also create additional folders or sub-folders to further organize your files. -
Page 52: Ring Tunes
Move to Memory Card: Lets you move the Selected file or Multiple files to a microSD memory card if one is inserted. For more information on transferring files to and from your phone or a memory card, see “Transferring Files” on page 37. ... - Page 53 Choose a Ring Tune To select a ring tune for your phone: 1. From the Idle screen, press [ 2. To choose a default ring tune (supplied with your phone) select Default Ring Tunes. To select a ring tune you have downloaded, select Downloaded Ring Tunes.
-
Page 54: Graphics
Copy to Memory Card: Lets you place a copy of the Selected file or Multiple files on a microSD memory card if one is inserted. Lock/Unlock: Allows you to lock the file so it can not be deleted. Files must be unlocked before they can be deleted. -
Page 55: Picture Album
Picture Album This folder stores pictures you have taken with the phone’s internal camera. To open a picture file: 1. From the Idle screen, press [ Picture Album. Highlight the picture you want to view and press [ Picture File Options The following options are available when you press <Options>... - Page 56 • Effects: Allows you to apply a Black & White, Negative, Sepia, Blur, Sharpen, Sketch, Posterize or Solarize effect to the image. • Adjust: Lets you adjust Brightness, Contrast and Colour settings. Use the left and right navigation keys to move the adjustment slider. •...
- Page 57 Photo Options The following options are available when you press <Options> with a picture file open: Send: Lets you send the chosen file to a recipient in a Picture Message, via Bluetooth to another Bluetooth device, or to an Online Album. ...
-
Page 58: Videos
Move to Memory Card: Lets you move the Selected file or Multiple files to a microSD memory card if one is inserted. For more information on transferring files to and from your phone or a memory card, see “Transferring Files” on page 37. ... - Page 59 Play Video Files To play a video file: 1. From the Idle screen, press [ 2. To play a video you have taken and stored on your phone, select My Video Clips.To play a video you have downloaded, select Downloaded Videos. To select a video stored on a memory card, select Memory Card.
-
Page 60: Voice Notes
Lock/Unlock: Lets you lock the file to prevent accidental deletion and unlock it when necessary. Display Mode: Lets you display the images in the folder in Line View or Thumbnail View. Properties: Display all the properties of the currently selected file (Name, Date, Format, Resolution, Size, Length, Quality, Lock/Unlock). -
Page 61: Other Files
Lock/Unlock: Lets you lock the file to prevent accidental deletion and unlock it when necessary. Properties: Display all the properties of the currently selected file (Name, Date, Format, Length, Size, Lock/Unlock). Other Files This folder provides a location where you can store other types of files on your phone, such as spreadsheets, text files and presentations. -
Page 62: Memory Status
Copy to Memory Card: Lets you copy the Selected file or Multiple files between your phone and a microSD memory card (phone only). Copy to: Lets you copy the Selected file or Multiple files to your phone or a different location on the memory card (memory card only). ... -
Page 63: Games & Apps
Games & Apps Using the Games and Apps menu (Menu 3) you can play games already stored on your phone, as well as download games and other applications from your service provider. Games Get New Games 1. From the Idle screen, press [ Games. -
Page 64: Get New Applications
Play a Game To play a game: 1. From the Idle screen, press [ 2. Scroll to the game you want to play and press [ <Options> and select Start. 3. The game’s welcome screen displays information about the game. Follow the on-screen instructions to play the game. -
Page 65: Call History
Call History In this menu (Menu 4), you can: View list of All Calls, Missed Calls, Calls Made or Calls Received. View call details, including time and length. While in any of the call lists, press <Options> to access the following functions: ... -
Page 66: Missed Calls
Note: You can access the most recent numbers in All Calls by pressing [ Missed Calls This menu (Menu 4.2) lets you view a list of calls you received but did not answer. 1. From the Idle screen, press [ Calls. -
Page 67: Call Time
1. From the Idle screen, press [ 2. Highlight the type of record you want to delete and press [ a check mark in the selection box at the left side. Repeat for other types of records to be deleted. 3. -
Page 68: Internet
Internet This menu selection (Menu 5) opens the Internet Browser and automatically accesses the Rogers home page. You can also view other Internet sites, view sites saved as Bookmarks, create Bookmarks, clear your cache or manage cookies. Accessing an Internet Site There are three ways to access an Internet site: ... -
Page 69: Browser Options
Entering Text in the Internet Browser When you are prompted to enter text, the current text input mode is indicated at the upper right side of the screen. See “Entering Text” on page 32 for more information. Browser Options While using the Browser, press <Options> to access the following functions: ... -
Page 70: Bookmarks
• Empty Cookies: Delete cookies. Cookies are pieces of personal information sent to a web server while navigating the web. • Cookie Options: Sets whether or not cookies are stored on your phone. You can Accept all, Reject all, or have the phone Prompt you to accept or reject each cookie received. -
Page 71: Edit A Bookmark
Send URL via message: Sends the URL of the current page to another person via a message. Store a Bookmark Use the following procedure to store the URL of a page you have accessed in you Bookmarks list. 1. With the Browser open and displaying the page, press <Options> and select Add bookmark. - Page 72 1. With the browser open, press <Options> and select View Bookmarks. 2. Press <Options> and select Delete bookmarks, highlight each bookmark to be deleted and press [ place a check mark in the corresponding selection box. To delete all bookmarks, highlight All and press [ 3.
-
Page 73: Messages
Messages From the Messages menu (Menu 6), you can send and receive a range of different message types from your mobile phone, including: Instant Message: Rogers IM (Instant Messenger) lets you send and receive instant messages using Windows Live and Yahoo! communities. ... - Page 74 2. Choose the IM service you want to access (Windows Live or Yahoo!) and press [ 3. If no accounts exist, choose New Account and press [ one or more accounts exist, choose the existing account you want to sign in to and press [ 4.
-
Page 75: Mobilemail
Sound Settings: Lets you choose sounds for Receive Message, Contact Alert, and System Message; and set Repetition (Once, Every 1 Minute, Every 2 Minutes). IM Profiles: Lets you view the Current Profile and change Profile Settings. The default network profile is GoRogers. ... - Page 76 2. Type your message in the message window. The number at the bottom left side of the screen displays the number of characters still available. For further information on entering characters, see “Entering Text” on page 32. While you are composing your text message, press <Options> to select any of the following: ...
- Page 77 Select Language: Allows you to temporarily change the input language used to create your message between English and Français (French). Input Mode: Lets you change the text input mode (abc, Abc, ABC, T9ab, T9Ab, T9AB, 123 or Symbols). For more information on text input modes, see “Entering Text”...
- Page 78 3. To add an picture or video, select Graphic or Video. The available options are: Add Graphic: Lets you Take Photo or add a file from Downloaded Graphics, My Photos or Memory Card. Add Video: Lets you Record Video or add a file from Downloaded Videos, My Video Clips or Memory Card.
- Page 79 Send Settings: Lets you change the message send settings (Delivery Report, Read Reply, Priority, Expiry, Delivery After). 5. To add message text, select Message. Type your message in the message window. For further information on entering characters, see “Entering Text” on page 32. While you are composing your text message, press <Options>...
-
Page 80: Message Folders
Message Folders All incoming and outgoing text and picture messages are saved in a series of folders on your phone. Inbox (Menu 6.4): Stores received text and picture messages. Sent (Menu 6.5): Stores messages you have sent successfully. ... -
Page 81: Templates
Reply: Allows you to reply to the selected message. Call Back: Makes a voice call to the originating message number. Edit: Lets you edit a message (Drafts or Outbox folders only). Send: Allows you to send an unsent message. ... -
Page 82: Use A Template
Delete: Allows you to delete the Selected template or Multiple templates. Press <Yes> to confirm the deletion. View a Template To view the contents of a template file: 1. From the Idle screen, press [ Templates. 2. Scroll to the template you want to view and press [ 3. -
Page 83: Voice Mail
1. From the Idle screen, press [ Templates. 2. Scroll to the template you want to use. To enter the text directly into a new Text Message, press <Options> and select Send messages, see “Create and Send a Text Message” on page 69. To enter the text directly into a new Picture Message, press <Options>... -
Page 84: Delete All
1. From the Idle screen, press [ Mail Connect to Voice Mail. Your phone connects to the mail server. 2. Follow the recorded instructions to listen to your messages. Note: You can also automatically dial voice mail directly from the Idle screen by pressing and holding Delete All Use this menu to delete groups of messages:... -
Page 85: Memory Status
Memory Status The Memory Status menu allows you to view the total memory used and available in your phone as well as the memory usage for each storage folder. To access the Memory Status menu: 1. From the Idle screen, press [ Status. -
Page 86: Tools
Tools The Tools menu (Menu 7) provides access to the Camera, Media Player, Record Audio, Calendar, Alarms, Calculator, World Clock, Stopwatch, Tasks, Notes, Tip Calculator, Converter and Timer. Camera Using the camera in your phone, you can take photos of people or events while on the move. - Page 87 You can change the zoom setting using the left and right navigation keys. You can change the brightness using the up and down navigation keys. 3. Press [ ] or the camera key to take the photo. Camera Options in Capture Mode Press <Menu>...
- Page 88 Timer: allows you to set a time delay before the camera takes the picture. The options are Off, 3 seconds, 5 seconds, or 10 seconds. The camera counts down the time on the screen and by playing a sound. ...
-
Page 89: Camcorder
Settings: Allows you to customize your camera settings. See “Camera Settings” on page 128 for complete information. Camera Options After Taking a Photo When Single Shot shooting mode is set to Take And Save and an image you have just taken is displayed, you can press <Options> to access the following options: ... - Page 90 1. From the Idle screen, press [ ] or press <Menu> and select Camcorder. 2. Rotate the phone to horizontal position. Aim the camera lens at the subject and frame the starting point for the video on the screen. Press <Menu>...
- Page 91 Timer: Allows you to set a time delay before the camcorder begins recording. The options are Off, 3 seconds, 5 seconds, or 10 seconds. The camera counts down the time on the screen and by playing a sound. White Balance: Allows you to set the white balance (color temperature of the surrounding light).
-
Page 92: Media Player
changes the Recording mode changes the Timer setting Settings: Opens the General Settings menu, where you can turn Zoom Sound and Brightness Sound on and off. Camcorder Options After Recording a Video When you press <Options> after saving a video, the following options are available: ... - Page 93 For information on transferring files to your phone or a microSD card, see “Transferring Files” on page 37. For information on Music folders see “Music” on page 45. Note: The Music Player does not necessarily support all features of a particular file format nor all the variations of those formats.
-
Page 94: Playlist Options
You can change the volume using the volume keys. While playing a music file, the following keys act as shortcuts: Up navigation key: Toggles the music player’s Shuffle and Repeat features, as indicated at the at the right side of the screen •... -
Page 95: Record Audio
Add to: Lets you add the selected music file to a playlist. Remove: Removes the selected file from the associated playlist (does not delete the file). Properties: Displays the properties of the selected file (Name, Date, Format, Bitrate, Length, Size, Lock/Unlock). ... -
Page 96: Calendar
Using Record Audio Options After saving a recorded file you can access various options by pressing <Options>. To execute an option, highlight it and press <Select> or [ The following options are available: Send in Message: Lets you send the selected file to a recipient in a Picture Message. -
Page 97: Calendar Options
forward or backward a month at a time by pressing the Volume keys on the left side of the phone. Week View: Provides a grid with the days of the week across and daytime hours arranged vertically. Use the navigation keys to move to specific days and times. -
Page 98: Creating Calendar Entries
Create New: Used to create a new event (Schedule, Anniversary, Miscellaneous or Task). Send via: Lets you send the information for the highlighted event to someone else via Text Message, Picture Message or Bluetooth. View Mode: Lets you change the view to one of the other options. ... -
Page 99: Alarms
End Date: If the displayed end date is not correct, use the navigation keys and numeric keypad to enter the required date. End Time: Use the numeric keypad to set the end time. Use the right navigation key to toggle the AM/PM setting. ... -
Page 100: Set An Alarm
Set the phone to switch on automatically and play alarms when switched Set an Alarm 1. From the Idle screen, press [ 2. Choose an alarm and press [ 3. In Alarm, press the left or right navigation key to turn the alarm On. 4. -
Page 101: Calculator
Note: The Alarm icon appears in the Icon area on the Idle screen to show that an alarm has been set. Note: To stop the alarm when it rings, press any key. To use the snooze function to delay the alarm, press <Snooze>. -
Page 102: World Clock
World Clock World Clock allows you to view the time of day in another part of the world and graphically depicts the position of this time zone relative to the one you are in. Your current time zone is shown on the map by a white vertical line (see “Set Time &... - Page 103 Entering New Tasks 1. From the Idle screen, press [ 2. Press <Options> and select Create new task. 3. In the Task text box, describe the task. The entry can be up to 100 characters long. 4. Highlight Start Date. Using the numeric keypad, enter the start date. 5.
-
Page 104: Notes
To Mark a Task as Completed 1. Highlight the task in the task list. 2. Press <Options> and highlight Mark as Done. Press <Select> or A check mark is placed in the box at the right side of the task. Task Options From the Tasks menu, you can access the following options by pressing <Options>:... -
Page 105: Tip Calculator
3. Type your note in the message window. For further information on entering characters, see “Entering Text” on page 32. The remaining number of character spaces is indicated at the upper left side of the display. 4. To save the note, press [ From the Notes screen, you can access the following options by pressing <Options>: ... -
Page 106: Converter
Converter Using the Converter, you can determine many unit conversions. 1. From the Idle screen, press [ 2. Select the conversion type required (Currency, Length, Weight, Volume, Area or Temperature) and press <Select> or [ 3. Use the left and right navigation keys to select the original unit type. 4. - Page 107 3. Using the numeric keys, enter the number of hours and minutes and that you wish to count down, then press <OK>. 4. Press [ ] to start the timer. To pause the countdown, press [ When the count reaches 0, an alarm sounds and Time out displays on the screen.
-
Page 108: Contacts
Contacts The Contacts menu (Menu 8) is used to manage your contact list. You can store names and phone numbers in both your SIM card and your phone’s memory, which are physically separate but both used to create the contact list. -
Page 109: Add New Contact
Add New Contact: Allows you to create a new contact. See “Add New Contact” on page 103 for more information. Send Business Card: Allows you to send a message containing your Business Card as a Text message, as a Picture Message, or via Bluetooth. - Page 110 6. In the Add New Contact screen, enter the information you want to save for this contact. The following fields are available for input: First Name: For recording the contact’s first name. Last Name: For recording the contact’s last name. ...
-
Page 111: Group
Storing a Number in the SIM Card 1. Enter the phone number you want to store directly on the Idle screen. 2. Press <Options> and select Save. 3. If the saving mode is set to Ask on Saving, the Save to screen appears. Choose SIM Card and press <Select>... -
Page 112: Group Options
3. Press <Add> (if there are already Group members, press <Options> and select Add). The Contact List opens. 4. Using the up and down navigation keys, scroll to each name to be added to the Group and press [ selection box beside the name. To find a specific name, begin entering the letters of the name. -
Page 113: Speed Dial List
3. Enter the name of the new group. Optionally, select a Graphic ID and Ring Tune for group members. Press [ Speed Dial List Using Speed Dial (Menu 8.4), you can assign up to eight phone numbers from your Contact List that you use most frequently to the number keys 2 to 9, and then dial them whenever you want simply by pressing and holding the associated number key. -
Page 114: Reject List
Remove: Allows you to clear the setting so that no number is assigned to the key. Press <Yes> to confirm number removal. Using Speed Dial From Idle mode, you can speed-dial the numbers assigned to numeric keys 2 to 9 by pressing and holding the key until the phone begins dialing. Reject List Your phone will reject calls from phone numbers that appear on the Reject List. -
Page 115: My Business Card
1. From the Idle screen, press [ List. 2. To remove an entry, choose the entry, press <Options> and select Remove Selected. To remove all entries, press <Options> and select Remove My Business Card This menu option lets you create a Business Card file containing your contact information that can be sent to others for addition to their contact list. -
Page 116: Own Number
Own Number Displays the number(s) assigned to the SIM card in your phone. FDN List This selection (Menu 8.8) accesses your FDN (Fixed Dialing Number) list. FDN mode, if supported by your SIM card, allows you to restrict outgoing calls to phone numbers stored in the FDN List. Use of the FDN List requires a PIN2 code (contact your service provider). -
Page 117: Settings
Settings This menu (Menu 9) lets you customize numerous phone settings to suit your preferences. Sound You can use the Sound menu to customize various sounds, such as: Ring melody, volume and type Sounds made when you press a key, receive a message, or switch your phone on or off ... -
Page 118: Display Settings
Display Settings In the Display Settings menu (Menu 9.2), you can change settings for the display and backlight. To change display settings: 1. In Idle mode, press [ 2. The following options are available. Use the navigation keys, <Select> and [ ] to change selections, <Save>... -
Page 119: Set Time & Date
Greeting Message: Lets you change the text that appears on the screen when the phone powers on. Set Time & Date Use this menu (Menu 9.3) to configure the settings for the time and date display. To modify Time & Date settings: 1. -
Page 120: Phone
• Date: Lets you change the date setting using the keypad. Scroll left or right to choose the number you want to modify and then enter a new number using the keypad. • Date Format: Lets you specify the date format you prefer. Scroll left or right to select. - Page 121 • Lock Phone: When the phone lock is enabled, the phone password must be entered each time the phone is switched on. The phone remains operational until switched off. To change the phone password, see “Phone Password” on page 30. •...
-
Page 122: Calls
Calls Call settings (Menu 9.5) let you configure the actions taken by the phone when you dial and receive calls. To access call settings: 1. In Idle mode, press [ 2. To change a setting, choose another setting and press <Save>. The following options are available: General This menu (Menu 9.5.1) lets you configure high-level features that specify... -
Page 123: Voice Call
Voice Call This menu (Menu 9.5.2) lets you configure the default settings for voice call features. Call Forwarding Call forwarding lets you reroute incoming calls to another number or to your voicemail. Availability of the various options depends on your service provider. - Page 124 Call Barring Call Barring allows you to restrict various types of calls from being made or received with your phone. This option is SIM dependent and requires a subscription. For more information, contact your service provider. The following call-barring options are possible: ...
-
Page 125: Connectivity
To disable Call Waiting, choose Cancel All and press <Select> or [ Auto Redial Auto Redial lets you configure your phone to automatically redial the last dialed number if the connection is lost or the call was unable to connect. To enable or disable Auto Redial: 1. - Page 126 My Devices This function provides a list of Bluetooth devices within range of your phone and lets you pair the phone with one or more devices. To search for Bluetooth devices: 1. From the Idle screen, press [ Connectivity 2.
- Page 127 2. Use the keypad to enter a new name. 3. Press [ ] (Save) save the new name. Note: The default name for your phone is SGH-T456, the model code. Secure Mode When Bluetooth visibility is turned on, your phone wirelessly transmits its phone name and status.
- Page 128 Headset: The remote Bluetooth headset enables outgoing and incoming calls. Handsfree: The remote Bluetooth car kit enables outgoing and incoming calls. Bluetooth Headset: The remote Bluetooth stereo headset lets you listen to music. File Transfer: The remote Bluetooth device allows users to transfer files from their handset to other Bluetooth devices.
- Page 129 PC using Microsoft MTP (Media Transfer Protocol), which supports Autosync of content from Windows Media Player and DRM (digital rights management). PC Studio: The phone is automatically recognized by Samsung PC Studio, a Windows-based PC program that you can use to manage Settings...
-
Page 130: Network Selection
personal data and multimedia files or access the Internet using the phone as a modem. Mass Storage: The PC recognizes a microSD card in your phone as a storage drive, allowing you to transfer files to and from the card. The card name appears in the list of disk drives in My Computer on the PC. -
Page 131: Applications Settings
1. Choose a profile (GoRogers, RogersMedia or RogersInternet) and press <Select> or [ 2. Change settings as required (vary depending on the selected profile), then press [ ] or press <Options> and select Save. Applications Settings The Applications Settings menu (Menu 9.7) provides convenient access to settings for Messages, Browser, Camera, Camcorder, Player, Record Audio, Calendar and Contacts. - Page 132 • Message Type: Specifies the default format of text (SMS) messages. Choose Text, Fax, Voice, ERMES, X.400 or Email. • Service Center: Stores the phone number for the text message center. Block Number: Lets you store a list of numbers that your phone automatically rejects messages from.
- Page 133 Block Number: Lets you store a list of numbers that your phone automatically rejects messages from. Message Class: Specify the acceptable type of received messages (Text Only, Small Imaging, Moderate Imaging, Small Video, Moderate Video). Creation Mode: Specify how new media content is sent: Warning, Free, Restricted.
-
Page 134: Browser Settings
• Channel List: Lets you specify the channels from which the phone will accept broadcast messages. You can enable all channels or enter individual channels in the My Channels box. • Language: Allows you to select your preferred language for display of cell broadcast messages. - Page 135 • Size: allows you to set the default picture size (in pixels). The options are: 1280x1024, 1024x768, 800x600, 640x480, 320x240, 220x165). • Viewfinder Mode: Lets you configure how the camera displays the image and indicators on the screen. Choose from Full Screen View (fills the screen with a cropped view of the image), Full Screen View And Indicator (displays icons on the screen that indicate camera settings), Full Screen View And Guidelines (adds lines to the screen...
-
Page 136: Camcorder Settings
Camcorder Settings Camcorder settings (Menu 9.7.4) let you set the default preferences for camcorder functionality. To access camcorder settings: 1. In Idle mode, press [ Camcorder Settings. 2. Change settings as required (see below). 3. To save changes, press <Save>. The following options are available. -
Page 137: Player Settings
Player Settings Player settings (Menu 9.7.5) let you set default playback options for the media player: Volume: Sets the default playback volume (level 0 to 14). Record Audio Settings Record Audio settings (Menu 9.7.6) let you specify the default audio recording settings. -
Page 138: Reset
2. Change settings as required (see below). 3. To save changes, press <Select>. The following options are available: Starting Day: Sets whether weeks in the calendar start on Sunday or Monday. Default View by: Specifies whether the calendar opens in Month, Week or Day view. -
Page 139: Memory Status
The following options are available: All: Resets all configuration options listed in this menu to their default values. Sound Settings: Resets sound options to their default values. For more information on Profiles, see “Sound” on page 111. Display Settings: Resets display options to their default values. -
Page 140: Solving Problems
Solving Problems If you are experiencing problems with your phone, perform the following simple checks before contacting a service professional. This may save you the time and expense of an unnecessary service call. When you switch your phone on, one of the following messages appears Insert SIM Card ... - Page 141 “No service,” “Network failure” or “Not done” displays The network connection was lost. You may be in a weak signal area (in a tunnel or surrounded by buildings). Change location and try again. You are trying to access an option for which you have not taken out a subscription with your service provider.
- Page 142 If the above guidelines do not help you to solve the problem, take note the model and serial numbers of your phone your warranty details a clear description of the problem Then contact your local dealer or Samsung after-sales service. Solving Problems ); the number of ) to weak (...
-
Page 143: Health And Safety Information
Health and Safety Information Exposure to Radio Frequency (RF) Signals Your wireless phone is a radio transmitter and receiver. It is designed and manufactured not to exceed the emission limits for exposure to radio frequency (RF) energy set by the Federal Communications Commission (FCC) of the U.S. -
Page 144: For Body Operation
For Body Operation For body worn operation, this model phone has been tested and meets the FCC RF exposure guidelines when used with a Samsung-supplied or approved accessory designated for this product or when used with an accessory that contains no metal and that positions the phone a minimum from the body. -
Page 145: Precautions When Using Batteries
If left unused, a fully charged battery will discharge itself over time. Use only Samsung-approved batteries and recharge your battery only with Samsung-approved chargers. When a charger is not in use, disconnect it from the power source. Do not leave the battery connected to a charger for more than a week, since overcharging may shorten its life. -
Page 146: Operating Environment
battery is fully charged. Li-ion batteries are particularly affected by temperatures below 0 C (32 F). Do not short-circuit the battery. Accidental short-circuiting can occur when a metallic object (coin, clip or pen) causes a direct connection between the + and terminals of the battery (metal strips on the battery), for example when you carry a spare battery in a pocket or bag. -
Page 147: Hearing Aids
against the RF signals from your wireless phone. Consult the manufacturer to discuss alternatives. Pacemakers Pacemaker manufacturers recommend that a minimum distance of 15 cm (6 inches) be maintained between a wireless phone and a pacemaker to avoid potential interference with the pacemaker. These recommendations are consistent with the independent research and recommendations of Wireless Technology Research. -
Page 148: Potentially Explosive Environments
Other Medical Devices If you use any other personal medical devices, consult the manufacturer of your device to determine if it is adequately shielded from external RF energy. Your physician may be able to assist you in obtaining this information. Switch your phone off in health care facilities when any regulations posted in these areas instruct you to do so. -
Page 149: Emergency Calls
Areas with a potentially explosive atmosphere are often but not always clearly marked. They include the areas below deck on boats, chemical transfer or storage facilities, vehicles using liquefied petroleum gas (such as propane or butane), areas where the air contains chemicals or particles, such as grain, dust or metal powders, and any other area where you would normally be advised to turn off your vehicle engine. -
Page 150: Other Important Safety Information
the only means of communication at the scene of an accident; do not cut off the call until given permission to do so. Other Important Safety Information Only qualified personnel should service the phone or install the phone in a vehicle. - Page 151 Keep the phone dry. Precipitation and humidity contain minerals that may corrode electronic circuits. Do not use the phone with a wet hand. Doing so may cause an electric shock to you or damage to the phone. Do not use or store the phone in dusty or dirty areas.
-
Page 152: Fcc Notice
FCC Notice Cautions Modifications not expressly approved by the party responsible for compliance could void the user's authority to operate the equipment. FCC Compliance Information This device complies with Part 15 of FCC Rules. Operation is subject to the following two conditions: 1. -
Page 153: Appendix A: Certification Information (Sar)
Connect the equipment into an outlet on a circuit different from that to which the receiver is connected. Consult the dealer or an experienced radio/ TV technician for help. Appendix A: Certification Information (SAR) THIS MODEL PHONE MEETS THE GOVERNMENT’S REQUIREMENTS FOR EXPOSURE TO RADIO WAVES. -
Page 154: Appendix B: Safe And Responsible Wireless Phone Use
PCS GPRS Body: 0.489W/kg Body-worn operations are restricted to Samsung-supplied, approved or non-Samsung designated accessories that have no metal and must provide at least 1.5cm separation between the device, including its antenna whether extended or retracted, and the user’s body. Non-compliance to the above restrictions may violate FCC RF exposure guidelines. -
Page 155: Appendix B: Safe And Responsible Wireless Phone Use
A Guide to Safe and Responsible Wireless Phone Use Tens of millions of people in North America today take advantage of the unique combination of convenience, safety and value delivered by the wireless telephone. Quite simply, the wireless phone gives people the powerful ability to communicate by voice-almost anywhere, anytime with the boss, with a client, with the kids, with emergency personnel or even with the police. - Page 156 1. Get to know your wireless phone and its features such as speed dial and redial. Carefully read your instruction manual and learn to take advantage of valuable features most phones offer, including automatic redial and memory. Also, work to memorize the phone keypad so you can use the speed dial function without taking your attention off the road.
- Page 157 need to dial while driving, follow this simple tip-dial only a few numbers, check the road and your mirrors, then continue. 7. Do not engage in stressful or emotional conversations that may be distracting. Stressful or emotional conversations and driving do not mix-they are distracting and even dangerous when you are behind the wheel of a car.
-
Page 158: Appendix C: Consumer Update On Wireless Phones
users of their responsibilities as safe drivers and good citizens. As we approach a new century, more and more of us will take advantage of the benefits of wireless telephones. And, as we take to the roads, we all have a responsibility to drive safely. - Page 159 wireless phones are absolutely safe. Wireless phones emit low levels of radio frequency energy (RF) in the microwave range while being used. They also emit very low levels of RF when in the stand-by mode. Whereas high levels of RF can produce health effects (by heating tissue), exposure to low level RF that does not produce heating effects causes no known adverse health effects.
- Page 160 FDA belongs to an interagency working group of the federal agencies that have responsibility for different aspects of RF safety to ensure coordinated efforts at the federal level. The following agencies belong to this working group: National Institute for Occupational Safety and Health ...
- Page 161 FDA has been a leading participant in the World Health Organization International Electromagnetic Fields (EMF) Project since its inception in 1996. An influential result of this work has been the development of a detailed agenda of research needs that has driven the establishment of new research programs around the world.
- Page 162 products, you can use measures like those described above to reduce your RF exposure from wireless phone use. 6. What about children using wireless phones? The scientific evidence does not show a danger to users of wireless phones, including children and teenagers. If you want to take steps to lower exposure to radio frequency energy (RF), the measures described above would apply to children and teenagers using wireless phones.
- Page 163 8. Do wireless phone accessories that claim to shield the head from RF radiation work? Since there are no known risks from exposure to RF emissions from wireless phones, there is no reason to believe that accessories that claim to shield the head from those emissions reduce risks. Some products that claim to shield the user from RF absorption use special phone cases, while others involve nothing more than a metallic accessory attached to the phone.
- Page 164 compatible phone and a compatible hearing aid at the same time. This standard was approved by the IEEE in 2000. FDA continues to monitor the use of wireless phones for possible interactions with other medical devices. Should harmful interference be found to occur, FDA will conduct testing to assess the interference and work to resolve the problem.
- Page 165 11. What research is needed to decide whether RF exposure from wireless phones poses a health risk? A combination of laboratory studies and epidemiological studies of people actually using wireless phones would provide some of the data that are needed. Lifetime animal exposure studies could be completed in a few years.
- Page 166 World health Organization (WHO): http://www.who.int/peh-emf/en International Commission on Non-Ionizing Radiation Protection: http://www.icnirp.de National Radiation Protection Board (UK): http://www.hpa.org.uk/radiation US Food and Drug Administration http://www.fda.gov/cellphones Health and Safety Information...
-
Page 167: Standard Limited Warranty
(d) malfunctions resulting from the use of Product in conjunction with accessories, products, or ancillary/peripheral equipment not furnished or approved by SAMSUNG; (e) defects or damage from improper testing, operation, maintenance, installation, or adjustment; (f) installation, maintenance, and service of Product, or (g) Product used or purchased outside the United States or Canada. - Page 168 80% of rated capacity or the battery leaks, and this Limited Warranty does not cover any battery if (i) the battery has been charged by a battery charger not specified or approved by SAMSUNG for charging the battery, (ii) any of the seals on the battery are broken or show evidence of tampering, or (iii) the battery has been used in equipment other than the SAMSUNG phone for which it is specified.
- Page 169 PROVINCES DO NOT ALLOW LIMITATIONS ON HOW LONG AN IMPLIED WARRANTY LASTS, SO THE ABOVE LIMITATION MAY NOT APPLY TO YOU. IN ADDITION, SAMSUNG SHALL NOT BE LIABLE FOR ANY DAMAGES OF ANY KIND RESULTING FROM THE PURCHASE, USE, OR MISUSE OF, OR INABILITY TO USE THE PRODUCT OR...
- Page 170 (INCLUDING NEGLIGENCE OR GROSS NEGLIGENCE) OR FAULT COMMITTED BY SAMSUNG, ITS AGENTS OR EMPLOYEES, OR FOR ANY BREACH OF CONTRACT OR FOR ANY CLAIM BROUGHT AGAINST PURCHASER BY ANY OTHER PARTY. SOME STATES/ PROVINCES DO NOT ALLOW THE EXCLUSION OR LIMITATION OF INCIDENTAL OR CONSEQUENTIAL DAMAGES, SO THE ABOVE LIMITATION OR EXCLUSION MAY NOT APPLY TO YOU.
- Page 171 Limited Warranty, or make additional warranties binding on SAMSUNG. Accordingly, additional statements such as dealer advertising or presentation, whether oral or written, do not constitute warranties by SAMSUNG and should not be relied upon. Samsung Electronics Canada, Inc.
-
Page 172: Index
Index Access Codes Accessory Interface connector Alarms All Calls Alphabet Mode Answering call second call Audio Recorder Auto Redial Battery charging installing low indicator removing Bluetooth Activation Name Options Searching for new devices Secure Mode Service Profiles Visibility Bluetooth Connectivity Bookmarks Broadcast Messages Browser... - Page 173 Earpiece/Speaker Emergency Call Emergency Calls Entering Text Alphabet Mode Using Number Mode Using T9 mode Using the Symbol Mode Explosive Environments FCC Notice File Transfer Bluetooth microSD Card USB cable Format microSD Card Games & Apps Get New Graphics Ring Tunes Getting Started activating your phone Graphics...
- Page 174 Mute Keys Navigation keys Network Profiles Network Selection New Contact in phone memory in SIM card Notes Number Mode On/off Switch Other Files Outbox Password PC Studio software Phone activating display icons layout Settings switching on/off Photo Options Photos taking Picture Message Send PIN2...
- Page 175 installing Soft keys Solving Problems Speakerphone Specific Absorption Rate Speed Dial Stopwatch Switching on/off Symbol Mode T9 Mode Tasks Templates Text Entering Text Message Settings Time format Timer Tip Calculator Tools menu Transfer Files to PC Transferring Files Travel adapter Vibration Mode Video Options After recording a video...